




This article will focus on MongoDB replication on Docker containers.
MongoDB has clustering features that provide more storage capacity (sharding) and reliability (replication).
Picture your database server. Now imagine it somehow breaking. Despair sets in and disrupts your response.
Maybe you lost your data. You had too much downtime. You may have lost hours of work or precious time and money. High Availability is a nice thing to have, but in times like these, you value it more.
Motivation
We felt the need to improve our production database and data backup strategy after identifying that it was putting a strain on server performance, and the disaster recovery process was difficult in most procedures.
So, we started designing a migration plan to address this. We also took the chance to update the Mongo version in use to benefit from new features and security improvements.
Before
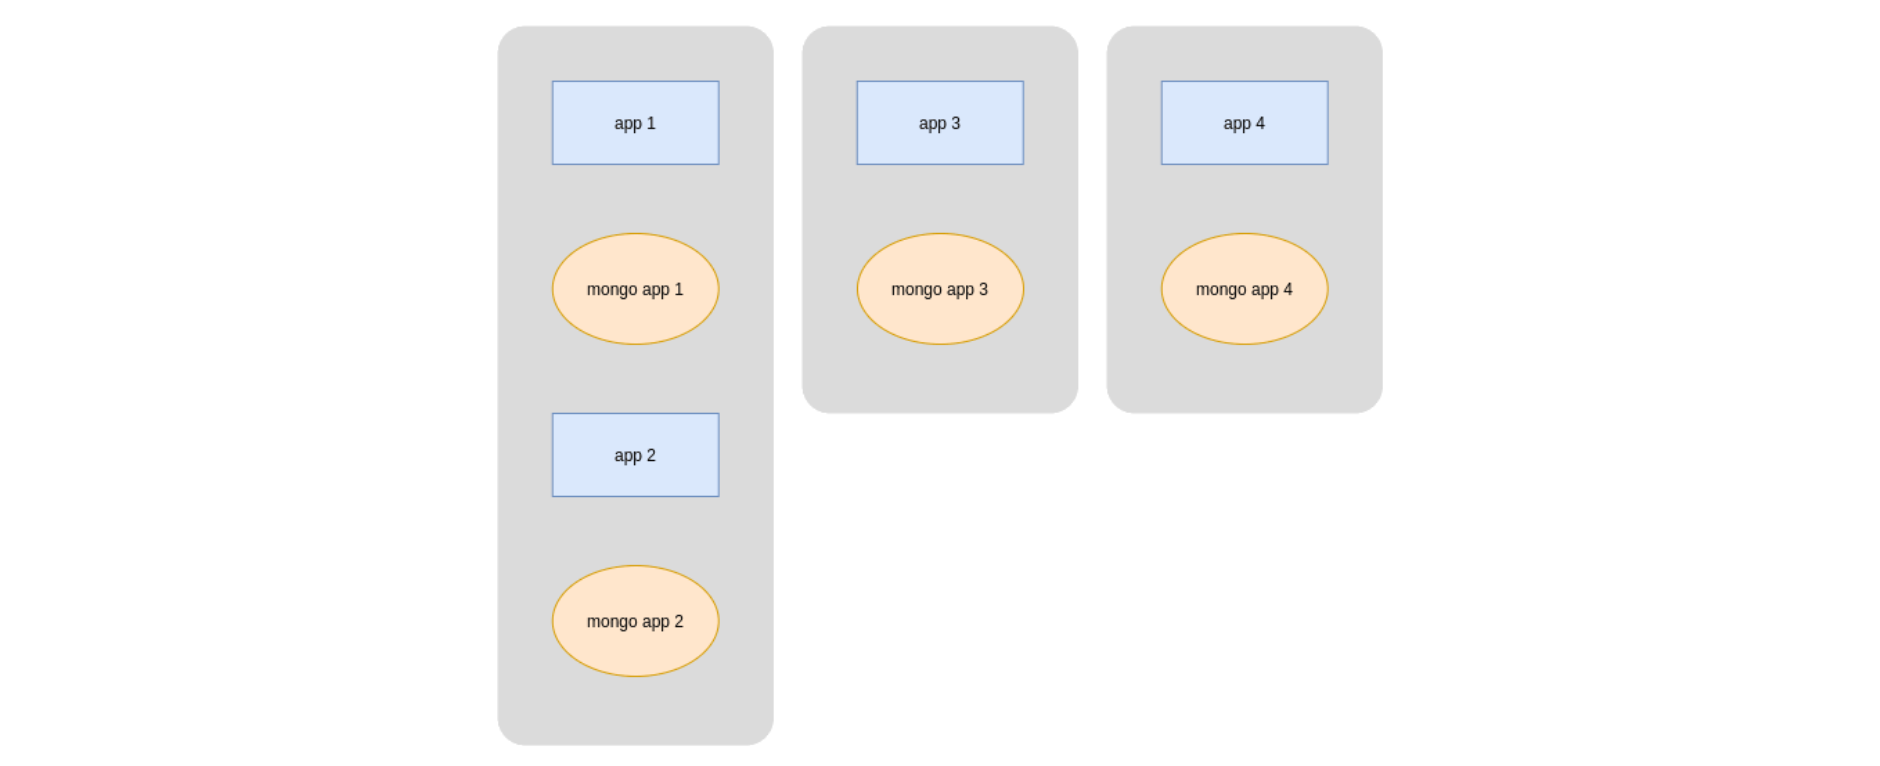
Old Production Environment
Production servers
- server_1: application services containers + 2 mongo containers
- server_2: application services containers + 1 mongo container
- server_3: application services containers + 1 mongo container
Mirror servers
- mirror_server_1: application services containers + 2 Mongo containers (updated once a day)
- mirror_server_2: application services containers + 1 Mongo container (updated once a day)
- (Services and data on server 3 were not in the mirror environment.)
The Mongo service was kept running using a mongodump/mongorestore strategy.
mongodump/mongorestore Strategy
The first part of the mongodump/mongorestore strategy consists of cron jobs that dump data from the Mongo database to a different Mongo instance using the mongodump utility.
Mongodump is a utility for creating a binary export of the contents of a database. Mongodump can export data from either Mongod or Mongos instances; i.e., it can export data from standalone, replica sets, and sharded cluster deployments.
mongodump --host=mongodb1.example.net --port=3017 --username=user --password="pass" --out=/opt/backup/mongodump-2013-10-24
The command above outputs a Mongo data dump file named mongodump-2013-10-24 in the /opt/backup directory from the connection to mongodb1.example.com.
The second part of this strategy is restoring the second database from the mongodump data using the mongorestore utility.
The mongorestore program loads data from either a binary database dump created by mongodump or the standard input (starting in version 3.0.0) into a mongod or mongos instance.
mongorestore --host=mongodb1.example.net --port=3017 --username=user --authenticationDatabase=admin /opt/backup/mongodump-2013-10-24
The command above writes the data from the /opt/backup/mongodump-2013-10-24 file to the Mongo instance on the mongodb1.example.com connection.
Warning: The process of restoring MongoDB is NOT incremental. Restoring a database deletes all data written before the Mongodump data.
Problems and Limitations
- Late backup data: Since the mongodump ran daily at a specified time, data from that time until the database switch would be lost.
- Unavailability: The mongodump and mongorestore utilities took several hours to complete in the biggest databases.
During the DB restore, nothing could be done because the Mongo data can’t be used until mongorestore finishes. The database will only be available when this is completed. Also, switching from production to a mirror environment was a manual process that took time.
- High disk usage: Restoring an entire database (or several DBs simultaneously) would consume disk inodes and put a heavy load on your disks.
- Scalability limitations: Using a Mongo Docker instance for each database, even distributed across different servers, required setting up an instance, different network addresses and ports, and new backup containers (mongo-tools).
A Mongo cluster would fit our applications’ needs and make database administration much simpler.
- Reserved memory: By default, each Mongo container will try to cache all available memory until 60%.
Since we previously had 1 Mongo container on two application servers and 2 containers on the same application server, all of them were at least 60% busy (in use and cached). When there is more than one Mongo container, they will compete for all available memory until each reaches 60%. (2 -> 120%, 3 -> 180%, 4 -> 240%, etc.). For these reasons, it is very important to set adequate container memory limits.
- Amount of Docker volumes: MongoDB data, dumps, and metadata were scattered across several Docker volumes and mapped to different filesystem folders. Merging these databases would centralize this data.
- Security and features: Upgrading to Mongo 4 would address security issues and add features that improve DB performance and replication, such as non-blocking secondary reads, transactions, and flow control.
Objectives
To improve our production database and solve the identified limitations, our clearest objectives at this point were:
- Upgrading Mongo v3.4 and v3.6 instances to v4.2 (all community editions);
- Changing Mongo’s data backup strategy from mongodump/mongorestore to Mongo Replication;
- Merging Mongo containers into a single container and Mongo Docker volumes into a single volume.
And to get to these objectives, we defined the following plan:
- Prepare applications for Mongo connection string changes;
- Assemble a cluster composed of three servers in different data centers and regions;
- Generate and deploy keyfiles on the filesystems;
- Redeploy existing Mongo Docker containers with the replSet argument;
- Define network ports;
- Deploy new 4 Mongo containers scaling to 3 (4 x 3 = 12) on a Mongo cluster;
- Add new Mongo instances to the replica set to sync from old Mongo containers;
- Stop Mongo containers from application servers and remove them from the replica set;
- Migrate backups and change which server they read the data;
- Merge data from four Mongo containers into one database;
- Unify backups.
We will publish a second part of this tutorial soon, where we will go through each of these topics.
Results
Some of the results achieved were:
- Fault tolerance: Automatic, instant primary database switch.
- Data redundancy: Instantaneously synced redundant data.
- Inter-regional availability: Location disaster safeguarding.
- Cluster hierarchy: Mongo replication lets you configure node priority, allowing you to order nodes by hardware power, location, or other criteria.
- Read operations balance: Read operations can be balanced through secondary nodes, like dashboard queries and Mongo dumps. Applications can also be configured (through the Mongo connection URI) to perform read operations from secondary nodes, which increases database read capacity.
- Performance: Now that the memory used and cached is right for the system’s needs, Mongo databases are hosted on dedicated servers, its version got bumped, and the cluster can balance read operations; performance improvements exceeded expectations.
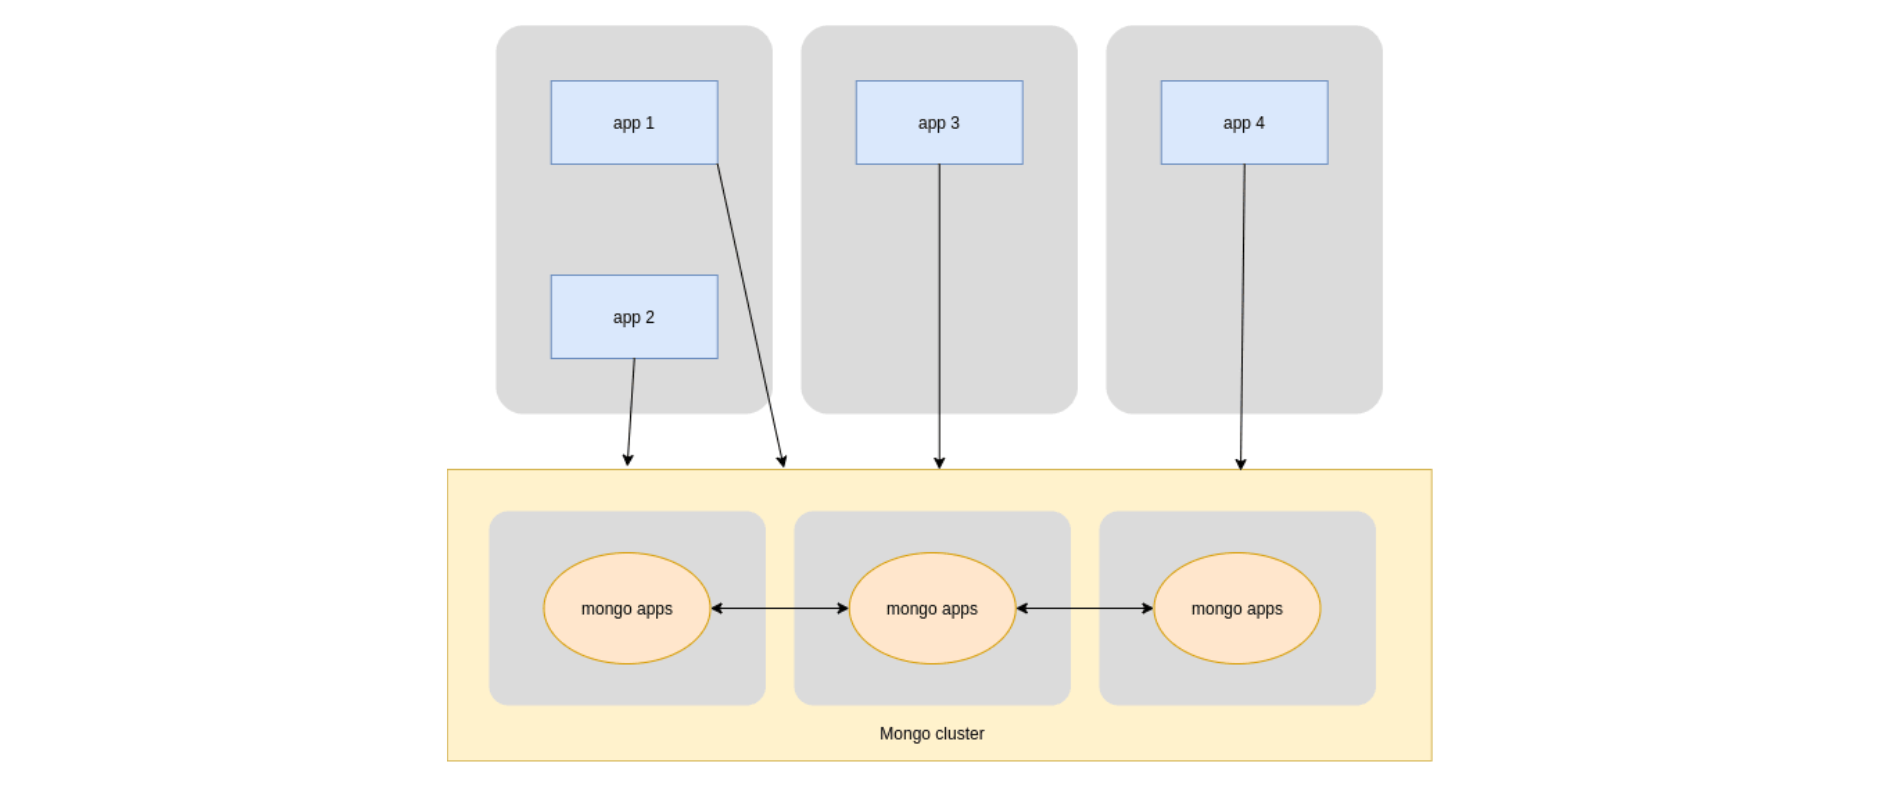
New Production Environment
- Production application servers should connect to the Mongo Production Cluster using a replica set;
- The Mirror application server should connect to the Mongo Production Cluster and keep storing the most recent Mongodumps;
- The Mongo Cluster secondary node should mongodump the cluster data to the Mirror environment, asking for it from another secondary node.
Conclusion
This post is more than about MongoDB replication on Docker. It is about stopping infrastructure growth in the wrong direction and doing things the way we thought they should be.
Much like a tree growing in a vase, we should plant it in a garden, where it can grow freely.
Now, we will watch that tree scale without adding a new vase every time it needs to grow, and without being afraid of breaking them. That’s what high availability clusters are all about — building an abstract module for the application layer which can scale and keep being used the same way.
We did the whole process in intervals between major steps to check whether the new strategy was working for us. We are glad to have solved all the problems in the previous section.
This means we are now prepared to scale easily and sleep well, knowing that MongoDB has (at least) database fault tolerance and recovers automatically and instantly —which lowers the odds of disaster scenarios.
Stay tuned for part 2, where we’ll explore the whole technical setup.
Meanwhile, you may like our post about Row vs. Columnar Databases.