How To Integrate Firebase Authentication With an Expo App
July 1st, 2021 | By Aman Mittal | 14 min read

Learn how to integrate Firebase authentication with an Expo app as a mobile developer building applications using the Expo SDK.
Firebase is a Backend as a Service (BaaS) that provides a variety of services for web and mobile app development. Most mobile apps built using React Native and Expo require knowing the identity of a user. This allows an app to securely save user data in the cloud and provide more personalized functionalities.
Firebase has an Authentication service that integrates well with React Native and Expo apps. It has a ready-to-use SDK and supports many authentication providers, such as email or password, phone numbers, and federated providers (Google, Facebook, Twitter, etc.).
In this tutorial, you are going to:
Create some sample screens to display forms (login, sign-up);
Create a home screen that only a logged-in user can access;
Create different navigators using the react-navigation library;
Create an authentication flow by conditionally rendering between these navigators when a user is logged in or not;
Integrate Firebase Auth with the email/password method.
The source code for this tutorial is available on GitHub.
Prerequisites
To follow this tutorial, please make sure you have the following tools and utilities installed on your local development environment and have access to the services mentioned below:
Nodejs (>= 12.x.x) with a package manager installed such as npm or yarn
Expo-cli (>= 4.x.x)
Firebase account (a free “Spark” plan is enough).
Creating a React Native app with expo-cli
The initial step is to either create a new React Native project using Expo-cli by following the steps mentioned below or if you know the lexicon for creating projects with Expo, integrate the Firebase JS SDK.
Yes, this guide uses the Firebase JS SDK and Expo-managed workflow.
Open your favorite terminal window, and execute the following command (where firebase-auth is an example name of the project directory)
expo init firebase-auth

# navigate inside the directory

cd firebase-auth
Then, install the following libraries:
npm install @react-navigation/native @react-navigation/stack

# OR is using yarn

yarn add @react-navigation/native @react-navigation/stack

# after the above dependencies install successfully

expo install firebase dotenv expo-constants react-native-gesture-handler react-native-reanimated react-native-screens react-native-safe-area-context @react-native-community/masked-view
Note: This example guide uses the React Navigation library version 5.
Create a Firebase Project
To get started, you’re going to need a Firebase app.
Once you’ve created a new account with Firebase and logged in, create a new project by clicking on the Add Project button.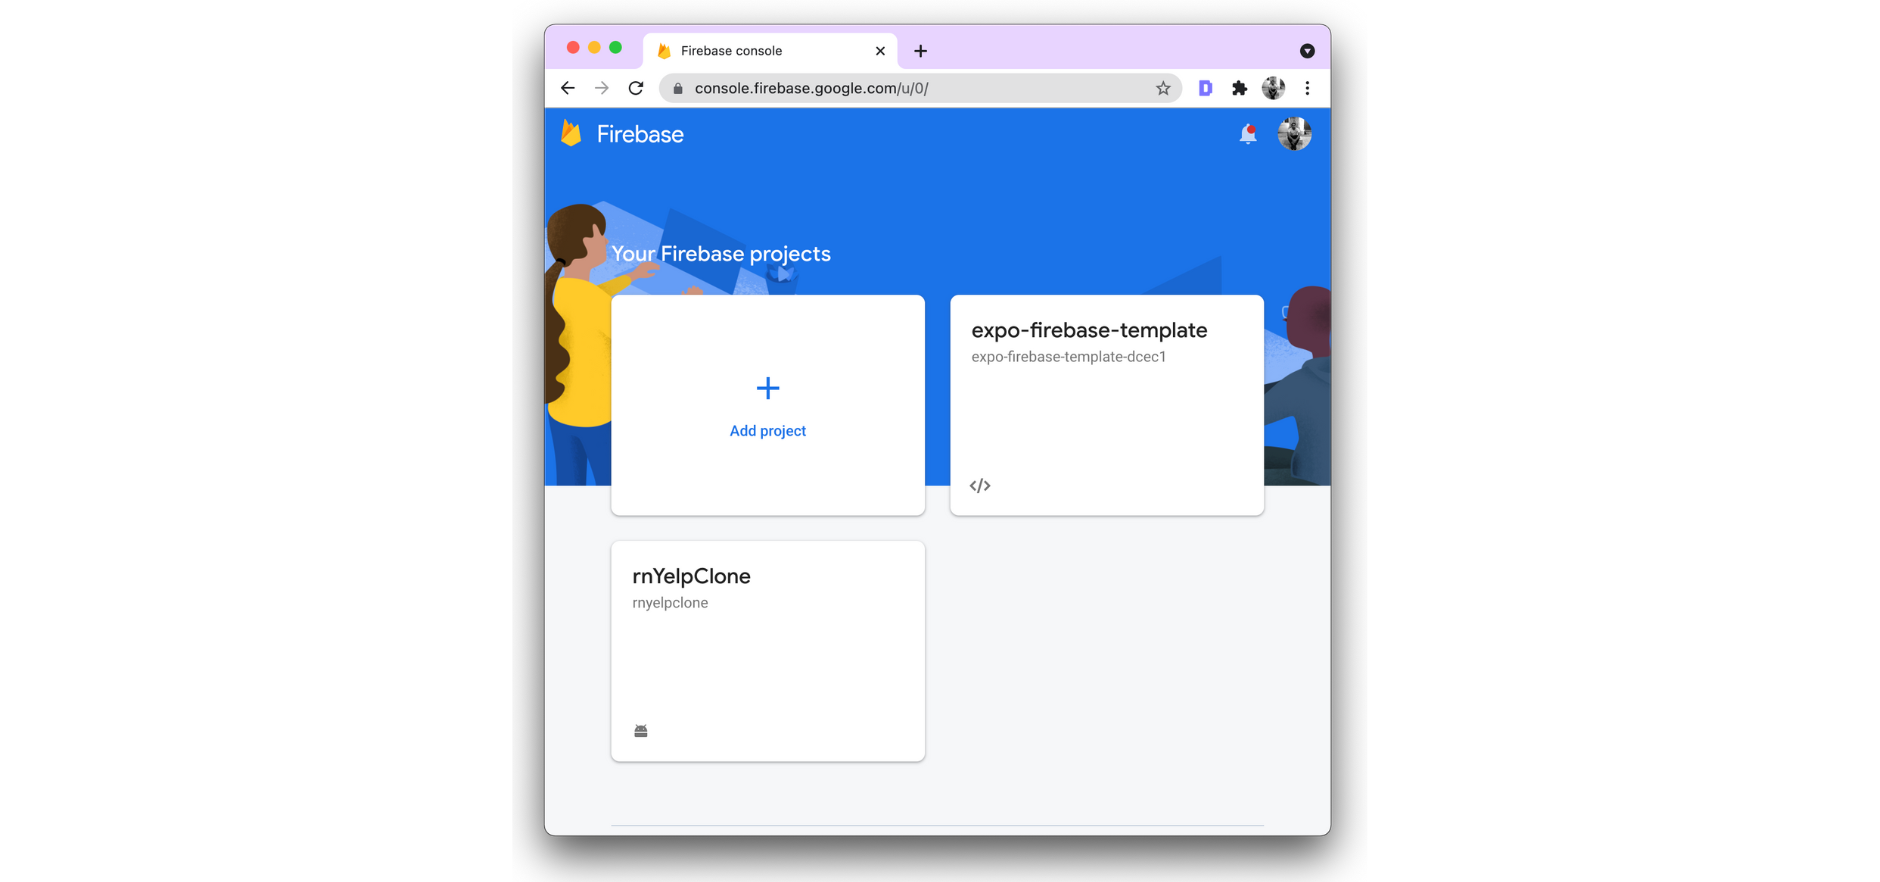
Next, add the name of the new Firebase project, and then click Continue.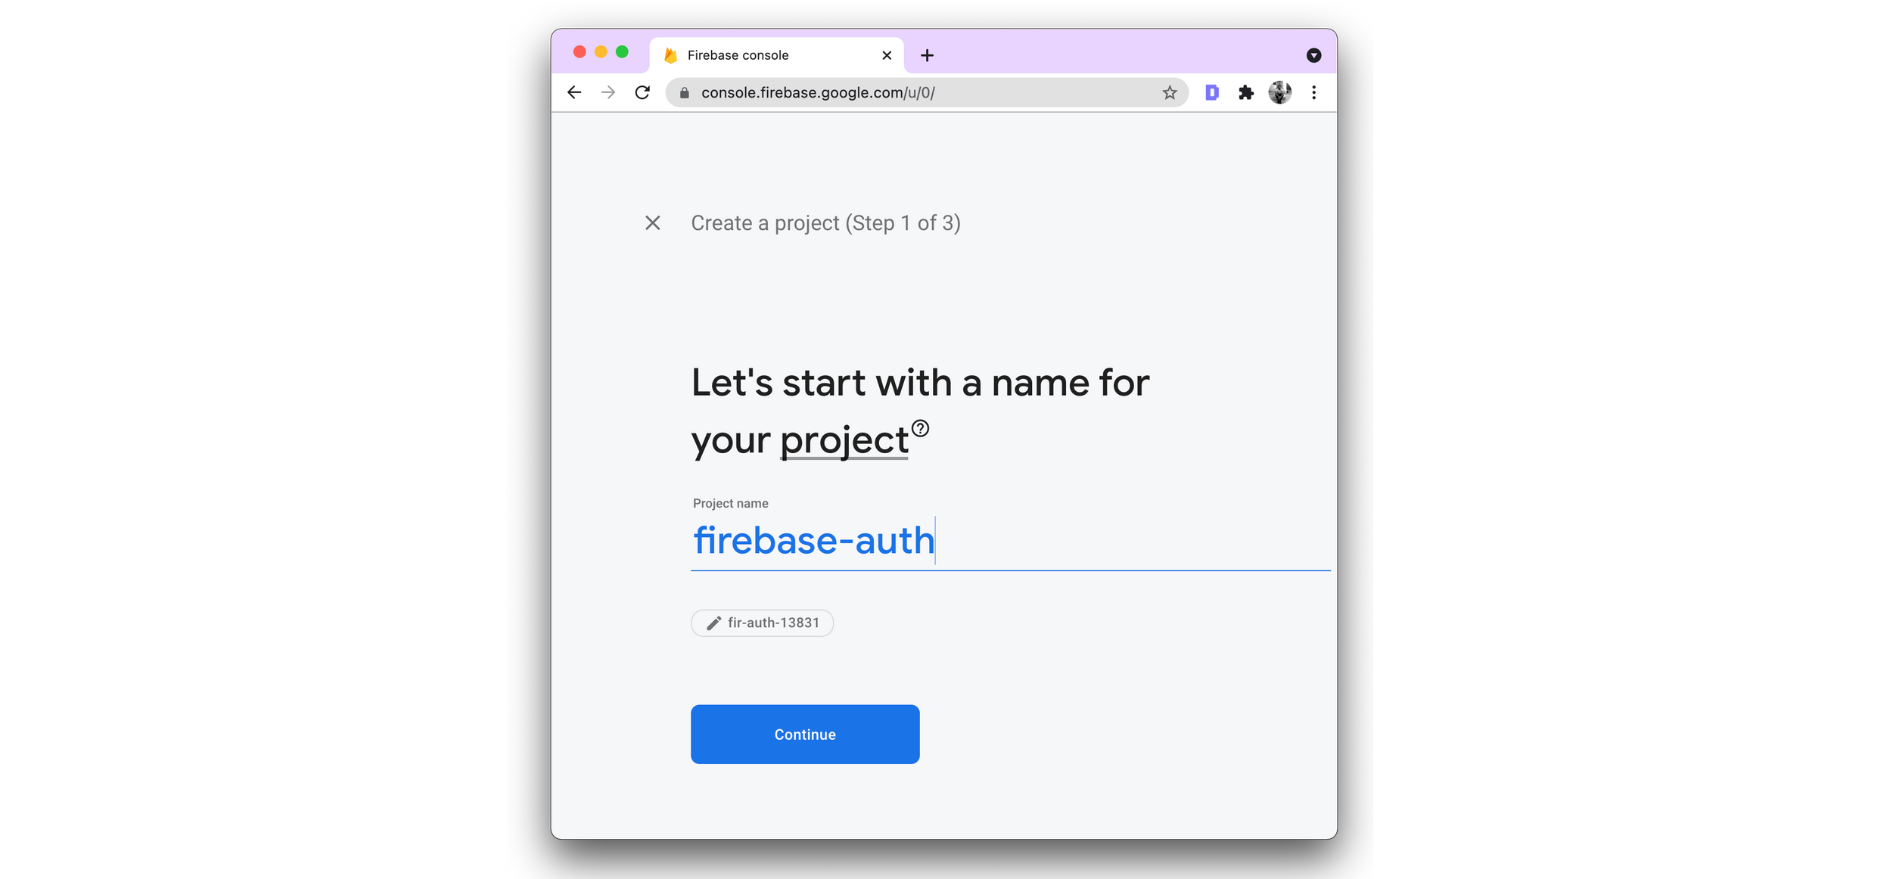
You can disable Google Analytics, as it won't be used in this example. Then click Create Project.
Expo Managed workflow apps can run inside the client app Expo Go (in development mode).
The Expo Go app currently supports the Firebase JS SDK and not the react-native-firebase library. More information is in the official Expo documentation.
On the Dashboard screen, in the left side menu, click the settings icon, and then go to the Project Settings page and look for the section General > Your apps. If it's a new project, there won't be any apps.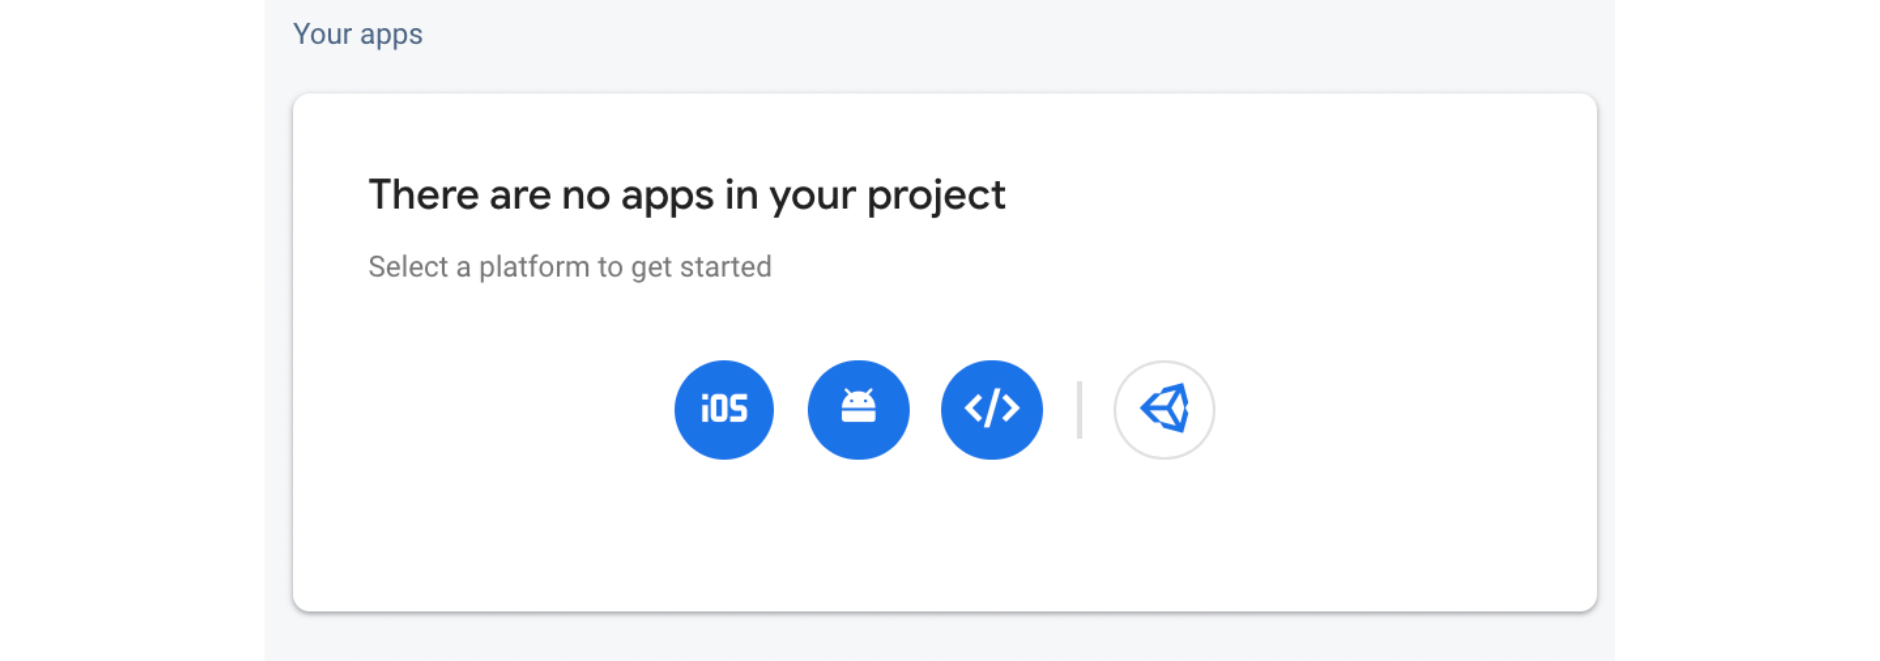
Click the Web button. It will prompt you to enter the details of your app. Enter the app’s nickname, and then click the Register app button.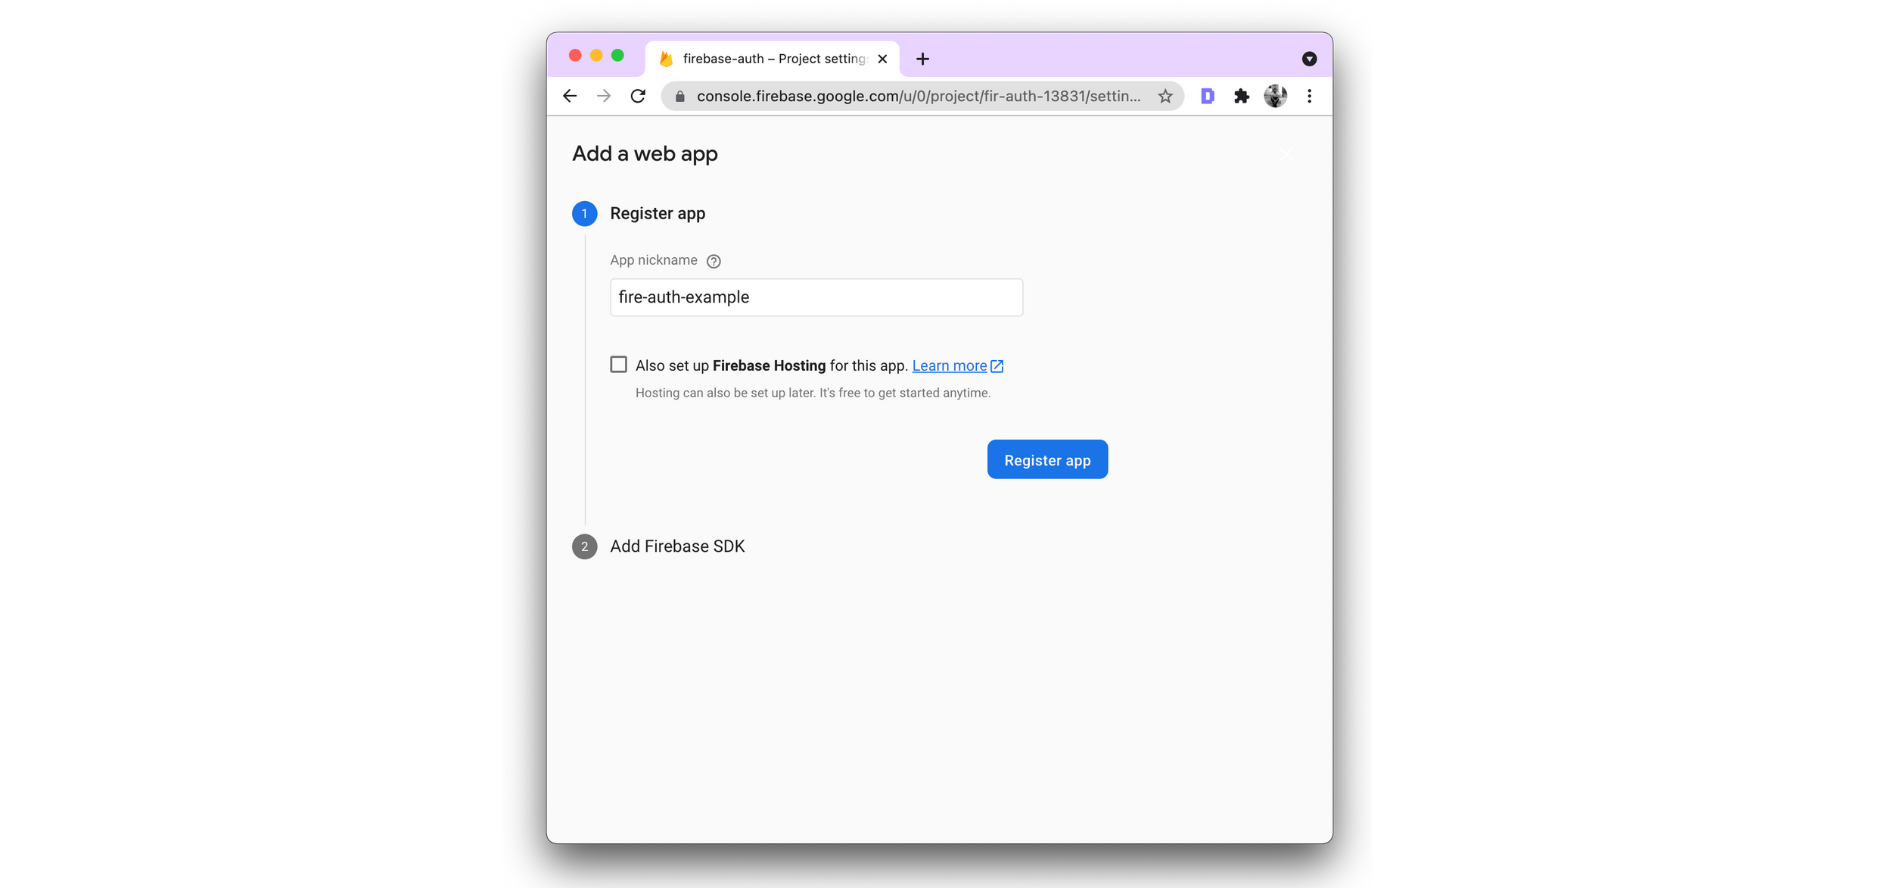
Then, Firebase will provide configuration objects with API keys and other keys that are required to use different Firebase services.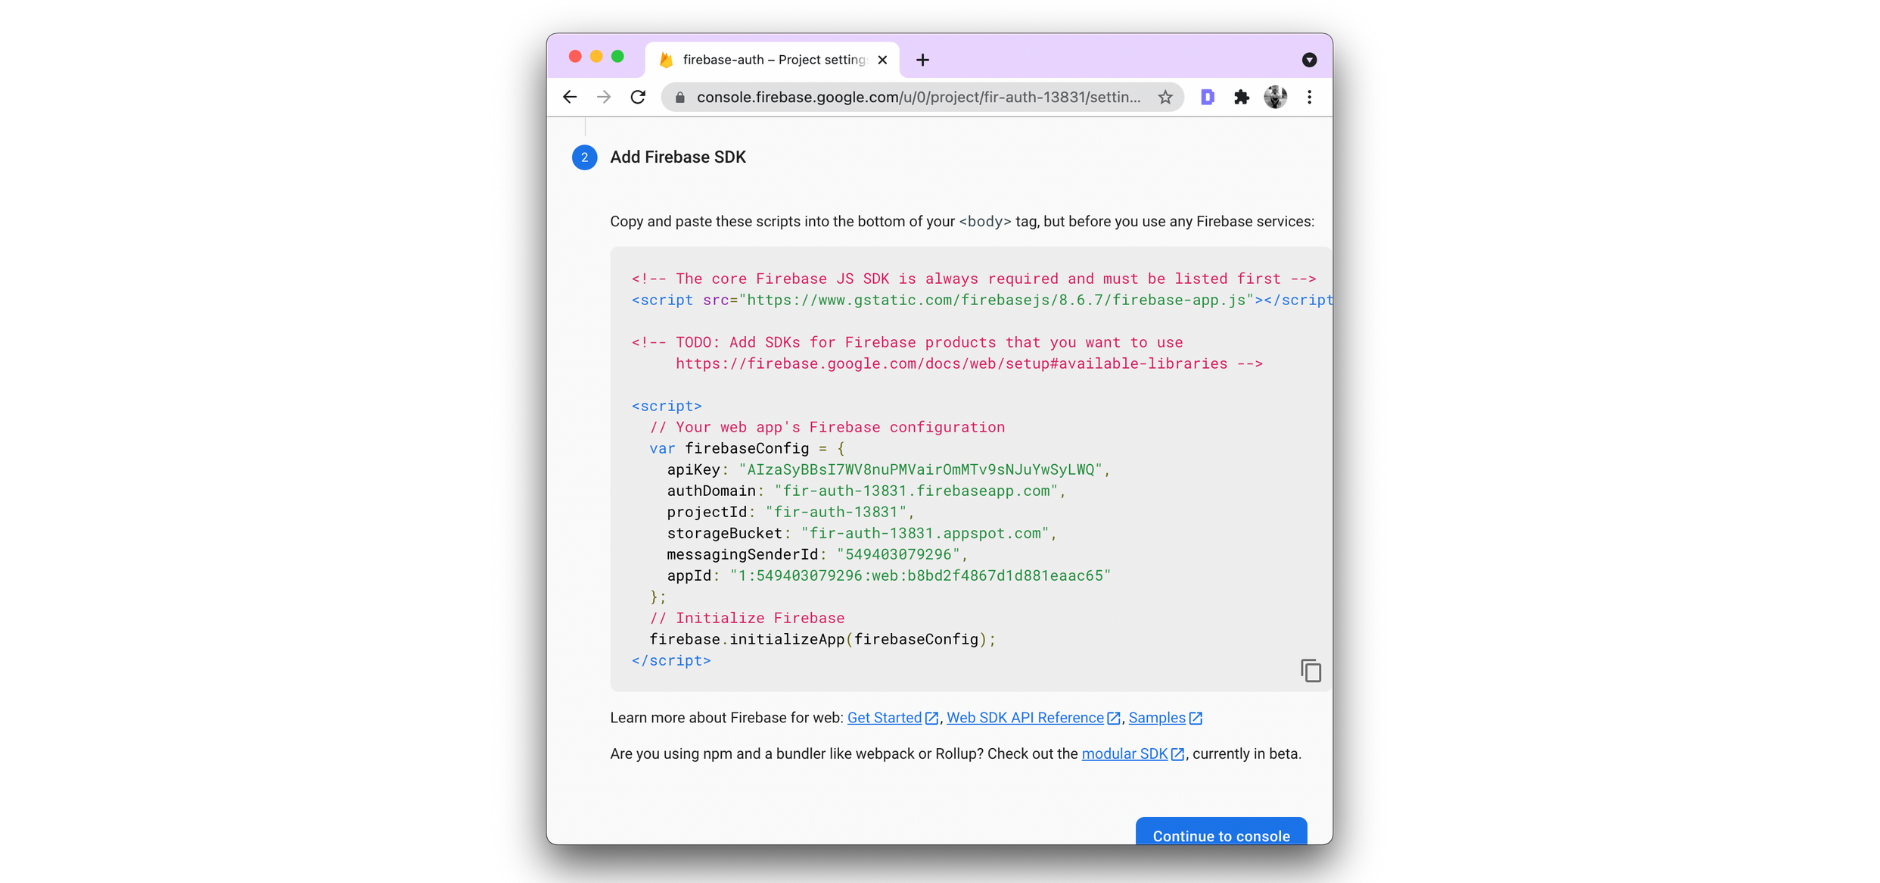
These API keys can be included in your React Native app as they are not used to access Firebase services’ backend resources. That can only be done by Firebase security rules.
This does not mean that you should expose these keys to a version control host such as GitHub. We will learn how to set up environment variables in an Expo app in the next section.
Let's enable the email/password sign-in method. From the left side menu, go to the Authentication page. If you are using this service for the first time in your Firebase project, click the Get Started button.
Then, in the Sign-in method tab, click the status of Email/Password, enable it, and then click Save.
Using Environment Variables
To add environment variables to an Expo app, the initial step is to install the dotenv package (which should be already installed if you have been following along).
Create a .env file at the root of your project and add the following:
API_KEY=XXXX
AUTH_DOMAIN=XXXX
PROJECT_ID=XXXX
STORAGE_BUCKET=XXXX
MESSAGING_SENDER_ID=XXXX
APP_ID=XXXX
Replace all Xs in the above file with actual values for each key you get from the firebaseConfig object.
Next, rename the app.json file to app.config.js at the root of your project. Add the import statement to use the dotenv configuration.
Since it's a JSON file, you will have to export all Expo configuration variables and also add an extra object that contains Firebase configuration keys. Here is how the file should look like after this step:
import 'dotenv/config';

export default {
  expo: {
    name: 'expo-firebase-auth-example',
    slug: 'expo-firebase-auth-example',
    version: '1.0.0',
    orientation: 'portrait',
    icon: './assets/icon.png',
    splash: {
      image: './assets/splash.png',
      resizeMode: 'contain',
      backgroundColor: '#ffffff'
    },
    updates: {
      fallbackToCacheTimeout: 0
    },
    assetBundlePatterns: ['**/*'],
    ios: {
      supportsTablet: true
    },
    android: {
      adaptiveIcon: {
        foregroundImage: './assets/adaptive-icon.png',
        backgroundColor: '#FFFFFF'
      }
    },
    web: {
      favicon: './assets/favicon.png'
    },
    extra: {
      apiKey: process.env.API_KEY,
      authDomain: process.env.AUTH_DOMAIN,
      projectId: process.env.PROJECT_ID,
      storageBucket: process.env.STORAGE_BUCKET,
      messagingSenderId: process.env.MESSAGING_SENDER_ID,
      appId: process.env.APP_ID
    }
  }
};
Now, all the keys inside the extra object are readable app-wide using expo-constants. This package allows reading values from app.json, or in this case, the app.config.js file.
Open the Expo-generated project in your code editor, create a new directory in the root called config/, and add a file called firebase.js. Edit the file as shown below:
import firebase from 'firebase/app';
import 'firebase/auth';
import Constants from 'expo-constants';

// Initialize Firebase
const firebaseConfig = {
  apiKey: Constants.manifest.extra.apiKey,
  authDomain: Constants.manifest.extra.authDomain,
  projectId: Constants.manifest.extra.projectId,
  storageBucket: Constants.manifest.extra.storageBucket,
  messagingSenderId: Constants.manifest.extra.messagingSenderId,
  appId: Constants.manifest.extra.appId
};

let Firebase;

if (firebase.apps.length === 0) {
  Firebase = firebase.initializeApp(firebaseConfig);
}

export default Firebase;
Creating reusable components
The example app we are building in this tutorial will require some reusable components. These are visual components that can be used on different screens. Instead of writing them from scratch on every screen inside the app, let's create them once and reuse them whenever required.
Create a new directory called components/ and the following files:
Button.js: contains a configurable <Pressable/> component;
IconButton.js: contains an icon button composed of a <Pressable/> component and the @expo/vector-icons library;
ErrorMessage.js: a text component that is used to display an error message when authenticating a user;
InputField.js: contains a configurable <TextInput /> component.
Add this code snippet to the Button.js file and this code snippet to IconButton.js.
Add the following code snippet in ErrorMessage.js. This component will be used to display error messages either when signing up or logging in to the app. These messages are human-readable and thrown by the Firebase Auth service.
You can go through the complete list of messages in the Firebase official documentation.
// components/ErrorMessage.js

import React from 'react';
import { StyleSheet, Text } from 'react-native';

const ErrorMessage = ({ error, visible }) => {
  if (!error || !visible) {
    return null;
  }

  return <Text style={styles.errorText}>⚠️ {error}</Text>;
};

const styles = StyleSheet.create({
  errorText: {
    color: '#fdca40',
    fontSize: 20,
    marginBottom: 10,
    fontWeight: '600'
  }
});

export default ErrorMessage;
Add this code snippet to InputField.js.
Lastly, create an index.js file that will expose all these components from the directory itself:
import IconButton from './IconButton';
import Button from './Button';
import ErrorMessage from './ErrorMessage';
import InputField from './InputField';

export { IconButton, Button, ErrorMessage, InputField };
Creating screens in the app
The sole focus of this tutorial is to integrate the Firebase SDK, not to teach how to create app screens in React Native from scratch. While we go briefly over which screen is going to be composed of what React Native elements, please make sure you have basic knowledge of what core components are included in React Native.
Let's start by creating the structure of the screens directory.
Once you have opened the Expo project in your preferred code editor, you will be welcomed by the default directory structure as shown below: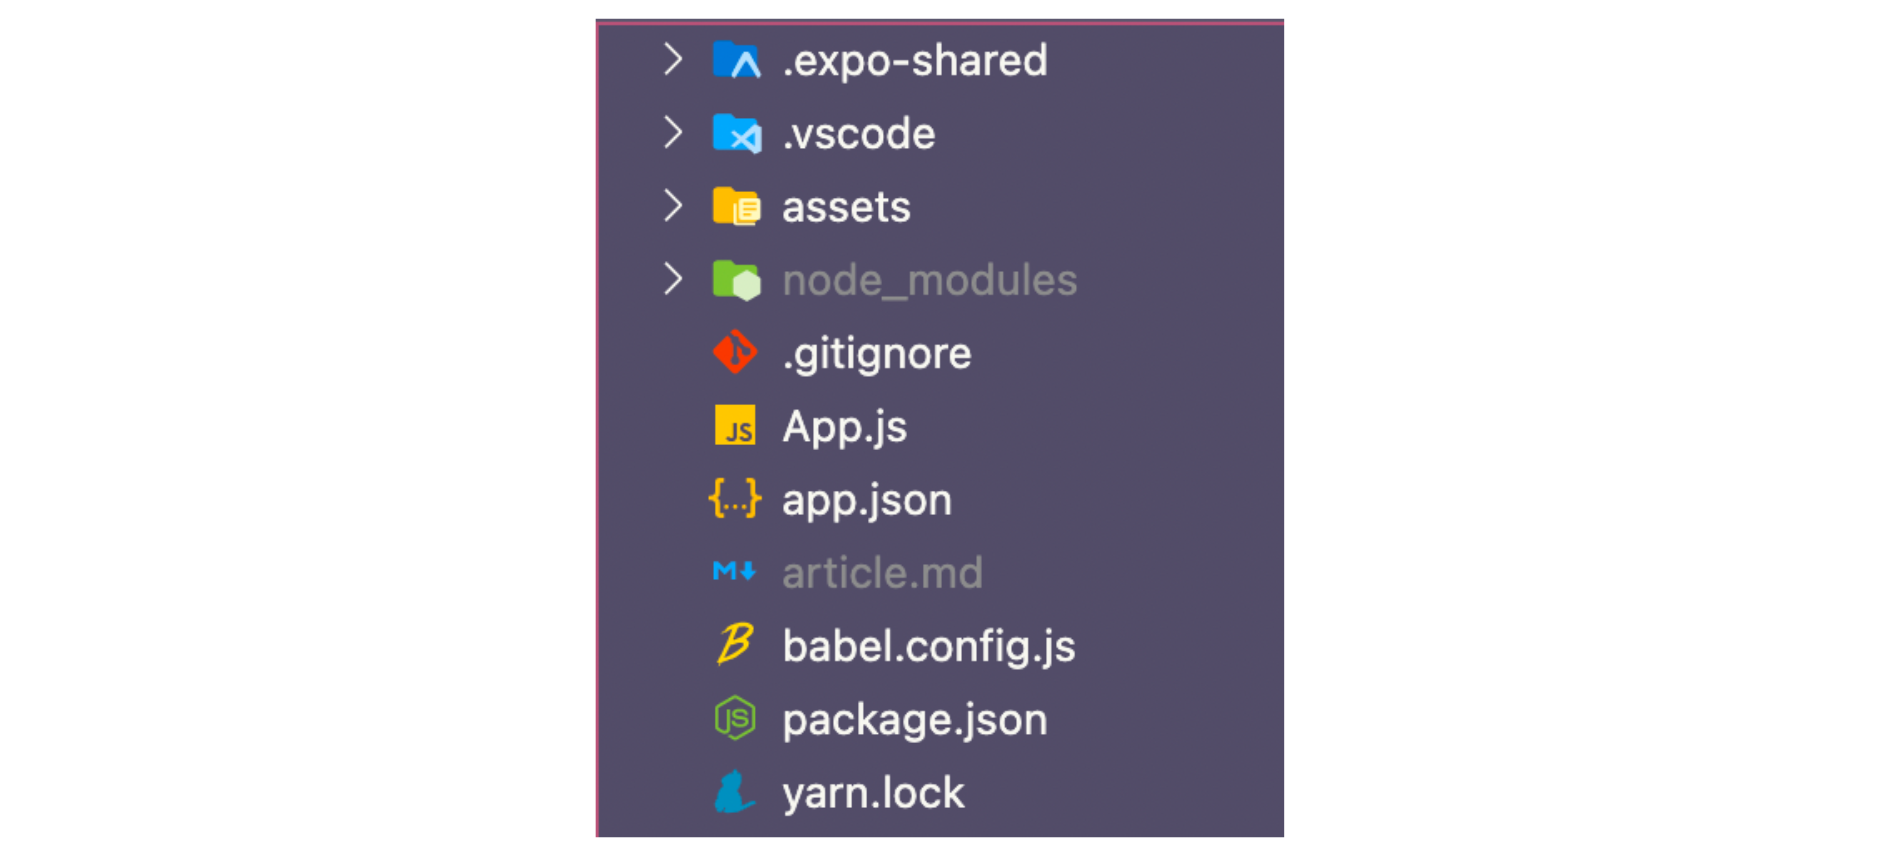
Create a new directory called /screens and add the following screen files:
HomeScreen.js
LoginScreen.js
SignupScreen.js
After creating these screen files, let's create the screens one by one. Start by modifying HomeScreen.js. This screen will show the user's email and their UID when the user has either successfully signed up or logged in.
The UID is generated and assigned to every user who registers with the Firebase Auth service.
Both the user's email and UID will come from AuthenticatedUserContext. We will get into those details later.
The firebase.auth().signOut() function is a method provided by the Firebase auth service to log out the user from the app.
Add the following code snippet to HomeScreen.js.
import { StatusBar } from 'expo-status-bar';
import React, { useContext } from 'react';
import { StyleSheet, Text, View } from 'react-native';

import { IconButton } from '../components';
import Firebase from '../config/firebase';
import { AuthenticatedUserContext } from '../navigation/AuthenticatedUserProvider';

const auth = Firebase.auth();

export default function HomeScreen() {
  const { user } = useContext(AuthenticatedUserContext);
  const handleSignOut = async () => {
    try {
      await auth.signOut();
    } catch (error) {
      console.log(error);
    }
  };
  return (
    <View style={styles.container}>
      <StatusBar style='dark-content' />
      <View style={styles.row}>
        <Text style={styles.title}>Welcome {user.email}!</Text>
        <IconButton
          name='logout'
          size={24}
          color='#fff'
          onPress={handleSignOut}
        />
      </View>
      <Text style={styles.text}>Your UID is: {user.uid} </Text>
    </View>
  );
}

const styles = StyleSheet.create({
  container: {
    flex: 1,
    backgroundColor: '#e93b81',
    paddingTop: 50,
    paddingHorizontal: 12
  },
  row: {
    flexDirection: 'row',
    justifyContent: 'space-between',
    alignItems: 'center',
    marginBottom: 24
  },
  title: {
    fontSize: 24,
    fontWeight: '600',
    color: '#fff'
  },
  text: {
    fontSize: 16,
    fontWeight: 'normal',
    color: '#fff'
  }
});
Next, let's create the login screen. Add the code snippet below inside LoginScreen.js. It contains two input fields and a button. Each input field represents the field where the user will enter their email and password. The value of each input field is stored inside two namesake state variables using the useState hook.
Initially, the value for each variable is an empty string. When the user provides the value in the input field, the current value for each of these variables is updated using the corresponding update function setEmail and setPassword. The values stored by these variables will be used when sending login information to Firebase.
The three other state variables defined inside the LoginScreen component are:
passwordVisibility: to show/hide password on the input field
rightIcon: to set a default icon for the passwordVisibility functionality
loginError: to store any incoming error when logging in from Firebase.
onLogin is an asynchronous method that handles whether to log in to the user or not based on their email and password values. These values are passed as arguments to a method called signInWithEmailAndPassword provided by Firebase Auth.
import { StatusBar } from 'expo-status-bar';
import React from 'react';
import { useState } from 'react';
import { StyleSheet, Text, View, Button as RNButton } from 'react-native';

import { Button, InputField, ErrorMessage } from '../components';
import Firebase from '../config/firebase';

const auth = Firebase.auth();

export default function LoginScreen({ navigation }) {
  const [email, setEmail] = useState('');
  const [password, setPassword] = useState('');
  const [passwordVisibility, setPasswordVisibility] = useState(true);
  const [rightIcon, setRightIcon] = useState('eye');
  const [loginError, setLoginError] = useState('');

  const handlePasswordVisibility = () => {
    if (rightIcon === 'eye') {
      setRightIcon('eye-off');
      setPasswordVisibility(!passwordVisibility);
    } else if (rightIcon === 'eye-off') {
      setRightIcon('eye');
      setPasswordVisibility(!passwordVisibility);
    }
  };

  const onLogin = async () => {
    try {
      if (email !== '' && password !== '') {
        await auth.signInWithEmailAndPassword(email, password);
      }
    } catch (error) {
      setLoginError(error.message);
    }
  };

  return (
    <View style={styles.container}>
      <StatusBar style='dark-content' />
      <Text style={styles.title}>Login</Text>
      <InputField
        inputStyle={{
          fontSize: 14
        }}
        containerStyle={{
          backgroundColor: '#fff',
          marginBottom: 20
        }}
        leftIcon='email'
        placeholder='Enter email'
        autoCapitalize='none'
        keyboardType='email-address'
        textContentType='emailAddress'
        autoFocus={true}
        value={email}
        onChangeText={text => setEmail(text)}
      />
      <InputField
        inputStyle={{
          fontSize: 14
        }}
        containerStyle={{
          backgroundColor: '#fff',
          marginBottom: 20
        }}
        leftIcon='lock'
        placeholder='Enter password'
        autoCapitalize='none'
        autoCorrect={false}
        secureTextEntry={passwordVisibility}
        textContentType='password'
        rightIcon={rightIcon}
        value={password}
        onChangeText={text => setPassword(text)}
        handlePasswordVisibility={handlePasswordVisibility}
      />
      {loginError ? <ErrorMessage error={loginError} visible={true} /> : null}
      <Button
        onPress={onLogin}
        backgroundColor='#f57c00'
        title='Login'
        tileColor='#fff'
        titleSize={20}
        containerStyle={{
          marginBottom: 24
        }}
      />
      <RNButton
        onPress={() => navigation.navigate('Signup')}
        title='Go to Signup'
        color='#fff'
      />
    </View>
  );
}

const styles = StyleSheet.create({
  container: {
    flex: 1,
    backgroundColor: '#e93b81',
    paddingTop: 50,
    paddingHorizontal: 12
  },
  title: {
    fontSize: 24,
    fontWeight: '600',
    color: '#fff',
    alignSelf: 'center',
    paddingBottom: 24
  }
});
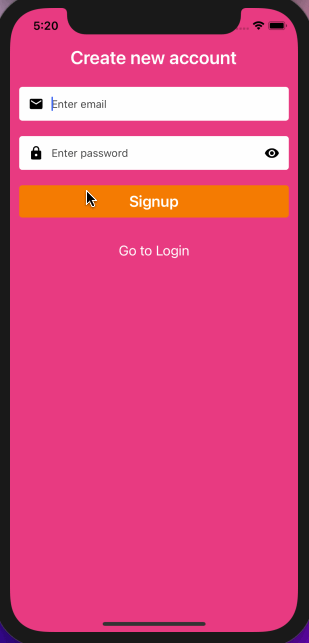
The signup screen is similar to the login screen. It uses onHandleSignup, which is an asynchronous method that handles the action of registering a user or not based on their email and password values.
These values are passed as arguments to a method called createUserWithEmailAndPassword provided by Firebase Auth. Add the following code snippet to the SignupScreen.js file:
import { StatusBar } from 'expo-status-bar';
import React from 'react';
import { useState } from 'react';
import { StyleSheet, Text, View, Button as RNButton } from 'react-native';

import { Button, InputField, ErrorMessage } from '../components';
import Firebase from '../config/firebase';

const auth = Firebase.auth();

export default function SignupScreen({ navigation }) {
  const [email, setEmail] = useState('');
  const [password, setPassword] = useState('');
  const [passwordVisibility, setPasswordVisibility] = useState(true);
  const [rightIcon, setRightIcon] = useState('eye');
  const [signupError, setSignupError] = useState('');

  const handlePasswordVisibility = () => {
    if (rightIcon === 'eye') {
      setRightIcon('eye-off');
      setPasswordVisibility(!passwordVisibility);
    } else if (rightIcon === 'eye-off') {
      setRightIcon('eye');
      setPasswordVisibility(!passwordVisibility);
    }
  };

  const onHandleSignup = async () => {
    try {
      if (email !== '' && password !== '') {
        await auth.createUserWithEmailAndPassword(email, password);
      }
    } catch (error) {
      setSignupError(error.message);
    }
  };

  return (
    <View style={styles.container}>
      <StatusBar style='dark-content' />
      <Text style={styles.title}>Create new account</Text>
      <InputField
        inputStyle={{
          fontSize: 14
        }}
        containerStyle={{
          backgroundColor: '#fff',
          marginBottom: 20
        }}
        leftIcon='email'
        placeholder='Enter email'
        autoCapitalize='none'
        keyboardType='email-address'
        textContentType='emailAddress'
        autoFocus={true}
        value={email}
        onChangeText={text => setEmail(text)}
      />
      <InputField
        inputStyle={{
          fontSize: 14
        }}
        containerStyle={{
          backgroundColor: '#fff',
          marginBottom: 20
        }}
        leftIcon='lock'
        placeholder='Enter password'
        autoCapitalize='none'
        autoCorrect={false}
        secureTextEntry={passwordVisibility}
        textContentType='password'
        rightIcon={rightIcon}
        value={password}
        onChangeText={text => setPassword(text)}
        handlePasswordVisibility={handlePasswordVisibility}
      />
      {signupError ? <ErrorMessage error={signupError} visible={true} /> : null}
      <Button
        onPress={onHandleSignup}
        backgroundColor='#f57c00'
        title='Signup'
        tileColor='#fff'
        titleSize={20}
        containerStyle={{
          marginBottom: 24
        }}
      />
      <RNButton
        onPress={() => navigation.navigate('Login')}
        title='Go to Login'
        color='#fff'
      />
    </View>
  );
}

const styles = StyleSheet.create({
  container: {
    flex: 1,
    backgroundColor: '#e93b81',
    paddingTop: 50,
    paddingHorizontal: 12
  },
  title: {
    fontSize: 24,
    fontWeight: '600',
    color: '#fff',
    alignSelf: 'center',
    paddingBottom: 24
  }
});
Create an authenticated user provider
You are going to create an authentication provider to check whether the user is logged in or not and access them if they are logged in.
Create a new directory called navigation/ and inside it, create a file called AuthenticatedUserProvider.js.
When a user is authenticated using a sign-in method in Firebase, it returns a user object with various properties such as email, photo URL, UID, display name, etc.
To create the auth flow in the example app we are building, we need a way of knowing whether this user object exists or not. Thus, we conditionally render two different stack navigators (we will create them in the next section). So, a user will only be able to log in and access HomeScreen if their respective user object exists.
One way to share data that is considered global in a React app is to use the React Context API. When creating a context, we must pass a default value. This value is used when a component has a matching Provider.
The Provider allows the React components to subscribe to the context changes. It wraps all other components in the React or React Native app.
To create an authenticated user provider, export a function called AuthenticatedUserProvider. This provider is going to allow the screen components to access the logged-in or logged-out state of a user in the application. So, in the code snippet below, we define a state variable called user.
import React, { useState, createContext } from 'react';

export const AuthenticatedUserContext = createContext({});

export const AuthenticatedUserProvider = ({ children }) => {
  const [user, setUser] = useState(null);

  return (
    <AuthenticatedUserContext.Provider value={{ user, setUser }}>
      {children}
    </AuthenticatedUserContext.Provider>
  );
};
Creating Home and Auth stacks
In this example app, there are two different stack navigator files to create:
HomeStack.js: composed of HomeScreen
AuthStack.js: composed of LoginScreen and SignupScreen
Create these new files inside the navigation/ directory.
Add the following code snippet inside HomeStack.js:
import React from 'react';
import { createStackNavigator } from '@react-navigation/stack';

import HomeScreen from '../screens/HomeScreen';

const Stack = createStackNavigator();

export default function HomeStack() {
  return (
    <Stack.Navigator headerMode='none'>
      <Stack.Screen name='Home' component={HomeScreen} />
    </Stack.Navigator>
  );
}
Next, add the following code snippet inside AuthStack.js:
import React from 'react';
import { createStackNavigator } from '@react-navigation/stack';

import LoginScreen from '../screens/LoginScreen';
import SignupScreen from '../screens/SignupScreen';

const Stack = createStackNavigator();

export default function AuthStack() {
  return (
    <Stack.Navigator headerMode='none'>
      <Stack.Screen name='Login' component={LoginScreen} />
      <Stack.Screen name='Signup' component={SignupScreen} />
    </Stack.Navigator>
  );
}
Check a user's authenticated state
The Firebase Auth service provides a listener called onAuthStateChanged to detect changes to a user's logged-in state. It subscribes to a user's current authenticated state and receives an event whenever that state changes.
Using this listener, if the returned state of a user is null, it means that the user is currently logged out. If it does not return null, it will return a user object. This helps in persisting a user's authentication state in the app.
We will use this listener method at the top of our navigator. Create a new file called RootNavigator.js inside the navigation/ directory. Start by importing the following statements:
import React, { useContext, useEffect, useState } from 'react';
import { NavigationContainer } from '@react-navigation/native';
import { View, ActivityIndicator } from 'react-native';

import Firebase from '../config/firebase';
import { AuthenticatedUserContext } from './AuthenticatedUserProvider';
import AuthStack from './AuthStack';
import HomeStack from './HomeStack';

const auth = Firebase.auth();
Next, create a function component called RootNavigator. Inside it, define a state variable called isLoading when a user's authenticated state is currently being checked with the Firebase Auth service.
Using the useContext hook, get the current value of the user and the method setUser to update that value from AuthenticatedUserContext.
This hook will trigger a re-render whenever the value of the user changes from the AuthenticatedUserContext.
The onAuthStateChanged listener will trigger inside the useEffect hook. It also returns an unsubscriber function which allows the app to stop listening for events whenever the hook is no longer in use.
Add the following code snippet inside the RootNavigator.js file:
export default function RootNavigator() {
  const { user, setUser } = useContext(AuthenticatedUserContext);
  const [isLoading, setIsLoading] = useState(true);

  useEffect(() => {
    // onAuthStateChanged returns an unsubscriber
    const unsubscribeAuth = auth.onAuthStateChanged(async authenticatedUser => {
      try {
        await (authenticatedUser ? setUser(authenticatedUser) : setUser(null));
        setIsLoading(false);
      } catch (error) {
        console.log(error);
      }
    });

    // unsubscribe auth listener on unmount
    return unsubscribeAuth;
  }, []);

  if (isLoading) {
    return (
      <View style={{ flex: 1, justifyContent: 'center', alignItems: 'center' }}>
        <ActivityIndicator size='large' />
      </View>
    );
  }

  return (
    <NavigationContainer>
      {user ? <HomeStack /> : <AuthStack />}
    </NavigationContainer>
  );
}
In the above code snippet, note that both stack navigators are conditionally rendered depending on the state of the user.
Wrapping RootNavigator with AuthenticatedUserProvider
Now that RootNavigator is defined, the question remains of how to use AuthenticatedUserProvider to wrap a set of components in the current app tree.
Well, you have to wrap this provider around the RootNavigator in order to use the helper functions as well as the value of the current user in the screen components.
Create an index.js file inside the navigation/ directory and add the following code snippet:
import React from 'react';

import { AuthenticatedUserProvider } from './AuthenticatedUserProvider';
import RootNavigator from './RootNavigator';

/**
 * Wrap all providers here
 */

export default function Routes() {
  return (
    <AuthenticatedUserProvider>
      <RootNavigator />
    </AuthenticatedUserProvider>
  );
}
Also, modify the App.js file to return Routes. Here is the demo of the complete authentication flow you will get after this step:
If you head over to the Firebase console and go to the Users tab on the Authentication page, you will see the details of the signed-up user.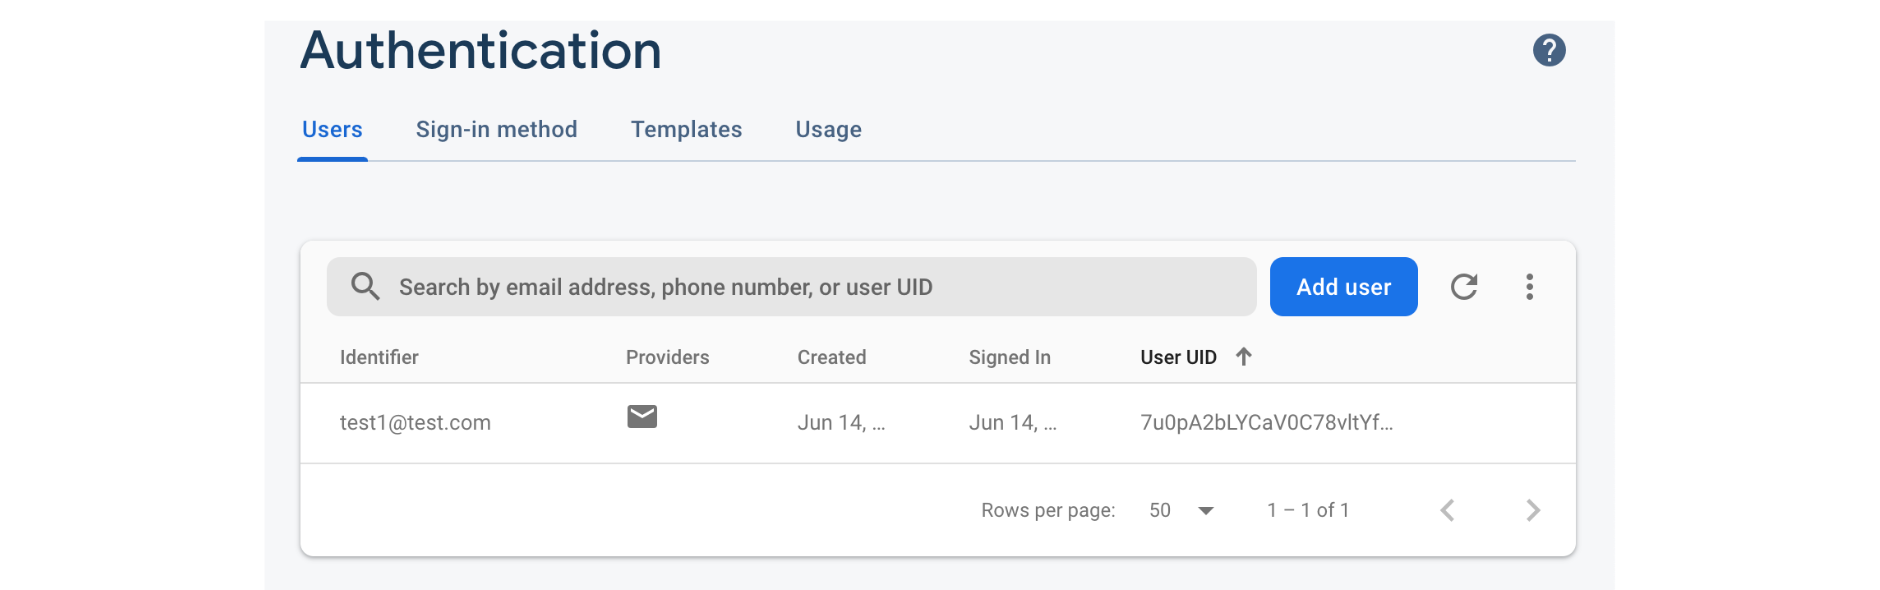
Conclusion
You have now successfully integrated the Firebase Auth service in a React Native app using the Expo SDK.
Using the Firebase JS SDK allows integration with other sign-in providers such as Phone authentication, Facebook, and Google.
Refer to Expo’s official documentation to try out other login providers.
Jscrambler
The leader in client-side Web security. With Jscrambler, JavaScript applications become self-defensive and capable of detecting and blocking client-side attacks like Magecart.
View All ArticlesMust read next
Building an app with Angular & Firebase
In this tutorial, you will learn how to build a basic CRUD app using Angular and Firebase
August 26, 2021 | By Jay Raj | 11 min read
Integrating Firebase with React Native
In this tutorial, you'll learn how to start building your cross-platform mobile app MVP with the power of Firebase and React Native.
August 6, 2021 | By Aman Mittal | 11 min read

