Category: Client-Side Security

Getting Started with GraphQL

GraphQL is a data query language and runtime. It is also a declarative, compositional, and strong-typed query language for querying dynamic data with a strong-typed schema.

The client gets to pick what it needs based on declarative syntax. The data is a hierarchical set of fields and queries that resemble the data. I like to think of it as a structured query language without SQL. This makes it easy for a product engineer to describe the data with declarative syntax.

Facebook has used this library since 2012 and recently went open source. The library has been on GitHub since 2015.

Type System

One of the features you get with GraphQL is a type system. This type system comes with introspection so you can query the types. This unit test illustrates how I query the sample schema:

const query = `
      query IntrospectionHumanTypeQuery {
        __type(name: "Human") {
          name
        }
      }
    `;

graphql.graphql(schema, query).then(function(result) {
    should(result.data.__type.name).equal('Human');
});


The schema points to a sample schema. I decided to stick with vanilla JavaScript in spite that GraphQL sits on top of Babel. Note that the query mimics the data I get back. I get a type.name which is close to the query of query { type { name } }.

There is a hierarchy between __type and name, just like the structure of the data. Queries return a Promise so I follow it up by then().

Unto the crux of this schema, below is the Human type I created:

const humanType = new graphql.GraphQLObjectType({
    name: 'Human',
    fields: {
        id: {
            type: new graphql.GraphQLNonNull(graphql.GraphQLInt)
        },
        name: {
            type: graphql.GraphQLString
        }
    }
});


GraphQL gives many options when defining the schema. I get GraphQLInt, GraphQLString for example. To make it awesome, I’ve added a constraint that makes the id non-nullable.

One big gotcha here is that GraphQL schemas need a query type to make them queryable. Below is the query type:

const queryType = new graphql.GraphQLObjectType({
    name: 'Query',
    fields: {
        human: {
            type: humanType,
            args: {
                id: {
                    type: new graphql.GraphQLNonNull(graphql.GraphQLInt)
                }
            },
            resolve: function(root, args) {
                return data[args.id];
            }
        }
    }
});


The queryType defines the way I expect to query the schema. Note the resolve callback, this gets called when the Promise gets fulfilled. You can just point this callback to a real call such as a database lookup.

Here, data is just plain old JSON. This callback executes within an asynchronous context. The same type of system used in humanType applies to queries. I expect to query this schema based on an id that is a GraphQLInt and non-nullable.

To finish the schema based on this type of system, we need a schema type:

const schema = new graphql.GraphQLSchema({
    query: queryType,
    types: [humanType]
});


I tell GraphQL precisely what I want. I need a humanType that gets queried by a queryType. I hope you can see how the type system comes together.

Validation

The upside of having a humanType and a queryType on the schema is validation. Say, I want to query the schema without arguments, like the test below:

 const query = `
      query HumanWithoutArgument {
        human {
        }
      }
    `;

graphql.graphql(target, query).then(function(result) {
    should.exist(result.errors);
});


Because I put a non-nullable constraint on the query type, this query fails. The test expects to see errors due to constraints on the type. This validation mechanism is a direct gain from the type system. One other validation one gets for free is that it has to be of type GraphQLInt. This is an integer type.

A query like a human(id: “1”) { name } will fail. Adding double quotes around the number tells the type system to expect a GraphQLString type. There are many scalar types available that add richness to the validation mechanism.

The type system is powerful for expressive queries one can validate. Armed with this arsenal of knowledge, let’s talk about querying the data.

Queries

Query composition derives from the type system. The example below illustrates this:

http://localhost:1337/?query={human(id:1){id,name}}


This query expects to see a human type with an integer id equal to 1. This human type contains a hierarchy of field types such as id and name. If you go back to the schema, this declarative query is almost identical. The query query string is just the way I pass the query into GraphQL. Below is the result I got back in application/json content-type:

{
    "data": {
        "human": {
            "id": 1,
            "name": "Obi-Wan Kenobi"
        }
    }
}


I get back a data type that contains the result of the query. The client gets to decide which field types to query. I could have just queried the name, for example, such as {human(id:1){name}}. If I donʼt specify a hierarchy like {human(id:1){}} then validation returns with a failure.

To set up this GraphQL API in the node, one can do:

var app = http.createServer(function(req, res) {
    const query = url.parse(req.url, true).query.query;

    graphql.graphql(schema, query).then(function(queryResult) {
        if (queryResult.errors) {
            res.writeHead(400, headers);

            res.end(JSON.stringify({
                error: queryResult.errors[0].message
            }));
        } else {
            res.writeHead(200, headers);

            res.end(JSON.stringify(queryResult));
        }
    });
});


The url library gives me a parse function to get the query string. Once the Promise gets fulfilled, I use JSON.stringify to convert to hypertext. The queryResult.errors is an Error type. This is why I get a message property that comes from the Error object in plain JavaScript.

Conclusion

GraphQL leaves it to the imagination to come up with nice ways of slicing and dicing data. Queries that are just objects that come from products in the real world. Feel free to check out the rest of my demo on GitHub.

Girls Develop and They’re Damn Good at It!

Girls Develop, and they know what they are doing. What does this mean?

Jscrambler has been supporting JavaScript-focused communities worldwide for a while now. This time, we would love to share our sponsorship experience with Girl Develop It, a non-profit organization supporting women’s inclusion in the web development world.

So, Why Sponsoring?

Sponsoring meetups and events is a great way to foster knowledge sharing within communities. In our case, it helps us bring security-related subjects to discussion and share our experience in the JavaScript Security field.

It is an opportunity to get valuable feedback regarding our product – it helps us align our strategy and improve the quality of our service.

Women in Tech

“If 90% of coders are men, developing and owning the language of the future, women won’t be part of the conversation.” Caitlin Moran.

From the collective rights standpoint, women are still perceived as a social minority when it comes to programming.

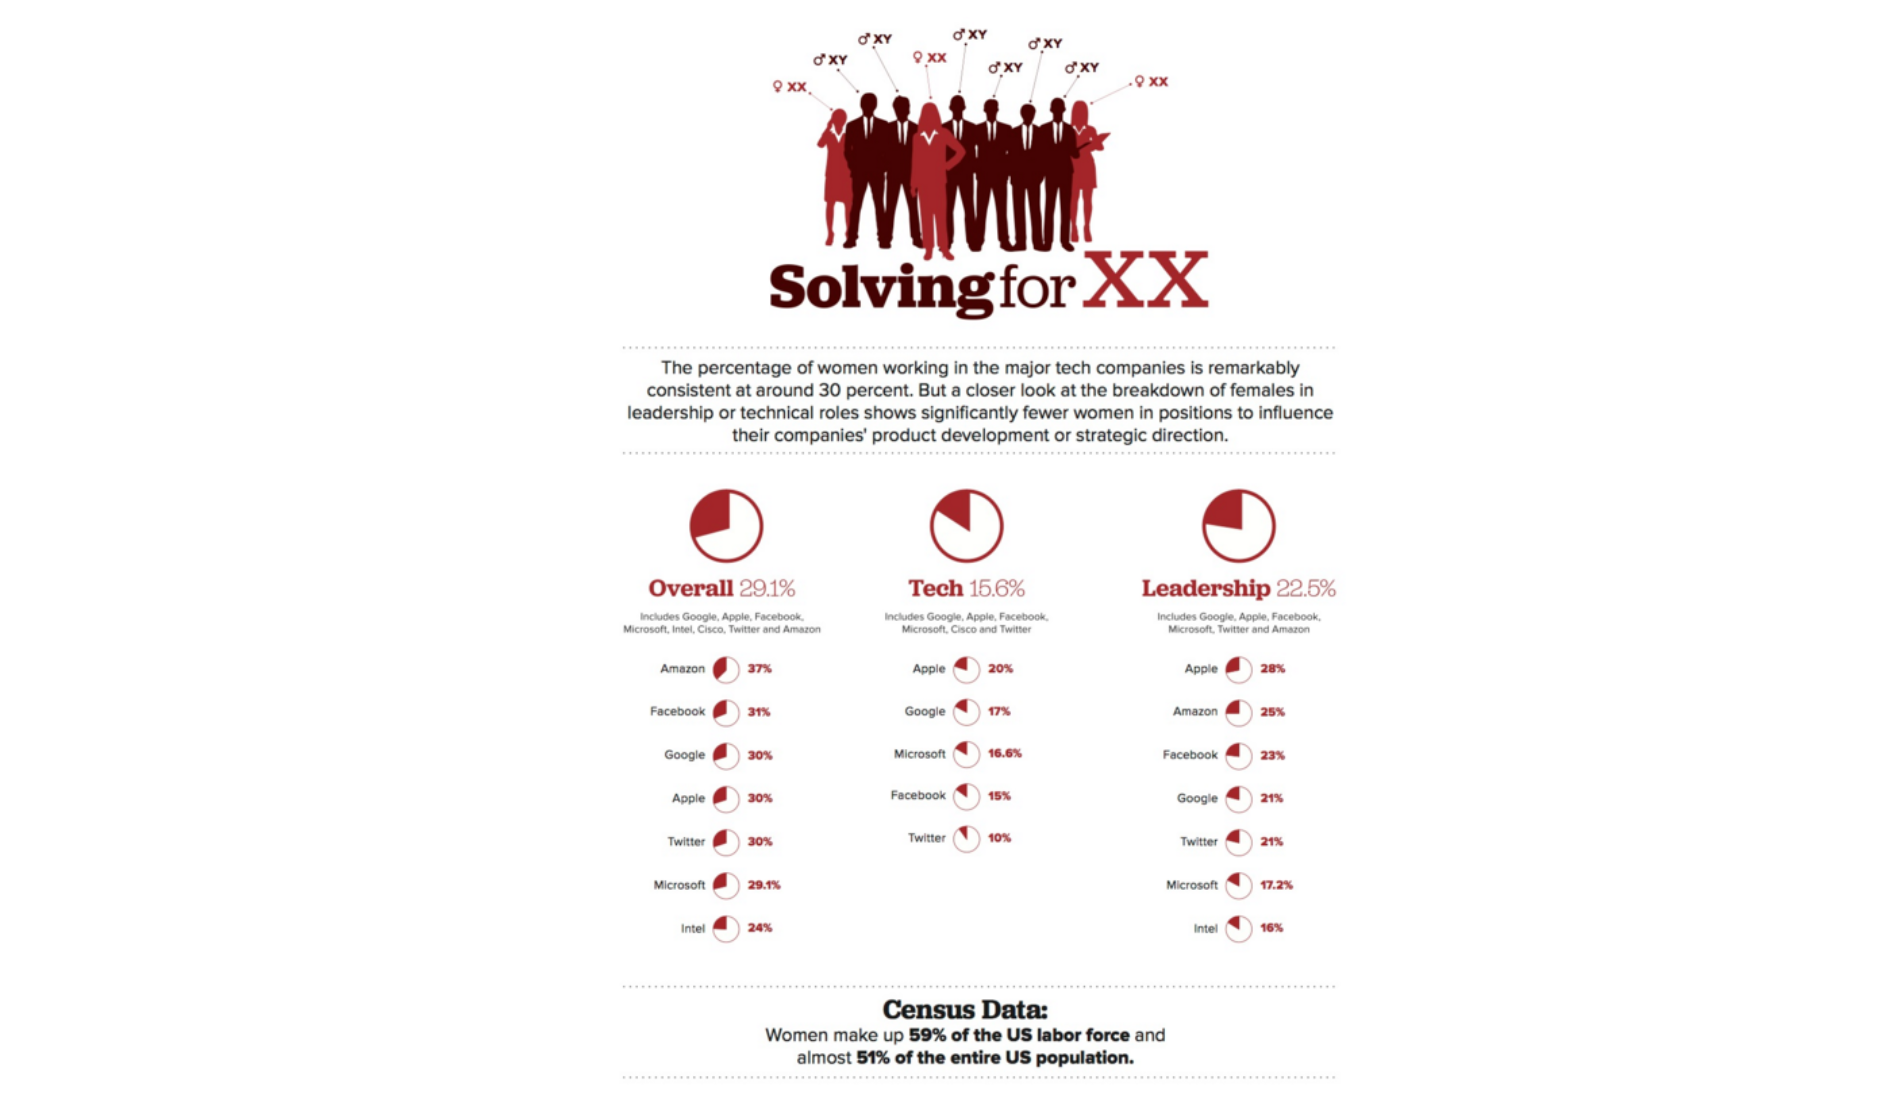
Not to mention that, according to CNET, the percentage of women working in major tech companies is 30% while the power of strategic decision-making is rarely in the hands of women.
girls-develop-it2-infographicAs social equality and coding education still have a long way to go, we were thrilled to come across Girl Develop It (GDI), a non-profit organization “that exists to provide affordable and judgment-free opportunities for women interested in learning web and software development.”

Vanessa Hurst and Sara Chipps founded GDI in 2010 in NYC to address the issue of gender inequality in tech. Since then the organization has grown and it currently has its presence in over 50 cities across the US with over 55,000 members nationwide.

Under the vision of “creating a network of empowered women who feel confident in their abilities to code and build beautiful web and mobile applications”, GDI provides affordable programming classes for all women who aspire to learn web and software development.

In terms of content taught, GDI courses cover a wide range of technical topics from HTML + CSS (parts I and II), JavaScript, Intro to Git & Github, Web Accessibility, Intro to Angular.js, PHP, and content strategy and SEO.

The classes are open to all adults over 18, and the price ranges from free to around $80. The class curricula are open source; they are created by experts in respective topics, vetted by the GDI community, and can be accessed on the GDI official website.

In keeping with Jscrambler’s area of expertise and activity and our conviction that JavaScript is the past, present, and future of web programming/development, we were happy to support the JavaScript classes organized by the Raleigh-Durham chapter of GDI (GDIRDU) in North Carolina.

The “Javascript Basics for Beginners” courses sponsored by Jscrambler were run in Raleigh and Durham as a 4-week series, each attended by about 25 women. The classes were taught by JavaScript professionals from companies such as Adwerx and Amplify.

javascript-basics-for-beginners-courseGDI students wearing Jscrambler t-shirts!

Join GDI

If you would like to enroll in any of the courses available in your city, the procedure is simple! Just go to the Girl Develop It website, choose your city, and book your place through Meetup, or get in touch with the organizers by sending them an e-mail.

Let’s change the world together!

Meteor, a Framework Where the Hardest Part is Coming Up with an App Name

Dive into our article to explore and understand how simple Meteor is.

If you’ve spent nights researching and pouring over new technologies almost as fast as they are created, then you know what it is to be a JavaScript developer in 2016.

You fill your mind with the most cutting-edge build processes and utilities expected of a relevant Web Dev. Yet, it seems like the JS ecosystem continues to change, and you never actually catch up.

Modern JS Developer

That was before you met Meteor. It’s as if the powers that be heard the pleas of countless Devs to incorporate a best-in-class bundle of libraries and tools for building JS applications into one framework.

Meteor is that complete framework.

It consists of packages and tools that allow you to start creating scalable apps immediately. This includes MongoDB, Node.js, Spacebars, and Blaze (a specially adapted version of Handlebars, jQuery, and virtual DOM).

Meteor also integrated an easy way of building mobile apps in JS through a custom Cordova integration. The magic doesn’t stop there. Meteor has a dedicated package manager and community similar to NPM called Atmosphere.

Getting set up with Meteor

Meteor is a full-stack framework, meaning it was created for building apps that can easily scale into larger platforms with the included components. To understand Meteors simplicity and ease of use we’ll be building a collaborative text-editor app. Let’s call it Sharedit for obvious reasons and because I’ve heard worse web app names.

First, let’s describe the main functionality and features of our app:

  1. Allow for real-time text editing.

  2. Show a live preview of our code.

  3. Don’t look terrible


Meteor has the technical stack to make our app a reality in a short amount of code and time.

As of today, Meteor is at version 1.3. The latest version boasts improved ES2015 along with integrations with React and Angular if that happens to be your preference.

For this project, we’ll install Meteor through our terminal on version 1.2.1. Not to worry, as we’re not using any bleeding edge features just yet.

To begin our app we’ll start by installing the MeteorJS stack onto our local machine.

curl https://install.meteor.com/ | sh


Once you’ve installed Meteor, create a new project at our specific version:

meteor create Sharedit--release 1.2.1


In our project’s version of 1.2.1, we start with 3 files, which is all we need for our app.

Sharedit.html
Sharedit.css
Sharedit.css


However, when you create a new project in 1.3, Meteor creates a file structure along with boilerplate files including css and our app’s HTML. A freshly created project root folder should look similar to the structure below:

client/main.js   # a JavaScript entry point loaded on the client
client/main.html # an HTML file that defines view templates
client/main.css  # a CSS file to define your app's styles
server/main.js   # a JavaScript entry point loaded on the server
package.json     # a control file for installing NPM packages
.meteor          # internal Meteor files
.gitignore       # a control file for git


Meteor depends on this specific file structure for recognizing whether code runs on the server or client. This distinctly modular approach makes any code found in the client folder accessible to the client and any code found in the server folder on the server.

Any code found in the root will be accessible to both the client and the server. If we needed to, we could manually create the above folder structure to allow our 1.2.1 code to run in its respective environment exactly as it would in 1.3.

Installing dependencies

We’ll also need to install Sharejs with Codemirror, which will enable the collaborative functionality found in our app:

meteor add mizzao: sharejs - codemirror


Meteor starts your project with code for a counter app tutorial. In this next step, we can remove a portion of the boilerplate code from the main.html and mostly all from the main.js files that are irrelevant to our project.

From main.html we can change the name of our template from “hello” to “editor” and move it into its template. We can delete everything else so that we only see the following:

<head>
    <title>Sharedit</title>
</head>

<body>
    <h1>Welcome to Meteor!</h1>
</body>

<template name="editor">
    {{> editor}}
</template>


Then, in our main.js we can remove essentially all boilerplate code below our imports. Go to your terminal and run Meteor by typing

meteor


Meteor will fire up a server and our template should render a blank page with only a “Welcome to Meteor!” Now we can begin adding functionality to our app.

Draw the rest of the owl

Meteor’s use of MongoDB is unique in the way it manipulates data.

The client initiates changes, those changes are sent to the server model, clients are informed that the model has changed, and the templates in the browser update the page on the client. This is all thanks to live data and client-side MongoDB.

To see this in action we’ll head back into the client/main.js file and add a startup function that will create a new MongoDB collection to store the data necessary for keeping our collaborative editor in sync.

this.Documents = new Mongo.Collection("documents");


We’re adding “this” to give our text editing packages access to our Document collection (MongoDB’s version of a table). Without this, the ShareJS package will not load.

Next, we can create our client and server blocks by adding the following:

if (Meteor.isClient) {}


and

if (Meteor.isServer) {
    Meteor.startup(function() {
        // this code will run at startup.
    });


Our server block will check to see if our collection exists when we add documents.findOne().

Next up we’ll create an If/Else statement to detect any documents. By adding a ! logical NOT operator to our function we can check our document for data (or lack thereof in this case). If no document data exists then the if statement will run by adding a title to the app.

if (Meteor.isServer) {
    Meteor.startup(function() {
        // startup code that creates a document in case there isn't one yet.
        if (!Documents.findOne()) { // no documents yet!
            Documents.insert({
                title: "my new document"
            });
        }
    });

Because this code is on our client, it will run at startup. If our code is correct we should be able to see the object with our title when we run our app.

Next, we’ll need to set up our template helpers which will pass in our docid information and display to our HTML page. We call a template within our main.html by adding the following to our template property.

{
    { > sharejsCM docid = docid id = "editor"
    }
}


This will display a code mirror editing window but we also need to provide a document ID, which will originate from the template helper we’ll add in the next step.

We won’t run it just yet though as we need to set up our template helper to pass information into our document. In our main.js file, we need to add our template helper within our client block by adding these few lines.

if (Meteor.isClient) {
    Template.editor.helpers({
        docid: function() {
            var doc = Documents.findOne();
            if (doc) {
                return doc._id;
            } else {
                return undefined;
            }
        }
    });
}


Our app will now find the first document in the Documents collection and send back its ID to the template.

The template will only be able to access other templates along with the docid parsed by the Meteor template helper (Spacebars). This syntax might even look familiar to many because it is based on the handlebars templating library.

Lastly, we have to create a variable to hold our Document and include an If/Else statement to provide our docid on success.

Your Sharedit.html should look like this:

<head>
    <title>Sharedit</title>
</head>

<body>
    <h1>Welcome to Meteor!</h1> {{> editor}}
</body>

<template name="editor">
    {{>sharejsCM docid=docid id="editor"}}
</template>


Your sharedit.js should now look like this:

if (Meteor.isClient) {
    Template.editor.helpers({
        docid: function() {
            var doc = Documents.findOne();
            if (doc) {
                return doc._id;
            } else {
                return undefined;
            }
        }
    });
}


It’s time to run and test our app with the meteor command in your terminal. Only this time open up localhost:3000 on another browser and bask in your progress.

You should now see both browser windows update in real-time with any changes you make to the text. So far we’ve successfully implemented collaborative real-time editing functionality into our Meteor app.

Next, we add some reactivity to our app. For the uninitiated, Reactive data is simply data that automatically tells us when it gets updated. This is exactly what we want, to render changes in our view automatically according to the changes that we make to our data.

When I type something into the editor, the template should re-render based on the new data in our collection.

Meteor has this reactivity built into it at a low level. Because real-time data is a cornerstone of our app Meteor allows us to take full advantage.

Style and Flare

We’ll need to polish our app some so that it doesn’t look so basic. To make our lives easier we’ll add a bootstrap meteor package to easily style our entire project.

meteor add twbs: bootstrap


Then in our sharedit.html, we can add in the following to add a navbar along with a stylish heading.

<body>
    <!-- / nav container -->
    <nav class="navbar navbar-default navbar-fixed-top">
        <div class="container">
            <a class="navbar-brand" href="#”>Sharedit</a>
    </div>
  </nav>
<body>


We can encapsulate our editor inside a Bootstrap container div to ensure that it displays on our page. Then we make sure it remains visible by applying top-margin CSS properties to it within our CSS file.

.top - margin {
    margin - top: 50 px;
}


After we style our editor we want to separate the page into our left half text editor and our right half iframe render. Start by adding some more Bootstrap classes to style the left column:

<div class="container top-margin">
    <div class="row">
        <div class="col-md-6">
            {{> editor}}// this class will house our editor
        </div>


The div container will wrap our editor template within half of the page and if you created the top-margin class should be invisible as soon as you save your file.

Next, we’ll create the right column HTML preview to display our rendered code as we type similar to JSFiddle or Codepen. The left half of our page will be our code and the right half will be a live preview of the code on the left, rendered within an iframe.

The code below includes the template for our HTML view template {{>viewer}} on the right side of the page:

<div class="container top-margin">
    <div class="row">
        <div class="col-md-6">
            {{> editor}}
        </div>
        <div class="col-md-6">
            {{> viewer}}
        </div>
    </div>
</div>


Our HTML so far should look like this:

<head>
    <title>Sharedit</title>
</head>

<body>
    <nav class="navbar navbar-default navbar-fixed-top">
        <div class="container">
            <a class="navbar-brand" href="#”>Sharedit</a>
    </div> <!-- / nav container -->
  </nav> 
  <div class=" container top-margin ">
    <div class="row”>
                <!-- / right and left containers -->
                <div class="col-md-6">
                    {{> editor}}
                </div>
                <div class="col-md-6">
                    {{> viewer}}
                </div>
        </div>
        </div>
</body>

<!-- / Template for our editor -->
<template name="editor">
    {{>sharejsCM docid=docid id="editor"}}
</template>


<!-- / Template for our iframe viewer -->
<template name="viewer">
    <iframe id="viewer_iframe">
    </iframe>
</template>


Then within the template that renders our editor, we’ll need to reconfigure our codemirror to bind our editor to the viewer by adding onRender=config which passes a function that displays the current state of the editor.

<template name="editor">
    {{>sharejsCM docid=docid onRender=config id="editor"}}
</template>


Next, we move into our Sharedit.js to create the config function that will bind our editor and viewer. The configuration function will also set properties, like our event listener, that will mirror the code in our editor as soon as we type it into our {{>viewer}} iframe.

We define our template helper inside of our config function within Sharedit.js.

Sharedit.js:

if (Meteor.isClient) {
    Template.editor.helpers({
        docid: function() {
            var doc = Documents.findOne();
            if (doc) {
                return doc._id;
            } else {
                return undefined;
            }
        },
        config: function() {
            return function(editor) {
                editor.setOption("lineNumbers", true);
                editor.on("change", function(cm_editor, info) {
                    $("#viewer_iframe").contents().find(
                       "html").html(cm_editor.getValue());
                });
            }
        },
    });
}


Config is a helper function for our template. Inside our function, we’re passing in the Codemirror editor along with information about the changes with our event listener editor.on(“change”, function(cm_editor, info) Whenever we see a change in the editor render it to our {{>viewer}} within our Sharedit.html.

This is where we can also add some flare to our text editor by enabling numbered lines in our code editor with the editor.setOption(“lineNumbers”, true); Lastly we’ll dynamically render our code in the iframe we created in our Sharedit.html file. We can use a jQuery selector to select the iframe we named “viewer_iframe” and display the contents from our editor.

We can chain our jQuery functions like so:

$("#viewer_iframe").contents().find("html").html(cm_editor.getValue());


Our completed Sharedit.js code should look like this:

this.Documents = new Mongo.Collection("documents");

if (Meteor.isClient) {
    // find the first document in the Documents collection and send back its id
    Template.editor.helpers({
        docid: function() {
            var doc = Documents.findOne();
            if (doc) {
                return doc._id;
            } else {
                return undefined;
            }
        },
        //template helper necessary for passing in our editor data.
        config: function() {
            return function(editor) {
                editor.setOption("lineNumbers", true);
                editor.on("change", function(cm_editor, info) {
                    $("#viewer_iframe").contents().find(
                      "html").html(cm_editor.getValue());
                });
            }
        },
    });
}

if (Meteor.isServer) {
    Meteor.startup(function() {
        // code that runs at startup and creates a document in case it doesn’t exist. 
        if (!Documents.findOne()) { // no documents yet!
            Documents.insert({
                title: "my new document"
            });
        }
    });
}


Our completed Sharedit.html should be the following:

<head>
    <title>Sharedit</title>
</head>

<body>
    <nav class="navbar navbar-default navbar-fixed-top">
        <div class="container">
            <a class="navbar-brand" href="#">Sharedit</a>
        </div>
        <!-- / nav container -->
    </nav>
    <div class="container top-margin">
        <div class="row">
            <div class="col-md-6">
                {{> editor}}
            </div>
            <div class="col-md-6">
                {{> viewer}}
            </div>
        </div>
    </div>
</body>

<template name="editor">
    {{>sharejsCM docid=docid onRender=config id="editor"}}
</template>

<template name="viewer">
    <iframe id="viewer_iframe">
    </iframe>
</template>


In our CSS file we can add some final styling to the borders and enlarge the preview area with a full-width column:

.top - margin {
    margin - top: 50 px;
}

#viewer_iframe {
    border: 1 px solid gray;
    resize: both;
    width: 100 % ;
    height: 100 % ;
}

Conclusion

We’ve built a real-time collaborative text editor thanks to the power of Meteor.

If it wasn’t for the combination of several extensible web components that make up Meteor, our job would not have been as easy. It may be difficult to appreciate what this framework has allowed us to accomplish in so few lines of code.

Everything we needed to build this app was found within the Meteor ecosystem. Meteor is more than a fancy build tool made of popular packages, it’s simplicity and productivity greatly reduce the amount of time and code it takes to develop exciting web applications.

Even better, Jscrambler is compliant with it (as it is for all main JS frameworks) so we can easily protect our Sharedit app before we deploy it. See it for yourself – start your free Jscrambler trial today.


Migrating your Gitlab Infrastructure into Docker

Bring your GitLab down to see how quickly you can annoy your developers.

If you did that already, you know how sensitive your built environment is, and you should do everything you can to make it healthy and stable. Unfortunately, that sometimes means that you might think twice before deciding to upgrade your GitLab configuration or before upgrading your CI server.

However, when using Docker, those troubles go away.

Today, we will show you how to migrate your current GitLab infrastructure into Docker.

Docker 101

If you have been around in the last couple of years, you probably already heard of Docker. Docker is a Linux Container management toolset.

Linux Containers provide resource limitation and prioritization (CPU, memory, block I/O, network) and application isolation of the execution environment (filesystem, process trees, networking, user IDs). This has obvious benefits in terms of security, but an equally important one is making the management of your CI infrastructure much more enjoyable and less painful.

Docker containers are not persistent because they are based on immutable images. If you restart a container, you’ll restart all the processes also. All changes made in previous executions will be lost because the container is created from the same original image.

To persist data, you need to separate the state (configuration files you want to be able to edit frequently, databases, logs, etc.) from the rest (system and static application files).

The static parts should live inside the docker container, and the state should be moved out to host volume folders that you can mount into your containers. This way, your state will be safe across multiple executions of the container.

Creating the initial state

Assuming that you already installed Docker on your server, the first step is selecting a Docker image that suits our needs. It’s always best to choose an official image as those are well structured and tend to be more up-to-date.

For this post, we selected the Gitlab Community Edition Docker image, which is based on the Omnibus package.

Before running the container we need to create the host volumes and set up the default configuration files that we’ll need in the first execution. There are three host volume folders that we will use:

Host Volume

Container location

Usage

/docker/GitLab/data

/var/opt/GitLab

Application data

/docker/GitLab/data

/var/log/GitLab

Logs

/docker/GitLab/data

/etc/GitLab

GitLab configuration files


To set our default configuration first create Gitlab’s configuration file /docker/GitLab/GitLab.rb. Let’s start with something simple:

# Change the external_url to the address your users will type in their browser
external_url 'https://gitlab.yourcompany.com'
nginx['listen_port'] = 443
nginx['listen_https'] = true
# SMTP settings
gitlab_rails['smtp_enable'] = true
gitlab_rails['smtp_address'] = "smtp.yourcompany.com"
gitlab_rails['smtp_port'] = 587
gitlab_rails['smtp_user_name'] = "gitlab"
gitlab_rails['smtp_password'] = "supersecurepassword"
gitlab_rails['smtp_domain'] = "yourcompany.com"
gitlab_rails['smtp_authentication'] = "login"
gitlab_rails['smtp_enable_starttls_auto'] = true
gitlab_rails['gitlab_email_from'] = '[email protected]'


For security purposes, we should enable SSL by default. This GitLab image will look for the SSL certificate in the /ssl/gitlab.yourcompany.com.crt.

Generate your self-signed certificate or even better, purchase a certificate for your GitLab sub-domain and install the files in:

/docker/gitlab/ssl/gitlab.yourdomain.com.crt
/docker/gitlab/ssl/gitlab.yourdomain.com.key


Don’t forget to do a chmod 600 /docker/gitlab/ssl/gitlab.yourdomain.com.*. The easiest way to break your crypto is to give your key away!

Creating the container

We don’t need to create a Dockerfile to set up our container, but it’s best if we do!

We can later tweak things to our taste and it’s easier to remember exactly what settings we used and a convenient starting point to upgrade our configuration. If you are migrating your current non-Docker installation of Gitlab into Docker you’ll need to install the same version.

Don’t worry, you can upgrade later. To specify a version you need to add an existing tag to the image name. In our case, we are using 8.5.7-ce.0.

We’ll use the supervisor to wrap up our service. The supervisor is basically a daemon wrapper that can automatically restart your services if for some reason they become down. This is the look of our Dockerfile:

FROM gitlab / gitlab - ce: 8.5.7 - ce.0
MAINTAINER you@ yourdomain.com

## Setup##
RUN apt - get update &&
    apt - get install - y supervisor &&
    mkdir /
    var / log / supervisor
COPY. / supervisor.conf / etc / supervisor / conf.d /

    EXPOSE 22 443
VOLUME['/etc/gitlab', '/var/log/gitlab', '/var/opt/gitlab']
CMD["/usr/bin/supervisord"]


The FROM instruction specifies which image we are using as a starting ground to build our own. RUN instructions indicate commands that will be executed on the container filesystem when building the image.

You can have multiple RUN instructions or a single one separating commands with &&. It’s best to merge into a single one as each instruction will result in a new layer that will patch the previous one. More layers will be slightly slower in terms of I/O latency.

The COPY instruction copies the file from the build directory to a directory inside the container. The EXPOSE instruction sets the ports that will be accessible outside the container.

The VOLUME instruction indicates which directories can be mounted as host or data volumes on the container.

The CMD tells Docker which binary to execute when the container starts. In this case, we’ll tell it to execute the supervisor daemon, which then starts and monitors Gitlab execution.

The base image that we are using executes as foreground /assets/wrapper. That’s what we need to set on our supervisor.conf file:

[supervisord]
nodaemon = true

    [program: gitlab]
command = /assets/wrapper
numprocs = 1
autostart = true
autorestart = true


The nodaemon instructs the supervisord to execute in the foreground, and the second block tells the supervisor to execute GitLab’s boot script. autostart will tell it to start automatically when you run the container, and auto restart instructs the supervisor to restart GitLab automatically if it comes down for some reason.

So right now you should have the following files in your build directory:

  • Dockerfile

  • supervisor.conf


To build your image, execute this command in the build directory:

docker build - t yourcompany / gitlab - ce: 8.5.7 - ce.0.

Running the container

To launch containers, we recommend that you use docker-compose and write down a docker-compose.yml configuration file. Again it’s a better way to manage it as later on chances are that you won’t remember the settings you used to start your containing.

You can think of the Dockerfile as the place where you should describe the building blocks of your container and the docker-compose.yml as the place where you describe how a particular instance of the container should be executed and, if need be, where you override some configuration parameters.

gitlab:
    image: 'yourcompany/gitlab-ce:8.5.7-ce.0'
restart: always
hostname: 'gitlab.yourcompany.com'
environment:
    -GITLAB_OMNIBUS_CONFIG: |
    external_url 'https://gitlab.yourcompany.com'#
Add any other gitlab.rb configuration options
ports:
    -'443:443' - '22:22'
volumes:
    -'/docker/gitlab/conf:/etc/gitlab' - '/docker/gitlab/logs:/var/log/gitlab' - '/docker/gitlab/data:/var/opt/gitlab'


It’s very easy to understand what these options do.

You don’t need to pass Gitlab variables using this file, but it is a convenient way to override your default configuration if you are deploying multiple instances of this Docker image.

To run our container: docker-compose up -d

The first time it runs it will take some time to create all state like databases, etc.

If you are setting up Gitlab for the first time in Docker, this is it. Create your first user and start adding your mates. You can jump to the next section as well.

Importing existing Gitlab data

This step is easy as Gitlab already has a tool to export/import all data in bulk.

In your existing GitLab execute the steps below. It will only work if your previous setup is an Omnibus Package installation. If you installed it from the source, explore it to proceed. Make sure your Gitlab is running when you do this.

sudo gitlab - rake gitlab: backup: create


It can take some time depending on how many projects you have. In the end, it will write a file with a name like <unixtimestamp>_gitlab_backup.tar e.g. 1460911132.

To restore move this backup file into /docker/GitLab/data/backups. Then, enter the container by typing:

docker exec - it `docker ps | grep "yourcompany/gitlab-ce:8.5.7-ce.0" | cut -d " " -f1`
bash


Now enter these commands:

# stop services
gitlab-ctl stop unicorn
gitlab-ctl stop sidekiq
cd /var/opt/gitlab/backups
chown git:git *_gitlab_backup.tar
# Overwrite the contents of your GitLab database. It may take some time to complete, depending on how big your database is.
gitlab-rake gitlab:backup:restore BACKUP=<DATE> (e.g. 1460911132)
gitlab-ctl start
# Check if everything is ok. Watch out for errors and warnings
gitlab-rake gitlab:check SANITIZE=true


And that’s it! Access https://gitlab.yourcompany.com, log in with your user, and make sure everything is in there!

Backups

To automate backups it’s just a matter of running an instance of the docker-machine:

docker exec `docker ps | grep "yourcompany/gitlab-ce:8.5.7-ce.0" | cut -d " " -f1` / opt / gitlab / bin / gitlab - rake gitlab: backup: create


Install it in the host’s cron (say every day at 4 a.m.) using a more generic grep regex to avoid the need to change this cron job when you upgrade the version.

0 4 * * * docker exec `docker ps | grep "yourcompany/gitlab-ce:8.5.7-ce.0" | cut -d " " -f1` / opt / gitlab / bin / gitlab - rake gitlab: backup: create


This will only backup your database, so remember to backup your configuration files as well (/docker/GitLab/conf) and the logs in (/docker/GitLab/logs), in case you want to keep them.

Upgrading your Gitlab

First stop your current docker instance:

docker stop `docker ps | grep "yourcompany/gitlab-ce:8.5.7-ce.0" | cut -d " " -f1` 


Delete the container:

docker rm `docker ps -a | grep "yourcompany/gitlab-ce:8.5.7-ce.0" | cut -d " " -f1`


To upgrade you need to edit your Dockerfile and docker-compose.yml files. You only need to edit the tag, e.g. from 8.5.7-ce.0 to 8.5.8-ce.0. Build it again:

docker build - t yourcompany / gitlab - ce: 8.5.8 - ce.0.


And then start it:

docker - compose up - d


If all went well, you should now have a new version up and running. Please keep in mind that new versions might break stuff sometimes. So test it before deploying it and it can’t hurt to run gitlab-rake gitlab:check SANITIZE=true to check for issues.

Wrapping up

Migrating your Gitlab to Docker is the first step in turning your CI more manageable.

You can easily move it to another server if you need and you can easily upgrade to newer versions without running the risk of breaking things. Gitlab is the core of your team’s development infrastructure and you’ll want it to run smoothly. Docker can help you achieve just that.

Of course, if you want even more stability, you need a High-availability (HA) container setup (e.g. with HAProxy) or to set up live migration of containers and data.

Those are advanced topics that we may explore in a future blog post.

8 Awesome ES6 Features

Today, we will dive into eight useful and interesting ECMAScript 6 (ES2015) features, such as classes, to make it easy for developers familiar with object-oriented programming to start using JavaScript.

We will also explore typical features inspired by functional programming languages, for instance, arrow functions, let variables, etc.

1. Using const and let

After a long time using the keyword var to create variables and instantiate objects, the ES6 added two new useful keywords to handle variables: const and let.

They are important features and it’s highly recommended to use them instead of the old var to avoid hoisting problems.

The main difference between const and let is that const allows you to create constants, and lets to do the same as var, but it avoids hoisting problems.

As a best practice, always use const to handle immutable data, because it uses less memory than using let. Take a look at this example:

// creating a constant
const MAX = 10;
// creating a variable
let value = 5;
// you can't change the value of a constant
MAX = 5;
// this change is allowed for `let` variables
value = 10;
// creating a constant object
const obj = {};
// You can only change object's attribute
obj.a = 10;
// but you can't reassign new data here
obj = 100;

2. Template Strings

The template string is a powerful feature, which allows you to interpolate data inside a string in an elegant way.

To create a template string you need to create a string using grave accent, like in this example: This is a template string. If you need to interpolate data inside a string, you just need to use this syntax: ${data}. Take a look at the example below:

var name = "John Connor";
console.log(`This is ${name} from the future!`);


Another advantage of using template string is to write multiline strings without concatenate strings using the + operator, now you can just break a line to do it:

var template = `
<div>
    <p>This is multline string</p>
</div>
`;

3. Arrow Functions

In JavaScript, it is very common to invoke functions, anonymous functions, and callback functions using the keyword function.

The arrow function is a new feature that changes the way to create functions and the way they behave. By using the syntax sugar => we are creating a function that does not alter this keyword and that does not create any special variables such as arguments. See some arrow examples:

// empty arrow-function
const foo() => {};
// inline arrow-function
const add = (a, b) => {
    a + b
};
// arrow-function
const compare = (a, b) => {
    if (a > b) {
        return a;
    } else {
        return b;
    }
};
// arrow-function sharing context
const doSomething = (a, b) => {
    this.a = a;
    // there is no need to use parenthesis when there is one argument
    const doNewThing = b => {
        this.b = b;
        return this.a + this.b;
    }
}

4. Spread Operators

The Spread Operator basically converts an array into arguments, it is very useful when you need to break array values to send them as parameters for a function or object constructors.

To understand these features, first, let’s create a simple function below:

function add(a, b) => {
    return a + b
};


Now, to invoke this function using an array of elements as arguments, you just need to use this syntax: …array, take a look:

const values = [1, 2];
add(...values); // returns 3

5. Method Definition

If you need to create simple objects with some attributes and some functions, ES6 makes the process easier, for example:

var MyObject = {
    a: 1,
    inc: function(b) {
        this.a += b;
    }
}


You can create methods instead of object functions, eliminating the use of function keywords, have a look:

var MyObject = {
    a: 1,
    // syntax sugar to create methods
    inc(b) {  
        this.a += b;
    }
}

6. Classes and inheritances

The class is one of the most awaited ES6′s features. Now you are able to create a class without the direct usage of the prototype objects in JavaScript.

While using class you can include constructors, destructors, methods, and inheritance.

To see the differences between classes and prototype objects, we’re going to write the same Vehicle object using class and prototype. First, take a look at how we can create a Vehicle prototype object:

var Vehicle = function(name) {
    this.name = name;
}

Vehicle.prototype.drive = function() {
    console.log("Driving the ", this.name);
};


And now, we can write an expressive Vehicle object using the ES6 class feature, see this example below:

class Vehicle {
    constructor(name) {
        this.name = name;
    }
    drive() {
        console.log("Driving the ", this.name);
    }
}


Using classes, your code will be more expressive and cleaner. And what if we need to use inheritance? Using the OOP*(Object-Oriented Programming)* concepts, let’s create a Car class that extends all behavior of the Vehicle class.

To do it, you just need to use the keyword extends to set who will be the parent class of this current class. In the child class constructor, you can use the super() method to call the parent class constructor when the current class is instantiated. See this example:

class Car extends Vehicle {
    constructor(name, brand) {
        super(name);
        this.brand = brand;
    }
}


There is no new way to instantiate a class because it follows the same way you instantiate prototype objects too, so nothing is changed in this code below:

let car = new Car("A3", "Audi");
car.drive();

7. Default arguments

Default arguments are a very old feature, largely used in other languages like Ruby, Python, PHP, Java, and others. Basically, it sets a default value for function arguments when these arguments do not have a value during a function invocation. In ES5 it was very normal to do this:

function Person(name, age) {
    this.name = name || " John";
    this.age = age || 25;
}


It was very common to use the OR operator to simulate default values for these arguments. Now you can write less complex code using the default arguments:

function Person(name = "John", age = 25) {
    this.name = name;
    this.age = age;
}

8. Object destructuring assignment

The shorthand value feature allows you to write less code when an object key and variable has the same name, for example:

// Creating a const name from this.obj.name
const {
    name
} = this.obj;
// This is the same as writing: const name = this.obj.name;


You can apply destructuring when you create a new object as well:

const name = "John Connor";
const obj = {
        name
    } // This is the same of write: obj = { name: name }

Final Thoughts

In this post, you learned a little bit about some useful features from ES6 (ECMAScript 6).

Today, not all features are compatible with the main browsers, even the latest version of Node.js still isn’t. To solve this problem, you can use Babel which falls back all main ES6 features to compatible ES5 for old browsers and Node.js too by transpiling the code.

Moreover, if you want to learn more about new JavaScript features and how to use Babel to be able to run your application everywhere check out our post about it.

Creating Modules in JavaScript with ES7 and Babel

Last year, the new version of JavaScript gave us a lot of new goodies.

Amongst those was syntax for importing and exporting of modules which finally codified “the only way” to do modules in JavaScript. Or well, eventually. Another nice thing is that it’s specced in such a way that you can statically analyze the whole module dependency tree. Pretty awesome.

Let’s take a quick look at what they are:

import v from "mod";
import * as obj from "mod";
import {
    x
}
from "mod";
import {
    x as v
}
from "mod";
import "mod";

export var v;
export default function f() {};
export default function() {};
export default 42;
export {
    x
};
export {
    x as v
};
export {
    x
}
from "mod";
export {
    x as v
}
from "mod";
export * from "mod";


So basically you can import the main value of a module (the “default”), or a specific property from explicit exports, a combination of this, or everything.

In symmetry, you can export one value for the module as the default, or an object with multiple properties. You can also export these properties one by one. I’ll leave the preferred style to the style guides.

For ES7 there are some small additions proposed to extend this syntax.

export * as ns from "mod";
export v from "mod";


Nothing shocking, but when can we use this? Well. There’s no time like the present.

As with many syntactical features from ES6, you can use a tool called Babel to translate them back to ES5 as long as support for them doesn’t cover your runtime targets. Then once your targets do support them out of the box you can tell Babel not to translate them anymore.

Let’s take a look at the setup required for this. We’ll do this on Node.js and NPM. Let’s try to execute this file;

src/letter_keys.js

// you would have a constant for each key
// (I would normally uppercase all constants)
const a = 119;
const d = 100;
const s = 115;
const w = 119;

// you would export all keys here
// note: you can't say `w: 119` here. It just isn't valid.
// This destructures to `w: w, a: a, ...`
export {
    w,
    a,
    d,
    s,
}


src/arrow_keys.js

const UP = 38;
const RIGHT = 39;
const DOWN = 40;
const LEFT = 37;

export {
    UP,
    RIGHT,
    DOWN,
    LEFT,
}


src/move.js

export {
    a, w, s, d
}
from './letter_keys';
export * as ARROWS from './arrow_keys';


The idea is that there is a main index.js file that exports stuff from internal modules. It assumes these keys are exported from the other files. The example is convoluted but that’s not very relevant.

src/index.js

import * as keys from './move';
console.log(keys);


This would be part of a project that depends on this module and it should print out the awsd keys as well as the arrows object. Let’s get crackin’ with npm first. Create the repo dir and initialize it.

~$ mkdir foo
    ~$ cd foo~/foo$ mkdir src#
put src files above in ~/foo/src~/foo$ npm init -yes~/foo$ npm install babel-cli babel-preset-es2015 babel-preset-stage-1 -D


This may take a minute. As you may have already guessed, babel-cli allows us to run Babel (6) from the command line and the babel-preset-stage-1 package contains the relevant ES7 module translation stuff (at the time of writing…).

The -yes flag will cause npm to create a default package.json without asking questions. The -D flag is short for –save-dev which adds the packages under the devDependency entry in package.json for you. We add the presets to the default babel configuration file:


.babelrc

{
    "presets": ["es2015", "stage-1"]
}


If this works for you, that’s awesome, hello future! But these examples wouldn’t run in ES6, let alone Node.js at the time of writing. With these translation steps it can be executed anyway.

There should now also be a near-empty package.json file, which contains those three dev dependencies we added. Let’s add a script to that package.json to do our translation:

  ...
  "scripts": {
      "test": "echo "
      Error: no test specified " && exit 1",
      "translate": "node_modules/babel-cli/bin/babel-node.js src/index.js"
  },
  ...


(Only added the “translate” line and the comma behind the “test” line).

The translated script is a build step. The final package.json file contents as used for this post (with fixed versions) can be found at the end of this article. Now all that is left is to call npm run translate to translate and run the code.

 ~/foo$ npm run translate --silent

{
    A: [Getter],
    W: [Getter],
    S: [Getter],
    D: [Getter],
    ARROWS: {
        UP: 38,
        RIGHT: 39,
        DOWN: 40,
        LEFT: 37
    }
}


Hurray! Now for bonus points, we can use Jscrambler to mangle that a little further. We can pass on the Babel-translated code, so why not?

~/foo$ npm install jscrambler -D


Our (final) package.json now looks like this:

package.json

{
    "name": "foo",
    "version": "1.0.0",
    "description": "",
    "main": "index.js",
    "scripts": {
        "test": "echo "
        Error: no test specified " && exit 1",
        "translate": "node_modules/babel-cli/bin/babel-node.js src/index.js"
    },
    "keywords": [],
    "author": "Your Name <[email protected]> (http://localhost/)",
    "license": "ISC",
    "devDependencies": {
        "babel-cli": "6.6.5",
        "babel-preset-es2015": "6.6.0",
        "babel-preset-stage-1": "6.5.0",
        "jscrambler": "0.7.5"
    }
}


Set up the config like you normally do (using Node.js requires a pro account), here’s the file I used (If you want to know more about how to set this file let this serve as an example and npm for further documentation:

.jscramblerrc

{
    "keys": {
        "accessKey": "See https://jscrambler.com/en/account/api_access",
        "secretKey": "See https://jscrambler.com/en/account/api_access"
    },
    "params": {
        "constant_folding": "%DEFAULT%",
        "dead_code": "%DEFAULT%",
        "dead_code_elimination": "%DEFAULT%",
        "dictionary_compression": "%DEFAULT%",
        "dot_notation_elimination": "%DEFAULT%",
        "function_outlining": "%DEFAULT%",
        "function-reorder": "%DEFAULT%",
        "literal_duplicates": "%DEFAULT%",
        "literal_hooking": "2;8",
        "member_enumeration": "%DEFAULT%",
        "mode": "nodejs",
        "rename_local": "%DEFAULT%",
        "string_splitting": "0.3",
        "whitespace": "%DEFAULT%"
    }
}


We’ll use a script to wrap it all together. This script will translate the original files with Babel, output them to /build folder, then have Jscrambler mangle them and put the result in /dist folder where we can run it as we normally would without using ES7 features.

run.sh

#!/bin/sh

echo "Babelifying src/*.js"
node_modules / babel - cli / bin / babel.js - d build src
    /*.js
    echo "Scrambling build/*.js"
    node_modules/jscrambler/bin/jscrambler -o dist build/src/**
    echo "Clean up artifacts"
    mv dist/build/src/* dist/
    rmdir dist/build/src
    rmdir dist/build
    echo "Done! See dist/scrambled.js"
    echo "Running:"
    node dist/index.js*/


Make it runnable:

chmod + x run.sh


And… run it!

~/foo$ ./run.sh
Babelifying src
/*.js
src/arrow_keys.js -> build/src/arrow_keys.js
src/index.js -> build/src/index.js
src/letter_keys.js -> build/src/letter_keys.js
src/move.js -> build/src/move.js
Scrambling build/*.js
Clean up artifacts
Done! See dist/ for your scrambled files
Running:
{ a: [Getter],
  w: [Getter],
  s: [Getter],
  d: [Getter],
  ARROWS: { UP: 38, RIGHT: 39, DOWN: 40, LEFT: 37 } }*/

Conclusion

You can investigate the results in the /dist folder yourself. It’ll be a far cry from the original source since it has been protected with Jscrambler but still runs.

And there you go, have fun working in ES7!

Setting Up 5 Useful Middlewares For An Express API

Express API: a guide with tips and tricks to improve the security and performance of a RESTful API. We will create an Express API with only one endpoint to simplify our example. To start, let’s set up our project.

  • Open the terminal and type the following command:

mkdir my - api
cd my - api
npm init

The npm init shows a quick quiz to set up some descriptions and generate the package.json file. It is the main file we will use to install some modules for our project. Feel free to answer each question in your way.

  • Let’s now install the Express framework running the following command

npm install express--save
  • Now we have the Express installed, let’s write our small and simple API code and start creating the index.js

var express = require("express");
var app = express();

app.get("/", function(req, res) {
    res.json({
        status: "My API is alive!"
    });
});

app.listen(3000, function() {
    console.log("My API is running...");
});

module.exports = app;
  • To test if everything is ok, type the following command

node index.js


Done that, open the browser at the address: http://localhost:3000/. Now, we have a small and functional API to explore in the sections below some useful middleware to improve the application.

Introduction to CORS

CORS (Cross-origin resource sharing) is a relevant HTTP mechanism. It is responsible for allowing or not asynchronous requests from other domains.

CORS, in practice, are only the HTTP headers included on the server side. Those headers inform which domain can consume the API, which HTTP methods are allowed, and which endpoints can be shared publicly with applications from other domains.

Enabling CORS in the API

As we are developing an API that will serve data for any kind of client-side applications, we need to enable CORS’s middleware for the endpoints to become public. Meaning that some clients can make requests on our API.

  • To enable it, let’s install and use the module Cors

npm install cors--save
  • Then, to initiate it, add the middleware app.use(cors())

var express = require("express");
var cors = require("cors");
var app = express();

app.use(cors());

app.get("/", function(req, res) {
    res.json({
        status: "My API is alive!"
    });
});

app.listen(3000, function() {
    console.log("My API is running...");
});

module.exports = app;


When using only the function cors() the middleware will release full access to our API. However, it is advisable to control which client domains can have access which methods they can use, and which headers must be required for the clients to inform in the request.

In our case let’s set up only three attributes: origin (allowed domains), methods (allowed methods), and allowedHeaders (requested headers).

  • So, let’s add some parameters inside app.use(cors())

var express = require("express");
var cors = require("cors");
var app = express();

app.use(cors({
    origin: ["http://localhost:3001"],
    methods: ["GET", "POST"],
    allowedHeaders: ["Content-Type", "Authorization"]
}));

app.get("/", function(req, res) {
    res.json({
        status: "My API is alive!"
    });
});

app.listen(3000, function() {
    console.log("My API is running...");
});

module.exports = app;


Now we have an API that will only allow client apps from the address: http://localhost:3001/. This client application can only request via GET or POST methods and use the headers: Content-Type and Authorization.

A bit more about CORS

For study purposes about CORS, to understand its headers, and most importantly to learn how to customize the rule for your API, I recommend you to read the full documentation.

Generating logs

We are going to set up our application to report and generate log files about the user’s requests. To do this let’s use the module morgan which is a middleware for generating request logs in the server.

  • To install it type the following command

npm install morgan--save
  • After that let’s include in the top of the middlewares the function app.Use (morgan(“common”)) to log all requests

var express = require("express");
var cors = require("cors");
var morgan = require("morgan");
var app = express();

app.use(morgan("common"));
app.use(cors({
    origin: ["http://localhost:3001"],
    methods: ["GET", "POST"],
    allowedHeaders: ["Content-Type", "Authorization"]
}));

app.get("/", function(req, res) {
    res.json({
        status: "My API is alive!"
    });
});

app.listen(3000, function() {
    console.log("My API is running...");
});

module.exports = app;


To test the log generation, restart the server and access multiple times any API address such as http://localhost:3000/.

  • After making some requests, take a look at the terminal.

Configuring parallel processing using cluster module

Node.js does not work with multi-threads. This is something that in the opinion of some developers is considered as a negative aspect and that causes a lack of interest in learning and in taking it seriously. However, despite being single-thread, it’s possible to prepare it to work at least with parallel processing. To do this, you can use the native module called cluster.

It basically instantiates new processes of an application working in a distributed way and this module takes care to share the same port network between the active clusters.

The number of processes to be created it’s up to us to decide, but a good practice is to instantiate a number of processes based on the amount of server processor cores or also a relative amount to core x processors.

For example, if I have a single processor of eight cores I can instantiate eight processes creating a network of eight clusters. But if there are four processors of eight cores each, you can create a network of thirty-two clusters in action.

To make sure the clusters work in a distributed and organized way, it is necessary that a parent process exists (also known as cluster master).

Because it is responsible for balancing the parallel processing among the other clusters, distributing this load to the other processes, called child process (or cluster slave). It is very easy to implement this technique on Node.js since all processing distribution is performed as an abstraction to the developer.

Another advantage is that clusters are independent. That is, in case a cluster goes down, the others will keep working. However, it is necessary to manage the instances and the shutdown of clusters manually to ensure the return of the cluster that went down.

Based on these concepts, we are going to apply in practice the implementation of clusters.

  • Create in the root directory the file clusters.js. See the code below:

var cluster = require("cluster");
var os = require("os");

const CPUS = os.cpus();
if (cluster.isMaster) {
    CPUS.forEach(function() {
        cluster.fork()
    });
    cluster.on("listening", function(worker) {
        console.log("Cluster %d connected", worker.process.pid);
    });
    cluster.on("disconnect", function(worker) {
        console.log("Cluster %d disconnected", worker.process.pid);
    });
    cluster.on("exit", function(worker) {
        console.log("Cluster %d is dead", worker.process.pid);
        // Ensuring a new cluster will start if an old one dies
        cluster.fork();
    });
} else {
    require("./index.js");
}
  • This time, to run the server, you must run the command

node clusters.js

After executing this command, the application will run distributed into the clusters and to make sure it’s working you will see the message “My API is running…” more than once in the terminal.

Basically, we have to load the module cluster and verify if it is the master cluster via cluster.isMaster variable.

Once you’ve confirmed that the cluster is master a loop will be iterated based on the total of processing cores (CPUs) forking new slave clusters inside the CPUS.forEach(function() { cluster.fork() }) function.

When a new process is created (in this case a child process) it does not fit in the conditional if(cluster.isMaster). So, the application server is started via require(“./index.js”) for this child process.

Also, some events created by the cluster master are included. In the last example of code, we only used the main events listed below:

  • listening: this happens when a cluster is listening to a port. In this case, our application is listening to the port 3000;

  • disconnect: happens when a cluster is disconnected from the cluster’s network;

  • exit: occurs when a cluster is closed in the OS.


Developing clusters:
A lot of things can be explored about developing clusters on Node.js. Here we only applied a little bit which was enough to run parallel processing. But in case you have to implement more detailed clusters, I recommend you read the documentation

Compacting requests using GZIP middleware

To make requests lighter and load faster, let’s enable another middleware which is going to be responsible for compacting the JSON responses and also the static files which your application will serve to GZIP format, a compatible format to several browsers. We will do this simple but important refactoring just using the module compression.

  • Let’s install it

npm install compression--save
  • After that, we have to include its middleware in the index.js file

var express = require("express");
var cors = require("cors");
var morgan = require("morgan");
var compression = require("compression");
var app = express();

app.use(morgan("common"));
app.use(cors({
    origin: ["http://localhost:3001"],
    methods: ["GET", "POST"],
    allowedHeaders: ["Content-Type", "Authorization"]
}));
app.use(compression());

app.get("/", function(req, res) {
    res.json({
        status: "My API is alive!"
    });
});

app.listen(3000, function() {
    console.log("My API is running...");
});

module.exports = app;

Installing SSL support to use HTTPS

Nowadays, it is required to build a safe application that has a safe connection between the server and the client. To do this, many applications buy and use security certificates to ensure an SSL (Secure Sockets Layer) connection via the HTTPS protocol.

To implement an HTTPS protocol connection, it is necessary to buy a digital certificate for production’s environment usage.

Assuming you have one, put two files (one file uses .key extension and the other is a .cert file) in the project’s root. After that, let’s use the native HTTP module to allow our server to start using HTTPS protocol and the fs module to open and read the certificate files: my-api.key and my-api.cert to be used as credential parameters to start our server in HTTPS mode.

To do this, we are going to replace the function app.listen() with https.createServer(credentials, app).listen() function.

  • Take a look at the code below for our API

var express = require("express");
var cors = require("cors");
var morgan = require("morgan");
var compression = require("compression");
var fs = require("fs");
var https = require("https");
var app = express();

app.use(morgan("common"));
app.use(cors({
    origin: ["http://localhost:3001"],
    methods: ["GET", "POST"],
    allowedHeaders: ["Content-Type", "Authorization"]
}));
app.use(compression());

app.get("/", function(req, res) {
    res.json({
        status: "My API is alive!"
    });
});

var credentials = {
    key: fs.readFileSync("my-api.key", "utf8"),
    cert: fs.readFileSync("my-api.cert", "utf8")
};
https
    .createServer(credentials, app)
    .listen(3000, function() {
        console.log("My API is running...");
    });

module.exports = app;

Congratulations! Now your application is running in a safe protocol, ensuring that the data won’t be intercepted. Note that in a real project, this kind of implementation requires a valid digital certificate, so don’t forget to buy one if you put a serious API in a production environment.

To test these changes, just restart the server and go to https://localhost:3000/

Armoring the API with Helmet

Finishing the development of our API, let’s include a very important module, which is a security middleware that handles several kinds of attacks in the HTTP/HTTPS protocols.

This module is called helmet which is a set of nine internal middlewares, responsible for treating the following HTTP settings:

  • Configures the Content Security Policy;

  • Removes the header X-Powered-By that informs the name and the version of a server;

  • Configures rules for HTTP Public Key Pinning;

  • Configures rules for HTTP Strict Transport Security;

  • Treats the header X-Download-Options for Internet Explorer 8+;

  • Disables the client-side caching;

  • Prevents sniffing attacks on the client Mime Type;

  • Prevents ClickJacking attacks;

  • Protects against XSS (Cross-Site Scripting) attacks.


To sum up, even if you do not understand a lot about HTTP security, you can use helmet modules because, in addition to having a simple interface, it will armor your web application against many types of attacks.

  • To install it, run the command

npm install helmet--save


To ensure maximum security on our API, we are going to use all middleware provided by the helmet module which can easily be included via the function app.Use (helmet()):

var express = require("express");
var cors = require("cors");
var morgan = require("morgan");
var compression = require("compression");
var fs = require("fs");
var https = require("https");
var helmet = require("helmet");
var app = express();

app.use(morgan("common"));
app.use(helmet());
app.use(cors({
    origin: ["http://localhost:3001"],
    methods: ["GET", "POST"],
    allowedHeaders: ["Content-Type", "Authorization"]
}));
app.use(compression());

app.get("/", function(req, res) {
    res.json({
        status: "My API is alive!"
    });
});

var credentials = {
    key: fs.readFileSync("my-api.key", "utf8"),
    cert: fs.readFileSync("my-api.cert", "utf8")
};
https
    .createServer(credentials, app)
    .listen(3000, function() {
        console.log("My API is running...");
    });

module.exports = app;

Now, restart your application and go to https://localhost:3000/

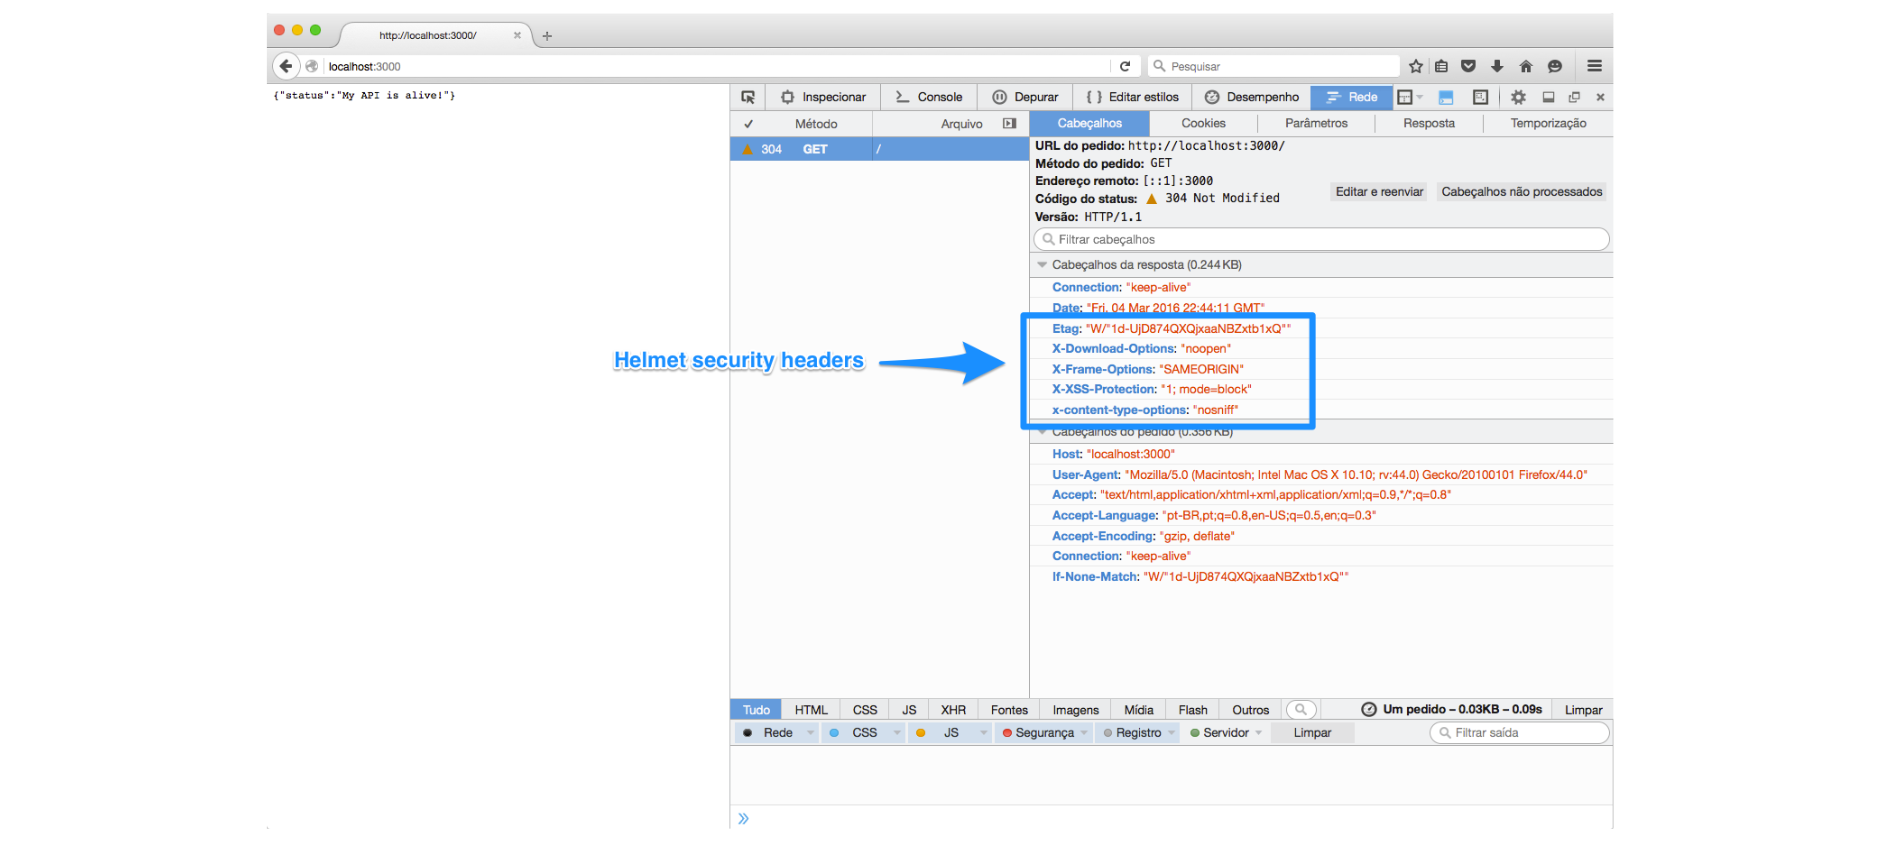
Open the browser console and in the Networks menu, you can view in detail the GET/request data. There you’ll see new items included in the header, something similar to this image:
security-headers-example-helmet

Conclusion

Now you have an API that uses some of the best security practices that will protect you against some common attacks. All data will be processed in parallel using clusters and the delivery of the data will be optimized to be served using GZIP compression.

CORS will enable restricted web clients and all requests will be logged via the Morgan module.

Feel free to use this small API as a reference for your new Express project.

Building an Expense Application with Electron and React

Learn how to develop a small expense application on top of Electron and React. JavaScript is everywhere these days. You can even use it to develop desktop applications.

Platforms like NW.js (formerly node-webkit) and Electron (formerly known as Atom Shell) enable this. In this post, I will show you how to develop a small expense-tracking application on top of Electron and React.

Getting Started with Electron


Before going further, make sure you have a fresh version of Node.js and Git installed. We can get a rough Electron application running really quickly:

git clone https: //github.com/chentsulin/electron-react-boilerplate.git expense-app
    cd expense - app
npm install


After these steps we’ll need to run the following commands in two separate terminals:

npm run hot - server
npm run start - hot

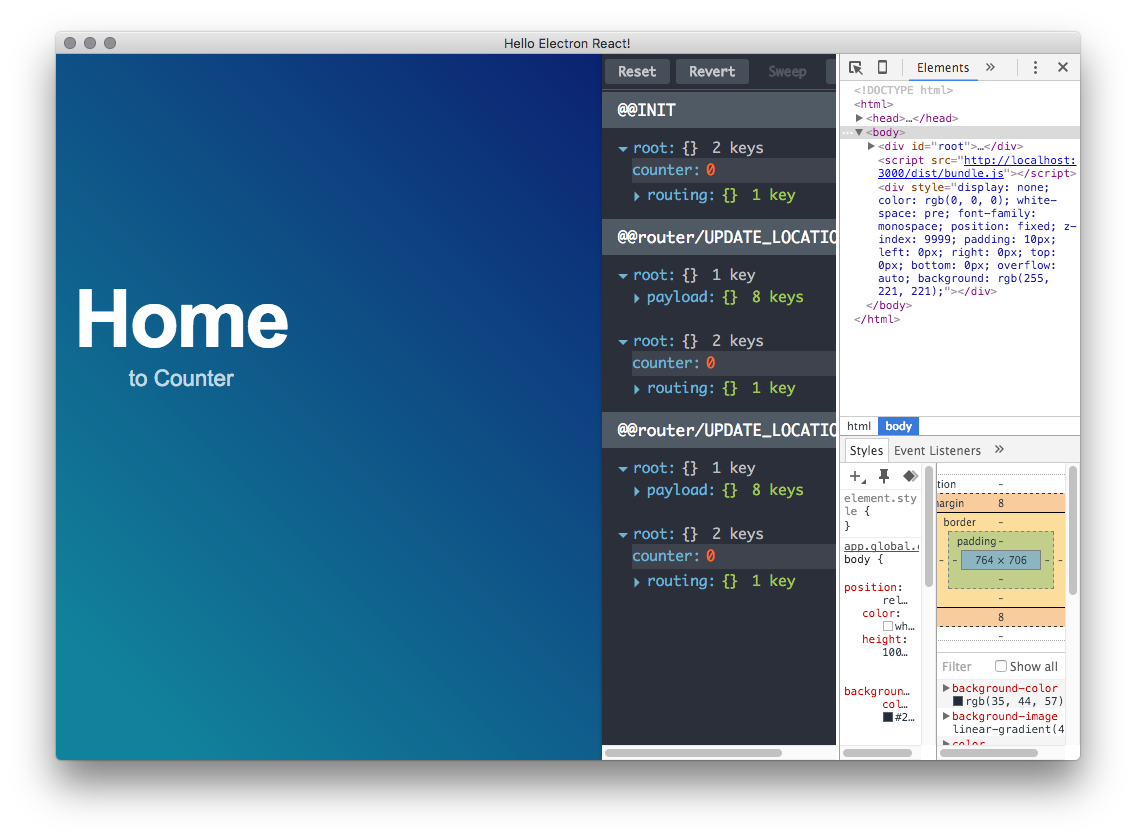
Once you have run the latter, you should see something like this:

step_01As you might guess by now, we actually have a browser running now. To be exact, it’s a version of Chromium. Compared to normal web development, though, we have more power at our disposal.
We can access the file system or use desktop notifications for example. We can even bundle our application and push it to the Mac App Store should we want to.

Expense Application Design

To track expenses, we are going to need three basic concepts:

  • Income – A list of income names and the amount of each.

  • Expense – A list of expense names and the cost per each.

  • Total – The sum of losses subtracted from the sum of profits.


In terms of user interface, we are going to need some way to enter incomes and expenses. In addition, we need to visualize them, and total, them somehow.

The first problem can be solved through a dropdown (income/expense) and an input. When you hit enter, it should add the value to the chosen collection.

The latter can be solved through list-based visualization (name, amount) and an element to display the calculated total.

Implementing the Application


To get started with the implementation, we could model a control for adding incomes and expenses. For the sake of simplicity, the implementation will track just the type of value and the amount/cost.

app/components/Home.js

import React, {
    Component
}
from 'react';
import styles from './Home.css';

export default class Home extends Component {
    render() {
        return ( 
      <div>
        <div className = {styles.container} >
          <div className = {styles.addValue} >
           <select>
            <option value ="income"> Income < /option> 
            < option value = "expense" > Expense < /option> 
           </select> 
          <input type = "number" min = "0" / >
          </div> < button type = "button" > Add < /button> 
        </div> 
      </div>);
    }
}


app/components/Home.css

.container {
    position: absolute;
    top: 30 % ;
    left: 10 px;
    text - align: center;
}

.container h2 {
    font - size: 5 rem;
}

.container a {
    font - size: 1.4 rem;
}

.addValue {
    display: inline;
}


After updating the code, you should see this:

step_02We still need to capture the user input somehow and render the values.


Even though the boilerplate provides Redux, I am going to keep it simple and use React’s state instead. Due to this, you will need to force refresh after the next addition! So trigger either cmd-r or ctrl-r at Electron window after changing the code as follows.

import React, {
    Component
}
from 'react';
import styles from './Home.css';

export default class Home extends Component {
    constructor(props) {
        super(props);

        this.state = {
            income: [],
            expense: []
        };

        this.addValue = this.addValue.bind(this);
    }
    render() {
        const sum = (a, b) => a + b;
        const income = this.state.income;
        const expense = this.state.expense;
        const total = income.reduce(sum, 0) - expense.reduce(sum, 0);

        return ( 
    <div>
    <div className={styles.container}>
        <div className={styles.addValue}>
            <select ref="valueType">
                <option value="income"> Income</option>
                <option value="expense"> Expense
                </option>
            </select>
            <input type="number" min="0" ref="value" />
        </div>
        <button type="button" onClick={this.addValue}> Add</button>
    </div>

    <div> Income
    </div>
    <Values values={this.state.income} />

    <div> Expense
    </div>
    <Values values={this.state.expense} />

    <div> Total: { total }
    </div>
</div>
        );
    }
    addValue() {
        const valueType = this.refs.valueType.value;

        // It would be a good idea to validate the value here!
        const value = parseInt(this.refs.value.value, 10);

        this.setState({
            [valueType]: this.state[valueType].concat(value)
        });
    }
}

const Values = ({
    values
}) => {
    return ( < ul > {
        values.map((value, i) =>
            < li key = {
                `value-${i}`
            } > {
                value
            } < /li>
        )
    } < /ul>);
}


There is actually a lot going on here. If you haven’t seen React code before, a lot of it might seem alien. We are leveraging a couple of core concepts of React here:

  • this.state – This refers to the internal state of the component in question. An interesting alternative would be to push it out of the component altogether, but that’s beyond the scope of this post.

  • render() – That’s where we can decide how to display the data. We derive the value of total dynamically in addition to rendering our values through a custom component known as Values. Values rely on a function-based component definition and it’s literally just render() by itself.

  • const valueType = this.refs.valueType.value; – We extract the value of our select element through a React ref. Refs give us direct access to the DOM and provide an escape hatch of some sort. This is known as the uncontrolled way to treat form fields. Alternatively, we could capture the state through event handlers and control the value within React. Now our implementation is tied to DOM and changing the implementation would break this dependency.

  • {values.map((value, i) => … } – The brace syntax allows us to mix JavaScript with JSX. JSX syntax itself is a light syntactical wrapper on top of React’s JavaScript API. We are relying on it heavily in this example.

  • <li key={value-${i}}>{value}</li> – To help React tell different list items apart, we are setting the key here. Setting it based on an array index like this isn’t the ideal solution, but it’s enough for this demo. It would be a better idea to generate unique IDs per each in our data model.


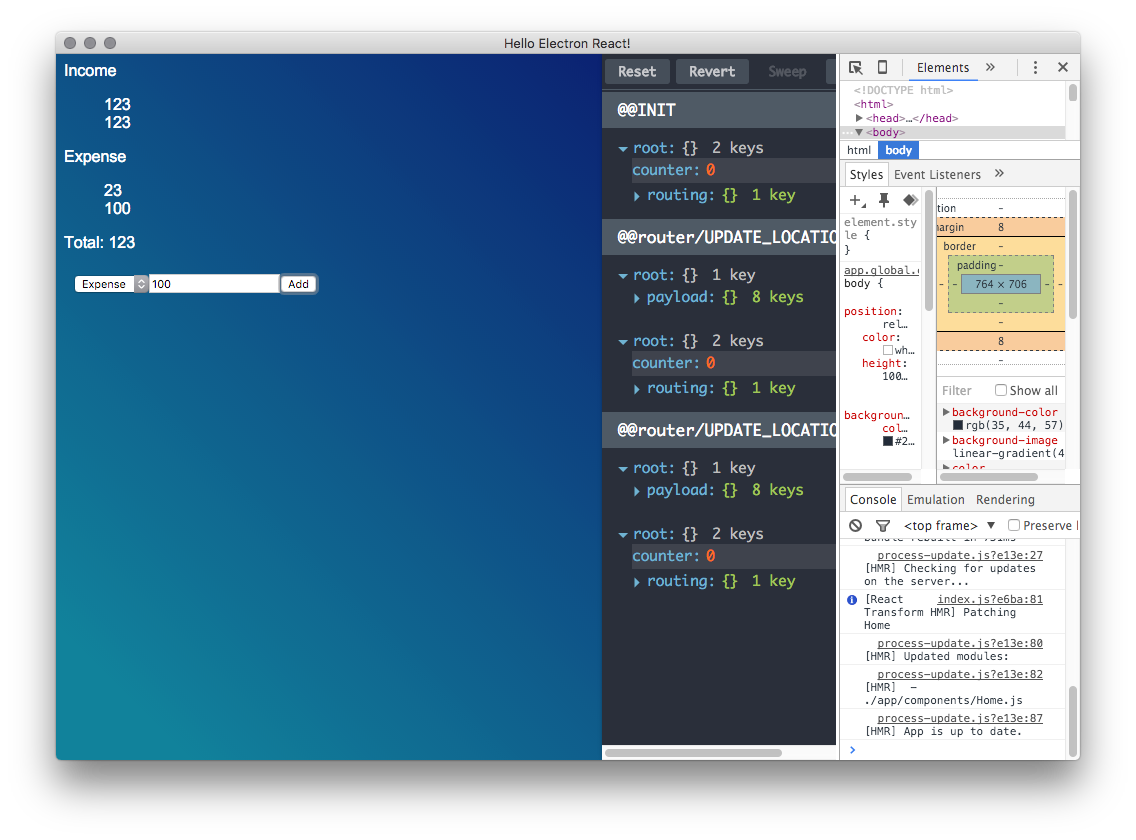
Assuming everything went fine, you should see something like this after using the application for a while:


Conclusion


The current application is somewhat simple when it comes to functionality and it’s far from a production-grade one. It would be fun to add more features to it:

  • Consider adding an input for entering income/expense name. Doing this change would mean that you would have to change the data model and start operating using arrays of objects instead of arrays of numbers.

  • The outlook of the application could be improved somewhat as well.

  • You could look into leveraging Redux over the React state.

  • Explore Electron’s capabilities further and save the data to the file system. You could also play around with notifications and show them when some limit is reached for instance.


To learn more about the topic, consider checking out my book, SurviveJS. It’s freely available and delves far deeper into the topic.

We’re Now AppSec Official Supporters

If you work in AppSec, you already know about the paramount importance of the work being developed by the OWASP. Through the years we have benefited in countless ways, through education, tools, and projects or simply by having the opportunity of working or interacting with some of the most brilliant and like-minded people working in AppSec.

In the last few years, I’ve attended a few OWASP events and even gave a talk in one of them. I’ve certainly obtained more than what I gave. Jscrambler has benefited a lot from OWASP. So this year we decided to become a corporate sponsor of OWASP and support the great work that is being done by this community.

Then there’s the wider picture. By supporting OWASP we also aim to increase the overall awareness on security-related subjects and in particular on AppSec, sometimes regarded as a lesser child in the security space. At Jscrambler we are certain that JavaScript already is and will continue to be the main language for the present and future of applications. We cannot stress enough the importance of tackling the security challenges that JavaScript-based applications have.

OWASP AppSec Europe

We are also glad to announce that we will be present at the OWASP AppSec Europe 2016.

The annual conference will take place in Rome, Italy, starting on June 27th and ending on the 1st of July 2016. As an official sponsor, we will have a few of our guys there and we invite you to visit our booth. We have new stuff that we haven’t released yet that we are demo’ing there that we believe you’ll find pretty neat.

The Envato Market and How to Boost IP Security on Your Digital Products

If you sell your digital products on Envato Market and want to prevent your product from being stolen or modified, explore the use case shared by Bruno Mota that illustrates how Jscrambler can help protect your product.

It would be a massive understatement to say that making a living as a freelance developer is challenging. There are seemingly endless hours generating an idea that you hope will turn a profit. Then, there are the countless sacrifices as you flush that idea out into a fully functional end product. Sometimes, your product is interesting, and the hard work may be rewarding.

Of course, that says nothing of what comes after marketing. In some ways, that may prove to be more of a challenge than the development phase. First, people need to lay their eyeballs on it. And how do you deliver it? You need a secure way to provide the customers with a way to securely download and transmit payments, meaning you need a secure e-commerce platform.

I am the creator of Plusquare, and I have been selling and distributing my themes and plugins through Envato for more than four years.

The Envato Market can be a tremendous help because it allows developers to have a way to share their digital masterpieces with the world on an existing infrastructure.

Envato Market: What’s in it for You?


While the decision is ultimately up to you, developers who do choose to sell their digital products on the Envato Market can reap a few significant benefits, just like I can say I did.

Exposure

Getting enough people to see your product in the first place is a pretty big task. By using Envato, developers can piggyback on the fact that it is already a go-to place to purchase digital products for some 1.5 million customers. So yeah, there’s a pretty good chance that more than a few people will see what you have to offer — and that’s all without spending a single dime on advertising.

Infrastructure

Another huge benefit is that the infrastructure is already there. They’ve done the marketing. They’ve established the system. They handle secure downloads and payments. All you need to do is focus on your passion and on getting your product approved, and they take care of the rest.

Quality

Opinions and feelings about the review process are bound to vary wildly, especially for those who have received negative feedback or for those who didn’t get something approved. But from an objective standpoint, it does create a win-win scenario both for Envato and for the developers.

The review process is a way to weed out apps, HTML templates, WordPress themes, and so on that don’t cut, and products that aren’t up to their quality standards. They are a business and do have a reputation for providing high-quality products to maintain.

While negative feedback can certainly be a major disappointment to developers, it can also be viewed as a chance to improve — improve code quality, improve design or what have you. The net result is that when things finally do go through, Envato Market maintains its reputation, customers are satisfied and developers have products that are more likely to sell. Win-win.


Although the benefits are certainly compelling, there are still some things that can be done regarding security. Envato does go to lengths to ensure that your work isn’t violating copyright protections. This, of course, minimizes the liabilities for both parties, and it also keeps things orderly amongst the various developers on the site.

They also have extensive documentation on what intellectual property rights are and what you can do if you discover that your rights are being infringed, such as assistance with issuing DCMA takedown notices. They even have policies for handling piracy where they find it, though they lean toward issues that affect the community rather than single instances of infringement.

What is still not being done, however, is taking measures towards the prevention of copyright infringement, especially when it comes to the demos that we as authors make available on the Envato market. For the most part, that’s left up to you, the developer.


How to prevent code theft

When I first started developing plugins and themes, after putting weeks or even months of effort into building solid JavaScript scripts for the Envato marketplace, it was demotivating seeing my work being given away for free on piracy sites. This would happen because it is deadly simple to extract JavaScript files from the item preview since it is run on the client side.


This of course hurts the sales, so I searched for a way to prevent this from happening.

The code still needed to run perfectly, but only in the item preview (domain lock) and unreadable (obfuscated and protected) to the point that it would not pay off for a user to snatch my work.

I searched for solutions over the web and found something that met all my requirements, a JavaScript code protection service called Jscrambler. It provided a lot of different source code transformations (i.e., function outlining, and string obfuscation, among others) but also several code locks and self-defending features: anti-debugging and anti-tampering. It seemed the most resilient as many of the features they offered could not be found elsewhere.

It also proved to have a great helpdesk, the support people helped me figure out what to use to secure my code.

Of course, one can argue that anything can be reverse-engineered.

No JavaScript obfuscation or protection can say it makes it impossible to reverse a piece of code. Jscrambler just makes it much harder than anyone else.

Other solutions in the market do not protect your code so they can be easily reversed in minutes and that’s why some people think it’s not worth investing in JavaScript security. However, it’s like getting the best lock for your house, would you not use one (ideally the strongest) just because it can be broken?

An important note is that Envato Market only allows demos to be protected. The real deal has to be in the original, un-obfuscated, unprotected form, which only seems fair. Developers who legitimately purchase the products should be able to modify them to suit their needs. But it makes sense that you protect your demos so that people won’t get your code without paying.

So I started obfuscating my item previews’ code and reported pirate links with DMCA reports so they were taken down, and the results were obvious.

Once in a while I still search for pirate links but can’t find any for my items anymore, thus I have seen my sales increase as well. In the end, and after some time using it, I found it to be a great way to narrow down the percentage of incidences of theft of the code on my demos.

On a side note, this process would be undoubtedly easier if Envato had an automated way of protecting the preview files, or at least recommend it, since I believe there are a lot of authors losing sales every day due to this issue.


Conclusion

Envato Market is a great resource both for those looking for a single place to market their products as well as those looking to enhance their already existing marketing efforts.

When it comes to security, if you’re already selling on Envato Market and would like to make sure no one copies or changes the code on your demos, it is my recommendation that you look for a way to protect them.

As far as my experience goes, Jscrambler seems to be the most resilient solution to achieve this so I strongly recommend all fellow authors to give it a try and see if it can help them too.

Best of luck for your Envato business!