


Category: Client-Side Security

Security Audit for Dummies

A security audit is the final and most relevant step in implementing security defenses.

When you build your service, you must remember to make it as safe as possible. The bigger it is, the more urgent its security is.

The first step is to run a risk analysis to find possible holes and find out what type of attacks you can expect.
The second step is to develop a proper policy to defend against them.

Finally, you undertake a security audit to check if it works.

What type of tests can we use?

Penetration Testing

We can use penetration testing (informally pen test) to check for possible attacks.

They are controlled attacks that look for security weaknesses. Their goal is to check our security system against known possible threats and return the report (what do we need to improve?).

We can identify which defenses are effective and which ones (if any) are defeated and need to be fixed.

A penetration test target may be either a white box (which provides background and system information) or a black box (which provides only basic information or no information except the company name).

We’ve compiled some Websites and Tools that can help you learn more about Penetration Testing:

Distros

Kali Linux
Parrot Security OS
PentestBox Windows

Tools

Metasploit
w3af
Wireshark

Tutorials and Training

Kali Tutorials – Pen Testing for Beginners
Offensive Security Online Training

Blogs

Sans Pen Testing Blog
Offensive Security Blog
Pentest Mag Blog

Risk-based testing (RBT)

In this kind of test, we prioritize and emphasize the most significant risks to us.

With this knowledge, we can choose and prepare proper tests during test execution.

We can call “risk” to an undesirable outcome we aim to prevent. There is not always enough time to efficiently check all security areas, so risk-based testing concerning the functionality of the systems with the highest impact and probability of failure can be the best choice.

We can summarize the whole idea of Risk-based testing in a few points:

  • It starts at the early beginning. We try to define the most dangerous threats. With this knowledge, we try to prepare proper plans for testing.

  • As it accompanies us during the development process, it helps reduce the likelihood of defects and create working workarounds (and testing them).

  • Define the most dangerous threats to us and which ones we still have to work on.

  • It measures how well we are doing in reducing the probability of failure. If we know we can’t deal with something, we can search for tools and people to help.

Most common type of attacks

Cross-Site Request Forgery (CSRF)

Cross-Site Request Forgery (CSRF) is a simple attack. It uses two facts.

One, communication between server and client is based on requests.

Two, cookies are sent automatically to the server.

CSRF attack allows an attacker to execute authenticated actions without user knowledge and approval. It depends mainly on forcing the browser to execute malicious requests and using a user logged-in status.

Cross-site Scripting (XSS)

Another type of attack is Cross-site scripting (XSS), in which malicious scripts are injected into theoretically trusted websites. It could be JavaScript, it could be, for instance, VBScript.

The main thing is it may be run in the browser. As a result, an attacker can execute any script he wants. It can be injected very easily using a comments system for example. You post a comment with a JavaScript code and if the server doesn’t do anything about it, it will execute your malicious code as well.

SQL Injection

While XSS works on the client side, SQL Injection uses databases. SQL Injection attack uses the form system to manipulate the data. Let’s say your query looks like this:

DELETE FROM Users WHERE id = '$_GET['id']'


If the attacker changes the proper id to the string like this ‘1’ OR ‘1’=’1′, your query will look like this:

DELETE FROM Users WHERE id = '1' OR '1' = '1'


As a result, it will delete all the users from the table. To understand this better, you can watch a Computerphile video.

Denial of Service (DoS)

The Denial of Service (DoS) is a type of attack that is focused on making a resource unavailable. It uses a mechanism of sending a massive amount of requests to the server making it incapable of returning the result.

It’s a common attack and not so hard to prepare. It’s often hard to defend against it because defining if a request is valid or if it’s an attack is not always so easy. Learn more about DoS:

How to prevent the attacks if you’re not an expert?

Use solid solutions

Don’t try to reinvent the wheel and do everything your way. Before building your application try to find a solid base. Check for secure and popular JavaScript frameworks and IT security frameworks.

They’re often made by experts and their popularity makes them secure. No one is perfect, but if they’re checked every day by their users, the holes and errors are easy to eliminate.

Deciding to stick with your hand-made framework could bring a lot of harm if an attack occurs. You can also use security frameworks to help yourself in security auditing.

Try popular tools

Don’t be afraid of using the captcha mechanism, testing automation tools, and so on. There are many of them on the market.

You could check SoapUI and TestingWhiz.

External professional security team

It’s the most expensive case but surely the best one.

Try to find an expert to back you up in terms of security. It can be really useful. He will always see a lot more than you because he knows more about the threats out there. If you can’t afford an expert for the development process, try to find him after finishing the job.

Make him check security and do a quality security audit.
If the results aren’t perfect repeat the whole process. It’s pointless to carry it and ignore the results. Also, don’t check only for holes.

Check the efficiency of the security-improving solutions.
For instance, if you deploy a strong password-changing policy, make sure there is no way to bypass this function. Let’s say you require changing passwords every week. If you don’t design it well, you could, for instance, give the user the possibility to change it just only to return to the old password after a minute.

Has the password been changed? Yes! But… it won’t do any good.

Try to be as detailed as you can.

Check for everything, not only for the most common type of attacks. Even big names we all have heard of have been the victims of imperfect security systems. Thus, it is certainly not a piece of cake.

Conclusion

Does good security auditing make you completely secure? Not really. They say, your security audit is as good as the auditors, but there aren’t perfect tools and perfect people. However… try to make it as safe as possible.

If you are going for a poor audit, better to not do it at all. Weak security auditing can leave you with a false sense of security that is extremely dangerous for your organization.

So, if you do it (and you should), try to be as effective as you can.

There can be no shortcuts! Use the best tools, hire the best auditors, do the most detailed audits, and don’t try to save some money here! If you save it now, there’s a very high risk of losing it in the future.


An Introduction to Content Security Policy (CSP)

As a JavaScript developer, CSP is a mandatory concept. You know some common vulnerabilities in web applications made possible by the language, most notably, XSS (cross-site scripting) attacks.

At the root of XSS attacks is a simple premise: the malicious code injection into your website or web application.

The first line of defense against XSS usually involves sanitizing user input, particularly anything that is later echoed back to the page. Content Security Policy is a subtly different approach to defending against similar types of attacks. In this article, we’ll look at it in more detail.

Note that CSP is not a replacement for input sanitization, which remains as important as ever. It complements the best practices you’re already (hopefully!) following.

The Basics of CSP

CSP allows you to be explicit about what resources should be trusted. Resources mean scripts — which is what we’re going to focus on in particular in this article — but also things like:

  • stylesheets

  • media (for example, audio and video)

  • fonts

  • form actions

  • frame sources

  • types of objects and plugins


In essence, what CSP provides is a means to “allowlist” the source of these resources.

So we could say, for example, that we wish to allow third-party scripts from our analytics provider, from certain CDNs or social networks — but make clear that anything else is not to be trusted. Let’s look at how to implement CSP in the next section.

Implementing CSP

There are two ways to implement CSP:

  1. Via HTTP headers

  2. Via meta tags in your HTML


Although they’re slightly more complex to set up than meta tags, HTTP headers are the preferred approach. There are numerous ways to accomplish this; for example setting them on your web server, by using middleware, or by setting them programmatically as required, for a per-route basis.

The CSP Headers and Simple CSP packages are just two JS-orientated packages that may help you implement CSP. There are plenty more for your server-side language of choice, so it’s worth doing some research before you start implementing it yourself.

Here’s an example of setting up CSP headers in an Express.js application using the Simple CSP package:

var express = require('express');
var app = express();
var csp = require("simple-csp");

var csp_headers = {
    "default-src": ["'self'", "http://example.com"],
    "connect-src": ["'self'", "http://example.com"],
    "img-src": ["'self'", "data:", "http://example.com"]
};

app.use("/", function(req, res, done) {
    csp.header(csp_headers, res);
    done();
});

// Static files from ./public
app.use("/", express.static("./public"));

app.listen(8888);


You might be wondering what those headers mean; let’s look.

Allowlisting Sources with CSP

You can specify what’s trusted in several ways. For example, you might want to say:

  • Trust only scripts from the same source via HTTPS, as well as from platform.twitter.com.

  • Disallow all inline scripts

  • Only allow images from a particular CDN

  • Disallow frames

  • Only allow fonts from Google Fonts


Let’s look at how to define the source of a resource. Consider the following:

example.com


This will allow resources from example.com to use any scheme (e.g. http, https, data), on any port. You can explicitly define the scheme, for example:

https://example.com


You can also explicitly define a subdomain:

https://cdn.example.com


If you want to be slightly more flexible about protocols you can do this:

*://cdn.example.com


Wildcards can also be used for the leftmost portion of the domain; for example, a subdomain:

https://*.example.com


Note that this will not match example.com

You can also explicitly specify the port:

https://example.com:443


There are also four important constants you can use.

‘self’ is probably the most common. It means that resources from the current host are to be trusted, which is usually going to be the case.

‘none’ is just as it implies; trust nothing. It can be used for a “safety-first” rule-set, or be applied to certain resource types; for example, you could use it to disallow all frame sources.

‘unsafe-inline’ allows potentially unsafe inline JavaScript. As the name implies, this requires caution – we’ll look at inline JavaScript shortly.

‘unsafe-eval’ permits potentially unsafe eval‘ed code. Use it with even more caution!

For all of these constants, you must wrap them in single quotations, as listed.

Once you have your sources defined, you simply append them to a keyword representing the resource type. For scripts, that means using the script-src keyword.

Separate sources with a space, for example:

Content-Security-Policy: script-src 'self'
https://platform.twitter.com https://cdn.example.com


Other resources can be specified using keywords such as connect-src for XHR or web socket connections, style-src, font-src, img-src for styles, fonts and images respectively, child-src for workers and embedded frame contents, and more.

You can specify a default source for all resources using default-src, for example:

default-src 'self'
cdn.example.com

What about Inline JavaScript?

That’s all very well, you might be thinking, but aren’t inline scripts what we should be worrying about when trying to combat XSS?

The short answer is that CSP takes the view that all inline scripts are potentially harmful, thus encouraging you to move inline JS code to a separate file. You can tell CSP to ignore this restriction using unsafe-inline, but there are better ways.

If you still want to execute inline code, CSP still provides two mechanisms for telling the browser what inline code is legitimate.

The first is to use a nonce; that is, a random unguessable string that is used to identify trusted inline code. It should be random, unguessable, and ideally re-generated on each page load.

The first step to using the nonce approach is to attach it to your <script type=”text/javascript”>// <![CDATA[ tags using the nonce attribute, for example:

<script nonce="d9j8g9irjgirjheg9i">
    console.log('This code is trusted!');
    // ]]>
</script>


Then, the same value should be inserted into your CSP header or meta tag, for example:

Content-Security-Policy: script-src 'nonce-d9j8g9irjgirjheg9i'


The second approach is to generate a hash of the inline code, using an encryption mechanism such as SHA. For example:

<script type="text/javascript">
    // <![CDATA[
    alert('Hello, world.');
    // ]]>
</script>


Take the hash of the contents of the <script type=”text/javascript”>// <![CDATA[ tag, and refer to it in your headers:

Content-Security-Policy: script- src 'sha256-qznLcsROx4GACP2dm0UCKCzCG-HiZ1guq6ZZDob_Tng='


Note that the first part of the hash identifies the mechanism used to encode it; in this case, SHA256.

Reporting

Another key feature of the CSP specification is reporting. Indeed, it’s relatively common just to use this feature; that is, as a tool to monitor potential vulnerabilities rather than as a preventative measure, although you can, of course, use both.

What the reporting element does is monitor for violations of the policy, and POSTs a report to the endpoint you specify via the report-uri keyword. Here’s an example:

Content-Security-Policy: ...;
report-uri / csp-report-endpoint;


When a violation occurs, your endpoint will be “pinged” with an HTTP POST request with a JSON-formatted body. Here’s an example of what such a report might look like:

{
    "csp-report": {
        "document-uri": "http://example.com/signup.html",
        "referrer": "",
        "blocked-uri": "http://example.com/css/style.css",
        "violated-directive": "style-src cdn.example.com",
        "original-policy": "default-src 'none'; style-src cdn.example.com;
                             report-uri /_/csp-reports"
    }
}


How you interpret or respond to these reports is up to you; there are third-party parsers and endpoint implementations available for various server-side languages — CSP Endpoint is just one example, for Node.js.

Browser Support

As always, it’s important to be aware of browser support – you can find more details on caniuse.

The Future of CSP

CSP as a standard is constantly evolving. Level two support is fairly common, (see caniuse for full details), whereas Level Three is a work-in-progress. It might be worth keeping an eye on the public-web app sec mailing list archives to keep up-to-date with developments, as well as referring to the draft Level Three standard.

There’s a lot more to CSP than we’ve been able to cover in this short introduction, but if you’re interested in finding out more then here are some useful links and resources:

  • HTML5Rocks has a comprehensive tutorial on CSP.

  • Chrome users might find the CSP Tester extension useful for testing your CSP rules.

  • There’s a great presentation, Making CSP Great Again which looks at some of the common pitfalls of CSP, as well as a look to the future.

The Case for Multiple Layers of JavaScript Application Security

JavaScript is here to stay and it is necessary to understand the layers of JavaScript Application Security.

First shipped in September 1995, over the last two decades has become the most popular programming language on earth. As of today, in 2016, over 88% of all websites use JavaScript and they do not show signs of stopping. You will find it also on mobile sites, games, and web applications.

The fact that it is simple to implement, it’s flexible and allows the best, real-time experiences for the user, amongst other advantages, has led companies like YouTube, Facebook, and Google to adopt it and contribute to its hegemony.

And not only on the client-side, the Developer Survey Results 2016 by Stack Overflow show that even Back-End developers are more likely to use JavaScript than any other programming language.

However, there are some issues concerning security. JavaScript is a very dynamic language that allows one to easily add/inject code that interferes with the applications and makes them do something else.

JavaScript vulnerabilities are both client-side issues and potential enterprise problems as anyone can steal server-side data and infect users with malware. And since we are developing everything in it, those are vulnerabilities that need to be addressed.

Keeping ahead of hackers is crucial when developing in any language, and this is especially true for organizations using JavaScript. The potential attacks facing organizations using JavaScript include Cross-Site Scripting (XSS), Cross-Site Request Forgery (CSRF), and improper client-server trust relationships which can result in devastating losses of revenue, reputation, and sensitive data for the exploited organization.

The best way to keep ensure that your JavaScript code is vulnerability-free and secure is by utilizing multiple layers of security solutions to ensure that your code is secure and can resist the threats posed by hackers, cyber criminals, and pirates.

1. Early Code Analysis

Analyzing your code as early as possible is crucial not only for your application’s security but also for your budget and release date as vulnerabilities discovered at the production stage of the software development life cycle (SDLC) can cost up to 100 times more to fix than ones discovered at the development stage.

When this cost is combined with the time needed to mitigate these risks, which includes the amount of time needed to re-acquaint the developers with their code that needs to be fixed, the overall cost of resources to the organization can be astronomical.

Checkmarx’s JavaScript scanner is a code analysis solution that is adapted specifically for developers and scans uncompiled source code for vulnerabilities at the development stage of the SDLC.

Checkmarx allows for the quick mitigation of vulnerabilities via the “Best Fix Location” feature which presents developers with a data flow graph that allows them to quickly mitigate numerous vulnerabilities at a single point. The incremental scanning feature lets organizations scan only modified code which can save hours, and days, depending on the size of the code portfolio.

Since developer buy-in is crucial for the adoption of any additional security solution, Checkmarx offers out-of-the-box integration with the most common development systems available. This includes seamless integration with the IDEs, source code repositories, build servers, and bug-tracking systems that your developers are already using.

Since vulnerabilities are mitigated during the development process as the developers are coding, developers become more and more aware of the vulnerabilities in their code and, as a result, are less likely to make the same mistake again.

One of the goals at Checkmarx is to help organizations attain a high level of “application security maturity” where vulnerabilities and bugs are given the same attention.********

2. Additional Layers of Protection

While there is no silver bullet that will resolve all the issues facing your application, applying multiple layers of application security will greatly enhance the security posture of your application.

Once your JavaScript code is scanned and secure, you’ll want to find a solution to further lessen the chances of your code and application being exploited, reverse-engineered, or tampered with.

Jscrambler offers a comprehensive solution that is simple to implement and easy to adopt. While Checkmarx will ensure that your application is built vulnerability-free, Jscrambler makes sure your application is safe against attacks and works exactly how it was developed to work.

Jscrambler allows developers and security professionals to add several layers of protection to their JavaScript applications. A first level is attained through concealing the logic of the application, by obfuscating the JavaScript. Then, code traps can be added – controls that enforce restrictions such as making the code only run in the right domain or the right browser – and finally, the app can be made self-defensive, a feature which makes it defend itself from tampering and reverse-engineering attacks.

Automated attacks can be also stopped by making the app polymorphic – which means the Jscrambler’s protection engine will produce very distinct versions of the code in the app with each build.

Jscrambler is compliant with all the main JavaScript stacks currently being used and it is the only solution to offer Real-time Application Self-Protection (RASP) on the client-side, meaning that it embeds security in JavaScript applications allowing them to detect and deter attacks in runtime.

For organizations with application security at the core of their values, combining two, or more, layers of application security helps ensure that the application, its users, and the organization stay safe from hackers and cybercriminals.****

Analyzing your JavaScript code with Checkmarx’s JavaScript scanner as you develop your application and protecting your code before it hits production will allow your application to stand tall against potential exploits, copyright infringement, malicious reverse-engineering attempts, and other malicious threats that could bring immeasurable harm to your organization, reputation, and clients.

Getting Started With Relay

We know what you are thinking, what the heck is Relay and why do I care? Arenʼt there enough frameworks already?

Relay is a framework meant to complement both GraphQL and React. If you think about it, a lot of developer productivity goes towards fetching data. React is a nice way to think about the UI as separate components.

Each component has a clean-cut separation of concerns. The problem at hand is how you feed it data.

One can dream up any push-and-pull solution to do this. This may involve Ajax slapping with a framework or two. Or, you could bridge client-side components with Relay. If you are already knee-deep in React and GraphQL, Relay will offer a nice way to bridge the two.

In this take, let’s walk through a quick way to get started with Relay. I will start from scratch and put in place a solution with Relay. We will cover each step of the way, so feel free to follow along.

What Is Relay?

I mentioned Relay is the bridge between React and GraphQL to fetch data. Turns out, there is a starter kit for Relay to get you off the ground.

First, clone the repo into the local dev environment with git clone.

Once cloned, the first thing is to install dependencies:

npm install

Phew, with 424 dependencies at the time of this writing. We are ready to update-schema:

npm run update - schema


Relay has to keep track of schema changes in GraphQL. This is one way it keeps an eye on the schema and bridges the data.

At the end, let’s start the web server.

npm start

If all goes well with your local machine, you should see this nice little demo:
little-react-demo-after-initial-set-upSo far, we have the Relay starter kit working. The next step is to create our schema.
GraphQL API

For the schema, I am thinking of a list of ferocious cats. Inside dataschema draw up an image field in the widgetType:

image: {
    type: GraphQLString,
    description: 'An image of a cat'
}


GraphQL is a declarative, strong-typed, and product-centric query language. Notice the GraphQLString type for the image. Feel free to leave the rest of the widget intact. As far as fields, we still need an ID, name, and an image.

It is time to fill up the GraphQL with data. Go to datadatabase and fill this GraphQL schema with new data:

const imageUrl = [
    'http://bit.ly/28WswxC',
    'http://bit.ly/28VXOoZ',
    'http://bit.ly/2919Fo6'
];

var widgets = ['Panther', 'Cougar', 'Lion'].map((name, i) = & gt; {
    var widget = new Widget();

    widget.name = name;
    widget.id = `${i}`;
    widget.image = imageUrl[i];

    return widget;
});


This grabs the list of cat names and iterates with a map. Gives it an ID based on the index i and a URL that comes from imageUrl. The imageUrl is an array with a list of images for each cat.

We are ready to test the new schema changes, type this up in the console:

npm run update - schema
npm start


With data and schema changes complete, feel free to check out the commit. Since I practice extreme programming, clean up unnecessary code in another commit.

React Component

For the front end, Relay creates a bridge to React components through a container. A container defines a viewer with a GraphQL declarative query to feed it data. Below is what the container looks like:

Relay.createContainer(App, {
    fragments: {
        viewer: () = & gt;Relay.QL `
fragment on User
widgets(first: 10)
edges
node
id,
name,
image
}
}
}
}
`
    }
});

Here Relay.QL defines a GraphQL query on what data to expect. If you glance at it, notice we are only interested in the first 10 widgets. It needs to know what to return, so tell it we want the ID, name, and image of each ferocious cat. The rest gets fetched by Relay, no funky XHR coding is necessary.

With the data fetching complete, it is time to wire up React. I have an App React component ready to make use of this data. So let’s build the list of cats:

<h1>Ferocious Cats</h1>
<ul>
    <ul>{this.props.viewer.widgets.edges.map(edge =>
        <li>
            <h3>{edge.node.name}</h3>
            <img alt="{edge.node.name}" src="{edge.node.image}" 
                       width="200px" />
        </li>
    </ul>
</ul>
)}


This leverages the JSX syntax. As shown, take the results from the Relay container and use it. Relay makes this complex data fetching seamless.

The front end is complete, feel free to check out the commit from this little hackathon.

A Final Demo

With both the back end and front end complete. It is time to fire up the demo, this time just start the server:

npm start


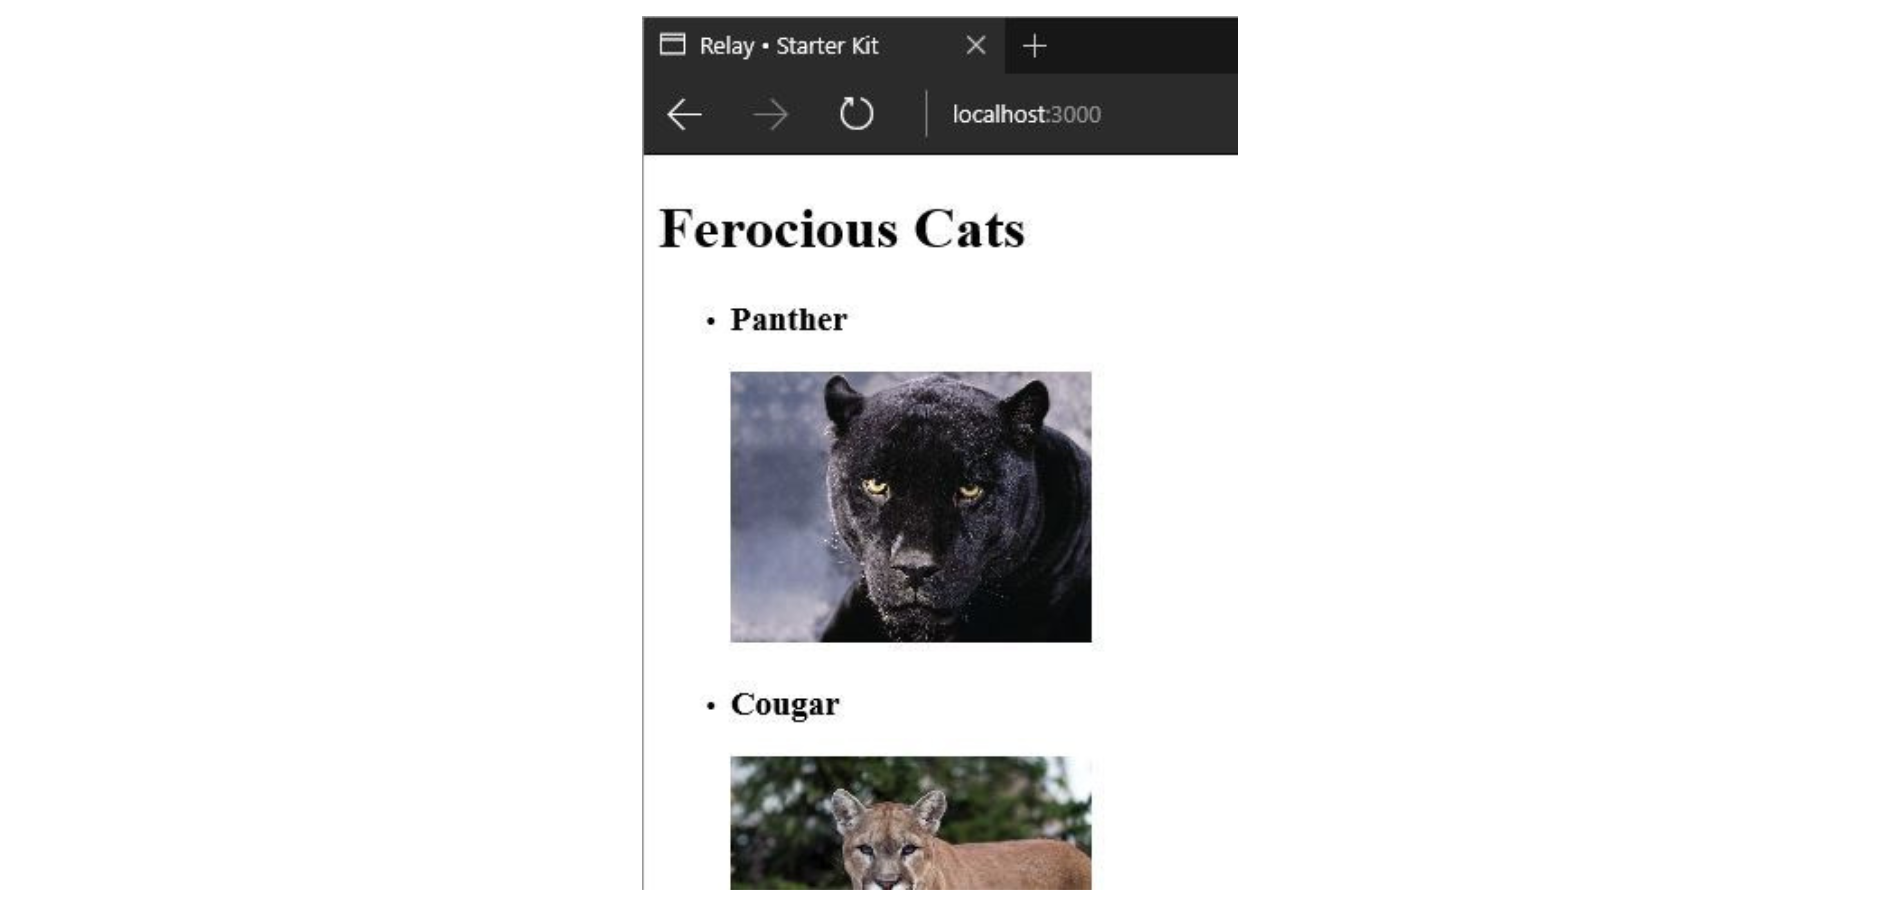
You will notice that webpack picks up all the changes and bundles them up. At the end, you should see this little demo:
ferocious-cats-demoThis wraps up the demo. If you open up the network tab in the browser, notice the graphql Ajax request that gets the data. All this happens behind the scenes for you with no extra coding. If you examine the JSON it gets back, all the data you need to render each component is in this request.



I encourage you to leave the dev tools open in the browser. Go through the HTML that gets rendered. Check out the rest of the requests in the network tab.

As shown, Relay leverages React and GraphQL and brings it all together. It gives you a nice layer of abstraction on top that bridges these two. Facebook open-sourced Relay circa August 2015 and it is gaining traction.

I hope this guide gives you what you need to get started with Relay.

How to Build a To-Do App in Vue.js – Part 2

This is the second part of a two-part series on building an App in Vue.js In the first part, we touched on how to supply data to templates from a component class, loop over data in the templates, and more.

In this second part, we will see how to handle events coming in from the template which will allow us to create more Todos, edit them, and eventually delete them.

Forms, Methods, and Events

So carrying on from the first part, we can now display a list of Todos. Let’s create our final component so that we can create, edit, and delete Todos.

Adding a New Todo Component

Create a new Todo component by creating a file in src/components/Todo.vue. Leave it empty for now.

Modify the main App.vue component template by adding a form after the to-do list invocation. So it should look like this:

<div class="container" id="app">
    <div class="page-header">
        <h1>Vue.Js Todo App</h1>
    </div>

    <todo-list v-bind:todos="todos"></todo-list>
    <form v-on:submit.prevent="addNewTodo()">
        <div class="form-group">
            <input -av-model="newTodoText" type="text" class="form-control" name="name" placeholder="Enter new Todo here">
        </div>
    </form>
</div>


Add a method to its component class. Vue.js puts methods in a class underneath a methods property.

methods: {
    addNewTodo() {
        if (this.newTodoText.length > 0) {
            this.todos.push({
                title: this.newTodoText,
                done: false
            })
            this.newTodoText = ''
        }
    }
}


What is happening here is that we are binding the form input value to the newTodoText property in the class.

<input v-model="newTodoText" type="text" class="form-control" name="name" placeholder="Enter new Todo here">


We are also adding an event handler named addNewTodo in our class. This is called when the new to-do form is submitted through the line below.

<form v-on:submit.prevent="addNewTodo()">


Now, anytime we submit the form, a new todo gets added to our list, and the new todo input field gets cleared.

Editing a Todo

To be able to edit a todo, we need to create a new Todo component. In the empty Todo component file created earlier, add the following content.

<template>
  <li class="list-group-item">
    <div class="row">
        <div class="col-md-8">
            <div class="todo-title" v-on:click="activateInEditMode" v-show="!isEditing" >
                {{ todo.title }}
            </div>
            <form v-show="isEditing" v-on:submit.prevent="deActivateInEditMode" >
                <div class="form-group">
                    <input v-model="todo.title" type="text" class="form-control" >
                </div>
            </form>
        </div>
        <div class="col-md-4">
            <span class="btn btn-default" v-on:click="removeTodo(todo)">remove</span>
            <span v-if="todo.done" class="bg-success todo-status">Done</span>
            <span v-else="todo.done" class="bg-danger todo-status">Not Done</span>
            <input v-model="todo.done" type="checkbox">
        </div>
    </div>
  </li>
</template>

<script type="text/javascript">
    // <![CDATA[
    export default {
        props: ['todo'],
        data() {
            return {
                isEditing: false
            }
        },
        methods: {
            activateInEditMode() {
                    this.isEditing = true
                },
                deActivateInEditMode() {
                    this.isEditing = false
                }
        }
    }
    // ]]>
</script>

<style scoped>
    <!-- -->
</style>


In the Todo Component here, we have set up a class with a property isEditing. This will be responsible for deciding whether the Todo is in edit mode or not. We have an event handler on the Todo title in the template. This triggers a method in the class called activateEditMode when the title gets clicked.

This method will set the data property editing to true. There is a conditional in the template that shows the Todo title when the isEditing property is false. It shows the edit form when it is true as shown below.

<div class="todo-title" v-on:click="activateInEditMode" v-show="!isEditing" >
    {{ todo.title }}
</div>
<form v-show="isEditing" v-on:submit.prevent="deActivateInEditMode" >
    <div class="form-group">
        <input v-model="todo.title" type="text" class="form-control" >
    </div>
</form>


When in edit mode, the form, when submitted has an event handler that triggers the method deActivateInEditMode. This method sets the property isEditing to false and thus hides the form. We also have a checkbox that toggles the done status of the Todo, showing and hiding the divs accordingly as shown below.

<span v-if="todo.done" class="bg-success todo-status">Done</span>
<span v-else="todo.done" class="bg-danger todo-status">Not Done</span>
<input v-model="todo.done" type="checkbox">


Now that we have an editable Todo, we have to modify the TodoList to make use of the new editable Todo Component. Replace the TodoList template with the code below:

<p>
    Total Todo Count <span class="badge">{{ todos.length }}</span>
</p>


Here, we are looping over the list of Todos instead of just showing the title as before. We are creating an instance of a Todo Component and passing in a Todo object in each case in this line.

<ul class="list-group">
    <todo v-on:remove-todo="removeTodo" v-for="todo in todos" :todo.sync="todo" ></todo>
</ul>


The part v-on:remove-to=”removeTodo()” just calls the removeTodo function anytime a child element sends up an event with the name remove-todo.

We will get to the usage of that in the next sub-section. To make sure the TodoList can use this component in its template, we must import it. First, add this to the top of its script tag.

import Todo from './Todo'

Next, add the imported Todo as a property of the components object. This shows our intent to make use of the component in this class.

export default {
    props: ['todos'],
    components: {
        Todo,
    },
};

Now we have the main TodoList component making use of the individual Todo component.

Deleting a Todo

Let’s add functionality to be able to delete a Todo. Add this to the template of the Todo Component at the top part of the div with the class of col-md-4.

<span class="btn btn-default" v-on:click="removeTodo(todo)">remove</span>


This adds a button to delete a Todo. Also, add a method to the component class to handle clicking on the button. This calls the removeTodo and passes the current Todo to delete.

removeTodo (todo) {
    this.$dispatch('remove-todo', todo)
}


The removeTodo method sends an event named ‘remove-todo’ to the parent TodoList Component. However the parent does not have a handler for the event, so add this to the TodoList Component class.

methods: {
    removeTodo(todo) {
        const todoIndex = this.todos.indexOf(todo)
        this.todos.splice(todoIndex, 1)
    }
}

We have to send the event upwards to the parent because it has access to the Todo list. This is so we can remove the desired Todo from that list. Now when you click on the remove button, the corresponding todo disappears from the screen.

Component Styles

Add this CSS to the styles section of the Todo component to style the Todo titles appropriately.

.todo - title {
    cursor: pointer;
    padding: 6 px;
    margin - bottom: 15 px;
}

.todo - title: hover {
    background - color: #F1EDED;
}

The scoped property on the style tag is a way to tell Vue.js to only apply these styles to elements in this component only. This is useful for introducing new components into an already existing application without affecting other components.

Integrating with Jscrambler

Security wise, you could use Jscrambler’s Domain Locking feature to make sure the code only runs on your chosen list of domains.

If that isn’t enough, you could add an extra layer of security by thwarting any debugging attempts made on the code using Jscrambler’s Self-Defending feature.

Conclusion

Now, we have a complete Todo Application. Even though this is a detailed Vue.js article, I urge you to have a look at the documentation to see what else you could achieve with this marvelous framework. For example, server-side storage of the Todo data, animations, and more.

In my opinion, Vue.js has a nice balance between configuration and convention. Whereas other frameworks, for example, Ember.js are heavily convention-based, Vue.js likes to let you make some choices for example in terms of folder structure. It lets you structure your app anyhow because you can put templates and classes in a single file.

This brings us to the end of the article. Thank you for reading.

You can find the code for this tutorial.

Don’t forget to pay special attention if you’re developing commercial Vue apps that contain sensitive logic. You can protect them against code theft, tampering, and reverse engineering.

How to Build a To-Do App in Vue.js – Part 1

A tutorial with many Vue concepts to create a To-Do app in Vue.js from scratch. With web applications becoming more sophisticated, the popularity of JavaScript frameworks is growing.

There are several frameworks out there to choose from. Some of the most popular choices are AngularJS, Ember.js, and Vue.js. All these frameworks are capable of building large and modern web applications.

In this two-part article, we will be covering Vue.js. The main reason is that Vue.js takes a different approach to development. It has a lot of powerful features to match any of the above. When starting, you are only exposed to simple APIs on the surface. This makes it easy to get started. However, you could dig underneath and bring forth that power when needed.

Today, we will cover how to set up Vue.js and a simple component. We will also touch on how to supply data to templates from a component class, loop over data in the templates, and more.

Vue.js is currently at version 1. Beta should soon be out (version 2), according to the Vue.js Blog. Let this not stop you from trying out the current version, as the API won’t change much.

Install and setup Vue.js

With that out of the way, let us now set up our environment so we can get up and running with our Todo App. You will first need to have node.js and npm installed. After that, you must install vue-cli using the following command.

npm install - g vue - cli


vue-cli is a command-line tool that makes it easy to develop an application using Vue.js.

There are many templates to bootstrap a new Vue.js application using the vue-cli. We will use a popular one called webpack. This template scaffold outputs ES2015/ES6 JavaScript, the latest stable version of JavaScript. To create a new project, go to any folder and set up a new application using:

vue init webpack vuetodo


You may get asked a few questions on the way. Just keep pressing enter to carry on with the defaults. Go inside the new directory using

cd vuetodo


Install the packages required by the application using

npm install


Start the Vue.js development server using

npm run dev


This starts the server and watches your project folders for any file changes. It automatically refreshes the browser to reflect any detected changes. This is a term called hot module replacement. Speaking of the browser, visit the URL http://localhost:8080. You should see a brand new Vue.js application.

We will be using Twitter Bootstrap to help style our application. So copy the contents of the URL /bootstrap/3.3.6/css/bootstrap.min.css from Bootstrap CDN and store it in static/css/bootstrap.css.

Create another CSS file in static/css/style.css. Lastly, include these as CSS links inside of the main HTML file index.html like so.

<meta charset="utf-8" />

<link title="no title" href="/static/css/bootstrap.css" 
   rel="stylesheet" media="screen" />
<link title="no title" href="/static/css/style.css" 
   rel="stylesheet" media="screen" />

Our Vue.js Todo App Components Structure

Our Todo Application will comprise many components.

A component helps us group pieces of functionality and visual representations into one “box”. For example, we can have a component for a list of contact details. The list itself could be a component. Since components can contain other sub-components, each contact detail itself could be a component.

Every Vue.js App needs to have a top-level component. In our Todo Application, we will have a main component for the skeleton of our application.

Nested in the main component is a TodoList component – this component will contain a list of Todo components nested inside of it. To give you a visual understanding of the structure, have a look at the tree below.

MainComponent > TodoList > Todo

Main App Component


Now that we know more about the structure of our application, let us dig in and start building it. We will begin with the main top-level component. Most of our code will be in the src folder of our project. A main component was already created for us in src/App.vue. This will contain any sub-components which we will create.

Creating a Component

As part of the new application, there exists a component created for us in src/components/Hello.vue. Delete the file as we won’t need it. Instead, we will create our own component called TodoList.vue inside of the components folder.

Inside of the new file, TodoList.vue, put in the following content.

Total Todo Count 
< span class = "badge" > 3 < /span> 
   < ul class = "list-group" >
    < li > Todo 1 < /li> 
    < li > Todo 2 < /li> 
    < li > Todo 3 < /li>
< /ul> 

< script type = "text/javascript" > // <![CDATA[
    export default {

    }
    // ]]></script>

What we’ve done here is create a component class and provide a template. A component file has three parts, a template area, a component class, and a styles area.

The template area is the visual part of a component. The class handles behavior and events and stores data that the template can access. The style part is for augmenting the presentation of the template.

For now, we will only have a template and a class part in the above component.

Importing Components

Next, let us make sure we can use the new component by importing it into our main component. So inside of App.vue, add the following line at the top of the script section:

import TodoList from './components/TodoList'

Remove the line

import Hello from './components/Hello'

Also, remove the reference to the Hello component from the components property. Add a reference to the TodoList component we just imported. So it will look like this

components: {
    TodoList
}

Using a component

Now that we have a basic component setup, let’s make use of it. Change the template of the main component src/App.vue to look like this:

<div class="container" id="app">
    <div class="page-header">
        <h1>Vue.js Todo App</h1>
    </div>

    <todo-list></todo-list>
</div>


To use a component, you need to invoke it like an HTML element as we’ve done above. You must separate words with dashes like below instead of camel case.

<todo-list></todo-list>

Component Data

Since our main component template will need to show a list of Todos, let’s supply some data to it.

A single Todo has two properties named title and done. The title is the name of the Todo and done will represent whether the task is completed or not.

Components provide data to their accompanying template through a data function. This function should return an object with the properties intended for the template. In our App Component, add a function returning an object with two properties like below.

export default {
    components: {
        TodoList
    },
    data() {
        return {
            newTodoText: '',
            todos: [{
                title: 'Todo 1',
                done: false
            }, {
                title: 'Todo 2',
                done: false
            }, {
                title: 'Todo 3',
                done: false
            }, {
                title: 'Todo 4',
                done: false
            }]
        };
    }

Note that we have two properties. The Todos property holds the list of todos. The newTodoText holds the text for creating a new to-do.

Loops and Properties

Component Properties

We know that a component class can pass data to its template. Data can also be passed into a component when using it from a template. We have data in our main App. vue component class. Let’s pass that down to the TodoList component. Change the main App.vue template to look like this:

<div class="container" id="app">
    <div class="page-header">
        <h1>Vue.js Todo App</h1>
    </div>

    <todo-list v-bind:todos="todos"></todo-list>
</div>


Notice this line

<todo-list v-bind:todos="todos"></todo-list>


We have passed the list of Todos down to the TodoList component. It will be available in that component through the name todos. This is because of the binding syntax used above.

It isn’t enough to just pass data down. We have to modify the TodoList component class. It has to declare what properties it will accept when using it. Modify the TodoList component class by adding a property to it like so.

export default {
    props: ['todos']

Looping Over Data

So now our TodoList component has revealed which properties it will accept. Inside the TodoList template, let’s loop over the list of Todos like this and also show the length of the todos array

Total Todo Count <span class = "badge"> {{ todos.length }} </span>
<ul class = "list-group">
    <li> {{ todo.title }} </li>
</ul>


Now that we can loop over our todos using a TodoList component, let us end part 1 here, and, in the next part, we will go in-depth into events, methods, creating, editing, and deleting todos.

Before deploying your commercial or enterprise Vue apps to production, make sure you are protecting their code against reverse engineering, abuse, and tampering.

Top 8 Most Popular JavaScript Frameworks

Do you know what are the top eight most popular JavaScript?

Building complex interfaces on the web surely wouldn’t be the same thing if it wasn’t for the many JavaScript frameworks and libraries available these days.

Besides making websites and applications faster, these tools can come in handy for developers as they have more time to create interactive elements without worrying about the structure and maintenance of code.

However, even with so many good options on the market, you should carefully choose which frameworks to use.

Having the right tool to work on your project impacts your web application performance and ability to maintain and update your code over time.

To help you decide, we are going to take a look at the top eight most popular JavaScript frameworks today:

1. Angular.js


Launched by Google in 2009 and available as open source under an MIT license, Angular is one of the favorite JavaScript frameworks for developing single-page web applications.

Among all the useful resources Angular can present, one of the most innovative features is the two-way binding, which allows automatic updating of the variables as they change when a user interacts with the interface. The same thing happens when the model receives changes: the view is re-rendered.

Another great advantage of Angular is that it is surrounded by a huge collaborative community. It’s really easy to find online content about it and their team is always growing and launching new tools to improve developers’ productivity, like Protractor and Zone.js. On the other hand, a little caution is needed for long-term projects.

Like its competitors, the feature falls into the same problem: while it makes it so simple for you to start, you can have some difficulties maintaining and extending your code in the future.

2. Babylon.js

Also known and called a game engine, Babylon.js is an open-source framework that’s been on the market since 2013. With this tool, developers can build 3D games with HTML5, WebGL, and Web Audio.

Although it supports animations and 3D graphics, this framework is focused on code, so you can’t expect to see a game editor.

What you can do is install some plugins that work with Blender, Max, Unity, and other software for integration. If you’re looking for a tool with a level editor, for example, you will need another kind of tool.

3. Backbone.js

Backbone.js offers great components for improving your web application structure, like Models, Collections, and Views. It also presents native support for integration with RESTful and JSON backends.

It’s no wonder why it’s used on services like Airbnb and Pinterest: this is one of the most lightweight, fastest, and easiest frameworks to learn and use, and it has complete documentation full of tutorials and application samples.

But, so much simplicity comes with a price: Backbone.js doesn’t provide any structure itself, it’s up to the developer to structure his project. Another downside of this framework is that, unlike Angular.js, it doesn’t support two-way data binding, meaning you’ll have extra work updating your model as the view changes.

4. Ember.js

Released in 2011, Ember is as powerful as Angular.js when it comes to building interactive front-end user interfaces.

Besides supporting two-way data binding, it comes with a data module that offers nice integration with Ruby on Rails back-end and even certain RESTful JSON APIs.

Although this is one of the most promising JavaScript frameworks, Ember presented a lot of changes before it stabilized. This means that sometimes you will find some outdated content and examples that will no longer work, so new adopters of the framework could be confused.

Looking on the bright side, the framework has a nice active community of developers, so you won’t be that lost in the process of adapting your project.

5. Mercury.js

Mercury.js was released just a couple of years ago but it has already attracted a lot of fans.

Licensed under MIT, this modern framework is fully modular and has some features inspired by React.js, such as virtual DOM, state management, and render methods.

It works well with other libraries and has a streamlined markup API, so the tags won’t mix with JavaScript.

6. Meteor

If you’re looking for a complete tool to build a mobile or web application, Meteor.js could be the right choice.

Released as an open-source framework in 2012 under an MIT license, this full-stack platform comes with everything you need: from back-end development to front-end rendering, business logic, and database management.

Besides having a helpful community full of resources, Meteor.js is pure JavaScript and you don’t need to have experience in any other language to develop applications.

Although this is a great tool to start creating and running projects easily and faster, many developers end up having some complaints about Meteor when it comes to building more complex applications, such as its deployment service, the package system, the lagging when the project gets heavy, and the lack of standard on the code.

7. Polymer.js

Polymer was also released by Google and it’s been on the market since 2013. The open-source project is led by a team of developers from the Chrome organization.

This framework offers structure so you can build custom HTML elements using browser-based technologies like Web Components, so the developer could use different name schemes. Polymer also brings a set of ready-made UI and non-UI elements for you to extend your project.

It may be worth it for you to give a try on the framework, but with some caution so every component works on different browsers.

8. React.js

You can have an idea of how powerful React.js can be when you look at Facebook and Instagram’s user interfaces. Although it doesn’t call itself a framework, it is as powerful as AngularJS when it comes to front-end web development.

The most well-known feature of this library is the virtual DOM: instead of writing code to manipulate the DOM, you describe how it is supposed to look and then React automatically does the hard work itself and makes the changes to match that description. This approach not only makes your test cases easier but also gives you much more flexibility and impacts the performance of the project.

Despite all this, you must keep in mind that React.js is a view layer. Although it is supposed to work well with other frameworks, it requires some configuration when you need to integrate it with a traditional MVC framework.

Other Promising JavaScript Frameworks

We’re talking about a very dynamic programming language, so of course, there will always be new resources joining the world of JavaScript development and some of them could be promising.

In case you don’t know which ones are worth a try, here are a few names you should keep an eye on:


Before deploying your commercial or enterprise JavaScript apps to production, you should make sure you are protecting their code against reverse-engineering, abuse, and tampering with Jscrambler.

Discover how and why Jscrambler is the most complete client-side protection solution and works seamlessly with all major frameworks and browsers.

Node.js Applications

We will explore ten expert tips for optimized performance in Node.js applications.

1. Always use asynchronous functions

Why should we always write asynchronous functions?
Because this is the best part of Node.js, all asynchronous functions perform a non-blocking I/O, avoiding CPU idle.

For an application that runs a lot of I/Os, this simple trick will make the servers work more and better because a server processing non-blocking I/O can handle multiple requests while one of these requests is performing an I/O. See the example:

var fs = require('fs');
// Performing a blocking I/O
var file = fs.readFileSync('/etc/passwd');
console.log(file);
// Performing a non-blocking I/O
fs.readFile('/etc/passwd', function(err, file) {
    if (err) return err;
    console.log(file);
});

2. Use the async module for better function organization


One of the challenges of working with asynchronous functions is to handle multiple chained callbacks.

Many chained callbacks make the code ugly and difficult to read: a classic callback hell.

var fs = require('fs');
// A common callback hell example
fs.readFile('/etc/passwd', 'utf8'function(passwdErr, passwd) {
    if (passwdErr) return passwdErr;
    fs.readFile('/etc/hosts', 'utf8', function(hostsErr, hosts) {
        if (hostsErr) return hostsErr;
        fs.mkdir(__dirname + '/test', function(dirErr) {
            if (dirErr) return dirErr;
            var data = passwd + hosts;
            fs.writeFile(__dirname + '/test/data', data, 'utf8', 
                function(err) {
                console.log('Done!');
            });
        });
    });
});


To avoid this callback hell, you can use the async module. This is a great module that has a lot of tricks and magic to deal with multiple asynchronous functions. See this example that eliminates the callback hell:

// You must install async before: npm install async
var async = require('async');
var fs = require('fs');

async.waterfall([
    function(callback) {
        fs.readFile('/etc/passwd', 'utf8', callback);
    },
    function(passwd, callback) {
        fs.readFile('/etc/hosts', 'utf8', function(err, hosts) {
            if (err) {
                return callback(err);
            }
            var data = passwd + hosts;
            return callback(null, data);
        });
    },
    function(data, callback) {
        fs.mkdir(__dirname + '/test', function(err) {
            if (err) {
                return callback(err);
            }
            return callback(null, data);
        });
    },
    function(data, callback) {
        fs.writeFile(__dirname + '/test/data', data, 'utf8', callback);
    }
], function(err) {
    if (err) {
        console.log(err);
        return;
    }
    console.log('Done!');
});


At first sight, this code looks bigger than the first one, but the async.waterfall uses an array structure to deal with multiple asynchronous functions better than the traditional callback method.

Another async feature is the async.parallel(), which executes asynchronous tasks in parallel.

3. Use ES6 Generators to organize asynchronous functions

Another way to avoid the callback hell is by using Generators from ES6. See how the previous example will look like using this alternative solution:

var fs = require('fs');

function* fileTask() {
    var passwd =
        yield fs.readFile('/etc/passwd', 'utf8');
    var hosts =
        yield fs.readFile('/etc/hosts', 'utf8');
    var data = passwd + hosts;
    yield fs.mkdir(__dirname + '/test');
    yield fs.writeFile(__dirname + '/test/data', data, 'utf8');
}

var task = fileTask();

task.next(); // Runs the "yield fs.readFile('/etc/passwd', 'utf8');
task.next(); // Runs the "yield fs.readFile('/etc/hosts', 'utf8');
task.next(); // Runs the "yield fs.mkdir(__dirname + '/test');
task.next(); /* Runs the "yield fs.writeFile(__dirname +
             '/test/data', data, 'utf8');*/

4. Use Node.js to send data

Node.js servers are better when they work to send data instead of an entire HTML page. This is why this platform became so popular for REST APIs.

In general, this kind of application works with JSON data, which is native to JavaScript and since Node.js is JavaScript, there are no parsing tasks between JSON and other data formats, so there is only JSON traffic between the server and clients, which increases the server’s performance by eliminating the parsing tasks.

5. Use Nginx or Apache for static servers


Don’t waste your Node servers by letting them serve static files, because there are servers like Nginx and Apache which work better than Node.js for this task. The reason is simple, Node.js works better processing data instead of serving static files. Nginx and Apache servers have a lot of configuration for serving static files and also have useful cache strategies. Like I said before, always use Node servers for processing data.

6. Avoid cookies and sessions

Cookies and sessions are techniques to store temporary states in the server. Keeping states is an expensive cost for servers.

Today, it is very common to build stateless APIs that provide token authentications like JWT, OAuth, and others. These tokens are kept on the client-side and prevent the servers from managing states.

7. Use cluster module for parallel processing

The cluster module is native to Node.js and it creates a lot of processes of the application including a master cluster which acts as the load balancer to distribute requests among all the slave clusters.

This technique optimizes your servers by using all the CPU cores to work with parallel processing.

8. Enable Streaming responses

The stream module is native. It allows the streaming of large data for a specific response.

This is very useful when the server needs to send videos, audio, and any type of data because the stream allows the request to send pieces of data instead of all of it and this technique avoids the buffer’s overflow on the server.

9. Always use the latest stable version

This tip is too obvious, but always use the latest stable version of Node.js because of the improvements for JavaScript V8 runtime, which often comes with a better optimization for memory and CPU uses.

10. Optimize, but don’t forget to protect

Optimization is essential but not enough. You have to think about security.

At Jscrambler, we help companies optimize and protect their Node.js applications.

Sign up for our free trial, and let us know if you have any questions. We have a team of experts ready to help you!

Web Workers And The Threads That Bind Us

Web Workers are scripts initiated from the JavaScript code in your app. We tend to take for granted our day-to-day web browsing experience.

Our daily life and work might have us using any single-page web app that seems like a web page with some neat UI icing.

In reality, these apps hide underlying complexity that makes them quick and responsive. App responsiveness and performance might be a non-issue for the latest Macbook Pro, but our concern lies in running it on a decently powered phone.

Developers understand the value of a responsive app and strive to avoid skipped frames that result in poor performance and user experience.

Web Workers

Web Workers are especially suited for doing expensive computations and avoiding blocking the UI rendering thread entirely.

They provide us with some concurrency within Javascript by running otherwise costly tasks in the background. Javascript is, for the most part, a single-threaded environment meaning that only one method can be executed at any given time.

Let’s say, for example, the task of rendering a UI in a web app is considered a process utilizing exactly one CPU thread. When you render a button or event, the thread starts the task of painting that button on the screen and won’t run other tasks during this event. If rendering the page takes too long, the content remains unresponsive to user interaction.

The Chrome V8 JavaScript engine is undoubtedly powerful but even it can’t handle running out of memory:
web-kit-user-select

Basic Example

Here’s a simple example of how you’d utilize a web worker. First, let’s initiate a web worker with Worker() as in the following main.html:

<h1>Web Workers example</h1>
<div class="controls" tabindex="0"></div>
<form>
    <div>
        <label for="number1">Multiply number 1: </label>
        <input id="number1" type="text" value="0" />
    </div>
    <div>
        <label for="number2">Multiply number 2: </label>
        <input id="number2" type="text" value="0" />
    </div>
</form>
<p class="result">Result: 0</p>
<script type="text/javascript">
    // <![CDATA[
    var first = document.querySelector('#number1');
    var second = document.querySelector('#number2');
    var result = document.querySelector('.result');
    if (window.Worker) { // Check if Browser supports the Worker api. 
      var myWorker = new Worker("worker.js");
//creates a new web worker with the provided file 
      first.onchange = function() {  
         myWorker.postMessage([first.value,second.value]);   
         console.log('Message posted to worker'); 
       } 
//our event listener receives messages from the worker second. 
      onchange = function() {
         myWorker.postMessage([first.value,second.value]);   
         console.log('Message posted to worker'); 
       } 
      myWorker.onmessage = function(e) {   
         result.textContent = e.data;   
         console.log('Message received from worker'); 
       } 
    };
   // ]]>
</script>


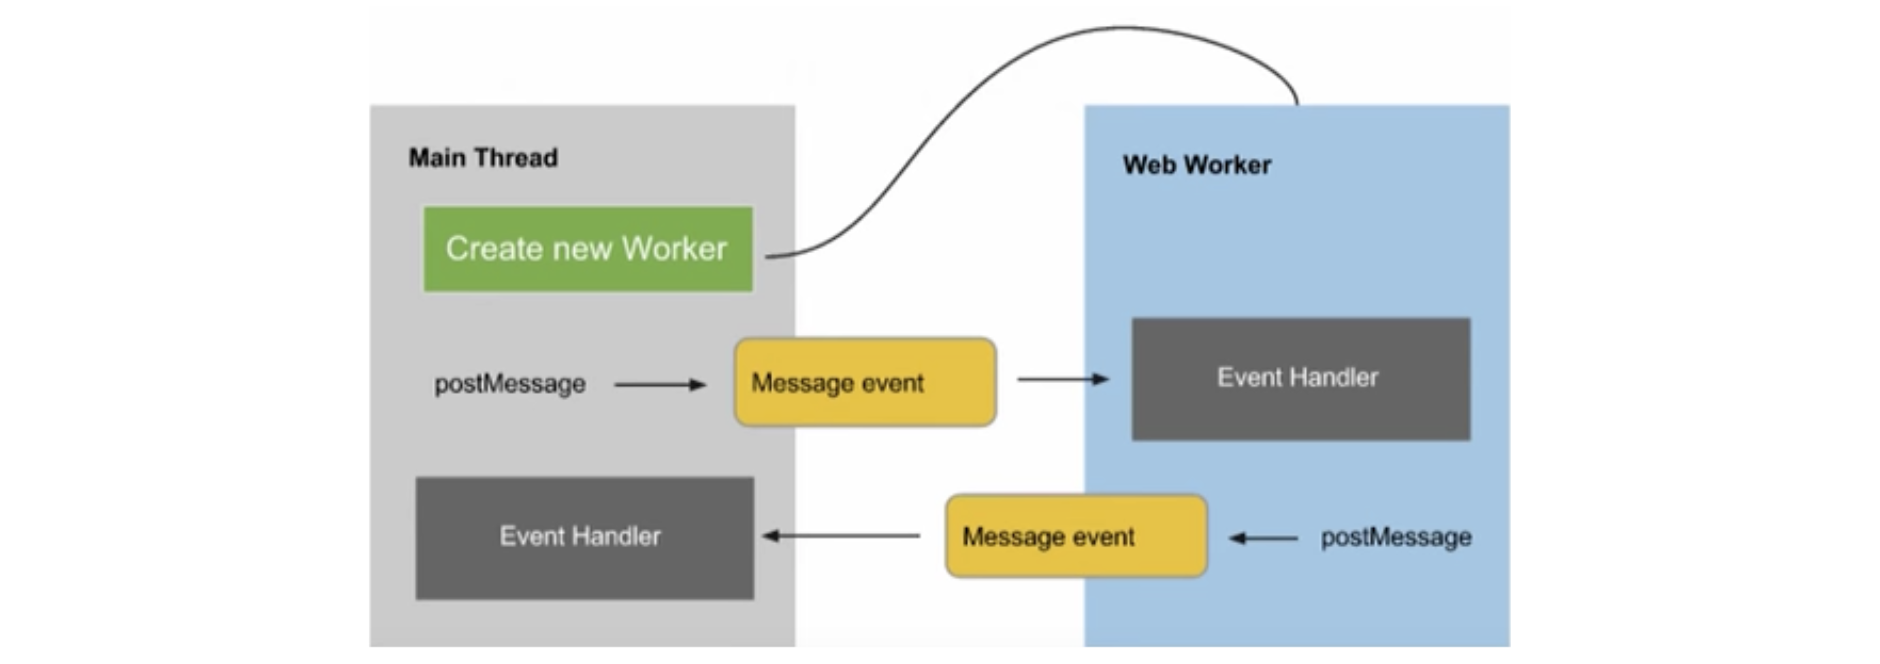
Our script logic runs immediately as soon as it’s passed to the worker object. Our onchange event looks for any events that fire. The worker thread receives the message, logs it, and posts the appropriate string using myworker.postMessage() method and notifies the UI thread with postMessage().

As you can see web workers are easy to get started but their true potential is in running asynchronously.

As soon as our Main script is called, it begins to run in the background. Our script logic runs immediately as soon as it’s passed to the worker object.

Our event listener looks for any events that fire. The worker thread receives the message, logs it, and posts the appropriate string using worker.postMessage() method and notifies the UI thread with self.postMessage().

As you can see web workers are easy to get started with but their true potential is running asynchronously.

Blocking vs. Non-Blocking

Because it costs much more to transmit a byte than it does to compute it, we can harness the power of web workers and offload any performance load to client CPUs. Rather than burdening servers and waiting to send clients data to be rendered, workers let us do some of the computing locally in a non-thread-blocking manner.

Web Workers can asynchronously reference an external script, download that script, and run it as a background process to not interfere with the main UI thread.

Workers use post messages to communicate through messages posted to and from each worker. The Web Workers API grants us the ability to run scripts in the background with each Web Worker assigned to its thread. As workers run in the background, application logic will not block the render thread.

One web worker uses one thread, enabling you to run application logic across various windows with improved performance. We’ve covered dedicated workers but there’s also a shared worker variation that allows multiple workers access to the same file.

Here are some other important things to know when using Web Workers:
…they have no control over the DOM( or window object) so they’re unable to update the UI.
…they share no memory with your main process.
…they have access to navigator metadata like user-agent and other information.
…they can use Timers (setTimeout, setInterval)
…they also get access to XMLHttpRequest and WebSockets
with-web-workers

Without Workers

You might still be wondering about practical applications for web workers.

Next, we’ll cover an example with and without workers to visualize the benefits. In the below example without web workers, we are generating a series of Fibonacci numbers up to a number of our choice.

Once our program runs, it fills up our results array and generates the series as an unordered list. The major key here is that when the thread begins computing a large Fibonacci number, the loading gif will lock up because UI is blocked by the thread calculating the series.

Our example without workers, worker.html:

	<link rel="stylesheet" type="text/css" />

<style type="text/css">
    <!-- ol {
        background-color: #ccc;
        width: 20%;
    }
    ol li {
        background-color: #fff;
        padding-left: 5px;
        margin: 5px;
    }
    -->
</style>
<div id="container">
    <h1>Fibonacci Web Workers</h1>
    <input id="seriesLength" type="numeric" value="40" />
    <input id="generateButton" type="button" value="Generate" />
    <img alt="" src="http://i.imgur.com/vp8NUmC.gif" />
    <ol id="log"></ol>
</div>
<script type="text/javascript">
    // <![CDATA[
    var results = []; //create the results array
    var log;
    //generates a log list with my Fibonacci series
    $(function() {
        log = $("#log");
        $("#generateButton").click(function() {
            log.html("");
            var seriesLength = parseInt($("#seriesLength").val());
            generateFib(seriesLength);
            //recursviely generate my series of Fibonacci numbers
            $.each(results, function() {
                logMsg(this);
                //iterate my series and log them as an unordered list
            });
        });
    });

    function calculateNextFibVal(n) {
        var s = 0;
        var returnValue;
        if (n == 0) {
            return (s);
        }
        if (n == 1) {
            s += 1;
            return (s);
        } else {
            return (calculateNextFibVal(n - 1) + calculateNextFibVal(n - 2));
        }
    }

    function generateFib(n) {
        results.length = 0;
        for (var i = 0; i < n - 1; i++) {
            results.push(calculateNextFibVal(i));
        }
    }

    function logMsg(msg) {
            log.append("

                    < li > " + msg + " < /li > ")

                }
                // ]]>
</script>

With Workers

The structure for our example with workers is generally the same. The only difference is that we move the logic to it’s worker script.

Worker.html:

<link rel="stylesheet" type="text/css" />

<style type="text/css">
    <!-- ol {
        background-color: #ccc;
        width: 20%;
    }
    ol li {
        background-color: #fff;
        padding-left: 5px;
        margin: 5px;
    }
    -->
</style>
<div id="container">
    <h1>Fibonacci Web Workers</h1>
    <input id="seriesLength" type="numeric" value="40" />
    <input id="generateButton" type="button" value="Generate" />
    <img id="loadImg" alt="" src="http://i.imgur.com/vp8NUmC.gif" />
    <ol id="log"></ol>
</div>
<script type="text/javascript">
    // <![CDATA[
    var log;
    var loadImg;
    var worker;
    //generates a log list with my Fibonacci series
    $(function() {
                log = $("#log");
                loadImg = $("#loadImg");
                loadImg.hide();

                $("#generateButton").click(function() {

                    var seriesLength = parseInt($("#seriesLength").val());

                    log.html("");
                    loadImg.show();

                    worker = new Worker("worker.js");
                    worker.onmessage = messageHandler;
                    worker.postMessage(seriesLength);
                });

                function messageHandler(e) {
                    var results = e.data;
                    $.each(results, function() {
                        logMsg(this);
                    });
                }

                function logMsg(msg) {
                    log.append("

                        < li > " + msg + " < /li>

                        ")}
                    });
                // ]]>
</script>


We are creating a new instance of worker with the worker when we initialize the worker() variable. We then process the onMessage() message handler and post the message to the worker.

The worker gets its commands by posting messages to the worker and then back up to the window. We get the values of my array from the worker while it loops through the results and creates an ordered list. The difference is that we’re not accessing from a local array the values that are passed in from the worker.

Worker.js:

var results = [];

function messageHandler(e) {
    if (e.data > 0) {
        generateFib(e.data);
    }
}

function calculateNextFibVal(n) {
    var s = 0;
    var returnValue;

    if (n == 0) {
        return (s);
    }

    if (n == 1) {
        s += 1;
        return (s);
    } else {
        return (calculateNextFibVal(n - 1) + calculateNextFibVal(n - 2));
    }
}

function generateFib(n) {
    results.length = 0;
    for (var i = 0; i < n - 1; i++) {
        results.push(calculateNextFibVal(i));
    }
    postMessage(results)
}
addEventListener("message", messageHandler, true);


The worker is in a separate javascript file that is assigned to the worker thread. When we call
postMessage() our message event will fire and show up in the event arguments for our results data.

Compared to our version that doesn’t use workers, this worker-assisted version will calculate a larger series without blocking the UI thread all while allowing me to interact with the UI.

Try generating a series of 40 or above to see a notable difference in performance. You can continue to highlight items, press the button, or even generate more numbers while it calculates a new series and we won’t see any unresponsive script errors.

It can be easy to take responsive web app experiences for granted.

The modern web makes it so that we can enjoy memory-intensive apps and games requiring heavy-duty computational resources, typically from mobile devices.

Tasks like parsing large JSON data sets, visualizing analytics, or sound and image processing can slow down an already overloaded client, negatively affecting user experience. Unless of course, we can leverage our resources effectively with tools like Web Workers.

Pay special attention if you are developing commercial JavaScript apps with sensitive logic. You can protect them against code theft, tampering, and reverse engineering by starting your free Jscrambler trial.

State of the Virtual DOM

Virtual DOM or Virtual Document Object Model is a convention for changing the document tree structure of a page, including the style and content.

Conceptual implementations of a virtual DOM can be found in several modern frameworks that exist today. You might even be using some right now and you don’t even know it.

The most common examples of Virtual DOM would be React, Mithril, and jQuery. The key here is that they all use a unique method for rendering changes to the DOM. The original DOM, as specified by the WC3, was never really intended or optimized for creating dynamic user interfaces.

Along with having to use memory to rewrite the entire DOM tree, you also load properties/attributes that are processed by your browser on demand. Yes, it’s inefficient. Luckily the world is a better place thanks to the arrival of the Virtual DOM.

Virtual DOM

The central benefit of a Virtual DOM is that it’s fast, faster than any kind of manual DOM rendering or manipulation.

Think of your DOM as a tree with each node of content as a branch. If you want to grow a new tree and a set of branches every time you pick a fruit (changed content), it just wouldn’t be sustainable.

Instead of re-rendering the entire DOM tree, we can simply keep an eye on the changes we’ve made, only replacing those elements on our page with the use of diffing. This avoids resources re-rendering nodes on a page or performing taxing DOM interactions unnecessarily.

Essentially we’ve abstracted our slowpoke DOM and created a replica of it that only renders the DOM changes which is traversed much more easily. Most Virtual DOM implementations work similarly.

Here’s a simple example that implements a Virtual DOM using Matt Esch’s handy library.

After installing the library with:

npm i virtual - dom


Our Example.js should look like this:

var createElement = require('virtual - dom / create - element')
var h = require('virtual - dom / h')
var diff = require('virtual-dom/diff')
        var patch = require('virtual-dom/patch')
            /* we load Hypersrcipt along with our diffing and 
               patching modules available in virtual-dom*/
        var vel = h('h1', 'Welcome to the world of Virtual DOM')
        var el = createElement(vel)
        document.body.appendChild(el)

        //we then patch new virtual elements after diffing the old ones.
        setTimeout(function() {
            var newVirtualElement = h('h1', 'New Virtual World')
            var patches = diff(vel, newVirtualElement) //we
            patch(el, patches)
            vel = newVirtualElement
        })


We can simulate a synchronous event by creating a new virtual element in our setTimeout function. We then designate a new patch by comparing our old elements with our new ones.

Lastly, we patch those changes to the DOM. A trivial example but it’s an indicator of the benefits in much larger applications.

Mithril Virtual DOM

There’s also Mithril.js. A framework with a tiny footprint at only 7.8k and no dependencies has an even simpler virtual DOM API than React.

Mithril provides methods for generating a DOM tree inside of a given HTML element. Should the method run more than once within the same root element, it will differentiate the new tree from the old one and intelligently modify only portions that have changed.

Compared to React, this optimized diffing algorithm doesn’t affect properties within elements of the DOM like inputs and focus ensuring safe user interactions. Here’s an example of Mithril Implementing Virtual DOM:

Example.js:

ensuring safe user interactions. Here’s an example of Mithril Implementing Virtual DOM:

Example.js:

var elements = [];

function Element() {
    this.isNew = true;
}

function elementView(element) {
    return m('li.element', {
        className: thing.isNew ? 'new' : 'notNew',
        config: function() {
            thing.isNew = false;
        }
    });
}

m.module(document.body, {
    controller: function() {},
    view: function() {
        return [
            m('button', {
                onclick: function() {
                    elements.push(new Element)
                }
            }, 'Add a thing'),
            m('ul', elements.map(elementView))
        ];
    }
});


In our CSS we denote the new elements rendered in red and untouched elements in black

CSS:

.element { & : before {
        content: ‘Element’
    }

    & .new {
        color: red;
    }
}


Notice how the state of our old elements doesn’t change as new ones are created. Mithril is great because you enjoy the same benefits in performance, security, and productivity with just plain old JavaScript functions.

React Virtual DOM

Facebook’s React.js provides its implementation of the virtual DOM.

React’s API allows users to describe a DOM tree directly in JavaScript. It does so by drawing a tree of custom objects representing a portion of the real DOM.

When a new div element is created it will create a React.div element, along with any children nodes like say an ordered list as React.ol. React can manipulate its virtual DOM quickly without needing the DOM to repaint thanks to its tree-diffing algorithm.

This stateless approach separates the view layer from the DOM, not only reducing complexity but improving performance as well. With React you are simply declaring how the view layer should look while abstracting the low-level DOM API methods.

Elements are rendered as if they were real DOM components. React controls the UI view by way of it’s components which in turn update the virtual dom. Those components specific to your app house the application-specific APIs and internal logic necessary for state management.

No matter the implementation, using Virtual DOM is about avoiding costly changes to the DOM. Those changes can be a detriment to performance if we call too many repaints of our application, especially at scale.

Conclusion

Whether you opt for Mithril’s minimal approach or React’s unique tree-diffing, the benefits are evident when you enjoy the optimized performance of a Virtual DOM on mobile devices.

If you want to secure your JavaScript source code against theft and reverse engineering, start your Jscrambler free trial.