


Category: Client-Side Security

What is Cross-Site Request Forgery?

Cross-Site Request Forgery (CSRF) is a type of attack that occurs when a malicious website/script causes unwanted actions at a trusted service using the authentication status of logged users without their knowledge.

How it works?

The client communicates with the server with the help of GET and POST requests. The server receives data sent by the client and executes given operations.

For example, when you change your password, the GET request could look like this:

/setpassword.php?pass=12345

…and like this in POST example

/setpassword.php

$_POST[‘pass’] = 12345

The server sets the new password for a logged-in user. But what if the same request is sent without your knowledge through a background process or from an external service? If you’re still logged in, it will do the same! There are a few ways to achieve that.

Somebody can send you a fixed link. In this case, it would be: /setpassword.php?pass=password It can be also any other external site. The link can be run by the JavaScript. It can be even hidden inside an <img> tag through the src attribute.

<img alt="" src="http://example.com/setpassword.php?pass=passwordofhijacker"/>


The browser will try to execute/download the image. Therefore, executing the script. Because this script has a footprint on the DOM tree, Jscrambler can notify your backend server about that and you can taint user session for further analysis or even block further requests/transactions.

/setpassword.php?pass=passwordofhijacker.

Is it a POST form?
They can lure you to a website that will execute a malicious form with the same fields as at the original site. The server will treat it in the proper form. Let’s go into a more detailed example.

Example of an attack scenario

You make a lot of shopping online so you often use the website of your bank. Let’s say the form for transferring money looks like this:
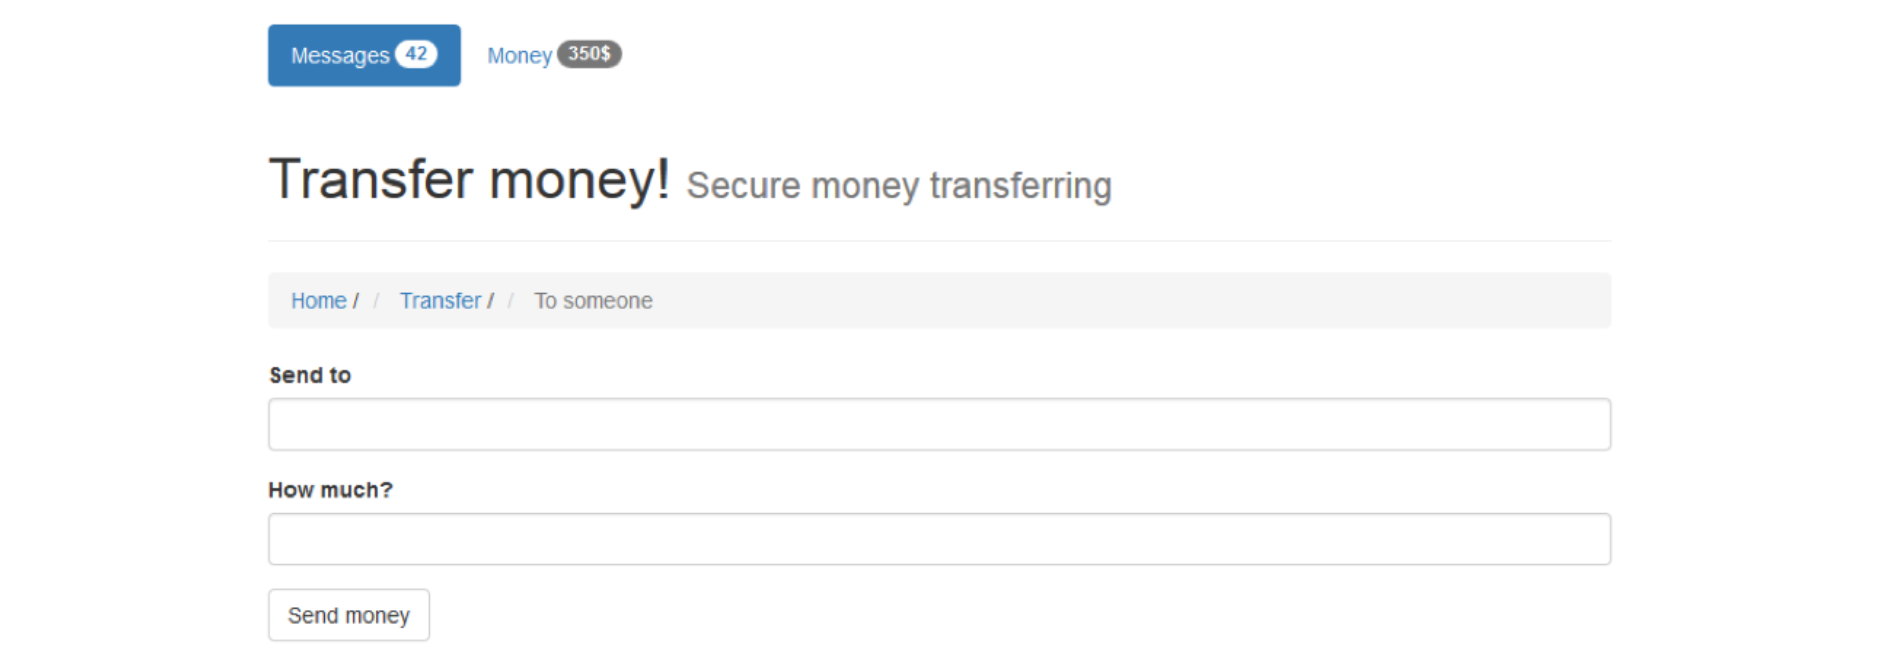
form-transferring-money-example-of-an-attack-scenarioYou have two important fields here. 

The number of the account you want to send money to and the value of the transfer. When you click “Send money” the form is submitted to the server. The server checks if you’re logged in and if you are, it sends the value specified in the “How much?” field to the “Send to” account. Everything is great.

But now, your friend knows that you’re a client of this bank and he’s just realized that it has a lot of security holes. He sends you a message with a link. You click it and see the photos of brand-new motorcycles.

You don’t even realize that there is a hidden form with a “Send To” and “How Much” already filled which will be automatically posted to the bank’s server. What does the server do with it?

Check if you’re logged in. You’re? Great! So money is transferred… Your friend has just received the money he spent on his purchase. So… How can you protect against it?

Ways to prevent CSRF

Checking HTTP Referrer header, origin header

It seems easy. You can do that. If a request comes from the other website you can just block it. But… What if the browser doesn’t give you this information? Or does Ads blocking or security software leave it empty?  You would probably have tons of criticism from the users. And what if the attack isn’t CSRF only? It’s not so hard to spoof any header from your browser. So it’s narrow solution…

Random tokens

The easiest way to defend against CSRF is to generate random tokens.  In that case server checks if the token is equal to that generated by the application before.

The attacker has no chance to know it. Unless the attacker will attack you by  XSS as well… Then getting your token is not a big problem.

Double submit cookie

Another way is “double submit cookie”. We generate a random value and send it by HTTP request and cookie. The server checks if they are the same. If not, it can report a CSRF attack.

Using ready solutions

There are ready solutions to deal with this CSRF. 

Anti-CSRF tools are already included in most frameworks and a lot of libraries. But… you have to remember about using them. It’s good when you generate tokens, but if you don’t validate it on the server, what’s the point in using them at all?

User interaction

Probably the best way is to extort user interaction for every operation, or at least the most important ones. It’s the safest way. What can we use? Captchamechanism,  Re-authentication, or one-time tokens (sms system for example) are widely used in banking. Of course, it’s not the most convenient solution. It can be annoying to the user.

Fight with CSRF in Node.js + Express

As I said before, there are a lot of ready solutions you can use. If you’re using Node.js with Express framework, you can use csurf. It’s easy to implement and do all the dirty work instead of you.

Take a look at a simple csurf example from gitHub.

Server-side

var cookieParser = require('cookie-parser')
var csrf = require('csurf')
var bodyParser = require('body-parser')
var express = require('express')

// setup route middlewares
var csrfProtection = csrf({
    cookie: true
})
var parseForm = bodyParser.urlencoded({
    extended: false
})

// create express app
var app = express()

// parse cookies
// we need this because "cookie" is true in csrfProtection
app.use(cookieParser());

app.get('/form', csrfProtection, function(req, res) {
    // pass the csrfToken to the view
    res.render('send', {
        csrfToken: req.csrfToken()
    })
});

app.post('/process', parseForm, csrfProtection, function(req, res) {
    res.send('data is being processed')
})


Client-side

<form action="/process" method="POST">
    <input type="hidden" name="_csrf" value="{{csrfToken}}" /> 
    Favorite color:
    <input type="text" name="favoriteColor" />
    <button type="submit">Submit</button>
</form>

How it Ranks in Top 10 Web Attacks

CSRF is not a well-known type of attack, but it was always quite high in the OWASP ranking.

In the 2013 ranking, it was placed at further position #8 and it seems that more and more developers remember to protect against it. It was once ignored by the web development and security communities, but now it has changed.

Recent CSRF attacks and damages

Among the victims of CSRF attacks, you can find such big brands as Digg.com, YouTube, INGDirect, MySpace, and Amazon.

In the case of digg.com, there was not so much harm, but the security hole in the shopping website allowed an attacker to change the address and buy something for himself… from the accounts of other users.

In the INGDirect case, hackers gained control of users’ accounts and they were able to transfer money! In YouTube’s case, hackers could add friends, like videos, and send messages on behalf of a hacked user.

At CVE Details you can see that developers still leave a lot of holes. Symfony 2.3.x before 2.3.35, 2.6.x before 2.6.12, and 2.7.x before 2.7.7, for instance, might allow remote attackers to have unspecified impact via a timing attack.

Limitations of the attack

CSRF attack is easy to prepare, but it’s not universal at all.

The attacker has to prepare a special script/form for a given attack. He has to know how is the website designed to make a proper request and, above all, he has to lure his victim to his malicious website. If malicious code uses JavaScript it can be also harmless due to no-script-like plugins.

Lastly, grab a copy of our free white paper about web supply chain attacks.

Immutable Data with Immutable.js

In this post, we will explore concepts about working with immutable data and immutable data structures using Immutable.js, which provides us with many highly efficient Immutable data structures.

Immutability refers to how data behaves after being instanced so that no mutations are allowed. In practice, mutations can be split into two groups: visible mutations and invisible mutations.

Visible mutations

Visible mutations are those that either modify the data or the data structure that contains it in a way that can be noted by outside observers through the API.

Invisible mutations

Invisible mutations are changes that cannot be noted through the API. In a sense, invisible mutations can be considered side effects.

The benefits

There are some benefits when compilers and runtimes can be sure that data cannot change:

  • Persistence becomes easier;

  • Copying becomes constant because you can’t change the data. You can only create a new reference from the existing instance of the original data by copying operation;

  • No locks are needed to synchronize data in multiple threads because the data cannot change.


The Immutable.js is a library created by Facebook to work with immutable collections in JavaScript. It provides many persistent immutable data structures like List, Stack, Map, OrderedMap, Set, OrderedSet, and Record.

Setting up the Immutable.js library

First, install the Immutable.js library. This library works on both Node.js and the browser. We use it on Node.js, but all the examples will work the same on the browser.

Let’s install immutable.js on our machine by running this command in the terminal:

npm install immutable


To test our first code, let’s create a simple immutable map:

var Immutable = require('immutable');
var client = Immutable.Map({
    name: 'John',
    age: 25
});
console.log(client.get('name')); // 'John'
console.log(client.get('age')); // 25


After you create a Map, you can use the map.get(‘key’) to access their data by providing a key.

If you need to update some data from this Map, use the map.set(‘key’) simple as that, but this function won’t change the current internal state of this Map because of the immutable behavior of this data structure, so instead of changing it internally, this function will return a copy of the current Map with some data changed.

See the example below:

var Immutable = require('immutable');
var client = Immutable.Map({ name: 'John', age: 25 });
var newClient = client.set('name', 'Mary');
console.log(newClient.get('name')); // 'Mary'
console.log(newClient.get('age')); // 25
console.log(client.get('name')); // 'John'
console.log(client.get('age')); // 25


Sometimes, tracking mutations and maintaining a state can be challenging to handle. Working with immutable data encourages you to think differently about how data flows through your application.

Immutable collections should be treated as values rather than objects.

While objects represent something that could change over time, a value represents the state of that thing at a particular instance in time. This principle is most important to understand the appropriate use of immutable data.

Exploring the data structures

  • List: is an immutable representation of an array. This List has the main functions of a JavaScript array:

var Immutable = require('immutable');
var scores1 = Immutable.List([2, 4, 6, 8]);
console.log(scores1.size); // 4
var scores2 = scores1.push(10); // [2,4,6,8,10]
var scores3 = scores2.pop().pop(); // [2,4,6]
var scores4 = scores3.shift(); // [4,6]
var scores5 = scores4.concat(10, 12, 14); // [4,6,10,12,14]
  • Stack: this is the classic FILO (first in, last out) data structure.  To modify the stack you can only use the push() and pop() methods and to access their elements you can use the get(index) method, take a look:

var Immutable = require('immutable');
var stack = Immutable.Stack();
var scores = stack.push(10, 12, 14);
console.log(scores.size); // 3
console.log(scores.get()); // 10
console.log(scores.get(0)); // 10
console.log(scores.get(1)); // 12
console.log(scores.get(2)); // 14
var newScores = scores.pop(); // [10, 12]
  • Map: is a key-value data structure, that represents a JavaScript object, but it’s an immutable one. In the constructor, you add the key and values. To access some value, you use the map.get(‘key’) and to change some value you use the map.set(‘key’, newValue), but this change will generate a new Map instead of mutating the current one. We have already seen the Map in action at the beginning of this post, so let’s jump to the next one.

  • OrderedMap: this is a mix of objects and arrays this data structure can be treated as an object by using the orderedMap.get(‘key’) and orderedMap.set(‘key’, newValue) functions, and there are some array methods too, like orderedMap.first() and orderedMap.last() methods. The keys are ordered based on the order in which they were added to the map. And you can re-define the order of these keys by using the orderedMap.sort() and orderedMap.sortBy() methods which will return a new ordered map.


var Immutable = require(‘immutable’); var clients = Immutable.OrderedMap() .set(‘John’, 25) .set(‘Mary’, 27); console.log(clients.first(), clients.last()); // 25, 27 console.log(JSON.stringify(clients)); // ‘{“John”: 25, “Mary”: 27}’ var olderClients = clients.sortBy(function(value, key) { return -value; }); console.log(JSON.stringify(olderClients)); // ‘{“Mary”: 27, “John”: 25}’

  • Set: is an immutable array of unique elements. No duplicated values are allowed, so if you add a duplicated value, the second one will be ignored.

var Immutable = require('immutable');
var set1 = Immutable.Set([1, 2, 3, 3]);
var set2 = Immutable.Set([4, 5, 5]);

console.log(set1.count()); // 3
console.log(set1.toArray()); // [1,2,3]
console.log(set2.count()); // 2
console.log(set2.toArray()); // [4,5]

var union = set1.union(set2);
console.log(union.count()); // 5
console.log(union.toArray()); // [1,2,3,4,5]
  • OrderedSet: This is a Set with keys ordered according to the time of addition, similar to OrderedMap, but it’s a Set.

var Immutable = require('immutable');
var orderedSet1 = Immutable.OrderedSet([1, 2, 2]);
var orderedSet2 = Immutable.OrderedSet([2, 1, 2]);

console.log(orderedSet1.count()); // 2
console.log(orderedSet1.toArray()); // [1,2]
console.log(orderedSet2.count()); // 2
console.log(orderedSet2.toArray()); // [2,1]

var intersected = orderedSet1.intersect(orderedSet2);
console.log(intersected.count()); // 2
console.log(intersected.toArray()); // [1,2]
  • Record: is a JavaScript class on which you can set default values. In the absence of a value, the default value will be used. This is useful to instantiate immutable objects.

var Immutable = require('immutable');
var Client = Immutable.Record({
    name: 'John',
    age: 25
});
var john = new Client();
console.log(john.toJSON()); // Object { name: 'John', age: 25 }
var mary = new Client({
    name: 'Mary',
    age: 20
});
console.log(mary.toJSON()); // Object { name: 'Mary', age: 20 }

Learning some useful functions

The immutable.js library has some useful functions that facilitate the manipulation of immutable data structures. Here are some useful modules you must learn how to use:

  • Immutable.Seq(): represents a sequence of values, but may not be backed by a concrete data structure. It allows you to run a chain of operations, see this example:

var object = Immutable.Seq({
        a: 1,
        b: 1,
        c: 1
    })
    .flip()
    .map(function(key) {
        return key.toUpperCase()
    })
    .flip()
    .toObject();
console.log(object); // Map { A: 1, B: 1, C: 1 }
  • Immutable.Range(): returns a sequence of numbers from start (inclusive) to end (exclusive), by step values. The default values for these variables are start=0, end=infinity, and step=1. When the start and end are equal values, it returns an empty range.

console.log(Immutable.Range()); // [0,1,2,3...]
console.log(Immutable.Range(5)); // [5,6,7,8...]
console.log(Immutable.Range(5, 10)); // [5,6,7,8,9]
console.log(Immutable.Range(5, 10, 2)); // [5,7,9]
console.log(Immutable.Range(5, 5)); // []
  • Immutable.Repeat(value, times): returns a sequence of values repeated by X times. When times are not defined, returns an infinite sequence.

console.log(Immutable.Repeat('john')); // ['john', 'john', 'john'...]
console.log(Immutable.Repeat('mary', 2)); // ['mary', 'mary']

Conclusion

This is a great library to handle with immutable data structures. It corrects the flaws of underscore.js and lodash libraries, namely that operations of different data structures were forced on JavaScript arrays and objects, mixing the concept of data types and losing immutability.

The name immutable.js reflects that we must deal with immutable data structures as a necessary condition for exercising pure functional programming.

Pay special attention if you’re developing commercial JavaScript apps with sensitive logic. You can protect them against code theft, tampering, and reverse engineering by starting your free Jscrambler trial.

Introduction to Koa.js

Koa.js, a next-generation web framework for node.js. In this article, we introduce this new framework so that you can decide whether it’s a valid alternative to Express or one you might like to try in your next project.

If you’re using Node.js to build an application that listens over HTTP – a web server, web application, or REST API – then chances are you’ll reach for Express, perhaps without even thinking about it.

Not without reason; it’s probably fair to say that it’s the “go-to” package for such purposes and is one of the most dependent packages in the Node ecosystem.

However, there are alternatives to Express. One such option is Koa.js.

What is Koa.js

Koa.js development belongs to the team behind Express. It aims to be a smaller, more expressive, and more robust foundation for web applications and APIs.

Its key feature is the use of ES6 generators. In practical terms, an application written using Koa.js contains far fewer callbacks. Behind the scenes, it still uses the asynchronous goodness from Node.js, but the code looks markedly different, cleaner, and easier to understand.

Judge for yourself when we come to look at some examples.

Hello World

Let’s implement the obligatory “Hello World”:

// server.js
var koa = require('koa');
var app = koa();

app.use(function*() {
    this.body = 'Hello World';
});

app.listen(80);


You’ll soon become accustomed to everything in Koa is middleware; app.use() is used extensively. You’ll note that there are no callbacks and that we can set the response body on the application object via the body property.

Depending on the version of Node you have installed, you may need to use the –harmony-generators flag when running it:

node--harmony - generators server.js


Rather than type this out each time, you can use the scripts property in your package.json file like so:

{
    ...
    "scripts": {
        "start": "node --harmony-generators server.js"
    }
    ...
}


You can run it simply by typing:

npm start


Now, let’s dive a little deeper.

Routing

Integral to any web application or API is routing.

One prominent characteristic of Koa.js is that it deliberately provides the minimum functionality out-of-the-box, so we’ll need to install some additional middleware.

The Koa route package provides middleware for routing. In other words, we can map URLs to methods.

Install it using npm:

npm install koa - route--save


Let’s modify our “Hello World” so that it returns the message for the URL /hello:

app.use(route.get('/hello', hello));

function* home() {
    this.body = 'Hello World';
}


Here’s a slightly more advanced example to demonstrate the use of route parameters:

app.use(route.get('/', home));
app.use(route.get('/page/:id', page));

function* home() {
    // Render the homepage
}

function* page(id) {
    // Render a page with the specified id
}


To implement these methods, it’s time to look at the templating.

Templating

We will use the co-views package, which uses the co for generator-based control flow to add templating functionality.

One of the great things about the co-views library is that it allows you to use one of many templating engine libraries — of which there are many options! — or even to use multiple engines in a single project. It also enables you to map file extensions to implementations.

Whichever engine you decide to use, note that you’ll need to make sure you install it separately; co-views doesn’t do that for you.


To illustrate how to use co-views, start by installing it along with a templating engine — in this example, ejs:

npm install co - views ejs--save


Then require it:

var views = require('co-views');


Now, we can use the views method to set up a render() method by supplying some configuration values.

In the following example, we’re specifying the location of our templates — a folder named views — and we’re “mapping” files with the .html extension to the EJS engine:

var render = views(__dirname + '/views', {
    map: {
        html: 'ejs'
    }
});


To render a view for a given route, you can do this; note that this assumes you have a template named views/index.html:

app.use(route.get('/', home));

function* home() {
    this.body =
        yield render('index');
}


Additionally, you can pass a hash of data as the second argument to render(), for example:

this.body =
    yield render('page', {
            title: 'Page title',
            body: 'The body of the page');


A typical page template might look like this:

<%- include( 'partials/header.html' ) -%>
    <h2><%= page.title %></h2>
    <%=p age.body %>

        <%- include( 'partials/footer.html' ) -%>


We can use this principle along with route parameters in a complete example, albeit one with a static hash of “pages” rather than something database-driven. Take a look at this example:

var pages = {
    about   :    {
        title: 'About',
        body: 'This is the about page'
    },
    contact   :    {
        title: 'Contact',
        body: 'This is the contact page'
    }
};

app.use(route.get('/', home));
app.use(route.get('/page/:id', page));

function* page(id) {
    var page = pages[id];
    if (!page) this.throw(404, 'No such page');
    this.body =
        yield render('page', {
            page: page
        });
}


This also demonstrates the throw method, which allows you to issue an error HTTP status: A 404 not found.

However, this will only throw a 404 when the route is prefixed with “page”; we also need a “catch-all” handler for routes that haven’t been defined. We’ll look at that in the next section.

Handling 404 Errors

One very important piece of functionality for web applications is handling page not found errors. We can do so by creating some simple middleware.

The code below shows how you might approach this with koa.js:

app.use(function* pageNotFound(next) {
    yield next;

    if (404 !== this.status) return;

    // Explictly set the status code
    this.status = 404;

    this.body =
        yield render('404');
});


Here we’re checking the status attribute of the application for the 404 status code; if we are indeed to handle a page not found, then we render out the 404.html template and tell koa.js to explicitly set the status code to 404 so that it doesn’t assign a status code of 200 to the rendered error page.

Here is a more advanced page not found handler, which customizes the output according to the request’s accept header:

switch (this.accepts('html', 'json')) {
    case 'html':
        this.type = 'html';
        this.body = '

        Page Not Found

            ';
        break;
    case 'json':
        this.body = {
            message: 'Page Not Found'
        };
        break;
    default:
        this.type = 'text';
        this.body = 'Page Not Found';
}

Summary

In this article, we’ve taken a brief look at Koa.js, an alternative to Express which leans heavily on generators.

It’s arguably easier to understand and debug than Express thanks to the lack of messy callbacks, which might be a convincing reason for you to give it a try.

On the flip side, because it’s younger than Express it doesn’t yet have the wide range of compatible packages available.

If you want to find out more about Koa.js, refer to its website, find it on Github, or check out this repository of examples.

If you want to secure your JavaScript source code against theft and reverse engineering, you can try Jscrambler for free.

15 Best Blogs To Follow About JavaScript

Today, we present 15 blogs to follow about JavaScript.

JavaScript is technically an easy programming language to learn. However, it provides so many possibilities that web developers must be constantly in touch with new resources and practices to make their code more effective.

The advantage, though, is that there is a lot of helpful information out there that can inspire and help developers to improve their projects. Explore our JavaScript blog curation.

1. Adequately Good

“Adequately Good” has an interesting foundation history: according to its creator, Ben Cherry, it was supposed to be a blog about Python. But then the 25-year-old developer discovered that he likes JavaScript, so most of his posts are about this language.

2. Adventures in Javascript Development

In “Adventures in Javascript Development” Rebecca Murphey not only shares technical Javascript tips but also describes her career journey and the experiences she had to become more effective as a developer and discusses equality in the workplace.

3. Brendan Eich

There’s no better source than the very own creator of the JavaScript language, Brendan Eich.

Co-founder of the Mozilla Project, Eich presents tutorials and articles about JavaScript and keeps readers in touch with many important events and conferences for the developers’ community, like TXJS and JSConf.EU.

4. David Walsh Blog

David Walsh is a web developer and software engineer. He works for Mozilla and also speaks at conferences and meetups like London AJAX, AustinJS, BrasilJS, etc.

In his blog, Walsh presents from career tips to tutorials and demos about React, Angular, Babel, and ES6.

5. Developer Drive

“Developer Drive” is a project from the same founders of the design blog called Webdesign Depot.com. Since 2011, they’ve been writing about JavaScript and library comparisons. Also, you’ll find articles and tutorials about PHP, HTML5, MySQL, and even C#.

6. Javascript Playground

“Javascript Playground” is a collaborative blog where you can find all kinds of JavaScript tutorials, like BackboneJS, FirefoxOS, NodeJS, jQuery, ReactJS, and more.

The site is hosted on a Github repository, so anyone can make changes and send new articles. To do this, you should create your fork of the repository, submit changes, and then create a pull request.

7. Javascript: The Right Way

“Javascript The Right Way” is more like a guide than a blog. The site brings tutorials, articles, and tips and also shows the top developers you should follow to be in touch with the language.

The page is maintained by the Brazilian developers William Oliveira and Allan Esquina but has contributors from other countries.

8. Joe Zim

Joe Zim created his blog to bring the best practices for modern web development to his public. The website started in 2011 with just an article per month. Today, it presents more than 150 articles and tutorials about JavaScript.

9. John Resig

Staff engineer at Khan Academy, Resig is the creator of the jQuery JavaScript library and he is also known for his books Pro JavaScript Techniques and Secrets of The JavaScript Ninja.

Besides showing some tutorials and tips, John Resig also brings some news about the development world in his blog, talking about careers and events.

10. NCZ Online

Nicholas C. Zakas is the author of many books about JavaScript, including High Performance JavaScript Professional and Professional AJAX. In his blog, he shares valuable tips and tutorials that can be useful for JavaScript and web developers.

11. Position: Absolute

In “Position: Absolute” you will be able to check interesting articles about HTML, CSS, Mobile, and JavaScript from the point of view of the front-end developer Cedric Dugas.

12. Sitepoint

“Sitepoint” was created more than 15 years ago by Mark Harbottle and Matt Mickiewicz and now it has 39 contributors. The website presents content about web development, including JavaScript, PHP, HTML, CSS, and even Design. It is a really good source even if you’re an expert or a beginner in this area.

13. Superhero.js

“Superhero.js” brings a collection of great articles, videos, and presentations about JavaScript coding. The website separates its content by categories, so the reader can navigate through articles about how to organize, test, get better performance, or secure JavaScript apps.

14. 2ality

Founded in March 2005 by Dr. Axel Rauschmayer, “2ality” is a relevant piece if you are looking for articles to get as close to ECMA specifications as possible. Besides tutorials, the website details the foundations of JavaScript language and the evolution of the specifications found in ES5 and ES6.

15. Web Appers

Created by the web developer and web designer Ray Cheung, “Web Appers” picks the best free JavaScript resources to help other people’s projects. Also, it presents tons of content for web designers. You just have to choose between the type of licenses that suits your project the best: Creative Commons, BSD, GPL, LGPL, MIT, and License Free.

Conclusion

Pay special attention if you are developing commercial JavaScript apps with sensitive logic.

You can protect them against code theft, tampering, and reverse engineering by starting your free Jscrambler trial.

The Integrity of your JavaScript Applications Is Being Compromised And You (Don’t) Know It

Many companies are unaware that their JavaScript applications don’t run as desired. Why is this happening?

The release of Jscrambler 4.0 last week was a success! Our new interface and features are up and running and available for anyone to try them on their JavaScript applications.

The release was also featured in the Huffington Post. We’re sharing the piece with you on our blog in case you’ve missed it.

The JavaScript Apps Integrity

“All sorts of companies are using JavaScript nowadays to build applications and websites. Most of them are unaware that at the same time, their applications don’t exactly run as designed, and are subject to tampering, hacking, or crippling. This interference is most of the time intentional but can sometimes be accidental.

The security of JavaScript applications is a well-founded concern. In the last few years, several cases of pirated app websites being closed down have been witnessed. Pirates attempt to reverse-engineer the apps and create clones. App stores often have screening lapses and modified copycats end up on App stores, competing with the legitimate versions. This reportedly happens on Apple’s App Store, Google Play, Windows Store, and Blackberry World.

This problem should get worse before it gets better. Mobile application sales are predicted to reach $77 billion by 2017. This will cause the problem of counterfeit or pirated apps to increase and it affects both developers, their brands, and the users that download them. Who wouldn’t like a piece of the $50,000 that Flappy Bird game was making out of in-app advertising and sales?

Web application tampering

Web Application Tampering is also becoming increasingly prevalent. Attackers first try to control the device, by infecting it with malware or by tricking the user to install some browser plugin. They then tamper with the client side directly by injecting malicious code. The goal is to capture and exfiltrate sensitive data such as user credentials or credit card information, steal money, change the appearance of the app, or trick the user into unwanted actions.

The banking sector and other industries

The banking sector has been particularly affected by tens of millions of dollars stolen from users’ bank accounts. But companies from all sectors (e-commerce, media, among others) are risking having their platforms changed and the experience of their users tampered with, with consequences to their business and reputation.

Malware sometimes also installs malicious ads that are shown when you visit specific websites. But tampering is not only performed by malware, and it’s not always involuntary. Users are installing browser plugins to have price comparisons injected into e-commerce websites. It can get them better deals, but from those e-commerce websites’ perspective, it’s stealing a significant percentage of their customer web traffic.

JavaScript is the common denominator to all issues affecting the application’s integrity. The reason why it is so easy to tamper with mobile and web applications is in part due to the nature of JavaScript language. It’s a very dynamic language that allows one to easily add/inject code that interferes with the existing code of the application and makes it do something else.

JavaScript prominence

And it is here to stay. According to Gartner’s Technical analyst Danny Brian, “JavaScript’s prominence is a byproduct of the browser being ubiquitous, whether that’s desktop, mobile or other platforms like native desktop applications using the browser wrapped up and deployed or built with HTML5”. So, if we need to live with it, perhaps we can make it stronger and more resilient to tampering.

Jscrambler, the Web Security startup with a focus on JavaScript Security, claims to have done just that. It launches version 4 of its service today which takes it from a code security tool to a completely re-engineered platform that aims to make sure JavaScript-based applications are executed the way they were developed to be.

Jscrambler gives companies the ability to transform their JavaScript apps so they can conceal the logic in the code. On top of that, it allows the possibility to add Code Traps – controls that are added to the code to enforce restrictions such as making the code only run in the right domain or the right browser – and finally makes the Application self-defensive, a feature which makes the application defend itself from tampering and reverse-engineering attacks.

With this new version, Jscrambler expects to offer a solution that takes the necessary protection to JavaScript. “Version 4 brings the product from a code protection solution to a platform that provides a tamper-proof environment to the application, making sure it is executed without interferences and by legitimate users only.”, says Pedro Fortuna, CTO of Jscrambler.

According to the company, the new level of resilience comes from stopping attackers from automating attacks to the code by making Jscrambler’s code transformations more polymorphic – which means the protection engine will produce very distinct obfuscated versions with each build – and by introducing new cutting-edge features to further conceal any sensitive logic and data contained in the code. As reported by Jscrambler, a switch to a more app-centric platform was also a goal for this version.

They claim developers can now easily manage the protection of their apps within Jscrambler. A new interface can provide an almost instant preview of the resulting protected code as options are selected, making it easier to understand the individual effect of each applied transformation. “The choice of transformations and where they are applied has gotten also simpler and straightforward. You can pick each target you want to transform, be it strings, classes, or functions, and see the effects on your code in real-time. Easily creating your app, swiftly managing its different versions, effectively protecting it and deploying it – those were our goals and we guarantee security professionals and developers will enjoy the experience”, concluded Pedro Fortuna.

Companies are still getting used to this Web and Mobile world where JavaScript is centered. Now that the code they write is shipped to all sorts of devices, it’s safer to assume that the application integrity will be compromised. It’s just a question of when, and for what reason.”

This article was originally published in the Huffington Post.

Documenting APIs using ApiDoc.js

Learn how to write and generate elegant API documentation.

Introduction to ApiDoc.js

It is a good practice to provide detailed documentation about how the client applications can connect and consume the data from an API. The coolest thing is that we will use a simple tool that generates documentation through the code’s comments.

ApiDoc.js is a Node.js CLI module to generate the documentation.

You can install it as a global module to enable the new command apidoc into your terminal, so run this command:

npm install apidoc - g

Building an API

Obs.: In our example, we are going to use the Express web framework to build an API and to simplify things we won’t write any business rules in the routes, we’ll only create all empty routes to be able to write their necessary documentation.

So first, let’s create the task-api project and install the express module:

mkdir task - api
cd task - api
npm init
npm install express--save


To build our API code, let’s create the index.js:

var express = require('express');
var app = express();

// Serving static files from "public" folder
app.use(express.static('public'));

app.get('/tasks', function(req, res) {
    // business logic for list all tasks...
});
app.get('/tasks/:id', function(req, res) {
    // business logic for find a task...
});
app.post('/tasks', function(req, res) {
    // business logic for create a task...
});
app.put('/tasks/:id', function(req, res) {
    // business logic for update a task...
});
app.delete('/tasks/:id', function(req, res) {
    // business logic for delete a task...
});
app.listen(3000, function() {
    console.log('Task api up and running...');
});


The app.use(express.static(‘public’)) middleware will enable a static server for the public folder, this directory will be used to put all the generated documentation’s file.

Documenting all API routes

Well, now we can write the documentation of our API. In order to do it, you just need to use some comments params provided by apidoc, you can see all params.

To start our documentation process, first, you need to create a descriptor file called apidoc.json in the root folder with these attributes:

{
    "name": "Task API documentation",
    "version": "1.0.0",
    "description": "API task list manager",
    "template": {
        "forceLanguage": "en"
    }
}

The template.forceLanguage disables the browser language detection, in this case, it will force the English language.

Now, let’s start the documentation process, by editing the index.js, route by route, the first will be the app.get(‘/tasks’) function, and in this route, we’re gonna use the following params:

  • @api: HTTP method, the path address, and the route’s title;

  • @apiGroup: route group name;

  • @apiSuccess: describes the fields and their data types for a successful response;

  • @apiSuccessExample: shows an output sample about a successful response.

  • @apiErrorExample: shows an output sample about a failed response.


Have a look:

/**
 * @api {get} /tasks List all tasks
 * @apiGroup Tasks
 * @apiSuccess {Object[]} tasks Task's list
 * @apiSuccess {Number} tasks.id Task id
 * @apiSuccess {String} tasks.title Task title
 * @apiSuccess {Boolean} tasks.done Task is done?
 * @apiSuccess {Date} tasks.updated_at Update's date
 * @apiSuccess {Date} tasks.created_at Register's date
 * @apiSuccessExample {json} Success
 *    HTTP/1.1 200 OK
 *    [{
 *      "id": 1,
 *      "title": "Study",
 *      "done": false
 *      "updated_at": "2016-02-10T15:46:51.778Z",
 *      "created_at": "2016-02-10T15:46:51.778Z"
 *    }]
 * @apiErrorExample {json} List error
 *    HTTP/1.1 500 Internal Server Error
 */
app.get('/tasks', function(req, res) {
    // business logic for listing all tasks...
});


The next route, the app.get(‘/tasks/:id’), will use all params from the previous one and one more param:

  • @apiParam: describes the fields and their data types for a path parameter;

/**
 * @api {get} /tasks/:id Find a task
 * @apiGroup Tasks
 * @apiParam {id} id Task id
 * @apiSuccess {Number} id Task id
 * @apiSuccess {String} title Task title
 * @apiSuccess {Boolean} done Task is done?
 * @apiSuccess {Date} updated_at Update's date
 * @apiSuccess {Date} created_at Register's date
 * @apiSuccessExample {json} Success
 *    HTTP/1.1 200 OK
 *    {
 *      "id": 1,
 *      "title": "Study",
 *      "done": false
 *      "updated_at": "2016-02-10T15:46:51.778Z",
 *      "created_at": "2016-02-10T15:46:51.778Z"
 *    }
 * @apiErrorExample {json} Task not found
 *    HTTP/1.1 404 Not Found
 * @apiErrorExample {json} Find error
 *    HTTP/1.1 500 Internal Server Error
 */
app.get('/tasks/:id', function(req, res) {
    // business logic for finding a task...
});


In the app.post(‘/tasks’), it will be used the @apiParam and @apiParamExample, explain how to send data via a body request, and the @apiSuccess {Boolean} done=false Task is done? is different from the others, because the done=false means default values for a field, in this case, the done field.

/**
 * @api {post} /tasks Register a new task
 * @apiGroup Tasks
 * @apiParam {String} title Task title
 * @apiParamExample {json} Input
 *    {
 *      "title": "Study"
 *    }
 * @apiSuccess {Number} id Task id
 * @apiSuccess {String} title Task title
 * @apiSuccess {Boolean} done=false Task is done?
 * @apiSuccess {Date} updated_at Update date
 * @apiSuccess {Date} created_at Register date
 * @apiSuccessExample {json} Success
 *    HTTP/1.1 200 OK
 *    {
 *      "id": 1,
 *      "title": "Study",
 *      "done": false,
 *      "updated_at": "2016-02-10T15:46:51.778Z",
 *      "created_at": "2016-02-10T15:46:51.778Z"
 *    }
 * @apiErrorExample {json} Register error
 *    HTTP/1.1 500 Internal Server Error
 */
app.post('/tasks', function(req, res) {
    // business logic for creating a task...
});


To write the app.put(‘/tasks/:id’) and app.delete(‘/tasks/:id’) route’s documentation, there is no secret and no new params to explain, so take a look at how both will be written:

/**
 * @api {put} /tasks/:id Update a task
 * @apiGroup Tasks
 * @apiParam {id} id Task id
 * @apiParam {String} title Task title
 * @apiParam {Boolean} done Task is done?
 * @apiParamExample {json} Input
 *    {
 *      "title": "Work",
 *      "done": true
 *    }
 * @apiSuccessExample {json} Success
 *    HTTP/1.1 204 No Content
 * @apiErrorExample {json} Update error
 *    HTTP/1.1 500 Internal Server Error
 */
app.put('/tasks/:id', function(req, res) {
    // business logic for update a task
});

/**
 * @api {delete} /tasks/:id Remove a task
 * @apiGroup Tasks
 * @apiParam {id} id Task id
 * @apiSuccessExample {json} Success
 *    HTTP/1.1 204 No Content
 * @apiErrorExample {json} Delete error
 *    HTTP/1.1 500 Internal Server Error
 */
app.delete('/tasks/:id', function(req, res) {
    // business logic for deleting a task
});


Let’s generate the docs! To do it, just run these commands below:

apidoc - e "(node_modules|public)" - o public / apidoc
node index.js


The apidoc command will filter for all files, except from the folders node_modules and public, because it was using the flag -e “(node_modules|public)” to ignore these directories, and all generated files will be into public/apidoc folder. After running these commands you will be able to access the address: http://localhost:3000/apidoc.

This time, we have a complete documentation page that describes step-by-step how to create a client application to consume data from the API. Take a look at the image below:

api-documented

Conclusion

Now you have a well-documented API and this will allow other developers to create client-side applications using the API through the rules of the API documentation.

Before deploying your commercial or enterprise JavaScript apps to production, make sure you are protecting their code against reverse-engineering, abuse, and tampering with Jscrambler.

Start your free trial today!

Jscrambler 4.0 is Here!

We have released our latest version, Jscrambler 4.0!

It is a breakthrough for JavaScript Security. You will notice many improvements, from our interface to our transformations, to ensure the integrity of your JavaScript applications is always protected and that the users’ experience is never compromised.

We hope you like all of it and give us your feedback!

Untraceable Protection

Our team of JavaScript security experts has gone further to ensure any attempt to attack or reverse your application is unfeasible.

With Jscrambler 4.0, all transformations work together to ensure your applications’ code is transformed into a distinct and obfuscated version with each protection.

Every time it runs, your code will take up a new form so that no traces are left behind by potential attackers.

New cutting-edge transformations

We added 18 new transformations to our list of unique others already available and that makes Jscrambler the only solution that is capable of actually protecting your JavaScript application.

Special mentions to the possibility of making your control flow completely flat and the new option of hiding all the regular expressions on your code. Two incredibly resilient techniques, among many others, will make your application inscrutable.

Application Management & Creation

Jscrambler 4.0 was developed to meet the needs of the application developer, be it web, mobile, node.js, or others. Thus, a switch to an app-centric platform was a clear path for us. Easily creating your app, swiftly managing its different versions, effectively protecting it, and deploying it with the assurance that your business is as safe as possible – those were our goals and we guarantee you’ll enjoy the experience.

Even more developer-friendly

The new Jscrambler Protection Platform was thought and designed to give the ultimate experience for developers wanting to choose the ideal protection features for their JavaScript Applications. The new Side-to-Side tool allows you to have a preview of the original and the transformed code at all times, making it easier to understand the resilience and potency of every applied transformation.

The choice of transformations and where you apply them is also more straightforward. You can pick each target you want to transform, be it strings, classes, functions, you name it, and see the effects on your code in real time.

Protect when you want, where you want

Jscrambler 4.0 brings yet another enhancement to an existent feature – Ignore Code Blocks – that will bring even more flexibility and control to the process of fine-tuning the set of transformations that will protect your app.

From now on it will be possible to change the transformations’ behavior using code annotations (a.k.a. code comments), namely allowing to:

  • Enable/disable a transformation

  • Change transformation parameters

  • Change transformation order

How can I Get It?

Go to our home page and click on the header bar. You will be able to start trying the 4.0 version of Jscrambler right away. Give us our feedback!

Understanding CORS: Cross-Origin Resource Sharing

This article aims to provide a straightforward overview of Cross-Origin Resource Sharing (CORS) and the reasoning behind it.

Background

AJAX and Cookie-Based Authentication

Thankfully, we don’t have to enter a username and password on every visit to most websites to interact with our data. Instead, logging in once results in some indicator of our identity being stored by the browser in a cookie.

Subsequent requests automatically include cookies associated with the site in question, granting the same access we acquired with our initial login.

Relatively few of the HTTP requests issued by complex web applications are the result of typing a URL into a browser or clicking a link.

Most are sent asynchronously via AJAX as we interact with the elements within a page. These requests may also include credentials stored in the browser’s cookies to authorize access to private or account-specific data.

Cross-Site Request Forgery

Since credentials may be included in AJAX requests once a cookie is stored in the browser, a whole world of devious possibilities seems to be available.

What’s to stop me from creating a website that sends an AJAX request to Pizza Hut with the message “the currently logged-in user orders one million pizzas”? As long as a visitor to my malicious site has credentials for their Pizza Hut account stored in their browser, shouldn’t my scheme work?

In some specific cases, historically anyway, the answer was yes. Such an exploit is called a cross-site request forgery (CSRF or XSRF). It’s a particularly nasty trick because if Pizza Hut were to review their logs, all they would see was that a valid request was made by a logged-in user with good credentials.


The Same-Origin Policy

Exploits such as CSRF are prevented in most cases by the same-origin policy. The same-origin policy is a rule enforced by web browsers that prevents scripts originating in one domain from making requests to another.

Pages served by pizzahut.com should be able to communicate freely with any other resources that originate within pizzahut.com. But, by the same-origin policy, scripts served from the domain of my malicious site would not be allowed to send requests to Pizza Hut.

Cross-Origin Resource Sharing

JSONP

One ill-advised way to work around the same-origin policy—and thereby negate its benefits—is to make use of JSONP. While the same-origin policy restricts AJAX requests across domains, remote scripts loaded via the src attribute of script elements are not so restricted.

Instead of requesting pure JSON data, using JSONP one would request an actual string of JavaScript that passes the desired JSON data into a local function.

This is best illustrated with a simple example:

<script>
    function logMessage(json) {
        console.log(json.message);
    }
</script>
<script src="http://example.com/jsonpMessage?cb=logMessage"></script>


The dynamically generated script loaded by the second element would be something like:

logMessage({
    message: 'Hello world!'
});


It should be fairly obvious that running external scripts introduces a variety of security vulnerabilities for the client. And since cookies are sent along with the request for a JSONP script, the potential for CSRF is reintroduced. Instead of circumventing the same-origin policy, it’s best to work with it using the tools of CORS.


CORS

If the same-origin policy was set in stone and without exceptions, much of the modern web would not work. Many web services are designed specifically to be consumed by scripts running on other websites. This is achieved safely using the conventions associated with the subject of this article: cross-origin resource sharing (CORS).

The general principle of CORS is simple: resources available on the web may define their allowable exceptions to the single-origin policy. These exceptions are coordinated through the use of specific request and response headers:

  • Request headers – Origin

  • Access-Control-Request-Method

  • Access-Control-Request-Headers

  • Response headers – Access-Control-Allow-Origin

  • Access-Control-Allow-Credentials

  • Access-Control-Expose-Headers

  • Access-Control-Max-Age

  • Access-Control-Allow-Methods

  • Access-Control-Allow-Headers


Let’s say we wanted to provide a service at /temp that responds to AJAX GET requests from the external site example.com with a JSON object containing the current temperature in Orlando, FL. All we need to do to enable this cross-domain resource sharing is ensure that the requests from example.com include the header:

Origin: example.com

(which they will by default), and that our responses include the header:

Access-Control-Allow-Origin: example.com


This is the basic mechanism of CORS: requests include headers indicating what is being requested, and responses include headers indicating what is allowed. If there is agreement, the cross-domain request is permitted.

In this example, since we are only dealing with GET requests for public information, we can open our service up to be used by any external domain by responding with the header:
Access-Control-Allow-Origin: *


However, if we wanted to allow incoming AJAX requests to include the browser’s cookies containing user credentials to access private, account-bound data, we would need to respond with the additional header:
Access-Control-Allow-Credentials: true

As you can see, the sometimes annoying configuration of Access-Control headers provides fine-grained control over exceptions to cross-origin constraints.

Preflight

Sending a GET request along with an access token to fetch private information is certainly powerful, but it’s the type of thing we do regularly when typing a URL into a browser’s address bar.

GET requests should have zero risk of resulting in the destruction or manipulation of server-side data. Other types of requests—PUT, DELETE, certain POSTs, etc.—are inherently riskier, and therefore require an additional security measure when using CORS.

Instead of making an AJAX request directly and checking the relevant headers, a web browser making more sensitive requests will first send a “preflight” request: a request using the OPTIONS method that essentially asks permission before sending the more sensitive request upon confirmation.

For example, if one were to send an AJAX DELETE request to another domain, the browser would first send an OPTIONS request with the header:

Access-Control-Request-Method: DELETE

If the response contained the header:

Access-Control-Allow-Methods: DELETE

along with an appropriate Access-Control-Allow-Origin header, then the desired DELETE request would be sent.

Conclusion

There are, of course, many more details associated with cross-origin resource sharing and the reasoning behind it. You may wish to read the official W3 recommendation, which includes all of the technical specifications.

Hopefully, this article has provided a conceptual overview that will enable you to deal confidently with CORS going forward.

As a final note, if you’re interested in knowing more about the growing threat of web supply chain attacks, download our free white paper about the mitigation of web supply chain attacks.

Testing APIs with Mocha

You can test APIs effectively with Mocha.

Creating automated tests is something highly recommended. There are several types of tests: unitary, functional, integration, and others. In this chapter, we will focus only on the integration tests. In our case, we aim to test the outputs and behaviors of the API routes.

Creating an API with Express

First of all, we need to build a small and simple API which will be called task-api and we will add some routes that will be enough to manage a task list. After that, we will create some tests. For this purpose, let’s create a Node.js project by running these commands:

mkdir task - api
cd task - api
npm init


Let’s install some useful modules to build our API. We’ll use: express as a web framework, body-parser as a JSON serializer, lowdb as JSON database, and uuid as a unique ID generator. To install them, just run this command:

npm install express body - parser lowdb uuid--save


With all dependencies installed, let’s build our API by creating the index.js file in the project’s root:

// Loading modules
var express = require('express');
var lowdb = require('lowdb');
var storage = require('lowdb/file-sync');
var uuid = require('uuid');
var bodyParser = require('body-parser');
// Instantiating express module
var app = express();
// Instantiating database module
// This will create db.json storage in the root folder
app.db = lowdb('db.json', {
    storage: storage
});
// Adding body-parser middleware to parser JSON data
app.use(bodyParser.json());
// CRUD routes to manage a task list
// Listing all tasks
app.get('/tasks', function(req, res) {
    return res.json(app.db('tasks'));
});
// Finding a task
app.get('/tasks/:id', function(req, res) {
    var id = req.params.id;
    var task = app.db('tasks').find({
        id: id
    });
    if (task) {
        return res.json(task);
    }
    return res.status(404).end();
});
// Adding new task
app.post('/tasks', function(req, res) {
    var task = req.body;
    task.id = uuid();
    app.db('tasks').push(task)
    return res.status(201).end();
});
// Updating a task
app.put('/tasks/:id', function(req, res) {
    var id = req.params.id;
    var task = req.body;
    app.db('tasks')
        .chain()
        .find({
            id: id
        })
        .assign(task)
        .value()
    return res.status(201).end();
});
// Delete a task
app.delete('/tasks/:id', function(req, res) {
    var id = req.params.id;
    app.db('tasks').remove({
        id: id
    });
    return res.status(201).end();
});
// API server listing port 3000
app.listen(3000, function() {
    console.log('API up and running');
});
// Exporting the app module
module.exports = app;

Introduction to Mocha

To create and execute these tests, we will have to use a test runner. We’ll use Mocha which is very popular in the Node.js community.

Mocha has the following features:

  • TDD style;

  • BDD style;

  • Code coverage HTML report;

  • Customized test reports;

  • Asynchronous test support;

  • Easily integrated with the modules: should, assert, and chai.


And it is a complete environment to create tests. You can learn more about it by accessing: mochajs.org.

Setting up the test environment

In our project, we are going to explore integration tests to create some tests for our API routes. To create them, we are going to use these modules:

  • mocha: the main test runner;

  • chai to write BDD tests via the expect function;

  • supertest to do some requests in the API’s routes;


So let’s install them:

npm install mocha chai supertest--save - dev


Now, let’s encapsulate the mocha test runner into the npm test alias command to internally run the command: NODE_ENV=test mocha test/**/*.js which is responsible for running all tests. To start the API server, we are going to use the npm start alias command to run the node index.js command.

To implement these new commands, edit the package.json and include the scripts.start and scripts.test attributes:

{
    "name": "task-api",
    "version": "1.0.0",
    "description": "Task list API",
    "main": "index.js",
    "scripts": {
        "start": "node index.js",
        "test": "NODE_ENV=test mocha test/**/*.js"
    },
    "dependencies": {
        "body-parser": "^1.15.0",
        "express": "^4.13.4",
        "lowdb": "^0.12.5",
        "uuid": "^2.0.2"
    },
    "devDependencies": {
        "chai": "^3.5.0",
        "mocha": "^2.4.5",
        "supertest": "^1.2.0"
    }
}


To finish our test environment setup, let’s prepare some Mocha settings. This helper will load the API server and the chai, supertest, and uuid modules as global variables. To implement this helper, create the file test/helpers.js file:

var supertest = require('supertest');
var chai = require('chai');
var uuid = require('uuid');
var app = require('../index.js');

global.app = app;
global.uuid = uuid;
global.expect = chai.expect;
global.request = supertest(app);


Then, let’s create a simple file that allows the inclusion of some settings as parameters to the mocha module. This will be responsible for loading first the test/helpers.js and also use the –reporter spec flag to customize the test’s report. So, create the test/mocha.opts file using the following parameters:

--require test / helpers
    --reporter spec

Writing tests

We finished the setup related to the test environment. What about actually testing something? What about writing some tests for the API?

To create tests, first, you need to use the describe function to describe what this test is for, and inside it, you create tests by using the it function. You can also use nested descriptions.

In all of the tests, we are going to use the request module to make some requests in the routes of our API.

To validate the tests’ results we use the expect module, which has a lot of useful functions to check if some variable is responding according to an expected behavior.

Finally, to finish a test you must run in the the done function. To learn all assertion functions from the expect module, you can take a look at chai BDD style documentation and you can learn about everything from the supertest module too.

To see in practice how to write tests, let’s create the main test/routes/index.js file and write these tests below:

describe('Task API Routes', function() {
    // This function will run before every test to clear database
    beforeEach(function(done) {
        app.db.object = {};
        app.db.object.tasks = [{
            id: uuid(),
            title: 'study',
            done: false
        }, {
            id: uuid(),
            title: 'work',
            done: true
        }];
        app.db.write();
        done();
    });

    // In this test it's expected a task list of two tasks
    describe('GET /tasks', function() {
        it('returns a list of tasks', function(done) {
            request.get('/tasks')
                .expect(200)
                .end(function(err, res) {
                    expect(res.body).to.have.lengthOf(2);
                    done(err);
                });
        });
    });

    // Testing the save task expecting status 201 of success
    describe('POST /tasks', function() {
        it('saves a new task', function(done) {
            request.post('/tasks')
                .send({
                    title: 'run',
                    done: false
                })
                .expect(201)
                .end(function(err, res) {
                    done(err);
                });
        });
    });

    // Here it'll be tested two behaviors when try to find a task by id
    describe('GET /tasks/:id', function() {
        // Testing how to find a task by id
        it('returns a task by id', function(done) {
            var task = app.db('tasks').first();
            request.get('/tasks/' + task.id)
                .expect(200)
                .end(function(err, res) {
                    expect(res.body).to.eql(task);
                    done(err);
                });
        });

        // Testing the status 404 for task not found
        it('returns status 404 when id is not found', function(done) {
            var task = {
                id: 'fakeId'
            }
            request.get('/tasks/' + task.id)
                .expect(404)
                .end(function(err, res) {
                    done(err);
                });
        });
    });

    // Testing how to update a task expecting status 201 of success
    describe('PUT /tasks/:id', function() {
        it('updates a task', function(done) {
            var task = app.db('tasks').first();
            request.put('/tasks/' + task.id)
                .send({
                    title: 'travel',
                    done: false
                })
                .expect(201)
                .end(function(err, res) {
                    done(err);
                });
        });
    });

    // Testing how to delete a task expecting status 201 of success
    describe('DELETE /tasks/:id', function() {
        it('removes a task', function(done) {
            var task = app.db('tasks').first();
            request.put('/tasks/' + task.id)
                .expect(201)
                .end(function(err, res) {
                    done(err);
                });
        });
    });
});


Now, run all the tests. To do so, just run the command:

npm test


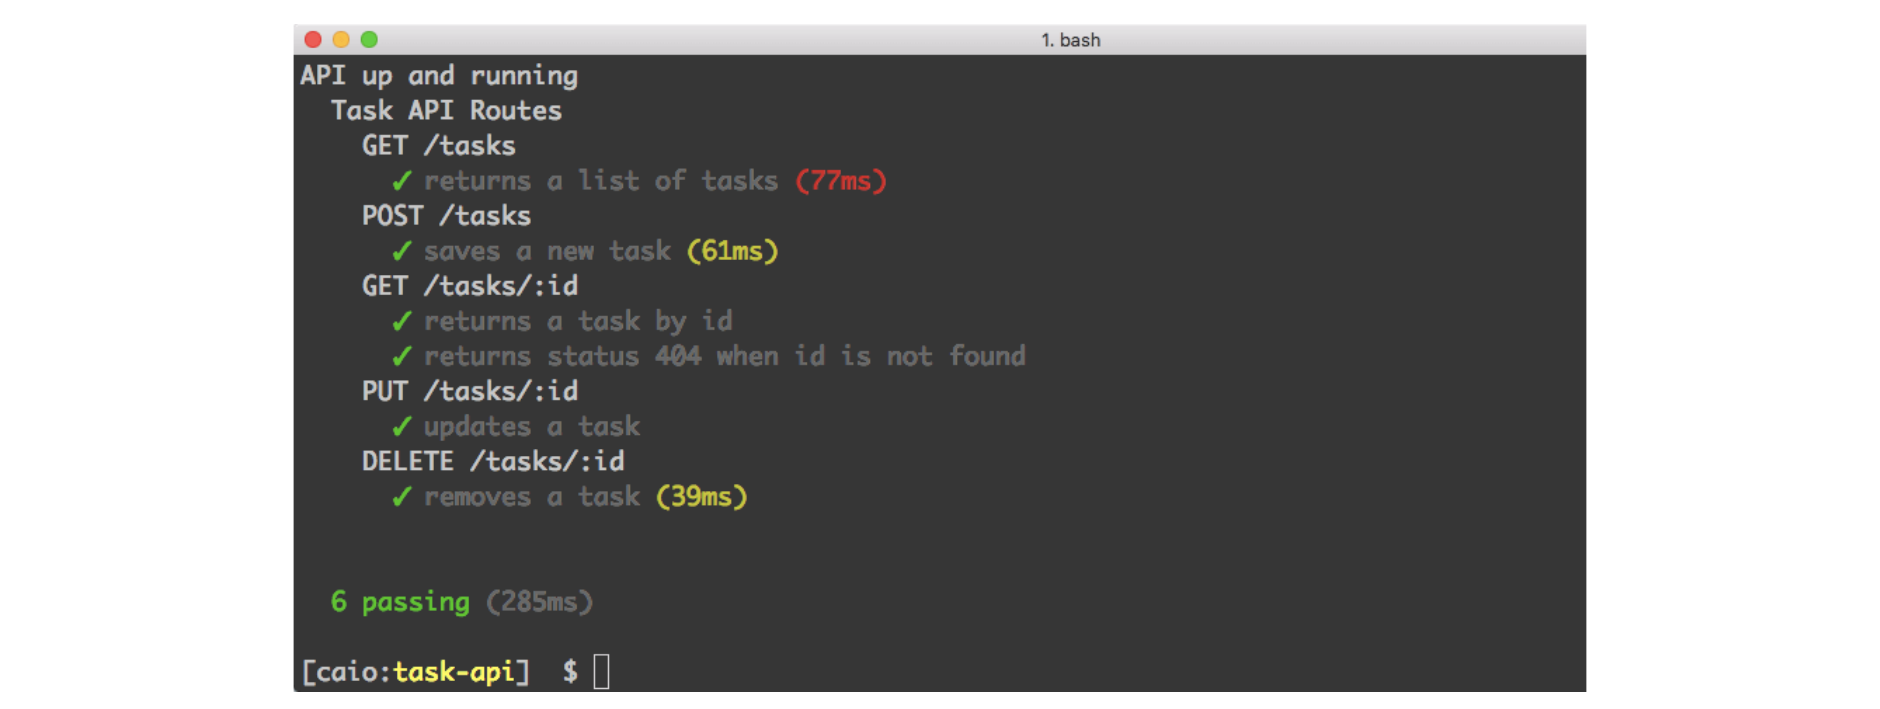
And see with your own eyes the successful result of these tests:
test-result-of-testing-APIs-with-Mocha

Conclusion

If you reached this point, then you have created a small API using Node.js with some integration tests to ensure the code quality of your project. This was all attained using some popular frameworks like mocha, chai, and supertest.

Pay special attention if you’re developing commercial JavaScript apps that contain sensitive logic. You can protect them against code theft, tampering, and reverse engineering by starting your free Jscrambler trial.

Getting Started with GraphQL

GraphQL is a data query language and runtime. It is also a declarative, compositional, and strong-typed query language for querying dynamic data with a strong-typed schema.

The client gets to pick what it needs based on declarative syntax. The data is a hierarchical set of fields and queries that resemble the data. I like to think of it as a structured query language without SQL. This makes it easy for a product engineer to describe the data with declarative syntax.

Facebook has used this library since 2012 and recently went open source. The library has been on GitHub since 2015.

Type System

One of the features you get with GraphQL is a type system. This type system comes with introspection so you can query the types. This unit test illustrates how I query the sample schema:

const query = `
      query IntrospectionHumanTypeQuery {
        __type(name: "Human") {
          name
        }
      }
    `;

graphql.graphql(schema, query).then(function(result) {
    should(result.data.__type.name).equal('Human');
});


The schema points to a sample schema. I decided to stick with vanilla JavaScript in spite that GraphQL sits on top of Babel. Note that the query mimics the data I get back. I get a type.name which is close to the query of query { type { name } }.

There is a hierarchy between __type and name, just like the structure of the data. Queries return a Promise so I follow it up by then().

Unto the crux of this schema, below is the Human type I created:

const humanType = new graphql.GraphQLObjectType({
    name: 'Human',
    fields: {
        id: {
            type: new graphql.GraphQLNonNull(graphql.GraphQLInt)
        },
        name: {
            type: graphql.GraphQLString
        }
    }
});


GraphQL gives many options when defining the schema. I get GraphQLInt, GraphQLString for example. To make it awesome, I’ve added a constraint that makes the id non-nullable.

One big gotcha here is that GraphQL schemas need a query type to make them queryable. Below is the query type:

const queryType = new graphql.GraphQLObjectType({
    name: 'Query',
    fields: {
        human: {
            type: humanType,
            args: {
                id: {
                    type: new graphql.GraphQLNonNull(graphql.GraphQLInt)
                }
            },
            resolve: function(root, args) {
                return data[args.id];
            }
        }
    }
});


The queryType defines the way I expect to query the schema. Note the resolve callback, this gets called when the Promise gets fulfilled. You can just point this callback to a real call such as a database lookup.

Here, data is just plain old JSON. This callback executes within an asynchronous context. The same type of system used in humanType applies to queries. I expect to query this schema based on an id that is a GraphQLInt and non-nullable.

To finish the schema based on this type of system, we need a schema type:

const schema = new graphql.GraphQLSchema({
    query: queryType,
    types: [humanType]
});


I tell GraphQL precisely what I want. I need a humanType that gets queried by a queryType. I hope you can see how the type system comes together.

Validation

The upside of having a humanType and a queryType on the schema is validation. Say, I want to query the schema without arguments, like the test below:

 const query = `
      query HumanWithoutArgument {
        human {
        }
      }
    `;

graphql.graphql(target, query).then(function(result) {
    should.exist(result.errors);
});


Because I put a non-nullable constraint on the query type, this query fails. The test expects to see errors due to constraints on the type. This validation mechanism is a direct gain from the type system. One other validation one gets for free is that it has to be of type GraphQLInt. This is an integer type.

A query like a human(id: “1”) { name } will fail. Adding double quotes around the number tells the type system to expect a GraphQLString type. There are many scalar types available that add richness to the validation mechanism.

The type system is powerful for expressive queries one can validate. Armed with this arsenal of knowledge, let’s talk about querying the data.

Queries

Query composition derives from the type system. The example below illustrates this:

http://localhost:1337/?query={human(id:1){id,name}}


This query expects to see a human type with an integer id equal to 1. This human type contains a hierarchy of field types such as id and name. If you go back to the schema, this declarative query is almost identical. The query query string is just the way I pass the query into GraphQL. Below is the result I got back in application/json content-type:

{
    "data": {
        "human": {
            "id": 1,
            "name": "Obi-Wan Kenobi"
        }
    }
}


I get back a data type that contains the result of the query. The client gets to decide which field types to query. I could have just queried the name, for example, such as {human(id:1){name}}. If I donʼt specify a hierarchy like {human(id:1){}} then validation returns with a failure.

To set up this GraphQL API in the node, one can do:

var app = http.createServer(function(req, res) {
    const query = url.parse(req.url, true).query.query;

    graphql.graphql(schema, query).then(function(queryResult) {
        if (queryResult.errors) {
            res.writeHead(400, headers);

            res.end(JSON.stringify({
                error: queryResult.errors[0].message
            }));
        } else {
            res.writeHead(200, headers);

            res.end(JSON.stringify(queryResult));
        }
    });
});


The url library gives me a parse function to get the query string. Once the Promise gets fulfilled, I use JSON.stringify to convert to hypertext. The queryResult.errors is an Error type. This is why I get a message property that comes from the Error object in plain JavaScript.

Conclusion

GraphQL leaves it to the imagination to come up with nice ways of slicing and dicing data. Queries that are just objects that come from products in the real world. Feel free to check out the rest of my demo on GitHub.