Category: Client-Side Security

Securing HTTP Cookies

HTTP cookies are common in web development since cookies persist data on the browser. For web developers, cookies solve many problems with a stateless protocol. In the HTTP protocol, there are myriad possibilities available with cookies.

The challenge for programmers building web solutions is to wield HTTP cookies. There are many effective ways to work with cookies and secure them.

In Node, for example, setting an HTTP cookie is trivial:

var http = require('http');

var app = http.createServer(function onRequest(req, res) {
  res.setHeader('Content-Type', 'text/plain; charset=utf-8');
  res.setHeader('Set-Cookie', 'sessionCookie=value; HttpOnly');

  res.end('Setting a session cookie in the browser');
});

This sets a session cookie on the browser because there is no expiration date set on it.

Session cookies go away as soon as you close the browser window or tab. With HTTP cookies it is important to know how long you plan to persist the data on the browser. If you set an expiration date you get a permanent cookie and not a session cookie.

Cookies are set through HTTP headers, hence res.setHeader() in Node.

HTTP Only

One level of security with cookies is to enable HTTP Only. In my previous example, note the HttpOnly flag as part of the header.

The HttpOnly flag in cookies makes it so that you can’t change cookie values through JavaScript. This setting mitigates cross-site scripting (XSS) attacks.

The DOM API has a document.cookie property that allows attackers to change cookie data. A good approach to mitigate this risk is to turn on HTTP Only in all your cookies. This provides a level of basic security when clients attempt to tinker with the cookies.

For example, without this HTTP-only flag, one can do:

document.cookie = 'sessionCookie=newValue'; // Without HTTP only this persists


Turning HTTP Only tells the browser to persist cookie values from the server. It is an effective way of ensuring data integrity with HTTP cookies. Modern browsers will, for the most part, let you enable this setting.

Encrypted Cookies

HTTP cookies often come from the web server so consider encrypting cookie values. This adds a layer of protection since the browser client can’t decrypt the data. This makes it so that HTTP cookies are meaningful only to the back-end application.

Server-side encryption adds more protection because the client can’t sniff the cookies. The cookie values the browser gets are meaningless without proper decryption. With encryption, the server becomes the sole source of truth for HTTP cookies.

HTTP cookies are a server concern and a simple way to persist temporary data on the browser. A good approach is to prevent the client from knowing what the cookie means on the server. Encrypting the value of the cookie is a good way to mitigate this risk. If the value has encryption the client can’t know what it means. This prevents attackers from sniffing cookie values and crafting attacks on the server.

The encryption you use can be a one-way lookup of the cookie value. It is possible to use the encrypted value as the key to look up data on the server. This means there is no need to take the cookie value and assume it is valid on the server. The web server can use the encrypted value to confirm what it knows about the client from the session. This one-way look-up of encrypted cookie values adds an extra layer of protection.

In spite of the fact that cookie tampering got disabled through client-side JavaScript. Any attacker can craft an HTTP message with cookies and send them to your server. Encrypting cookies doing one-way loop-ups can mitigate even a well-crafted attack.

Client-Side Persistence

The browser will use cookies to persist data across HTTP requests. HTTP cookies are an effective way to keep data around that you may need later. Web developers often turn to cookies to solve many persistence problems.

One gotcha with cookies is users often expect the exact same experience across devices. With a cookie, you store data on the specific browser itself. In a mobile-first world, this way of solving persistence problems falls apart. HTTP cookies only persist data across many requests on the same browser, not on many devices.

The web server has no way of knowing where the HTTP request with a cookie comes from. Any attacker has the ability to craft cookies and dupe your web server. The web server, for the most part, has no way of knowing who sent the HTTP cookie.

It is important to keep in mind HTTP cookies solve a niche problem on the web. When you use cookies with the wrong assumptions it is easy to miss the mark or create security holes. Any system that blindly trusts HTTP cookies on the web server is open to attacks.

Consider using HTTP cookies as a simple way to identify who sent the request. Once a browser gets an HTTP cookie it can carry it around as a way of identifying itself. Think of it as an identity card browser clients have to tell you something about them. Of course, anybody can lose or steal identity cards so you need to validate them.

The web server can take whatever cookies the client sends and do a session validation. If the information stored on the session matches that of the browser you have a secure cookie. If it does not you have a potential attacker, you can then log their activity or have the app blow up in their face. With validation, you have a way of setting up security landmines to stop attackers in their tracks.

Conclusion

HTTP cookies solve the perennial problem with a stateless protocol. It is important to realize cookies come with limitations and pitfalls. You can mitigate risks with HTTP-only cookies, adding encryption, and cookie validation.

If you are using HTTP cookies for session management, take a look at this OWASP cheat sheet.

Before deploying your commercial or enterprise JavaScript apps to production, make sure you are protecting their code against reverse-engineering, abuse, and tampering with Jscrambler.

Start your free trial today!

Is Neglecting the Client Side Costing Your Business?

“Companies of all shapes and sizes rely on a webpage that anchors them to the online world.

Webpages represent the face of the majority of businesses and provide a first glimpse for many potential customers. With this in mind, organizations have specific security requirements and the need to make sure that their web platforms or online presence is secure.

We should highlight those who do business in sectors where the cost of fraud can be significant and the loss of reputation dramatic, ie banking and financial services, e-commerce, or government.

The web browser

The web browser is permissive. Both JavaScript and a web page’s DOM are highly dynamic and modifiable during runtime. Anything that has unrestricted access to the execution context of the webpage is able to modify both the code and the web page DOM. But why would an attacker want to do that in the first place?

The main motivations behind tampering with a webpage and its code can include:

  • Credentials harvesting

  • Interfering with financial transactions or stealing money

  • Personal Identifiable Information (PII) and Personal Health Information (PHI) leakage

  • To present malicious content to deceive and manipulate the user

  • To perform actions which impersonate the user of the website


Of course, having unrestricted access to the execution context is no small thing. If this were the case, all web pages would be doomed. So, how can attackers attain this capability?

The obvious, and traditional way, is to find and exploit an injection vulnerability that allows the attacker to run its own code on the webpage.

Over the last few years, there has been a huge focus on addressing web application vulnerabilities, not only to prevent infrastructure from being compromised and assets stolen, but also to make users safe.

It would be fair to say that the AppSec community has been reasonably successful in this mission. That is not to say that web applications don’t have vulnerabilities, but they are way more complex now and much more difficult to find.

Security awareness, good documentation, and tools such as static analyzers, scanners, or fuzzers have all played an important part in this success.

However, this success has made attackers more determined and they have adapted their approach accordingly to include factors other than just web application vulnerabilities. There are two attack avenues that they can follow:

  1. Target the end user and its device by infecting the devices with a Man-in-the-Browser (MITB) Trojan or by deploying malicious browser extensions that the users inadvertently install,

  2. Target third-party code and dependencies that the web application is using.

Man-in-the-Middle (MITM), and Man-in-the-Browser (MITB) attacks

Malicious browser extensions are quite effective in modifying the way users interact with applications and capturing or tampering with the data that flows through them.

Some of these devices can be owned by users of these websites and the experience they get may not be the one that the server delivers.

These damaging consequences are a result of a continuing cycle where the user’s machines keep getting infected, an almost certainty for a percentage of your users, and because these types of malware are able to inject code into the client-side without being noticed, solutions to detect these injections and mitigate them are needed.

In 2014, Kapravelos et al, found that five percent of 48,000 extensions from the Chrome webstore were injecting dynamic JavaScript into the webpage.

A few extensions were doing nasty things such as preventing extension uninstall, stealing passwords from forms, keylogging, injecting security-related HTTP headers, and connecting to arbitrary servers. According to recent research, MITB capabilities are at the top of the wish list for cyber-criminals today.

Nowadays, web development relies on third parties more than ever before. The evidence is clear; third-party code is all over web applications, both on the server side and the client-side. Some code is even loaded at runtime from remote servers, which pretty much takes them out of the web developer’s control, whilst still giving them the capability to completely change the application in runtime.

It’s easy to anticipate that this has the hallmark for everything to go wrong. In late 2014, jQuery CDN was hacked and for a short period was planting the RIG exploit kit into vulnerable visitors of websites using jQuery from its CDN.

For attackers, this is an even better way of delivering malware, and we will see more and more of this moving forward. In the face of these challenges, new standard proposals such as Subresources Integrity (SRI) and Content Security Policy (CSP) have been put forward. However, these alone are not enough to mitigate third-party code carrying malicious payloads that target applications.

Allaying the dangers and creating awareness about web application threats that do not rely on web application vulnerabilities should rightly motivate further discussion within the AppSec community and beyond.

Conclusion

Any organization with an important online presence or that deals with sensitive data should be able to get precise information on what code was injected and where giving them visibility on what’s happening with their applications on the client-side and helping prevent a class of attack that is growing in frequency and complexity.”

Contributed by Pedro Fortuna, co-founder and CTO, of Jscrambler.
Originally published in SC Magazine UK on July 18, 2017.

Becoming Familiar with Redux

Becoming familiar with Redux replies to how Redux has become a tool for managing state in JavaScript applications.

Redux is usually partnered with ReactJS, but it can be integrated wherever one wishes to use it. There have also been several libraries created for Redux integration, such as ngRx for Angular.

Regardless of how Redux is being implemented, the core concepts behind it will always be the same.

Today, we’re going to get a taste of how Redux works and take a look at the core concepts of the framework. By the end, we’ll have a low-level counter application.

Core concepts of Redux

“Immutable State Tree”

As JavaScript use continues to grow, so does the complexity of the JavaScript applications being built. In turn, there have been many libraries created to handle the state (or data) of an application, as this is often the most difficult part of development. At the heart of Redux is the immutable state tree, known as the store, which is just an object representation of all of an application’s data.

A redux store is often referred to as the single source of truth. It allows for great debuggability as users will be informed immediately whether the state is updating correctly, and it even allows users to “time-travel” to previous states to see what is going on.

“State is Read-only”

An application’s store is read-only. It can only be changed by dispatching action objects.

store.dispatch({
   Type: ‘INCREMENT’
});

Soon, we will see how to use action objects in better detail. Right now, however, it’s important to understand that enforcing a read-only state eliminates the need to worry about outside factors causing a mutation in application data, and that is just wonderful.

“Changes are made with pure functions”

To successfully update an application state, we must use a redux reducer, which will be used with JavaScript’s reduce function, to create the next application state. The reducer function is a pure function.

A pure function is a function that will always map the same input to the same output. They are essential to building immutable JavaScript applications, as they allow developers to look at the code and easily determine the result of a function.

All a developer needs to do is take a look at the Redux-style reducer function, and the action object that is being dispatched. For those interested in truly learning more about reduce, and why it’s one of the most powerful functions JavaScript has to offer, check out the article about it.

Now that we know the core concepts, let’s dive into a sample application built using create-react-app. The code for this project can be found in the GitHub repository.

The first function we want to take a look at is our reducer function. Redux users will spend a lot of time using reducer functions, so it’s important to understand how they work.

// index.js
const reducer = (state = 0, action) => {
  switch(action.type) {
   case ‘INCREMENT’:
	return state + 1;
   case ‘DECREMENT’:
	return state - 1;
  default: return state;
}


The reducer function takes two arguments: state and action. The state argument is the state of our application when an action is triggered.

Because ES6 is so awesome, we can set a default value for our state. In our case, the state currently is 0. In addition to our previous state, the reducer also takes the action objects mentioned earlier.

Action objects must have a type property but may contain other properties such as payload.

The type property is essential as it is what our reducer uses to determine what update it should make to the state.

To accomplish this, reducer functions include switch… case statements when updating the state. Taking a look at this statement, we will see that it will switch on an action’s type property.

Specifically, it will add 1 to the counter when an action with a type of INCREMENT is passed in, while DECREMENT will subtract the counter by 1. In both instances, the result will be a new state object.

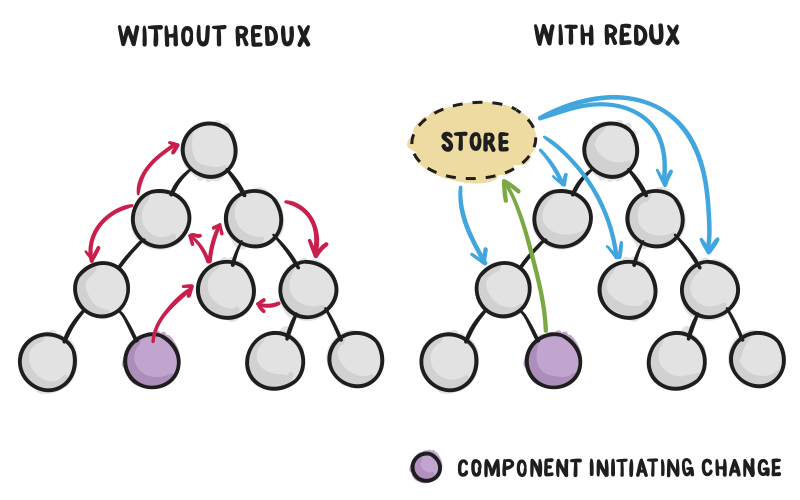
CSS Tricks Redux Diagram
An application’s store can only be updated by dispatching action objects. To perform this, we need to use the store.dispatch method. Our example has the following code for a Counter component.

// index.js
const Counter = ({value}) => {
 return (
  <div>
   <h3>Counter</h3>
   <button onClick={() => store.dispatch({ type: 'INCREMENT'})}>+</button>
   {value}
  </div>
 )
}


Inside the return statement for this component, we see the store.dispatch method being passed into react’s onClick handler.

Each time a button is clicked, our store will be updated accordingly. Following this, we see the expression, {value}, that will evaluate and render our application’s state, which in this case is the number of times the button has been clicked.

Final Touches

In order for all of this to work, we need to use Redux’s createStore() method. createStore needs to be imported from the Redux library, and it takes a reducer function. Our store declaration should look like this.

import React from 'react'
import ReactDOM from 'react-dom'
import { createStore } from 'redux'
const reducer = (state = 0, action) => {
 switch (action.type) {
   case 'INCREMENT': return state + 1;
   case 'DECREMENT': return state - 1;
   default: return state;
 }
}
 
const store = createStore(reducer);
 
/** counter component **/
const Counter = ({value}) => {
  return (
    <div>
      <h3>Counter</h3>
      <button onClick={() => store.dispatch({ type: 'INCREMENT'})}>+</button>
      {value}
    </div>
  )
}


Now that our store has been created, we need to use two more store methods: the getState and the subscribe method.

We’re going to use getState() to populate the value property that is passed into the Counter component by simply passing it into our <Counter> tag.

// index.js
const render = () => {
 ReactDOM.render(
   <Counter value={store.getState()} />,
   document.getElementById('root')
 )
}


This will give our component access to the state, but we still need to subscribe to our store. If we don’t our application won’t know when any state changes happen.

In this example, we’re going to subscribe to our render const like so.

//index.js
store.subscribe(render);


It is important to note that there are libraries like react-redux which provide users with a number of tools that make react-redux integration a breeze.

Nonetheless, we have successfully created our first redux counter app! The final code sample for our index.js file should look like the following:

//index.js
import React from 'react'
import ReactDOM from 'react-dom'
import { createStore } from 'redux'
const reducer = (state = 0, action) => {
  switch (action.type) {
    case 'INCREMENT': return state + 1;
    case 'DECREMENT': return state - 1;
    default: return state;
  }
}
const store = createStore(reducer);
const Counter = ({value}) => {
  return (
    <div>
     <h3>Counter</h3>
     <button onClick={() => store.dispatch({ type: 'INCREMENT'})}>+</button>
     {value}
    </div>
  )
}
const render = () => {
  ReactDOM.render(
   <Counter value={store.getState()} />,
    document.getElementById('root')
  )
}
store.subscribe(render);
render();

You made it!

Congratulations! You successfully worked your way through a reactJS application with Redux architecture.

Hopefully, by now, you have gained a bit of knowledge regarding how Redux works. In the meantime, I encourage those interested in Redux to check out the following links as they are great sources of information.

5 Steps to Fine-tune your Jscrambler Application

Last updated on February 16th, 2021

Do you know how to fine-tune your Jscrambler application?

At Jscrambler, we go the extra mile to make sure our product is easy and intuitive to use. But when you’re developing software that is required to be highly performant, there might be a need for additional configuration.

In this article, we will go in-depth into some features and strategies you can use to make your application as protected as possible while maintaining a high degree of your application’s original performance.

Be aware of the transformation’s potency and resilience!

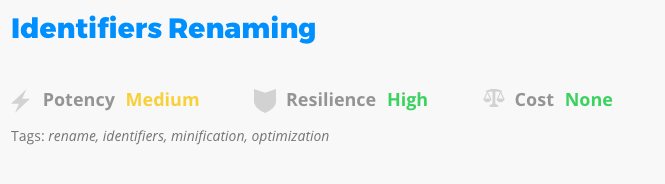
Jscrambler offers a different number of transformations with distinct levels of potency and resilience which are two metrics associated with obfuscation.

Potency translates how hard it is for a human to understand the code; resilience translates how difficult it is for a machine to defeat the protection applied.

Our documentation provides an estimate of the potency, resilience, and cost of each transformation.

jscrambler-potency-resilience-and-cost-valuesIf you want to protect strings in your code, Jscrambler offers four distinct transformations, String Splitting, String Encoding, String Concealing, and Char To Ternary Operator.

These transformations have distinct levels of potency, resilience, and cost, which means that, if you want to protect strings, choosing the most powerful one (String Concealing) should be enough to provide a high degree of protection and not impact the cost too much, whereas selecting all possible transformations could bloat the code, impacting performance.

If protecting strings is not one of the main concerns, then opt for a less powerful transformation as it will provide a lesser degree of protection but will keep your code performant.

Step into Advanced Mode

Jscrambler offers two distinct ways of selecting the transformations that will be applied to the code: Targets and Advanced.

Whenever selecting a target in the “Targets” mode, Jscrambler will select all the transformations available for that target (you can step into the Advanced mode and check the mapping) and apply the default parameterization of the transformation.

The “Targets” mode allows you to select which targets of your application you want to protect. By targets, we mean any of JavaScript’s building blocks (e.g., predicates, statements, booleans, and numbers).

By going into the “Advanced” mode, you can select each individual transformation and its parameterization. You should mix and match transformations and arrive at a degree of protection you deem fit.

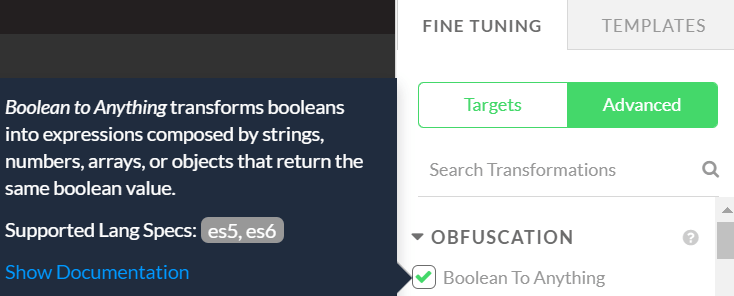
If you have any questions regarding the transformation’s parameterization, then hover over it. You’ll find a description of the transformation’s parameters and a link to our documentation.

Jscrambler Transformation Information

Select a Specific Order of Transformations

Jscrambler’s protections are polymorphic. This means that no protection is exactly the same as in previous transformations. This is guaranteed not only by randomizing the order by which transformations are applied but also by having random behaviors inside each transformation.

Selecting a specific order of transformations might be useful since some of Jscrambler’s transformations generate targets that will be used by other transformations. For example, the Number To String transformation will convert numbers to strings. These newly created strings will be protected by following transformations that are applied to strings. This is intended as it will increase the degree of protection.

This polymorphic behavior can, however, have a significant impact on the code’s performance in cases where too many targets were created. For example, if all of the transformations that generate strings are applied before String Encoding, the resulting code’s size will be much greater than normal.

To address this, you can either enable Jscrambler’s Recommended Order (a specially crafted order that keeps the code performant but also ensures a high degree of protection) or craft your own specific order.

The Recommended Order can be enabled in Jscrambler’s Web Application by clicking on the lower cogwheel on the top right corner of your app and checking the box.

The Recommended Order can also be activated through the API by adding the following parameter:

"useRecommendedOrder": true


If you want to use a custom order, you can specify the areSubscribersOrdered option which will make the transformations selected to be applied in the order they appear.

// the dotToBracketNotation transformation
// will be applied after identifiersRenaming
"params": [
  {
    "name": "identifiersRenaming"
  },
  {
    "name": "dotToBracketNotation"
  }
],
"areSubscribersOrdered": true

Use Code Annotations

Jscrambler’s Code Annotations allow you to strategically place annotations in parts of your code that need to be better protected.

As an example, Jscrambler’s Control Flow Flattening transformation is really powerful but its potency comes with a cost.

If you want to apply the transformation but only need it on a specific part of your code, you can remove it from your configuration (or selected parameters) and use it via code annotations. This way, the transformation will only be applied to that specific block.

function iDontNeedThisProtected (a) {
  return a + 1;
}
 
function iDontNeedThisEither (b) {
  return b + 2;
}
 
 
// @jscrambler enable controlFlowFlattening
function thisWillBeProtected (c) {
  if (c > 0) {
    return c + 1;
  } else {
    return c + 2;
  }
}


Alternatively, you can use Code Annotations to disable globally applied transformations in specific parts of the code.

Sidenote: If performance is a critical aspect of your app, you may also want to check our Profiling feature, which helps effortlessly optimize performance.

Reuse a Randomization Seed

One of Jscrambler’s advanced features is the Randomization Seed. This is a specific string that you can supply to the protection process which will allow you to deterministically reproduce all of Jscrambler’s polymorphic behavior.

This feature is useful in cases where you want to reproduce a previous protection that might have better performance and benchmark it against the current version of your protected code.

This feature should not be used as a replacement for selecting a custom/recommended order of transformations and tuning the transformation’s parameterization.

Keep in mind that the output of protection will only be the exact same if you provide the same input and seed. If you perform changes on some files in your application and protect them, these files will be completely different. Only the ones that were unchanged will remain the same. This should be used for benchmarking/debugging, and not in production.

Conclusion

Fine-tuning your application’s protection can take its time.

However, with the combination of several of the features discussed in this article, we can achieve a balance between keeping the integrity and performance of your application while also presenting a very high degree of protection.

In case you’d like some personalized recommendations to address eventual performance issues, get in with our client-side protection experts.

Jscrambler 5.0 is Now Live!

We are proud to announce that Jscrambler 5.0 is now live! We extend our code protection expertise to the webpage, introducing a new layer of security: the Webpage Integrity module – an anti-fraud solution designed to protect web pages.

Webpage Integrity: How it works?

Jscrambler’s Webpage Integrity module identifies fraud by detecting malicious tampering and client-side injections to webpages.

Jscrambler gives precise information on what code was injected and where, something that is unprecedented in the cybersecurity market, being an effective tool to prevent and react to a class of attacks that is growing in frequency and complexity, with serious financial consequences and impacting the reputation of companies and governments.

Major key points

  • Protection against MITB, Bots, 0-Day Threats, and APT (Advanced Persistent Threats).

  • Data loss (credentials, private data, payment card Information), poisoning, and DOM-tampering prevention.

  • Removal of known threats on the client-side.

  • Easy-to-use installation on the end device required and always up-to-date.

  • Universal solution that works with all browsers and with all server-side technologies.

jscrambler-wepage-integrity-module

What kind of threats does Jscrambler’s Webpage Integrity module allow me to detect and block?

Jscrambler can identify any client-side injection (MITB, Malicious Extensions, Client-side XSS, Malicious/Compromised third-party code, etc.), no matter if it is a known injection or a completely new one (0-day attacks).

Man-in-the-Browser attacks, for instance, are one such example where attackers successfully target the device by first deploying Trojans and then being able to tamper with the application. The number of Trojans has been increasing, spreading through phishing campaigns.

Eko and Smartbrowse are recent examples of MITB attacks that made the headlines. Eko, discovered on Facebook Russia in early 2015, spread malware via Facebook direct messages and scam video postings.

Victims were sent links to phishing websites replicating Facebook and YouTube, which prompted users to install video player extensions containing malicious code.

Using our new module, it is possible to remove injections on the spot in real-time and report back in near real-time to the backend of the application, allowing it to react to the threat.

What kind of companies does Jscrambler cater to?

Any organization with an online presence or dealing with sensitive online assets should assume the end-user cannot be trusted.

With Jscrambler in action, they can get precise information on what code was injected and where giving them unprecedented visibility on what’s happening on the client-side and is an accurate tool to prevent a class of attacks that are growing in frequency and complexity, with serious financial consequences and impacting the reputation of companies and governments.

What makes Jscrambler different?

Other solutions to this problem have been proposed before but, in contrast to other technologies, Jscrambler’s Webpage Integrity module emerged as a solution that does not look for malware signatures. It looks for changes made to the untampered page and it can detect 0-day threats.

The majority of the solutions available in the market fail because they can be easily tricked or removed from the path of the attacker.

Jscrambler’s Webpage Integrity module is protected by our code protection technology, trusted by more than 30,000 companies and individuals, including Fortune 500 businesses.

This protection technology is unfeasible to trick and difficult to circumvent. Finally, it is plug-and-play, not requiring the installation of anything locally on the client device. It is transparent to the client device and supports all browsers and platforms.

“Having listened to the feedback from many of our customers and continuing our mission to protect the client-side, we felt that this was the right time to upgrade our solution to offer a unique proposition to the market.” – Rui Ribeiro, CEO of Jscrambler

Conclusion

Jscrambler’s new Webpage Integrity module may be the solution to finally ensure that web applications will look and behave as intended on all browsers and devices and that users can run it safely – even in hostile environments as a compromised computer.

Getting Started with Riot.js

Javascript fatigue is still an ongoing thing. Even before introducing our new framework, Riot.js, there seems to be an acknowledgment of the above.

Even with this acknowledgment, one should always keep tabs on what’s new even if it’s not used immediately.

A couple of reasons why. You might find it a good fit for a future project. Secondly, you may learn a better paradigm of programming in what’s new, sometimes even without switching to the new framework, you may still be able to incorporate it into the one you’re currently using, as a framework user or developer.

Regardless of the number of libraries out there, it is vital to give room for newcomers. This is because there is always a chance for improvement or otherwise. I say otherwise due to other frameworks such as Ember.js that cater to and promote the idea that “more is better”. I have discovered a library that says otherwise.

Let’s say you need something structured as in React.js or Ember.js, but only need to integrate it into an existing application in a very minimal way. Something you can just drop in and get going. Here, I introduce you to Riot.js.

Before we proceed, if you are curious, you can see the demo and download the repository.

Riot.js, React.js, and Angular.js

Riot.js, such as React.js, uses a self-contained single file component. However, Riot.js takes this to the next level because you do not need to import a component to use it inside of another.

The Riot.js acknowledges the brilliance of React.js, yet they believe they are addressing some of the library’s weak points.

The most appealing thing to me about Riot.js is how easy it is to drop it into an existing application.

We can link to our Riot.js components, instantiate the main one, pass it some JSON data, and have it be part of our program.

All of this without sacrificing things we’ve grown to love with Angular.js and React.js, such as code manageability with components, familiar APIs, for example, looping over data, templating, handling DOM events such as clicks, and easy component nesting.

The Application

So now that we have been introduced to Riot.js, let’s describe the application we’ll be building.

We will build a tab of contents application called tabs. It can potentially be used as a categorized list of links or categories of anything. We will use a static array of data but as you’ll see, this data could come from some JSON call and is easily switchable.

To get started, Riot.js comes with a command line interface. However, it is not necessary as Riot.js has an in-browser compiler that you can include as a script. In fact, we will build the tabs application without using the CLI. For production or larger applications, it may be worth looking into.

The CLI makes it easy to include a large number of component files as you do not have to include them individually as we will do in this article. However, for small projects like ours, manual inclusion is fine. We will touch on its usage in the last part of this article. To get it out of the way you can install it using the below npm command:

npm install riot - g


Now let’s start writing our application. Create a html file called index.html, and add it the boilerplate below:

<!DOCTYPE html>
<html lang="en">

<head>
    <title>Tabs</title>
    <meta charset="UTF-8">
    <meta name="viewport" content="width=device-width, initial-scale=1">
</head>

<body>
    <div class="main-container">

    </div>
    <script type="text/javascript">
        var tabs = [{
                id: 1,
                title: "tab 1",
                content: "some content 1"
            },
            {
                id: 2,
                title: "tab 2",
                content: "some content 2"
            },
            {
                id: 3,
                title: "tab 3",
                content: "some content 3"
            }
        ];
    </script>
    <script src="https://cdnjs.cloudflare.com/ajax/libs/riot/3.3.0/riot+compiler.min.js"></script>
</body>

</html>


In this boilerplate, we are linking to the Riot.js CDN link which contains the main library, and the in-browser compiler. This removes the need for a command line compiler. We are also creating an array, which is a list of objects, each representing a tab and its content.

Next, in the head of the document, add the styles below for our tabs:

<style>
    .tab-content {
        display: none;
    }

    .tab-headers {
        display: flex;
    }

    .tab-header {
        background-color: #eff0f2;
        color: #888;
        padding: 5px 10px;
        border-bottom: 2px solid #87d3b7;
    }

    .tab-header:hover {
        cursor: pointer;
    }

    .tab-header.active {
        background-color: #87d3b7;
        color: #FFF;
    }

    .tab-content {
        padding: 5px;
    }

    .tab-content.active {
        display: block;
    }
</style>


After the inclusion of the Riot.js library, add in this line:

<script>
    riot.mount('*', {
        tabs: tabs,
        defaultTabIndex: 1
    })
</script>


This bootstraps our application and passes in an optional object as the application data and options. The options and data are pure javascript data types. Here, we are passing on the list of tabs we created moments ago. We are also passing in the index of the currently visible tab by default.

Let’s create our main Riot.js component. Create a file within a components directory called components/tabs.tag.

The file extension .tag is not a compulsory one to use but it is a common convention used in the Riot.js documentation. In this file put in the following:

<tabs>
    <tab-headers isclicked={this.isclicked} tabs="{opts.tabs}"></tab-headers>
    <tab-contents tabs="{opts.tabs}"></tab-contents>

    <script>
        this.on('before-mount', function() {
            if (typeof opts.defaultTabIndex !== "undefined") {
                opts.tabs[opts.defaultTabIndex].active = true;
            }
        })

        this.isclicked = (event) => {
            opts.tabs.forEach((tab) => {
                if (event.item.tab.id == tab.id) {
                    tab.active = true;
                } else {
                    tab.active = false;
                }
            });

            this.update();
        }
    </script>
</tabs>


This is how a Riot.js component file is created. First, we wrap the whole of the component using the custom tags as we intend to use them in our application, in this case:

<tabs>
</tabs>


Inside of the custom tag, we have the contents of the component which can be static HTML content or inclusion of other components as we have above. Those components have not been created yet but we will do so in a moment.

Finally, you have an optional scripts tag which is where the logic of the component will live. In our component above, we have an event handler we want to run before the component is inserted into the DOM.

We also have a function we want to use as part of the component. This is used to handle the click event on a tab heading but we will get to that shortly.

Now that we have the basic foundation of a component, let’s create the other components.

The main component will include contents, a list of tab headers, and a list of tab contents. When we click on a tab header, the corresponding content tab will be visible and the others will be hidden.

Create the tab-headers component components/tab-headers.tag with the contents:

<tab-headers>
    <div class="tab-headers">
        <tab-header onclick="{parent.opts.isclicked}" each={tab in opts.tabs} tab="{tab}"></tab-header>
    </div>
</tab-headers>


Then create the component components/tab-header with the component:

<tab-header>
    <div class="{active: opts.tab.active} tab-header">{opts.tab.title}</div>
</tab-header>


In the tab-headers component, we are looping over the list of tabs that were passed in when we mounted the components in index.html.

In each loop instance, we are creating a tab-header component instance and passing in event handlers and values. The list of tabs is accessible through a special property called opts which is available in all components. The property lets you access properties passed in by a parent component.

In Riot.js, you can pass in values and functions as data properties as we are doing in tab-headers.

We are passing in a click handler from the top-level parent tabs component onto each child tab-header component. A component can access the parent properties and functions of a component using the property called parent. Remember there is a distinction between parent properties and passed-in properties.

To access a passed-in property you can directly go through that component’s opt property. However, to access a parent’s property, you must go through the parent property of the component.

In the tab-header component, we are displaying the tab title as the title of the tab. We are also adding or removing the class active depending on whether the tab is active or not.

Now that we have created the tabs, tab-headers, and tab-header components, let’s add them to our main HTML page. Before the mount statement, add the following lines to include the components:

<script src="components/tab-header.tag" type="riot/tag"></script>
<script src="components/tab-headers.tag" type="riot/tag"></script>
<script src="components/tabs.tag" type="riot/tag"></script>


Finally, let’s create the components for the tab contents. Create a component in components/tab-contents with the content:

<tab-contents>
    <div class="tab-contents">
        <tab-content each={tab in opts.tabs} tab="{tab}"></tab-content>
    </div>
</tab-contents>


Create components/tab-content with the content:

<tab-content>
    <div class="{active: opts.tab.active} tab-content">{opts.tab.content}</div>
</tab-content>


Link to the component file by using:

<script src="components/tab-content.tag" type="riot/tag"></script>
<script src="components/tab-contents.tag" type="riot/tag"></script>


Now our application has been created but we still need to use the main component to make it appear. In index.html, inside of the main-container div put:

<tabs></tabs>

Events

Let’s revisit the isclicked function in the main component:

<script>
    // Some code here
    ...

    this.isclicked = (event) => {
        opts.tabs.forEach((tab) => {
            if (event.item.tab.id == tab.id) {
                tab.active = true;
            } else {
                tab.active = false;
            }
        });

        this.update();
    }
</script>


What we are doing here is setting which tab in the list is active when a header is clicked. We achieve this by setting a click event handler on the tab-header. When clicked, this function is called:

<tab-header onclick="{parent.opts.isclicked}" each={tab in opts.tabs} tab="{tab}"></tab-header>


Now point a web server to the root directory which contains the index.html file. Open the web server URL in a browser and now, we should have a functional tabs application.

So now the application is functional but let’s revisit the riot compiler we mentioned earlier. Currently, we are manually linking to components. This is fine for our simple application but it could become tedious if we have tens or even hundreds of components to link to. Let’s combine all the components into one file.

We will compile and concatenate all the component files into one file called app.js which is the only file we will link to.

On the command line, navigate to the project root folder and run the command:

riot components app.js


This will run the compiler just once. To have a watcher on the components folder that’ll run the compiler automatically when the contents change, run the following instead:

riot components app.js - w


Link to the newly created file by removing all the links to the individual component files, and adding the following just before we mount the components:

<script src=“app.js”></script>

Conclusion

Riot.js takes many of the good parts of React.js and makes it even simpler.

There are many tools available to use Riot.js but as you have seen above, they are just complementary to Riot.js but are not absolutely necessary to get a functional application up and running.

Have you used Riot.js before or are considering it for your next project?

Getting Started with Three.js

Three.js: Illumination Confirmed!

3D graphics in the browser have been a hot topic since they were first introduced. However, creating apps in pure WebGL takes ages.

This is why libraries have appeared, Three.js being one of the most popular. It is a nice and simple layer on top of WebGL that provides its users with plenty of well-written documentation.

Three.js may look complex at first, but it takes even more coding to write the same program in pure WebGL, mostly to write a rendering engine. With Three.js the heavy lifting is done without sacrificing much flexibility.

Three.js also does an excellent job of abstracting many of the details of WebGL, but it also gives you very clean, low-level access to all the rendering (projection, animation) capabilities.

If you want to do 3D models, textures, and render scenes, that look more realistic, Three.js is the way to go.

Countless well-documented examples on the website demonstrate this. You can draw inspiration from these creative demos and create your games based on them.

Many 3D WebGL projects have spun off and are propelling Three.js engine adoption.

We will create a scene where the user clicks away colorful blocks in an endless jumble while keeping track of the number of times the cubes were clicked. Find a working example.

Setting up Three.js

To install three.js you can click on the download button in JavaScript 3D library.

Once the zip has finished downloading, open it up and go to the build folder. Inside, you’ll find a file called three.min.js that you should copy into your local development directory. From here, you can include the library in your HTML file.

<script src="js/three.min.js"></script>


For this game you’ll also need the following files:

  • examples/js/libs/stats.min.js

  • examples/js/renderers/CanvasRenderer.js

  • examples/js/renderers/Projector.js

  • examples/js/libs/tween.min.js


Remember to add them to the HTML file, as shown in the three.min.js file.

Programming our game

To demonstrate how the game was built, we will start with our global variables, followed by the functions used to set up our cubes, header, scene, and score, followed by event listeners, and finally how they are all used to build the game.

Global variables

We will need to use the following variables.

var numCubes = 10;
var container, stats;
var camera, scene, renderer;
var textureLoader = new THREE.TextureLoader();
var raycaster;
var mouse;
var cubeTexture = textureLoader.load('http://i.imgur.com/U1DnhNv.png');
var isMouseDown = false,
	onMouseDownPosition, onMouseDownTheta = 45,
	onMouseDownPhi = 60,
	phi = 60,
	theta = 45,
	radious = 1600,
	count = 0;

We start by defining the number of cubes we want. From there, we have the container itself and stats.

The container will have all the cubes, titles, and stats. It represents the whole game scene. Stats will be used to monitor the game’s performance (FPS – frames per second, and MS – milliseconds to render a frame).

We create our camera, scene, renderer, raycaster, mouse, and cube texture variables. Then we have some variables that will be used for camera rotation, a count variable used to count the number of times the cubes were clicked.

Creating a Cube

The following function demonstrates how to create cubes through BoxGeometry. To use its constructor we have to at least define the width, height, and depth.

function createGeometry() {
	var geometry = new THREE.BoxGeometry(100, 100, 100);
	var object = new THREE.Mesh(geometry, new THREE.MeshBasicMaterial({
		color: Math.random() * 0xffffff,
		opacity: .75,
		map: cubeTexture
	}));
	object.position.x = Math.random() * 800 - 500;
	object.position.y = Math.random() * 800 - 600;
	object.position.z = Math.random() * 800 - 700;
	object.scale.x = Math.random() * 2 + 1;
	object.scale.y = Math.random() * 2 + 1;
	object.scale.z = Math.random() * 2 + 1;
	object.rotation.x = Math.random() * 2 * Math.PI;
	object.rotation.y = Math.random() * 2 * Math.PI;
	object.rotation.z = Math.random() * 2 * Math.PI;
	return object;
}

Here, boxes or cubes are created, and have a color, opacity, and texture applied, followed by a random position, scale, and rotation.

This means that although all the cubes have the same texture and opacity, they’ll be in different places, with different rotations, and different scales. Some cubes will look like rectangles due to the scaling.

Creating a Header, Score, and Scene

The following functions will be used later on inside the init function:

function setHeader() {
	var info = document.createElement('div');
	info.style.position = 'absolute';
	info.style.top = '10px';
	info.style.width = '100%';
	info.style.textAlign = 'center';
	info.innerHTML = '<a href="https://jscrambler.com" target="_blank">Jscrambler</a> - Three.js cube example';
	container.appendChild(info);
}


Here, we can see our setHeader function. It’s just a simple text linking to Jscrambler, that says “Jscrambler – Three.js cube example”. After creating the element it is placed inside the container through container.appendChild(info).

function setScore() {
	var info = document.createElement('div');
	info.id = 'score';
	info.style.position = 'absolute';
	info.style.top = '30px';
	info.style.width = '100%';
	info.style.textAlign = 'center';
	info.innerHTML = 'Score: ' + count;
	container.appendChild(info);
}


Like in the setHeader function, setScore creates an element, this time giving it an Id, so we can later alter its inner HTML. Note that the inner HTML has our count variable, which will keep track of the number of times the cubes were clicked.

function createScene() {
	scene = new THREE.Scene();
	renderer = new THREE.WebGLRenderer({
		antialias: true
	});
	renderer.autoClear = true;
	renderer = new THREE.CanvasRenderer();
	renderer.setClearColor(0xf0f0f0);
	renderer.setPixelRatio(window.devicePixelRatio);
	renderer.setSize(window.innerWidth, window.innerHeight);
	container.appendChild(renderer.domElement);

	for (var i = 0; i < numCubes; i++) {
		var geometry = createGeometry();
		scene.add(geometry);
	}
}


As for the createScene, we have followed the creation of several cubes with var geometry=createGeometry(), according to the previously defined numCubes, and their addition to the scene.

Event Listeners

These event listeners will be triggered after being defined inside the init function.

onWindowResize

function onWindowResize() {
	camera.aspect = window.innerWidth / window.innerHeight;
	camera.updateProjectionMatrix();
	renderer.setSize(window.innerWidth, window.innerHeight);
}


Here we resize our project, by altering the camera, and the renderer, whenever the window is resized.

onDocumentMouseDown

function onDocumentMouseDown(event) {
	isMouseDown = true;
	onMouseDownTheta = theta;
	onMouseDownPhi = phi;
	onMouseDownPosition.x = event.clientX;
	onMouseDownPosition.y = event.clientY;
	mouse.x = (event.clientX / renderer.domElement.clientWidth) * 2 - 1;
	mouse.y = -(event.clientY / renderer.domElement.clientHeight) * 2 + 1;
	raycaster.setFromCamera(mouse, camera);
	var intersects = raycaster.intersectObjects(scene.children); //if mouse intersects a cube
	if (intersects.length > 0) {
		new TWEEN.Tween(intersects[0].object.position).to({
				x: Math.random() * 800 - 400,
				y: Math.random() * 800 - 432,
				z: Math.random() * 800 - 777
			}, 2000)
			.easing(TWEEN.Easing.Elastic.Out).start(); //moves cube
		new TWEEN.Tween(intersects[0].object.rotation).to({
				x: Math.random() * 2 * Math.PI,
				y: Math.random() * 2 * Math.PI,
				z: Math.random() * 2 * Math.PI
			}, 2000)
			.easing(TWEEN.Easing.Elastic.Out).start(); //rotates cube
		count++;
		document.getElementById("score").innerHTML = "Score: " + count;
	}

}


Once the mouse is clicked, the isMouseDown variable is set as true. Now we have Theta and Phi, which help with the camera rotation, and we record the mouse position, once in onMouseDownPosition and another time in the mouse.

The reason behind this is that the onMouseDownPosition is used to rotate the Camera, while the mouse is used with the raycaster to work out what objects the mouse is over. If the mouse is over a cube, the clicked cube will suffer a progressive rotation and position change.

The count is also incremented, and our scoring element will be altered as well, according to the new count value.

onDocumentMouseMove

function onDocumentMouseMove(event) {
	if (isMouseDown) {

		theta = -((event.clientX - onMouseDownPosition.x) * 0.5) + onMouseDownTheta;
		phi = ((event.clientY - onMouseDownPosition.y) * 0.5) + onMouseDownPhi;

		phi = Math.min(180, Math.max(0, phi));

		camera.position.x = radious * Math.sin(theta * Math.PI / 360) * Math.cos(phi * Math.PI / 360);
		camera.position.y = radious * Math.sin(phi * Math.PI / 360);
		camera.position.z = radious * Math.cos(theta * Math.PI / 360) * Math.cos(phi * Math.PI / 360);
		camera.updateMatrix();
	}
}

Whenever the mouse is moved this function is triggered if the isMouseDown variable is true, that means that the mouse is being clicked, and the camera will rotate, according to the mouse movement.

onDocumentMouseUp

function onDocumentMouseUp(event) {
	isMouseDown = false;
}

This function is triggered whenever the mouse stops being clicked. The isMouseDown variable is set as false, so the program knows the mouse isn’t being clicked anymore.

Building the game

To build our game, we need to call the init() and the animate() function which we’ll define below.

init();
animate();

This will lead to:

Init

function init() {
	container = document.createElement('div');
	document.body.appendChild(container);
	setHeader();
	setScore();
	camera = new THREE.PerspectiveCamera(70, window.innerWidth / window.innerHeight, 1, 10000);
	camera.position.y = 360;
	camera.position.z = 555;
	raycaster = new THREE.Raycaster();
	mouse = new THREE.Vector2();
	stats = new Stats();
	container.appendChild(stats.dom);

	createScene();
	onMouseDownPosition = new THREE.Vector2();
	document.addEventListener('mousedown', onDocumentMouseDown, false);
	document.addEventListener('mousemove', onDocumentMouseMove, false);
	document.addEventListener('mouseup', onDocumentMouseUp, false);
	window.addEventListener('resize', onWindowResize, false);
}

In the init function, we set our container as a div. It’ll be filled with our cubes, header, and score, as shown previously.

Then we have setHeader(); and setScore() that, as we’ve demonstrated, are used to create the header text and the score tracker of our game.

From here we set our camera’s initial position, our raycaster, mouse, and stats. We have the createScene function, which handles our renderer initialization, and cube creation.

All that’s left is handling the mouse position, with the onMouseDownPosition, and our Event Listeners for when the mouse is moved, down, or up, and when the window is resized.

Animate and Render

We need to use an animation function. It may not seem like anything is really “animated” here in the traditional sense, but we do need to redraw when the camera orbits around the cubes.

This is done by calling the render function that will alter the camera’s position, to change the way it looks at the scene.

function animate() {
	requestAnimationFrame(animate);
	render();
	stats.update();
}

function render() {
	TWEEN.update();
	theta += 0.1;
	camera.position.x = radious * Math.sin(THREE.Math.degToRad(theta));
	camera.position.y = radious * Math.sin(THREE.Math.degToRad(theta));
	camera.position.z = radious * Math.cos(THREE.Math.degToRad(theta));
	camera.lookAt(scene.position);
	renderer.render(scene, camera);
}

Camera

Looking further into detail at the camera.

	camera = new THREE.PerspectiveCamera(70, window.innerWidth / window.innerHeight, 1, 10000);
	camera.position.y = 360;
	camera.position.z = 555;


Our camera has a perspective projection, which is designed to mimic the human eye. We start by setting its field of view, aspect ratio, near plane, and far plane. The planes represent the distance at which you start seeing objects near and far, as they originate from the camera.

In other projects, it might be more fitting to employ an Orthographic perspective like the one shown above. For now, we’ll keep the PerspectiveCamera and position it to view a good amount of blocks without them blocking the line of sight.

The vast selection of plugins and community projects built on three.js lets anyone take advantage of the API. This doesn’t only expand the three.js community but also incentivizes new spin-off projects based on this library.

There’s also a three.js extension site known as threeX which provides several handy components which you can reuse when making your app. It could be a great way to deploy rapid experiments with some visual tweaks applied through components rather than rolling your own.

Remember that if you have a Three.js game or any other Javascript application you want to protect from prying eyes, Jscrambler is the best solution to do so.

Some good transformations for games would be Code Locks, where you can lock your code to dates, browsers, operating systems, and domains, and Self Defending, to prevent your code from being debugged and tampered with.

You can test Jscrambler and all of its functions in the Playground app.

Porto’s Startup Scene

Porto’s startup ecosystem is flourishing and welcoming new and exciting players. Jscrambler has been supporting communities all over the world for a while now. Remember the time we sponsored Girl Develop It, a non-profit organization that supports women’s inclusion in the world of web development?

This time, we are proud to announce that tomorrow, 5th April, Pedro Fortuna, our CTO and Co-Founder, will be the guest of Porto Startup Coffee #69 and also a speaker on the panel “From 1M to 100M” with BySide and AdClick at Founders Founders Inauguration.

Porto Startup Coffee

Porto Startup Coffee are regular informal meetup in Porto (Portugal), for entrepreneurs, investors, and people interested in entrepreneurship in general – everyone is welcome.

The idea is to give people the chance to have a place and time where they can have a coffee or beer after work and network with interesting folks while strengthening their networks by meeting fellow entrepreneurs and discussing how they can launch companies and make them successful.

This meetup edition will have a new venue – Porto Innovation Hub.

Also happening tomorrow, 5th April, our CTO and Co-Founder, will be a speaker in the panel “From 1M to 100M” with BySide and AdClick.

Founders Founders is a community of inspiring companies, entrepreneurs, biz experts, investors, journalists, and more. This community promotes a sharing culture, with the particularity of being made by founders and for an advanced stage of growth companies as they have all passed the startup phase, have a solid business validation and still growing.

This will be a unique opportunity to celebrate the growth of the startup/scaleup ecosystem in Portugal, where Jscrambler will represent the more mature scaleups based in Porto and will discuss the challenges inherent to their growth.

The event will also be attended by João Vasconcelos (Secretary of State of Industry of the Portuguese Republic) and Rui Moreira (Mayor of Porto).

The inauguration will take place at the Founders House.

See you tomorrow!

Protect Your Site Against Web Scraping

Web scraping is the process of extracting data that is available on the web using a series of automated requests generated by a program.

It is known by a variety of terms like screen scraping, web harvesting, and web data extracting. Indexing or crawling by a search engine bot is similar to web scraping.

A crawler goes through your information for the purpose of indexing or ranking your website against others, whereas, during scraping, the data is extracted to replicate it elsewhere, or for further analysis.

A crawler also strictly follows the instructions that you list in your robots.txt file, whereas, a scraper may totally disregard those instructions.

During the process of web scraping, an attacker is looking to extract data from your website – it can range from live scores, weather information, prices, or even whole articles. The ideal way to extract this data is to send periodic HTTP requests to your server, which in turn sends the web page to the program.

The attacker then parses this HTML and extracts the required data. This process is then repeated for hundreds or thousands of different pages that contain the required data. An attacker might use a specially written program targeting your website or a tool that helps scrape a series of pages.

Technically, this process may not be illegal as an attacker is just extracting information that is available to him through a browser unless the webmaster specifically forbids it in the terms and conditions of the website. This is a gray area, where ethics and morality come into play.

As a webmaster, you should, therefore, be equipped to prevent attackers from getting your data easily. Uncontrolled scraping in the form of an overwhelming number of requests at a time may also lead to a denial of service (DoS) situation, where your server and all services hosted on it become unresponsive.

The top companies that are targeted by scrapers are digital publishers (blogs, news sites), e-commerce websites (for prices), directories, classifieds, airlines, and travel (for information).

Scraping is bad for you as it can lead to a loss of competitive advantage and therefore, a loss of revenue. In the worst case, scraping may lead to your content being duplicated elsewhere and lead to a loss of credibility for the original source. From a technological point of view, scraping may lead to excess pressure on your server, slowing it down and eventually inflating your bills too!

Since we have established that it is good to forbid web scrapers from accessing your website, let us discuss a few ways through which you can take a strong stand against potential attackers. Before we proceed, you must know that anything that is visible on the screen can be scraped and there is no absolute protection, however, you can make a web scraper’s life harder.

The easiest way to avoid scraping is to take a legal stand, whereby you mention clearly in your terms of service that web scraping is not allowed. For instance, Medium’s terms of service contain the following line:

Crawling the Services is allowed if done in accordance with the provisions of our robots.txt file, but scraping the Services is prohibited.

You can even sue potential scrapers if you have forbidden it in your terms of service. For instance, LinkedIn sued a set of unnamed scrapers last year, saying that extracting user data through automated requests amounts to hacking.

Prevent denial of service (DoS) attacks

Even if you have put up a legal notice prohibiting the scraping of your services, a potential attacker may still want to go ahead with it, leading to a denial of service at your servers, and disrupting your daily services. In such cases, you need to be able to avoid such situations.

You can identify potential IP addresses and block requests from reaching your service by filtering through your firewall.

Although it’s a manual process, modern cloud service providers give you access to tools that block potential attacks. For instance, if you are hosting your services on Amazon Web Services, the AWS Shield would help protect your server from potential attacks.

Use Cross-Site Request Forgery (CSRF) tokens

By using CSRF tokens in your application, you’ll prevent automated tools from making arbitrary requests to guest URLs. A CSRF token may be present as a session variable or as a hidden form field.

To get around a CSRF token, one needs to load and parse the markup and search for the right token, before bundling it together with the request. This process requires either programming skills or access to professional tools.

Using .htaccess to prevent scraping

.htaccess is a configuration file for your Apache web server, and it can be tweaked to prevent scrapers from accessing your data. The first step is to identify scrapers, which can be done through Google Webmasters or Feedburner. Once you have identified them, you can use many techniques to stop the process of scraping by changing the configuration file.

In general, the .htaccess file is not enabled on Apache and it needs to be enabled, after which Apache would interpret .htaccess files that you place in your directory.

.htaccess files can only be created for Apache, but we would provide equivalents for Nginx and IIS for our examples too. A detailed on converting rewrite rules for Nginx can be found in the Nginx documentation.

Prevent hotlinking

When your content is scraped, inline links to images and other files are copied directly to the attacker’s site.

When the same content is displayed on the attacker’s site, such a resource (image or another file) directly links to your website. This process of displaying a resource that is hosted on your server on a different website is called hotlinking.

When you prevent hotlinking, such an image, when displayed on a different site does not get served by your server. By doing so, any scraped content would be unable to serve resources hosted on your server.

In Nginx, hotlinking can be prevented by using a location directive in the appropriate configuration file (nginx.conf). In IIS, you need to install URL Rewrite and edit the configuration (web.config) file.

Deny or Allow specific IP addresses

If you have identified the IP addresses or patterns of IP addresses that are being used for scraping, you can simply block them through your .htaccess file. You may also selectively allow requests from specifics that you have allowlisted.

In Nginx, you can use the ngx_http_access_module to selectively allow or deny requests from an IP address. Similarly, in IIS, you can restrict IP addresses accessing your services by adding a Role in the Server Manager.

Throttling requests

Alternately you may also limit the number of requests from one IP address, but it may not be useful if an attacker has access to multiple IP addresses. A captcha may also be used in case of abnormal requests from an IP address.

You may also want to block access from known cloud hosting and scraping service IP addresses to make sure an attacker is unable to use such a service to scrape your data.

Create “honeypots”

A “honeypot” is a link to fake content that is invisible to a normal user, but that is present in the HTML which would come up when a program is parsing the website. By redirecting a scraper to such honeypots, you can detect scrapers and make them waste resources by visiting pages that contain no data.

Do not forget to disallow such links in your robots.txt file to make sure a search engine crawler does not end up in such honeypots.

Change DOM structure frequently

Most scrapers parse the HTML that is retrieved from the server.

To make it difficult for scrapers to access the required data, you can frequently change the structure of the HTML Doing so would require an attacker to evaluate the structure of your website again in order to extract the required data.

Provide APIs

As Medium’s terms of service say, you can selectively allow extracting data from your site by making certain rules.

One way is to create subscription-based APIs to monitor and give access to your data. Through APIs, you would also be able to monitor and restrict usage of the service.

Report attackers to search engines and ISPs

If all else fails, you may report a web scraper to a search engine so that they delist the scraped content, or to the ISPs of the scrapers to make sure they block such requests.

Conclusion

A fight between a webmaster and a scraper is a continuous one and each must stay vigilant to make sure they remain a step ahead of the other.

All the solutions provided in this article can be bypassed by someone with a lot of tenacity and resources (as anything that is visible can be scraped), but it’s a good idea to remain careful and keep monitoring traffic to make sure that your services are being used in a way you intended them to be.

12 Useful Newsletters For Web Developers

Let us show you 12 useful newsletters for web developers to keep up with relevant topics related to the web developer’s world.

Some newsletters post weekly news, articles, links, and tools about JavaScript, HTML, CSS, Node.js, and many other frontend stuff.

We recommend staying aware of significant areas such as security, accessibility, usability, and performance. Explore these newsletters and find out which ones suit you better.

1) JavaScript Weekly

This is the most popular newsletter, which posts weekly all new stuff about the JavaScript environment. Today, there are more than 116k subscribers, and it has many resources and news about JavaScript.

Link: JavaScript Weekly

2) Node.js Weekly

This newsletter is curated by the same editor of JavaScript Weekly. However, it is more focused on the Node.js platform.

Well, your JavaScript stack can’t be full without Node.js. So if you want to keep up to date with all the latest Node.js news this will be an awesome newsletter to subscribe to with more than 36k subscribers today.

Link: Node.js Weekly

3) FrontEnd Focus

This weekly newsletter publishes useful resources about HTML, CSS tips, WebGL, Canvas, Progressive web apps, WebRTC, and other stuff about browser technologies. If you are a Frontend Engineer, you must subscribe to this newsletter.

Link: Frontend Focus

4) WebTools Weekly

Web Tools Weekly is a front-end development and web design newsletter with a focus on tools. Each issue features a brief tip or tutorial, followed by a weekly round-up of various apps, scripts, plugins, and other resources to help front-end developers solve problems and be more productive.

Link: WebTools Weekly

5) JSter

JSter is a catalog of libraries and a newsletter. They publish content every month about libraries, articles, guides, techniques, interviews, resources, and anything else related to frontend and JavaScript.

Link: JSter

6) React Status

This is a weekly roundup of the latest news, tutorials, and projects in the React and React Native worlds. This newsletter has more than 10k subscribers and it is curated by the same editor of JavaScript Weekly, Frontend Focus, and Node.js Weekly.

Link: React Status

7) Mobile Web Weekly

In this newsletter, more than 11k subscribers receive weekly news, libraries, articles, and many other resources about web apps and native apps, but this newsletter focuses more on mobile web app technologies.

Link: Mobile Web Weekly

8) CSS Weekly

This is a newsletter focused on CSS so, every week, they publish useful articles, tutorials, tools, and some interesting experiments created using CSS for more than 27k subscribers.

Link: CSS Weekly

9) GameDev.js Weekly

If you like game development, you must subscribe to this newsletter. Weekly, they publish a lot of useful tutorials, tools, and articles related to HTML5, Canvas, and WebGL game development.

Link: GameDev.js Weekly

10) JavaScript Kicks

JavaScript Kicks is a curated newsletter about JavaScript. Every week they publish the most voted content from their forum.

Link: JavaScript Kicks

11) Pony Foo Weekly

This newsletter focuses on advanced topics related to web development. Here, you will receive useful links and trending topics about the news of JavaScript and ECMAScript.

12) Changelog Weekly

This is a great newsletter! Weekly, they post about anything related to the open-source world and software development. Sometimes they also present useful links about JavaScript.

Conclusion

Nowadays, one of the most useful ways to keep up to date about JavaScript is by subscribing some newsletters, and the amazing thing is that we can always learn some news from these resources.

There are newsletters about subjects related to other programming languages, databases, and frameworks.