Create an Ionic 4 PWA with Capacitor
March 22nd, 2019 | By Ahmed Bouchefra | 7 min read

In this tutorial, we’ll learn to build an Ionic 4 PWA (Progressive Web Application) with Capacitor.
A PWA is a web application similar to traditional web apps but provides extra features for users that are only available in native mobile apps like instant loading, add-to-home screen, splash screens, access to device capabilities, push notifications, and offline support.
The term “Progressive” in Progressive Web Apps refers to how these apps provide web experiences that are reliable - by loading instantly regardless of network conditions - fast - by responding immediately and smoothly to every user interaction - and engaging - by providing an immersive and natural user experience.
To achieve these demanding user experience primers, a PWA makes use of Service Workers for supporting features like instant loading and offline support so it needs to be securely served via HTTPS, as Service Workers only work under HTTPS connections.
PWAs achieve support for all modern and old browsers, which is an important aspect of this kind of app. Since they use modern features that might not be available in all browsers, PWAs make use of progressive enhancement which is using the feature when it’s available and using a fallback for browsers that don’t support it.
The application we'll be building is a simple JavaScript Jargon app that's based on the Simplified JavaScript Jargon available on GitHub. We'll export the entries as JSON data and we'll consume them from our PWA. We already created a statically generated JSON API.
You can find the source code of this app in this GitHub repository.
Note: If you would like to consume an API from your server, make sure you have CORS enabled in your web server. Otherwise, the web browser will block your requests due to the Same Origin Policy available on modern browsers.
Let’s get started!
Prerequisites
You need to have a development environment with Node.js and npm installed. You can install both of them by going to the official website and grabbing the binaries for your system.
Familiarity with TypeScript since we’ll be using Ionic 4 with Angular.
Generating a New Ionic 4 Project
Let’s start by installing Ionic CLI globally on your system from npm using the following command:
npm install -g ionic
Using the CLI, you can generate a new project using the following command:
ionic start
The CLI will prompt you for information about your project, such as the name (enter jsjargonpwa) and starter template (choose side menu). This will set up your project.
When prompted to Install the free Ionic Appflow SDK and connect your app? (Y/n) just type n.
You can now navigate to your project’s folder and serve your application locally using:
cd ./jsjargonpwa
ionic serve
Your application will be available from the http://localhost:8100 address.
We’ll be working on the home page, so you can remove the list page. First, delete the list folder containing the files; next, open the src/app/app.component.ts file and delete the entry for the list page from the appPages array:
     public appPages = [
       {
         title: 'Home',
         url: '/home',
         icon: 'home'
       }
     ];
Next, open the src/app/app-routing.module.ts file and delete the route for the list page:
   const routes: Routes = [
     {
       path: '',
       redirectTo: 'home',
       pathMatch: 'full'
     },
     {
       path: 'home',
       loadChildren: './home/home.module#HomePageModule'
     }
   ];
Getting JSON Data
We’ll use HttpClient from Angular to send a GET request to our server to fetch the JSON entries. Before that, we need to import it into our project.
First, open the src/app/home/home.module.ts file and import HttpClientModule:
   // [...]
   import { HttpClientModule } from '@angular/common/http';

   @NgModule({
     imports: [
       /* [...] */
       HttpClientModule
     ],
     declarations: [HomePage]
   })
   export class HomePageModule {}
Next, open the src/app/home/home.page.ts file and update it accordingly:
   import { Component } from '@angular/core';
   import { HttpClient } from '@angular/common/http';
   @Component({
     selector: 'app-home',
     templateUrl: 'home.page.html',
     styleUrls: ['home.page.scss'],
   })
   export class HomePage {
     API_URL = "https://media.jscrambler.com/blog/data.json";
     entries: Array<any>;
     constructor(private httpClient: HttpClient){
     }
     ionViewDidEnter(){
       this.getData();
     }
     getData(){
       this.httpClient.get(this.API_URL).subscribe((entries: any[])=>{
         this.entries = entries;
       })
     }

   }
We declare two variables: API_URL — which holds the address of the JSON file that we need to fetch — and entries, an array that will hold the entries.
Now, let’s inject HttpClient as httpClient via the component’s constructor.
Next, we add a getData() method that calls the get() method of HttpClient and subscribes to the returned Observable. We then assign the fetched data to the entries variable.
Finally, we add the ionViewDidEnter() event that gets called when the Ionic page is loaded and we call the getData() method to fetch the entries once the page is loaded.
Next, open the src/app/home/home.page.html file and update it as follows:
   <ion-header>
     <ion-toolbar>
       <ion-buttons slot="start">
         <ion-menu-button></ion-menu-button>
       </ion-buttons>
       <ion-title>
         JSJargon
       </ion-title>
     </ion-toolbar>
   </ion-header>
   <ion-content>
       <ion-list lines="none">
         <ion-item *ngFor = "let entry of entries">
           <ion-card>
             <ion-card-header>
               <ion-card-title>{{ entry.name }}</ion-card-title>
             </ion-card-header>
             <ion-card-content>
               <p>{{ entry.description }}</p>
             </ion-card-content>
           </ion-card>
         </ion-item>
       </ion-list>
   </ion-content>
We loop through the entries variable and display the name and description of each entry using an Ionic card.
This is a screenshot of the result: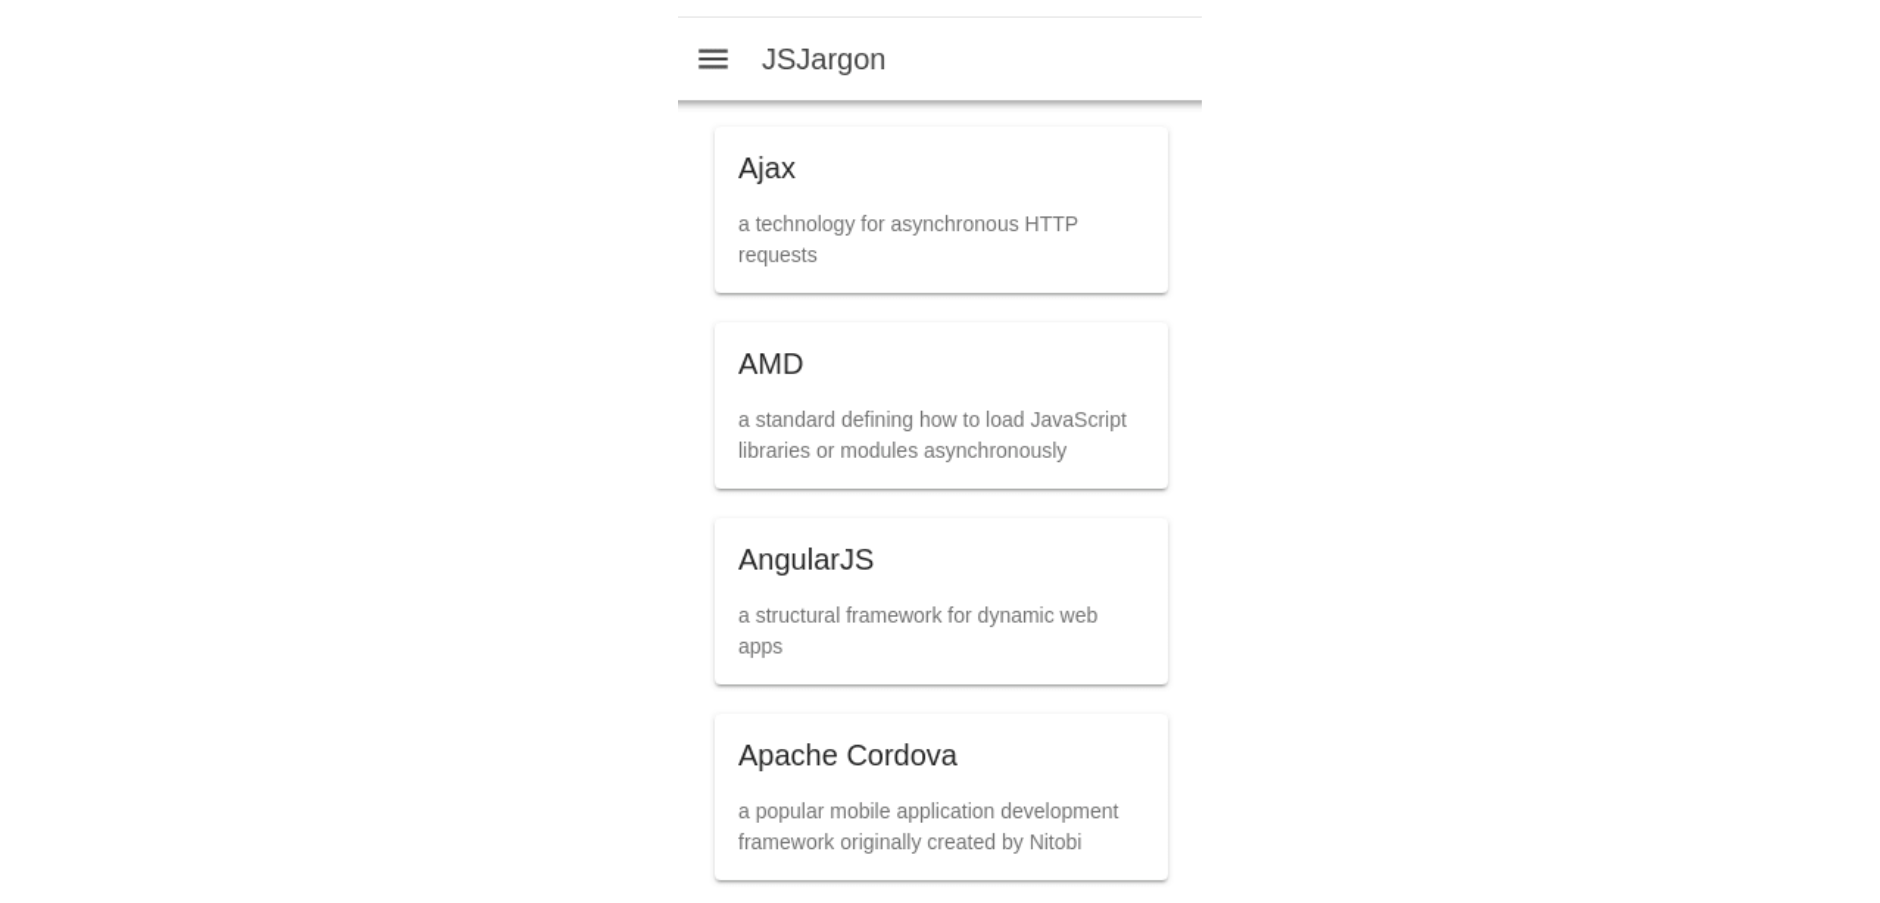
Adding Capacitor
Capacitor is an open-source native container (similar to Cordova) built by the Ionic team that you can use to build web/mobile apps that run on iOS, Android, Electron (Desktop), and Progressive Web Apps with the same code base. It allows you to access the full native SDK on each platform, and easily deploy to App Stores or create a PWA version of your application.
Capacitor can be used with Ionic or any preferred frontend framework and can be extended with plugins. It has a rich set of official plugins and you can also use it with Cordova plugins.
Installing Capacitor
Let’s start by installing a Capacitor in your project:
npm install --save @capacitor/cli @capacitor/core
Next, you need to initialize Capacitor with npx cap init \[appName\] [appId]:
npx cap init jsjargon com.techiediaries.jsjargonUsing the Clipboard Plugin
Let’s use the Clipboard Capacitor plugin in our project to see how Capacitor works by example.
Open the src/app/home/home.page.ts file and add:
import { Plugins } from '@capacitor/core';
const { Clipboard } = Plugins;
Next, add the copy() method which will be used to copy a JS term to the clipboard:
     async copy(name: string, text: string){
       Clipboard.write({
         string:  name + ' is ' + text
       });
     }
Finally, open the src/app/home/home.page.html file and add a button to the Ionic card for each entry:
           <ion-card>
             <ion-card-header>
               <ion-card-title>{{ entry.name }}</ion-card-title>
             </ion-card-header>
             <ion-card-content>
               <p>{{ entry.description }}</p>
             </ion-card-content>
               <ion-button (click)="copy(entry.name, entry.description)">
                 Copy
               </ion-button>
           </ion-card>
This is a screenshot of the result: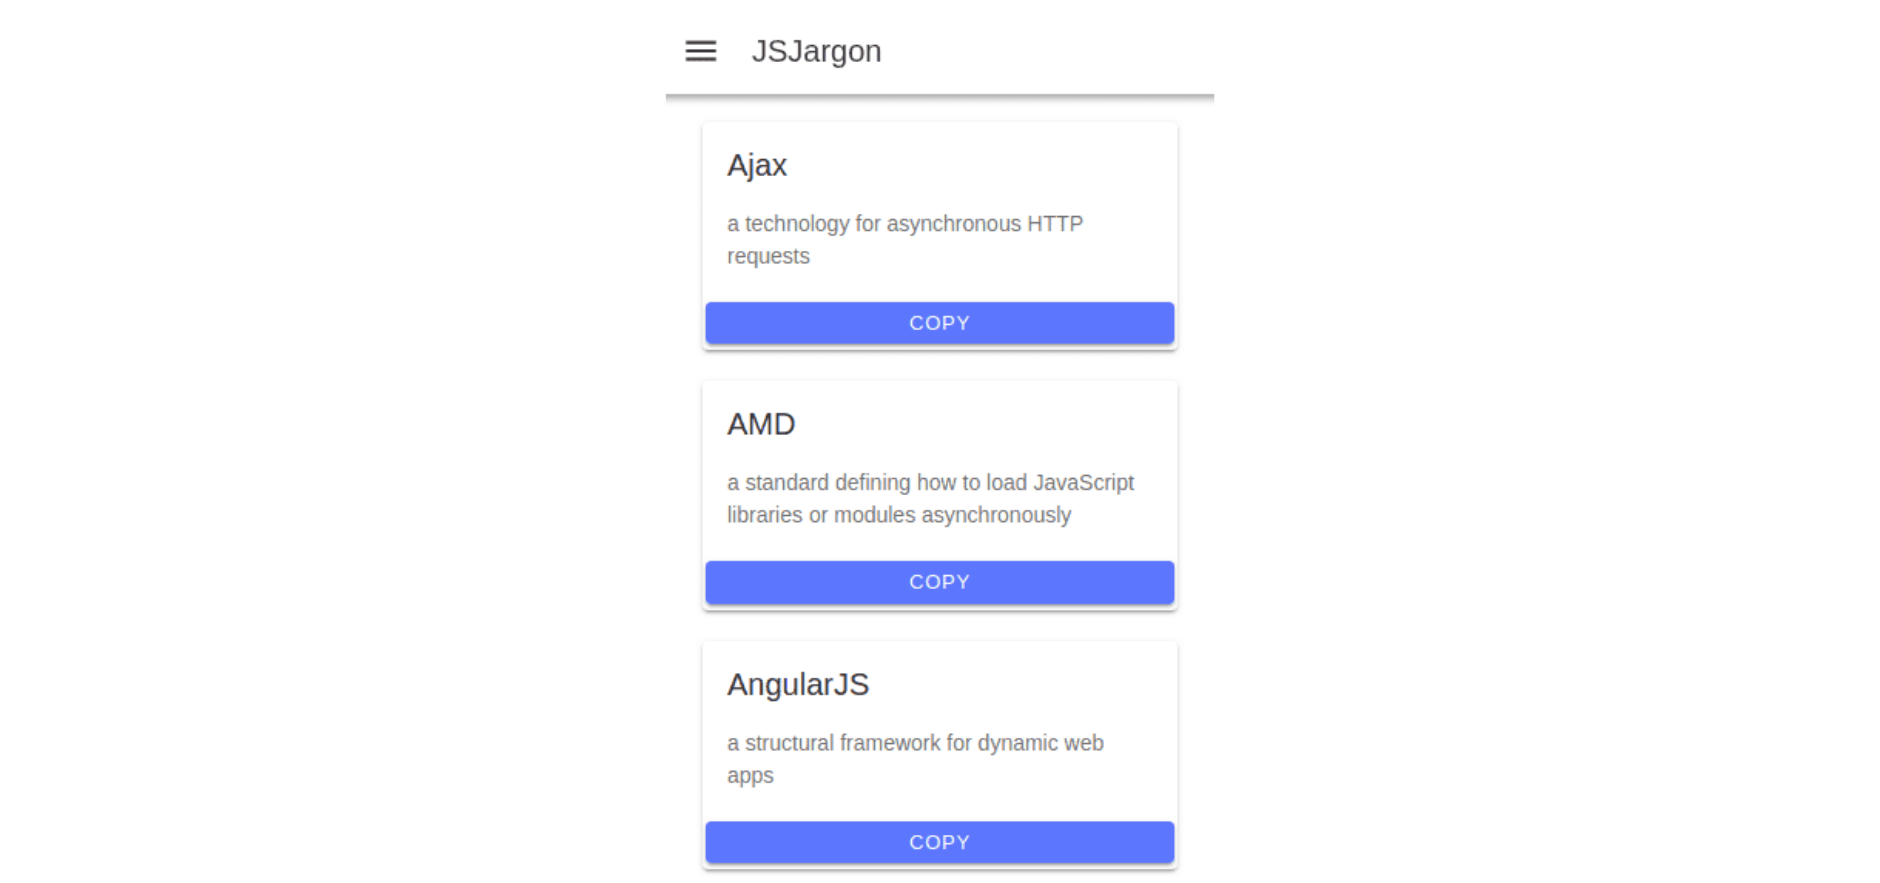
Adding a Web Manifest and A Service Worker
A web manifest and service worker are essential requirements for a PWA. You can add both of them using the @angular/pwa package. In your terminal, run:
cd jsjargonpwa
ng add @angular/pwa
This is a screenshot of what @angular/pwa has added and updated in your project: For example, a src/manifest.webmanifest file is created and referenced in the index.html file:
<link rel="manifest" href="manifest.webmanifest">
Also, different default icons were added in the src/assets/icons folder. In production, you will need to change these icons with your own.
In the src/app/app.module.ts file, a service worker is registered using the following line:
ServiceWorkerModule.register('ngsw-worker.js', { enabled: environment.production })
This is only enabled for production so you will need to build your application for production to register the service worker.
Next, we need to build our application for production using the following command:
ionic build --prod
Finally, we need to use a hosting service like Netlify to securely host the application over HTTPS (required by a PWA).
Conclusion
We have seen how to create a PWA with Ionic 4, Angular, and Capacitor.
We have seen an example of sending GET requests using HttpClient and how to access the device clipboard using the Clipboard Capacitor plugin.
We hope that this tutorial has been useful in helping you with your own projects.
Jscrambler
The leader in client-side Web security. With Jscrambler, JavaScript applications become self-defensive and capable of detecting and blocking client-side attacks like Magecart.
View All ArticlesMust read next
Background Services in Ionic Capacitor
Capacitor provides a different approach from Cordova, by focusing on a native development workflow. Here, we explore how it handles background tasks.
October 29, 2019 | By Karan Gandhi | 5 min read
Introduction to Ionic 4
The new Ionic 4 comes packed with new features to help you deliver hybrid mobile apps with JavaScript. Learn how to get started with this guide.
February 8, 2019 | By Ahmed Bouchefra | 6 min read
