Implementing Angular Lazy Loading
October 28th, 2021 | By Jay Raj | 5 min read

Implementing Angular Lazy Loading has several advantages, from faster page loads to a better user experience.
When your Angular application loads, the application modules are loaded, whether they’re required or not.
It may not sound like much of an issue if the application is small, but as its modules eventually grow, it will slow down the entire application.
The answer to this problem is found through Lazy loading, which is the technique of initially loading only the required modules and loading the other modules only when they are actually required.
From the Lazy-loading feature modules' official docs:
By default, NgModules are eagerly loaded, which means that as soon as the application loads, so do all the NgModules, whether or not they are immediately necessary. For large applications with lots of routes, consider lazy loading—a design pattern that loads NgModules as needed. Lazy loading helps keep initial bundle sizes smaller, which in turn helps decrease load times.
Advantages of Lazy loading
Lazy loading loads the resource as and when required, which results in:
Faster page loads.
Better user experience.
Bandwidth conservation.
Now let's see lazy loading in action.
Implementing Lazy Loading
Step 1: Creating an Angular app
Start by creating an Angular app using the Angular CLI.
ng new angular-app
Say yes to creating Angular routing and adding the CSS stylesheet format. Once the application is created, navigate to the project directory and run the application.
cd angular-app
npm start
You will see the Angular app up and running. Our application will have two modules: the Dashboard module and the Home module.
By default, you'll be loading the App module. The Home module and the Dashboard module will come into play when clicking the links in the App module.
Step 2: Creating the Dashboard Module
From your application root directory, execute the following command to create the Dashboard module:
ng g module dashboard --routing
The above command creates the dashboard module. The --routing option creates the routing configuration for the module.
Once the module command is executed, you can check the application src/app folder; it will contain a dashboard folder for the Dashboard module. Inside the folder, there will also be a file called dashboard-routing.module for routing specific to the module.
Navigate to the dashboard module folder and create a component for the module.
cd .\src\app\dashboard\
ng g component chart
Modify the dashboard-routing.module file by adding the default route for the module, which points to the Chart component. Here is how the file looks:
import { NgModule } from '@angular/core';
import { RouterModule, Routes } from '@angular/router';
import { ChartComponent } from './chart/chart.component';

const routes: Routes = [
  {path: '', component: ChartComponent},
];

@NgModule({
  imports: [RouterModule.forChild(routes)],
  exports: [RouterModule]
})
export class DashboardRoutingModule { }
Add the following HTML to the chart.component.html file:
<h4>
    Welcome Dashboard
</h4>
Step 3: Creating the Home Module
Let's create the Home module. From the project root directory, execute the following command:
ng g module home --routing
The above command creates the Home module with routing configuration. Create a component inside the Home module by navigating to the Home module folder.
cd .\src\app\home\
ng g component userHome
Modify the home-routing.module.ts file to set the default route to the UserHomeComponent. Here is the home-routing.module.ts file:
import { NgModule } from '@angular/core';
import { RouterModule, Routes } from '@angular/router';
import { UserHomeComponent } from './user-home/user-home.component';

const routes: Routes = [
  {path: '', component: UserHomeComponent},
];

@NgModule({
  imports: [RouterModule.forChild(routes)],
  exports: [RouterModule]
})
export class HomeRoutingModule { }
Add the following HTML to the user-home.component.html file:
<h4>
    Welcome Home
</h4>
Add the following HTML to the app.component.html file:
<h2>
  Welcome to course !!
</h2>
<a [routerLink]="'home'">Go to Home</a>
<a [routerLink]="'dashboard'">Dashboard</a>
<router-outlet></router-outlet>
Step 4: Without Lazy Loading
Add the component references to the app.module.ts file:
import { NgModule } from '@angular/core';
import { BrowserModule } from '@angular/platform-browser';

import { AppRoutingModule } from './app-routing.module';
import { AppComponent } from './app.component';
import { ChartComponent } from './dashboard/chart/chart.component';
import { UserHomeComponent } from './home/user-home/user-home.component';

@NgModule({
  declarations: [
    AppComponent,
    ChartComponent,
    UserHomeComponent
  ],
  imports: [
    BrowserModule,
    AppRoutingModule
  ],
  providers: [],
  bootstrap: [AppComponent]
})
export class AppModule { }
Add the required routes to the app-routing.module.tsfile:
import { NgModule } from '@angular/core';
import { RouterModule, Routes } from '@angular/router';
import { ChartComponent } from './dashboard/chart/chart.component';
import { UserHomeComponent } from './home/user-home/user-home.component';

const routes: Routes = [
  {path: 'dashboard', component: ChartComponent},
  {path: 'home',component : UserHomeComponent}
];

@NgModule({
  imports: [RouterModule.forRoot(routes)],
  exports: [RouterModule]
})
export class AppRoutingModule { }
So as seen in the above Routes, a request to the /dashboard route takes you to the ChartComponent in the DashboardModule, and a request to the /home route takes you to the UserHomeComponent.
Save the above changes and start the Angular application. On the default page, you'll be able to see two links to the home page and the dashboard, respectively. If you click on either of the two links, it takes you to the respective module.
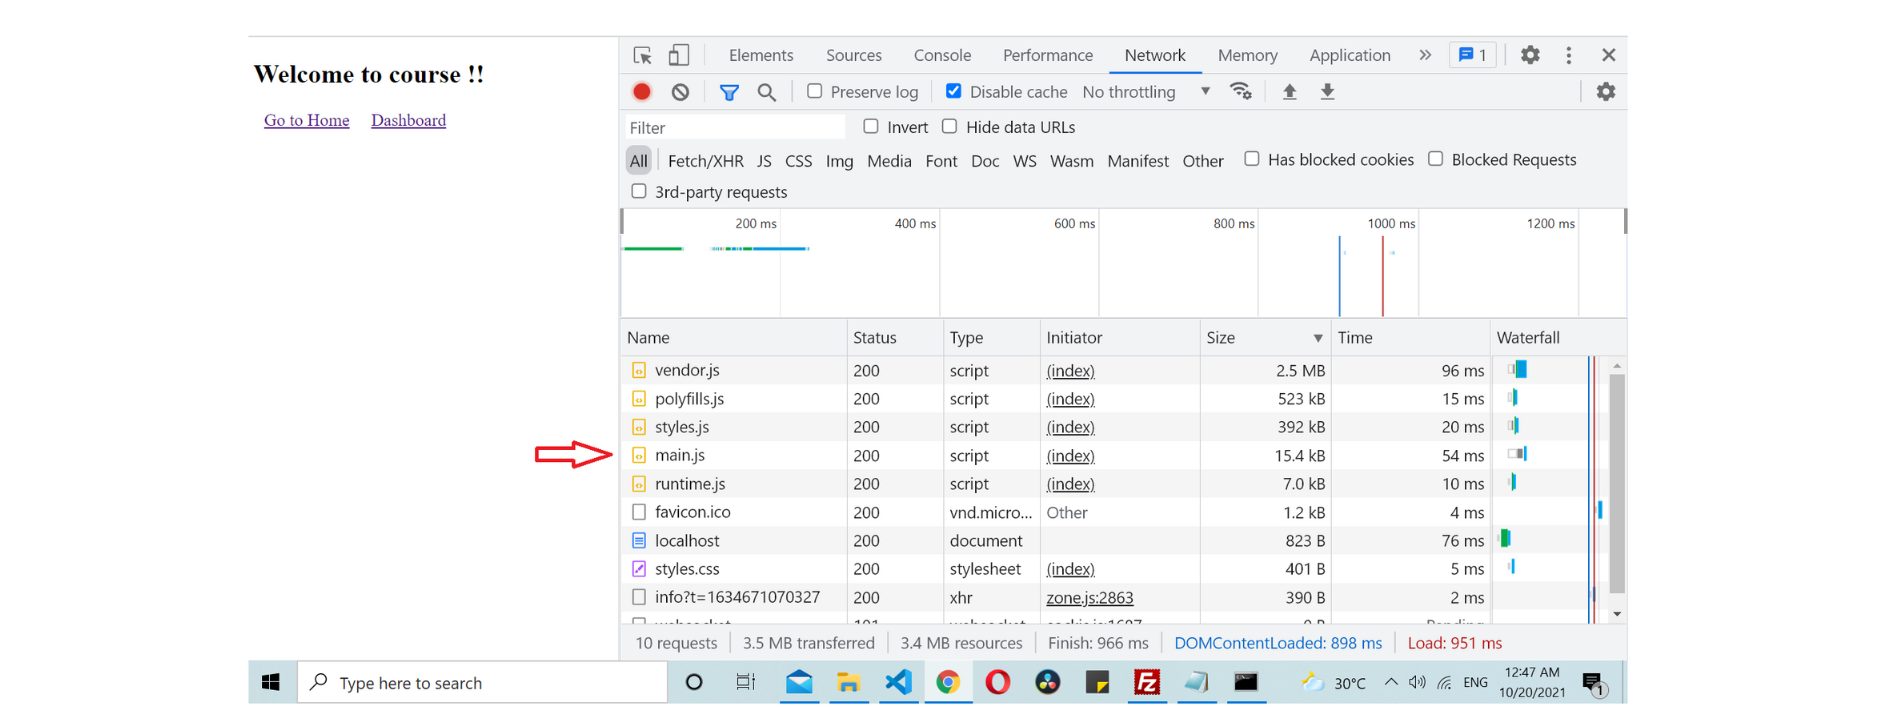
If you check the console, you can see that the size of the main.js file is 15.4KB. That is all the component data that is being loaded. If you notice, we don't need the Dashboard module and the Home module on the initial load. You only need them once you click on their particular links.
Now let's see how to achieve that using lazy loading.
Step 5: Lazy Loading
To lazy load, the modules, go to the app-routing.module.ts file and use loadChildren.
You don't need to import the module in the app-routing.module.ts but it will get imported dynamically during runtime. Here is how the app-routing.module.ts file looks:
import { NgModule } from '@angular/core';
import { RouterModule, Routes } from '@angular/router';

const routes: Routes = [
  {path: 'home', loadChildren: () => import('./home/home.module').then(m => m.HomeModule)},
  {path: 'dashboard', loadChildren: () => import('./dashboard/dashboard.module').then(m => m.DashboardModule)}
];

@NgModule({
  imports: [RouterModule.forRoot(routes)],
  exports: [RouterModule]
})
export class AppRoutingModule { }
Modify the app.module.ts to remove the Chart component and UserHome component imports.
import { NgModule } from '@angular/core';
import { BrowserModule } from '@angular/platform-browser';

import { AppRoutingModule } from './app-routing.module';
import { AppComponent } from './app.component';

@NgModule({
  declarations: [
    AppComponent
  ],
  imports: [
    BrowserModule,
    AppRoutingModule
  ],
  providers: [],
  bootstrap: [AppComponent]
})
export class AppModule { }
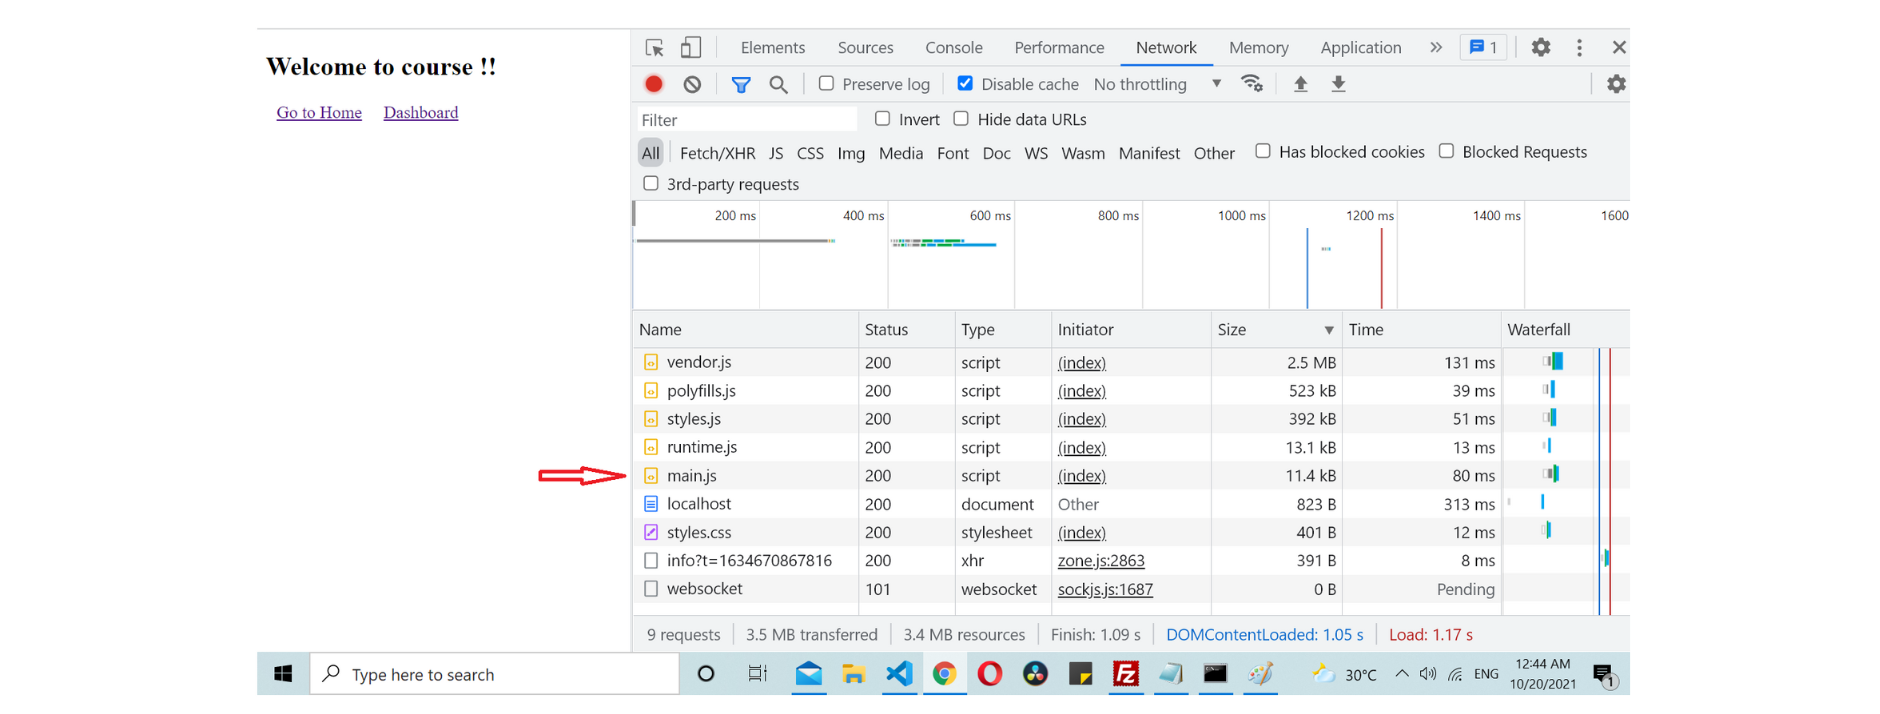
Save the changes and load the application. Now if you check the browser console on initial load the size of main.js has been reduced to 11.4KB.
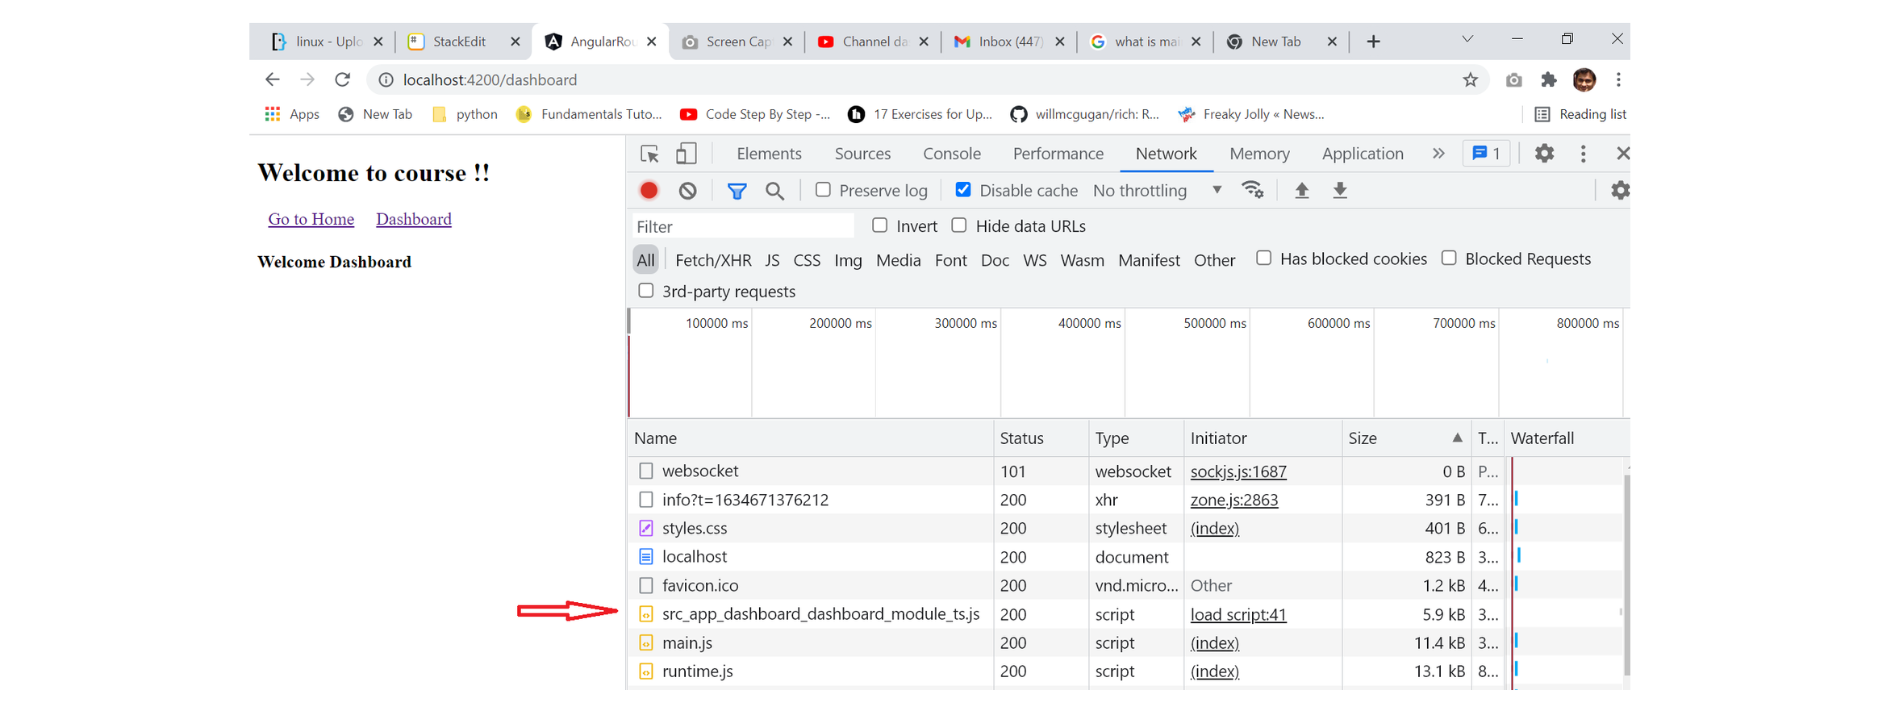
If you click on any of the links, you can see that the respective module file is loaded on demand. Please check the file indicated in red. It wasn’t there in the initial load.

Conclusion
Lazy loading is an important Angular feature that helps reduce the initial load time since it loads only the necessary files first. Other required modules are loaded on demand when you navigate to their particular route.
You can use this feature to improve your app's load time.
Lastly, learn how you can secure your Angular source code against theft and reverse engineering.
The source code for this tutorial is available on GitHub.
Jscrambler
The leader in client-side Web security. With Jscrambler, JavaScript applications become self-defensive and capable of detecting and blocking client-side attacks like Magecart.
View All ArticlesMust read next
Angular 2 and Typescript Conference Browser Application
How to build a conference browsing application using typescript and the Angular 2 CLI
September 6, 2016 | By Jscrambler | 11 min read
Working with Angular Local Storage
In this article, we'll discuss local storage and its usage from an Angular application's perspective. Let's start by trying to understand what Angular local storage is.
April 8, 2022 | By Jay Raj | 5 min read
