New Year’s Resolution: Build an Angular 2 To Do App
January 7th, 2016 | By Jscrambler | 7 min read

Today, we have a quick guide about building an Angular 2 To-Do app.
You may have heard of the latest Google framework to hit beta as of December 15th. This new and improved version 2 isn’t necessarily meant to replace Angular 1. Instead, it enhances conventions the framework is known for like its data binding, services, and dependency injection. All while incorporating the latest ES5 and 6 features and functionality.
Angular’s speed and use of server-side rendering are sure to be a big hit thanks to its inherent SEO benefits. Add to that a distinctly approachable syntax compared to Angular 1 and you have the makings of a modular and efficient framework.
Angular 2: Changes and Features
Angular 2 is intended to sit on top of already existing or planned web standards and was built to be a practical tool in developers' belts as the web evolves. Let’s cover what has changed from Angular 1 and what makes Angular 2 stand out.
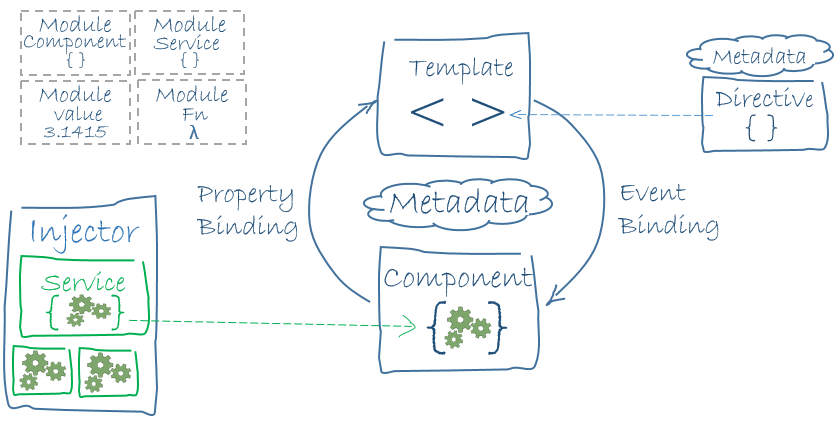
Conceptually, Angular 2’s API makes heavy use of web components. $Scope is no longer and everything is attached to your component class. HTML templates, services, and two-way data binding made the cut to Angular 2. Directives exist but in a different form which we’ll cover later.
One of the coolest changes in Angular 2 is that almost everything is Components. Previously in Angular 1, we’d need to create controllers, place those controllers into templates, and feed data to $scope.
The Component in Angular 2 replaces all of the above. Because every component is basically composed of other modules, the framework's structure helps our codebase remain bug-free and easy to maintain.
Components are the fundamental building blocks of Angular 2 applications, they essentially configure dependency injection as they load external components for use into our template.
Components can also have several decorators attached to them that grant extra features like template use, the ability to create views, dependency injection, and selectors with custom HTML tags. Think of your application as the root of all other components with other components that include behavior or state, branching off.
We are going to build our To Do app in ES5 but Angular 2 is fully compatible with ES6 and can be transpiled to ES5 through the use of Babel or Typescript. As a bonus, we’ll secure our entire app by utilizing a handy webpack plugin with Jscrambler.
Building our App
Disclaimer: Angular 2 is officially in beta developer preview so things might/probably/definitely change. We’ll be using a self-executing alpha version of Angular for this demo. I’m also assuming you have a cursory knowledge of Node and NPM for our tools.
Let’s begin by creating an app.js file that will contain our app's logic and serve as the root for all other components of our project. Next we’ll create our index.html which will create our main view. We’ll also need an app.html to serve as a template.
Next, we can add the HTML to our index:
index.html:
<!DOCTYPE html>
<html>

<head>
    <link rel="stylesheet" href="style.css">
    <script src="https://code.angularjs.org/2.0.0-alpha.22/angular2.sfx.dev.js"></script>
    <script src="app.js"></script>
</head>

<body>
    <my-app></my-app>
</body>

</html>
We load our angular script as well as our app.js and also place the <my-app></my-app> web component within a body tag. This could really be named anything and Angular will know that this HTML ornament is our app.
In our app.js we’ll set our main app component like so:
app.js
function AppComponent() {
    this.name = "ToDo App";
}
AppComponent.annotations = [
    new angular.ComponentAnnotation({
        selector: 'my-app'
    }),
    new angular.ViewAnnotation({
        templateUrl: 'app.html',
        directives: [angular.For]
    })
];

document.addEventListener('DOMContentLoaded', function() {
    angular.bootstrap(AppComponent);
});
We’ll use the AppComponent annotations to define the actual component for our app with the selector property. To define our view we set the ViewAnnotation properties to load our app.html template with the html for our list. Then angular.bootstrap takes our AppComponent and loads it to the document. One thing to note is that by adding the directives property we are loading our angular. For module in our View Annotation for use in our app. We’ll use this functionality to add and list our to-dos.
Next in our app.html template, we’ll add the following code to Display a Title, Input, and Our List on one page.
Adding our input is similar to the process in Angular 1 only now we just simply bind our (click) to our button and define its behavior. In our input element, we add a click event to addTodo() and pass in #newtodo which associates the input itself instead of the value.
Gone are the days of ng-click, instead we write behaviors into our html elements and load directives as needed. Lastly, we add a directive to our unordered list with a for and use the syntax “of” in <li for="#todo of todos; #i = index"> to define the iterable portion of the list from our to-do’s. We also set our todo array with #i = index.
We need to ensure we can delete to-do's by adding “deleteTodo(i)” and binding it with (click). We’ll use an X as a placeholder for our event but you can easily use an image or something more aesthetic to serve as the anchor.
So far we’ve got a template to display our app, some of our logic, and the main pieces of our to-do list. Now we need to finish it off by code in some tasks to complete and make sure we can modify the array of To Do’s. We do this by adding the following line to our main app function.
this.todos = ["Learn Angular 2", "Build to do app", "???", “profit”];
After we create our array, we add functionality by coding in more behaviors like adding and deleting to-dos. The following function will read the value of the input and push it to our array:
this.addTodo = function(newtodo) {
    this.todos.push(newtodo.value);
    newtodo.value = "";
};
newtodo.value = ""; is used to reset our input value after adding a to-do. The final piece of our app will enable us to delete tasks from our list. Here is the code we’ll use:
this.deleteTodo = function(i) {
    this.todos.splice(i, 1)
};
No magic here, just a function to splice elements in our array. We use it to choose where we begin to splice from until the second argument 1. This makes it so only the item we click X for will be deleted.
Now that we’re able to add or delete to-do’s our final app.js code should look more like this:
function AppComponent() {
    this.name = "ToDo App";
    this.todos = ["Learn Angular 2", "Build to do app", "???", “profit];

    this.addTodo = function(newtodo) {
        this.todos.push(newtodo.value);
        newtodo.value = "";
    };

    this.deleteTodo = function(i) {
        this.todos.splice(i, 1)
    };
}
AppComponent.annotations = [
    new angular.ComponentAnnotation({
        selector: 'my-app'
    }),
    new angular.ViewAnnotation({
        templateUrl: 'app.html',
        directives: [angular.For]
    })
];

document.addEventListener('DOMContentLoaded', function() {
    angular.bootstrap(AppComponent);
});
Congrats! We’ve completed our To-Do app. Now for the final piece of the puzzle, minifying and protecting your app. This also happens to be the easiest step for webpack users.
First, you will need to create a .jscramblerrc file with your API Credentials. You can find those in your Jscrambler Account Panel.
.jscramblerrc
{
    "keys": {
        "accessKey": "XXXXXX",
        "secretKey": "XXXXXX"
    },
    "params": {
        "self_defending": "%DEFAULT%"
            // there is a big set of transformations that you can use
            // check https://jscrambler.com/en/help/javascript_obfuscation
    }
}
Finally, you simply need to create and setup a webpack.config.js and add this:
webpack.config.js
module.exports = {
    entry: "./app.js",
    output: {
        path: __dirname,
        filename: "bundle.js"
    },
    module: {
        loaders: [{
            test: /\.js$/,
            exclude: /node_modules/,
            loader: 'jscrambler-loader'
        }]
    }
};
Conclusion
That's it! Our work is done and we simply run webpack to bundle our entire to-do app.
Compared to Angular 1, version 2 is much more concise and streamlined, our tiny codebase proves this. Throw in some handy dev tools like Webpack and Jscrambler and it has never been easier and safer to build modern web applications.
What better way to track your personal New Year’s resolutions for 2016 than with a to-do app built by you on a shiny new tech stack wrapped in a secure and protected bundle!
Finally, don't forget to pay special attention if you're developing commercial Angular apps that contain sensitive logic. You can protect them against code theft, tampering, and reverse engineering.
Jscrambler
The leader in client-side Web security. With Jscrambler, JavaScript applications become self-defensive and capable of detecting and blocking client-side attacks like Magecart.
View All ArticlesMust read next
Angular 2 and Typescript Conference Browser Application
How to build a conference browsing application using typescript and the Angular 2 CLI
September 6, 2016 | By Jscrambler | 11 min read
Getting Started with Angular 2
Angular 2 has been built to be completely decoupled from the DOM, meaning that developers can use the framework to build more than just web applications.
November 10, 2016 | By Thomas Greco | 6 min read
