Build Database Relationships with Node.js and MongoDB
September 10th, 2019 | By Connor Lech | 8 min read

Learn how data relationships work between MongoDB collections in a Node.js server application.
MongoDB is a NoSQL document-oriented database. It’s popular in the Node.js community and a viable database solution for building real-world applications.
MongoDB is different from traditional, SQL databases like MySQL and PostgreSQL in that data is stored in binary JSON-like objects called BSON). This structure lends itself well to building Javascript applications that communicate with JSON. Additionally, MongoDB has a flexible schema. This means there aren’t database migrations to worry about and data models can grow and change.
In this tutorial, we’re going to set up a Node.js server application, connect it to MongoDB, and demonstrate how relationships work between MongoDB Collections.
In the table below (provided by MongoDB) you’ll see how traditional aspects of SQL databases stack up against their MongoDB equivalents. You can find the whole source code for this tutorial in this GitHub repo.
MySQL | MongoDB |
|---|---|
ACID Transactions | ACID Transactions |
Table | Collection |
Row | Document |
Column | Field |
Secondary Index | Secondary Index |
JOINs | Embedded documents, $lookup & $graphLookup |
GROUP_BY | Aggregation Pipeline |
Source: MongoDB.
In SQL databases, we get database relationships using joins. For example, if we had an SQL database with two tables, books, and authors, we could get all the books that belong to an author like so:
SELECT b.id AS ‘Post ID’, b.title AS ‘Book Title’, a.name AS ‘Author Name`, a.id AS ‘Author ID’
FROM books b
JOIN authors ON b.author_id = a.id
WHERE a.id = 1234;
This will grab information from both tables and display the results in a single dataset for us. Frameworks like Ruby On Rails and Laravel have abstracted this functionality for developers, making it possible to write PHP or Ruby to grab related information.
In Ruby On Rails, using Active Record finding, an author and related posts could look like:
authorWithBooks = Author.find 1234, :include => [:books]
In Laravel, using Eloquent, we could do:
$authorWithBooks = Author::find(1234)->books();
These results would give us the author with ID 1234 and all the books that they’ve written.
On the books table, we’d store an author_id, setting up the relationship between authors and books in the SQL world. MongoDB doesn’t use joins though, so how do we achieve this functionality?
There is a helper npm package for working with MongoDB called Mongoose that we’re going to use for illustrative purposes in this tutorial.
Mongoose is an ORM (stands for Object Relationship Mapper) that is a helper for MongoDB kind of like how ActiveRecord and Eloquent are helpers for working with relational data.
Create Database Models with Mongoosejs
The first thing to do is set up our models in Mongoose. These schemas are flexible but help us define what we want our data to look like.
For the author model, we define a model schema that can reference documents in another collection:
const mongoose = require('mongoose');

const authorModel = mongoose.Schema({
  name: {
  	type: String,
  	required: '{PATH} is required!'
  },
  bio: {
  	type: String
  },
  website: {
  	type: String
  },
  books: [
    { type: mongoose.Schema.Types.ObjectId, ref: 'Book' }
  ]
}, {
  timestamps: true
});

module.exports = mongoose.model('Author', authorModel);
In the above model, we define that in the authors' MongoDB collection authors have names, bios, websites, and an array of books. Each element in the books array will reference the book ID on the books collection. We’ll define that below. The second argument, saying timestamps = true will include “updated at” and “created at” fields when we create author records.
The Book schema models what our book data will look like.
The schema has a reference to find the id of an associated author. In this example, I’m saying that a book is written by only one author, though in the real world that’s not always the case! Here’s what a belongs-to relationship could look like using Mongoose.js:
const mongoose = require('mongoose');

const bookModel = mongoose.Schema({
  title: {
  	type: String,
  	required: '{PATH} is required!'
  },
  subtitle: {
  	type: String
  },
  author: {
    type: mongoose.Schema.Types.ObjectId,
    ref: 'Author'
  }
}, {
  timestamps: true
});

module.exports = mongoose.model('Book', bookModel);
Instead of an array of authors, the book references one author id as the author of the book. We’re using timestamps again for the “updated at” and “created at fields”.
In the root models directory, I added an index to register the models:
module.exports = {
	'Author': require('./Author'),
	'Book': require('./Book'),
};
Register Routes to Return JSON From Express 4
Now that we have the authors and book models defined, it’s time to return and show the data via a JSON API. For that, I set up a controller for Authors called AuthorsController and one for Books called BooksController.
The controllers are responsible for handling the request after the router determines which route to use. Below, we’ll define a method for rendering a JSON response of all authors and the JSON of one author based on an ID.
The authors' controller looks like this:
const { Author } = require('../models');

const AuthorsController = {
  async index(req, res){
  	const authors = await Author.find().populate('books');
  	res.send(authors);
  },
  async show(req, res){
  	const author = await Author.findById(req.params.id).populate(‘books’);
  	res.send(author);
  }
};

module.exports = AuthorsController;
Here, I’m importing the author model, grabbing all of them, and populating the query result with the related books. To use the async-await functionality with Express 4, I pulled in a package called express-async-errors and registered it in server.js like so: require('express-async-errors').
Following that Express 4 requires some server boilerplate setup:
app.use(bodyParser.json());
app.use(bodyParser.urlencoded({ extended: true }));
app.use(cors());
app.use(methodOverride());
app.use(cookieParser());
app.use(express.static(__dirname + '/public'));

require('./server/routes')(app);
In the server/routes.js file, I register API routes for showing all the authors with their books and individual authors with their books:
const express = require('express'),
	path = require('path'),
	rootPath = path.normalize(__dirname + '/../'),
	router = express.Router(),
	{ AuthorsController,
		BooksController } = require('./controllers');

module.exports = function(app){

	router.get('/authors', AuthorsController.index);
	router.get('/authors/:id', AuthorsController.show);

	app.use('/api', router);
};
Now we have a working API that returns authors with the books that they’ve written. The only problem is that there are no authors or books stored in MongoDB yet! To fix that, we’ll need to set up code to seed the database with records. If you visit /api/authors now all you’ll see is an empty array.
Seed Records Into MongoDB
We need to make sure that the Express 4 server connects properly to MongoDB. For that, we can connect via a URL and listen for successful connection events like so:
const mongoose = require('mongoose'),
	env = process.env.NODE_ENV = process.env.NODE_ENV || 'development',
	envConfig = require('../server/env')[env];

mongoose.Promise = require('bluebird');
mongoose.connect(envConfig.db, { useMongoClient: true, });

mongoose.connection.on('connected', function () {
  console.log(`Database connection open to ${mongoose.connection.host} ${mongoose.connection.name}`);
});

mongoose.connection.on('error',function (err) {
  console.log('Mongoose default connection error: ' + err);
});

mongoose.connection.on('disconnected', function () {
  console.log('Mongoose default connection disconnected');
});
With the environment config file defined like so:
var path = require('path'),
	rootPath = path.normalize(__dirname + '/../../');

module.exports = {
	development: {
		rootPath: rootPath,
		db: 'mongodb://localhost/mongodb-relationships',
		port: process.env.PORT || 3000
	},
	production: {
		rootPath: rootPath,
		db: process.env.MONGOLAB_URI || 'you can add a mongolab uri here ($ heroku config | grep MONGOLAB_URI)',
		port: process.env.PORT || 80
	}
};
The seeder itself is going to run from the command line. It’s a bit verbose but goes through the process of creating and updating records in MongoDB with Mongoose.js.
require('./index');
const mongoose = require('mongoose');
const { Author, Book } = require('../server/models');

async function seedAuthors() {
  console.log('Seeding authors to ' + mongoose.connection.name + '...');
  const authors = [
    { name: 'JK Rowling', bio: 'J.K. Rowling is the author of the much-loved series of seven Harry Potter novels, originally published between 1997 and 2007.' },
    { name: 'Tony Robbins', bio: 'Tony Robbins is an entrepreneur, best-selling author, philanthropist and the nation\'s #1 Life and Business Strategist.' },
  ];

  for (author of authors) {
    var newAuthor = new Author(author);
    await newAuthor.save();
  }

  const a = await Author.find();
  console.log('authors: ', a);
}

async function seedBooks() {
  console.log('Seeding books to ' + mongoose.connection.name + '...');

  const jkRowling = await Author.findOne({ name: 'JK Rowling' });
  const tonyRobbins = await Author.findOne({ name: 'Tony Robbins' });

  let harryPotter = new Book({ title: 'Harry Potter', author: jkRowling._id });
  let awakenGiant = new Book({ title: 'Awaken the Giant Within', author: tonyRobbins._id });

  await harryPotter.save();
  await awakenGiant.save();

  jkRowling.books.push(harryPotter);
  tonyRobbins.books.push(awakenGiant);

  await jkRowling.save();
  await tonyRobbins.save();
}

seedAuthors();
seedBooks();
This will create a new connection to the MongoDB database and then convert a normal array of JavaScript objects into data we can persistently access.
The author will have an array of books with one book for each author in the array. To add more books, we can push to the books array and save the changes. Each book will have one author. MongoDB stores these relationships via the id. Using the populate method in our controller above, we’ll be able to view the entire object.
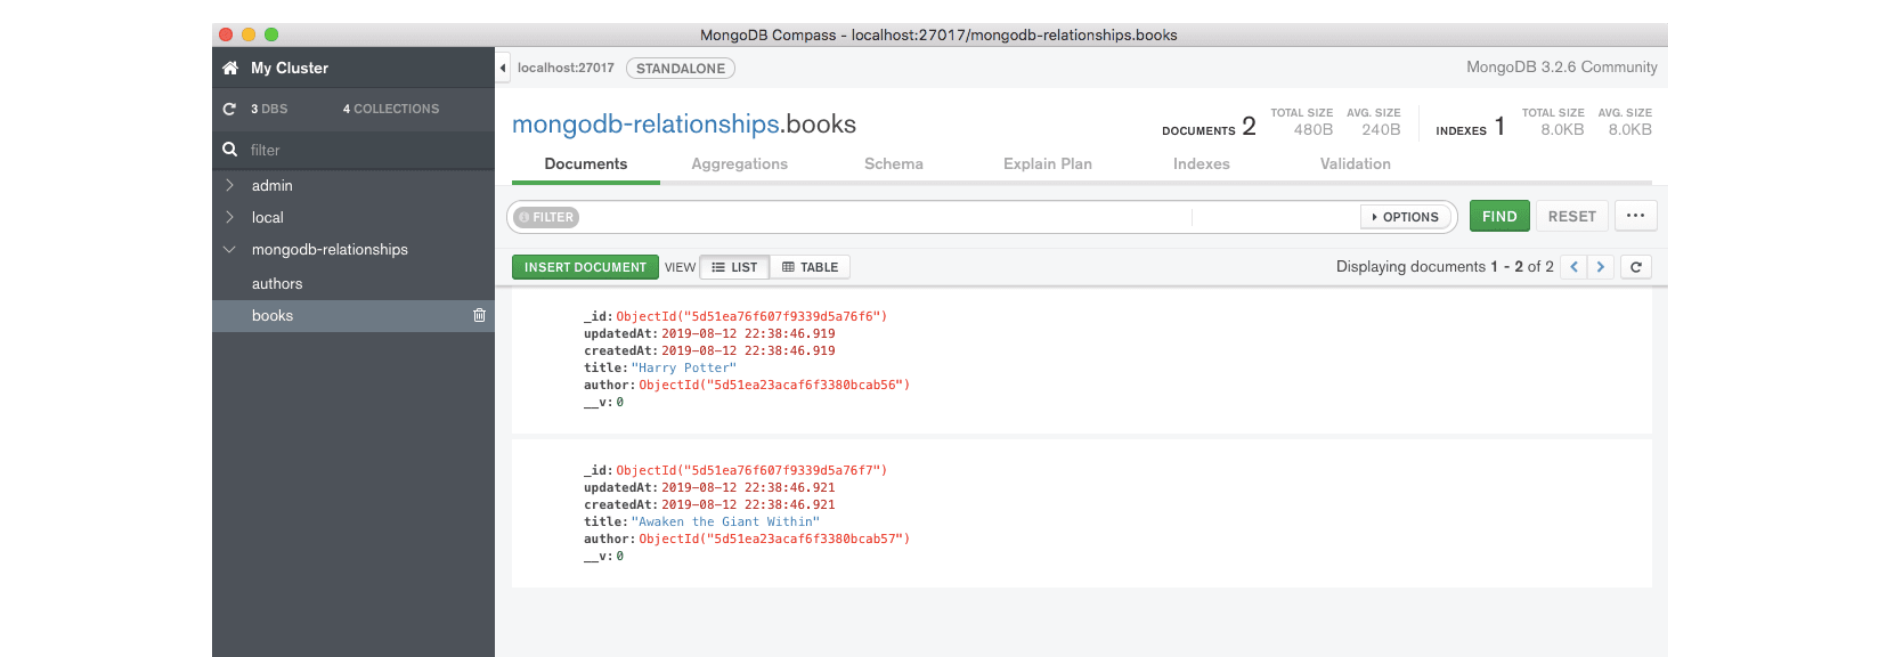
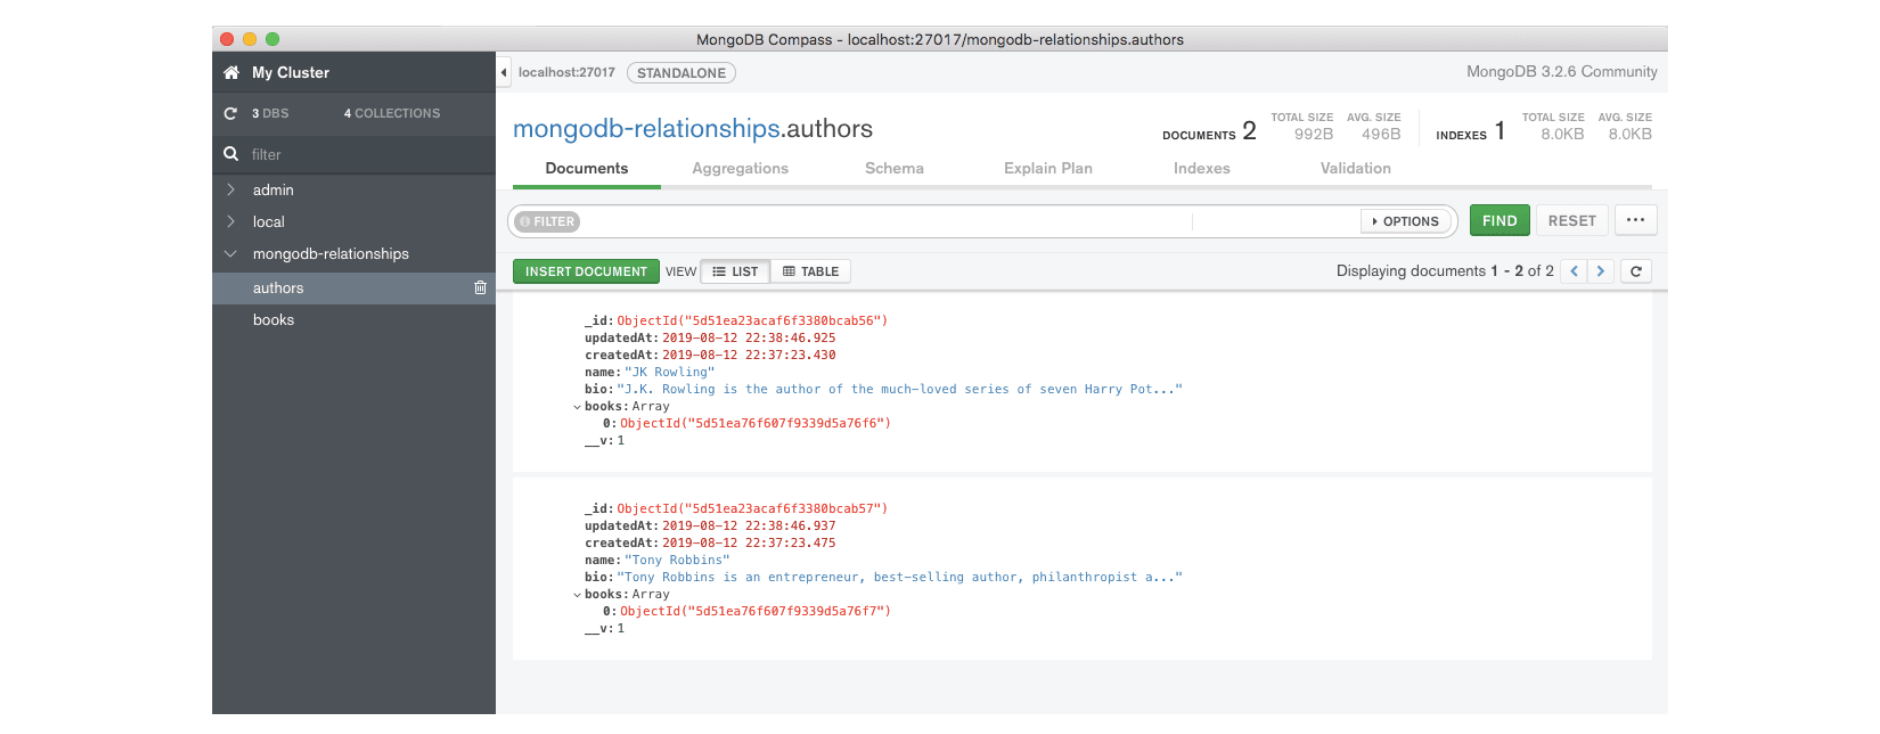
After running the seeder, you should be able to see your records in MongoDB Compass, as shown below. Compass is a GUI for viewing, creating, deleting, querying, and editing MongoDB data.

Test The API
Now, to view this data from MongoDB via the API, start the Node server with npm run start and visit localhost:3000/API/authors in the web browser.
The final data will look something like:
[{
        "_id": "5d51ea23acaf6f3380bcab56",
        "updatedAt": "2019-08-12T22:38:46.925Z",
        "createdAt": "2019-08-12T22:37:23.430Z",
        "name": "JK Rowling",
        "bio": "J.K. Rowling is the author of the much-loved series of seven Harry Potter novels, originally published between 1997 and 2007.",
        "__v": 1,
        "books": [{
            "_id": "5d51ea76f607f9339d5a76f6",
            "updatedAt": "2019-08-12T22:38:46.919Z",
            "createdAt": "2019-08-12T22:38:46.919Z",
            "title": "Harry Potter",
            "author": "5d51ea23acaf6f3380bcab56",
            "__v": 0
        }]
    },
    {
        "_id": "5d51ea23acaf6f3380bcab57",
        "updatedAt": "2019-08-12T22:38:46.937Z",
        "createdAt": "2019-08-12T22:37:23.475Z",
        "name": "Tony Robbins",
        "bio": "Tony Robbins is an entrepreneur, best-selling author, philanthropist and the nation's #1 Life and Business Strategist.",
        "__v": 1,
        "books": [{
            "_id": "5d51ea76f607f9339d5a76f7",
            "updatedAt": "2019-08-12T22:38:46.921Z",
            "createdAt": "2019-08-12T22:38:46.921Z",
            "title": "Awaken the Giant Within",
            "author": "5d51ea23acaf6f3380bcab57",
            "__v": 0
        }]
    }
]
Congratulations, you’ve built an API with Node.js, Express 4, and MongoDB!
Lastly, a word from the Jscrambler team — before shipping your web apps, make sure you are protecting their JavaScript source code against reverse-engineering, abuse, and tampering.
2 minutes is all it takes to begin your free Jscrambler trial and start protecting JavaScript.
Jscrambler
The leader in client-side Web security. With Jscrambler, JavaScript applications become self-defensive and capable of detecting and blocking client-side attacks like Magecart.
View All ArticlesMust read next
The Data Processing Holy Grail? Row vs. Columnar Databases
Columnar databases are great for processing big amounts of data quickly. Let's explore how they perform when compared with row DBs like Mongo and PSQL.
December 5, 2019 | By João Routar | 8 min read
Practical data visualization concepts in D3.js
The strategic use of accessible data visualization is not only common sense but also provides a significant competitive advantage.
September 1, 2016 | By João Samouco | 7 min read
