Setting Up A Parse Server As An Alternative Backend
September 24th, 2020 | By Karan Gandhi | 7 min read

Parse Server is an open-source mobile Backend As a Service (mBAAS) platform. Previously, Parse was a backend platform similar to Firebase. In 2016, Facebook open-sourced the platform code and sunsetted its hosting services. In this article, we will be taking a brief look at Parse and seeing how it allows us to deploy applications quickly.
Overview
Parse is a full-fledged backend with support for the REST API and GraphQL, which can be self-hosted. Communities maintain Parse's activeness, supported by being open source.
It has SDKs available for iOS, Android, JavaScript, and other platforms, as well as support for Push notifications, including campaigns, out-of-the-box user management, support for OAuth providers (including Facebook, Twitter, Google, GitHub, and LDAP), support for Docker, deployment options to various platforms (including AWS and Heroku), as well as support for different storage adapters.
Parse is extensible with webhooks, jobs, and configuration and has quite a few community plugins. You can use it with Express.js.
Setting up Parse
Parse requires Node 8+, MongoDB, or PostgreSQL to set up. On UNIX-like systems, it's advisable to use NVM for Node.js installations. The steps are as follows:
npm install -g parse-server mongodb-runner
mongodb-runner start
parse-server --appId APPLICATION_ID --masterKey MASTER_KEY --databaseURI mongodb://localhost/test
We can also use Docker to start Parse.
git clone https://github.com/parse-community/parse-server
cd parse-server
docker build --tag parse-server .
docker run --name my-mongo -d mongo
docker run --name my-parse-server -v cloud-code-vol:/parse-server/cloud -v config-vol:/parse-server/config -p 1337:1337 --link my-mongo:mongo -d parse-server --appId APPLICATION_ID --masterKey MASTER_KEY --databaseURI mongodb://mongo/test
APPLICATION_ID is the name of the application and can be user-generated. MASTER_KEY is a key that can override all permissions. Other parameters are listed below:
databaseURI: Connection string URI for your MongoDB.
cloud: Path to your app’s Cloud code
appId: A unique identifier for your app.
fileKey: A key that specifies a prefix used for file storage. For migrated apps, this is necessary to provide access to files already hosted on Parse.
masterKey: A key that overrides all permissions. Keep this secret.
clientKey: The client key for your app. (optional)
restAPIKey: The REST API key for your app. (optional)
javascriptKey: The JavaScript key for your app. (optional)
dotNetKey: The .NET key for your app. (optional)
push: An object containing the push configuration. See Push
filesAdapter: An object that implements the FilesAdapter interface. For example, the S3 file adapter
auth: Configure support for third-party authentication.
maxUploadSize: Maximum file upload size.
And that's it! We had a Parse backend running successfully in minutes.
For convenience, we can install the Parse dashboard, a visual admin panel for the Parse server. To run parse-dashboard, we need to install it globally.
npm -i g parse-dashboard

parse-dashboard --dev --appId APPLICATION_ID --masterKey MASTER_KEY --serverURL "http://localhost:1337/parse/" --appName SimpleFileStorage
We can access the dashboard on localhost:4040. For this tutorial, we will be using the REST API.
Backend Features
Storing Data
As mentioned earlier, Parse allows us to store data easily. The base unit of all data is the object API. For example, if we define a vehicle class with the key manufacturer and model, we can perform CRUD REST operations using a simple curl request.
curl -X POST \
  -H "X-Parse-Application-Id: simple_file_storage" \
  -H "X-Parse-REST-API-Key: ${REST_API_KEY}" \
  -H "Content-Type: application/json" \
  -d '{"manufacturer": "Lamborghini", "model":  "Gallardo"}' \
  http://localhost:1337/parse/classes/vehicle
We get objectId and created_date in response. Further operations on the object can be performed using objectid.
curl -X GET \
  -H "X-Parse-Application-Id: simple_file_storage" \
  -H "X-Parse-REST-API-Key: ${REST_API_KEY}" \
  -H "Content-Type: application/json" \
  http://localhost:1337/parse/classes/vehicle/objectId
url -X PUT \
  -H "X-Parse-Application-Id: simple_file_storage" \
  -H "X-Parse-REST-API-Key: ${REST_API_KEY}" \
  -H "Content-Type: application/json" \
  -d '{"manufacturer": "Lamborghini", "model":  "Murcielago"}' \
  http://localhost:1337/parse/classes/vehicle/objectId
curl -X DELETE \
  -H "X-Parse-Application-Id: simple_file_storage" \
  -H "X-Parse-REST-API-Key: ${REST_API_KEY}" \
  http://localhost:1337/parse/classes/objectId
If a class is not predefined, it will be created by the server. We can use the Parse Dashboard to create custom classes.
As far as data types are concerned, Parse has support for string, number, boolean, arrays, JSON Objects, Date-Time, File, and Null. Additionally, Parse has two custom datatypes, a pointer to another Parse object and a relation to another Parse class.
Data types in Parse are locked in. Once a datatype is set, it will return an error if you try to save anything else.
Files
As with data, file upload is straightforward. The files URL is the /files route, and the file name. However, we have to manually handle the content type.
curl -X POST \
  -H "X-Parse-Application-Id: simple_file_storage" \
  -H "X-Parse-REST-API-Key: REST_API_KEY" \
  -H "Content-Type: image/jpeg" \
  --data-binary '@myPicture.jpg' \
  http://localhost:1337/parse/files/pic.jpg
As a response, we receive the file location and name of the saved file. A unique identifier is appended to the file name.
{
  "url": "http://localhost:1337/parse/files/simple_file_storage/d840137c22d89d126075ec7fa875c54f_pic.jpg",
  "name": "d840137c22d89d126075ec7fa875c54f_pic.jpg"
}
Authentication and Security
Parse provides out-of-the-box user authentication. This includes token-based authentication, user actions like sign-up, login, email verification, reset passwords, token-based session management, and role-based access management. The routes for users are /parse/users, the routes for roles are /parse/roles and the routes for sessions are /parse/sessions.
To secure data, Parse provides Class Level Permissions (CLP) and Access Control Lists (ACL). CLP provides fine-grained control over data access for roles. Using Class Level Permissions, we can define Roles that will have the ability to:
Create new Classes;
Add Fields to Classes;
Read or Query Data from classes;
Furthermore, using ACLs, we can restrict access to objects to individuals and roles. An example snippet of ACL is:
{
  classLevelPermissions:
  {
    "find": {
      "requiresAuthentication": true,
      "role:admin": true
    },
    "get": {
      "requiresAuthentication": true,
      "role:admin": true
    },
    "create": { "role:admin": true },
    "update": { "role:admin": true },
    "delete": { "role:admin": true }
  }
}
This particular object
is inaccessible to guests;
requires authentication to view and query objects;
has a predefined role of admin and can perform all operations.
The picture below, from the Parse documents, demonstrates how CLPs and ACLs interact.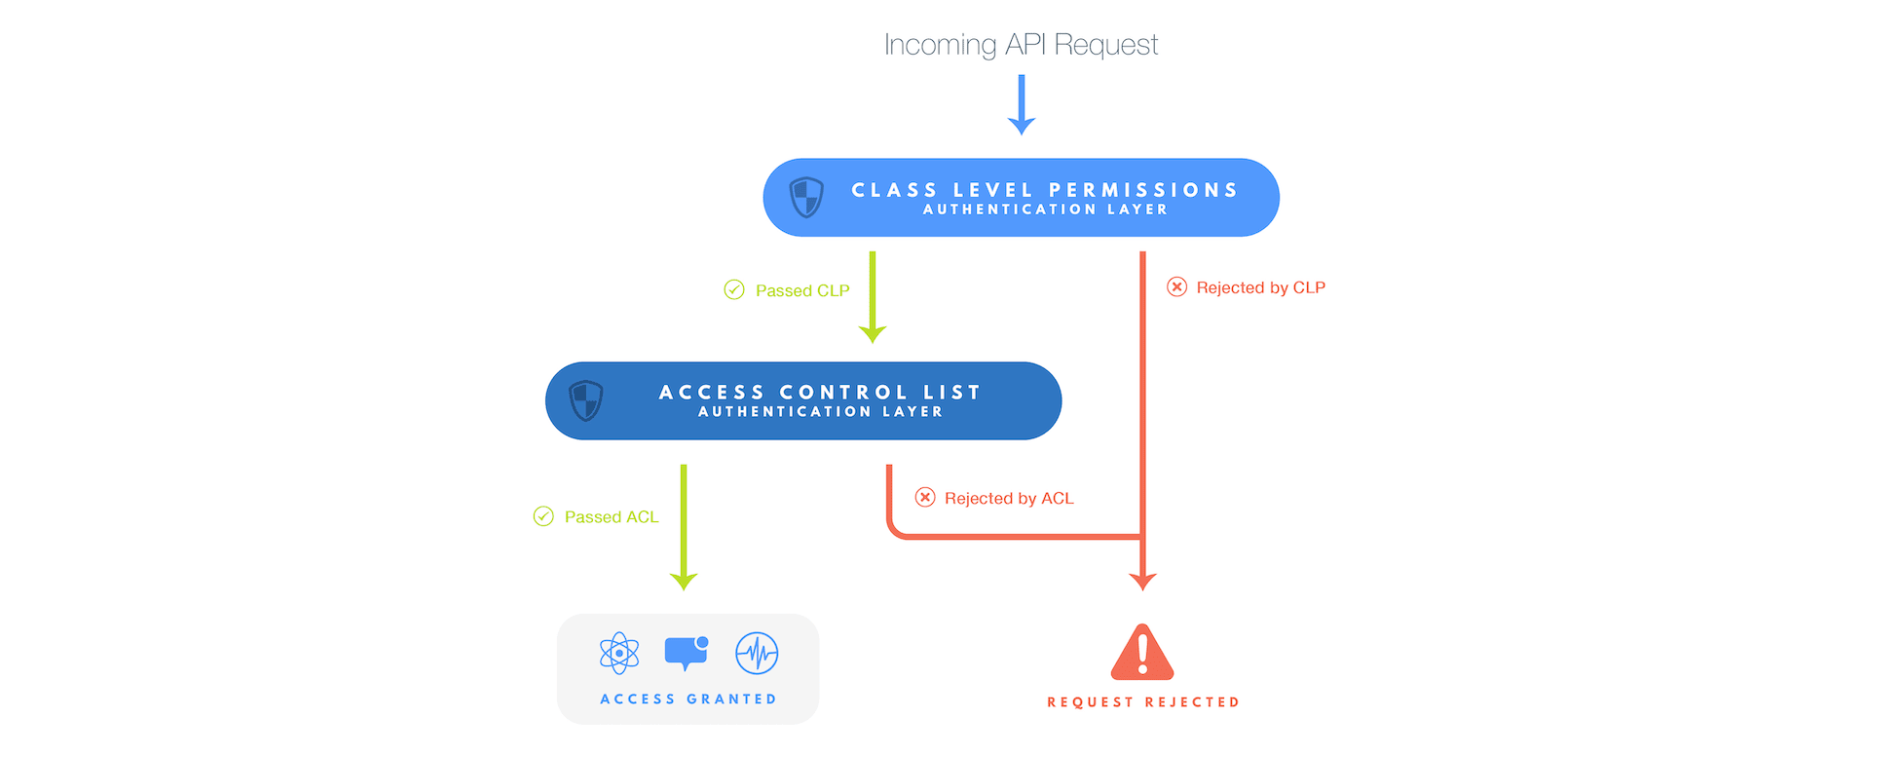
Miscellaneous Features
Cloud Functions allow us to define custom functions in the Parse backend.
Hooks allow us to run custom code in other languages and extend server-side logic.
Jobs allow us to run long-running functions, so we don't have to wait for a response.
Triggers allow us to write custom code before or after data is modified.
Analytics allows us to add dimensions and metrics to our application.
The Push Dashboard allows us to create custom push campaigns for our mobile apps.
Geopoints allow us to associate real-world latitudes and longitudes with an object.
Config allows us to save configuration parameters on the server.
Extending Parse with Chisel and Parse Auditor
Chisel CMS
Chisel is an API-first headless CMS built upon Parse. Setting up Chisel over Parse is quite straightforward.
npm install -g chisel-cms
chisel-cms --appId "APP_ID" --serverURL "https://YOURSERVER.com/parse"
Chisel will start at localhost:9000.
Chisel provides an admin panel where we can set up multiple sites. Additionally, it has its own Parse server. While you can run Chisel on any Parse server, Chisel's server has helpful templates like blog and knowledge base.
Parse Auditor
Parse Auditor is a module inspired by the Envers Project. It adds automated data tracking/auditing to classes. This is useful when the app needs to adhere to regulations like HIPAA. Parse Auditor has to be used in the cloud code. Let's take a look at how Parse Auditor works
Let's assume we have ImportantData and SortOfImportanData classes in Parse. We would like to track data changes in both classes and know if ImportantData was accessed.
To set up Parse Auditor, we need to edit the cloud code. First, shut down any running instances of the Parse server and dashboard. Then, navigate to the cloud folder of your Parse installation. If there is no cloud folder, then create a main.js file inside a cloud folder. We need the absolute path of the cloud folder. It should look like this:
C:\somefolder\Parse\cloud\main.js
Inside the cloud folder, add parse-auditor to the dependencies in package.json
{
  "dependencies": {
    "parse-auditor": "*"
  }
}
Now, edit the main.js file as follows:
const ParseAuditor = require('parse-auditor');
ParseAuditor(['ImportantData', 'SortOfImportantData'],['ImportantData'])
The first parameter takes an array of Class names and tracks them in a separate Class_AUD class. The second parameter takes an array of Class names and tracks views in the Class_AUD class.
By default, changes to ImportantData and SortOfImportantData will be tracked in ImportantData_AUD and SortOfImportantData_AUD. Views of ImportantData will be tracked in SortOfImportantData_AUD. Four extra fields are attached to the audit logs:
meta_actor: The user involved in this event. Either the user who made the update or the one who viewed this record.
meta_action: Will be "SAVE", "DELETE", or "FIND" depending on the action the user took.
meta_class: The name of the class, convenient when combining complex audit histories across many classes.
meta_subject: The row being edited/viewed.
The plugin can be configured further using these fields:
{
    classPrefix: '', //Class Prefix
    classPostfix: '_AUD', //Class Postfix
    fieldPrefix: 'meta_', //field Postfix
    fieldPostfix: '', // field Postfix
    parseSDK: Parse, //SDK Object
    useMasterKey: false, //MasterKey
    clp: {} //Class Level Permissions
}
Consider the example below:
const ParseAuditor = require('parse-auditor');
const customConfig = { classPostfix: '_LOGS' };
ParseAuditor(['ImportantData', 'SortOfImportantData'], ['ImportantData'], customConfig);
This will log the data to a class sufficed with _LOGS. To start the server, we will have to pass main.js to the cloud param as below.
parse-server --appId APPLICATION_ID --masterKey MASTER_KEY --databaseURI mongodb://localhost/test --cloud "C:\somefolder\Parse\cloud\main.js"
With this, we have successfully set up Parse with custom logging.
Conclusion
In this article, we have seen how we quickly generate an app backend using Parse.
We have covered how Parse handles permissions and how they can be used to secure data. Also, we have covered two useful tools that can be used with Parse: Chisel CMS and Parse Auditor.
As a closing note, if you want to ensure that the source code of your Node.js apps can't be easily retrieved or reverse-engineered, learn how to protect it.
Jscrambler
The leader in client-side Web security. With Jscrambler, JavaScript applications become self-defensive and capable of detecting and blocking client-side attacks like Magecart.
View All ArticlesMust read next
Vue.js Authentication System with Node.js Backend
In this tutorial, we'll explore different authentication types for JavaScript applications and build a Vue authentication system with a Node.js backend.
October 18, 2018 | By Lamin Sanneh | 17 min read
Build a Task Management App Using Vue.js and a Node.js Backend
This full-stack tutorial will guide you through creating a task management app with features to create, move, and update tasks.
April 30, 2019 | By Lamin Sanneh | 18 min read
