Creating a Real-Time Location Tracking App with NativeScript-Vue
March 19th, 2020 | By Wern Ancheta | 11 min read

Learn how to create a real-time location-tracking app using the NativeScript Vue template.
Prerequisites
Basic knowledge of NativeScript is required to follow this tutorial. VUE knowledge is optional.
The following package versions were used in creating this tutorial:
Node 12.7.0
Yarn 1.19.1
Nativescript-Vue 2.4.0
NativeScript CLI 6.1.2
Be sure to install the same version or higher to ensure the app will work.
Lastly, you need a Pusher and Google account to use their API.
App Overview
We're going to create a real-time location-tracking app. It will allow users to share their current location or track another person's location via a map interface. Here's what it will look like:![]()
You can view the source code in the GitHub repo.
Setting up a Pusher app instance
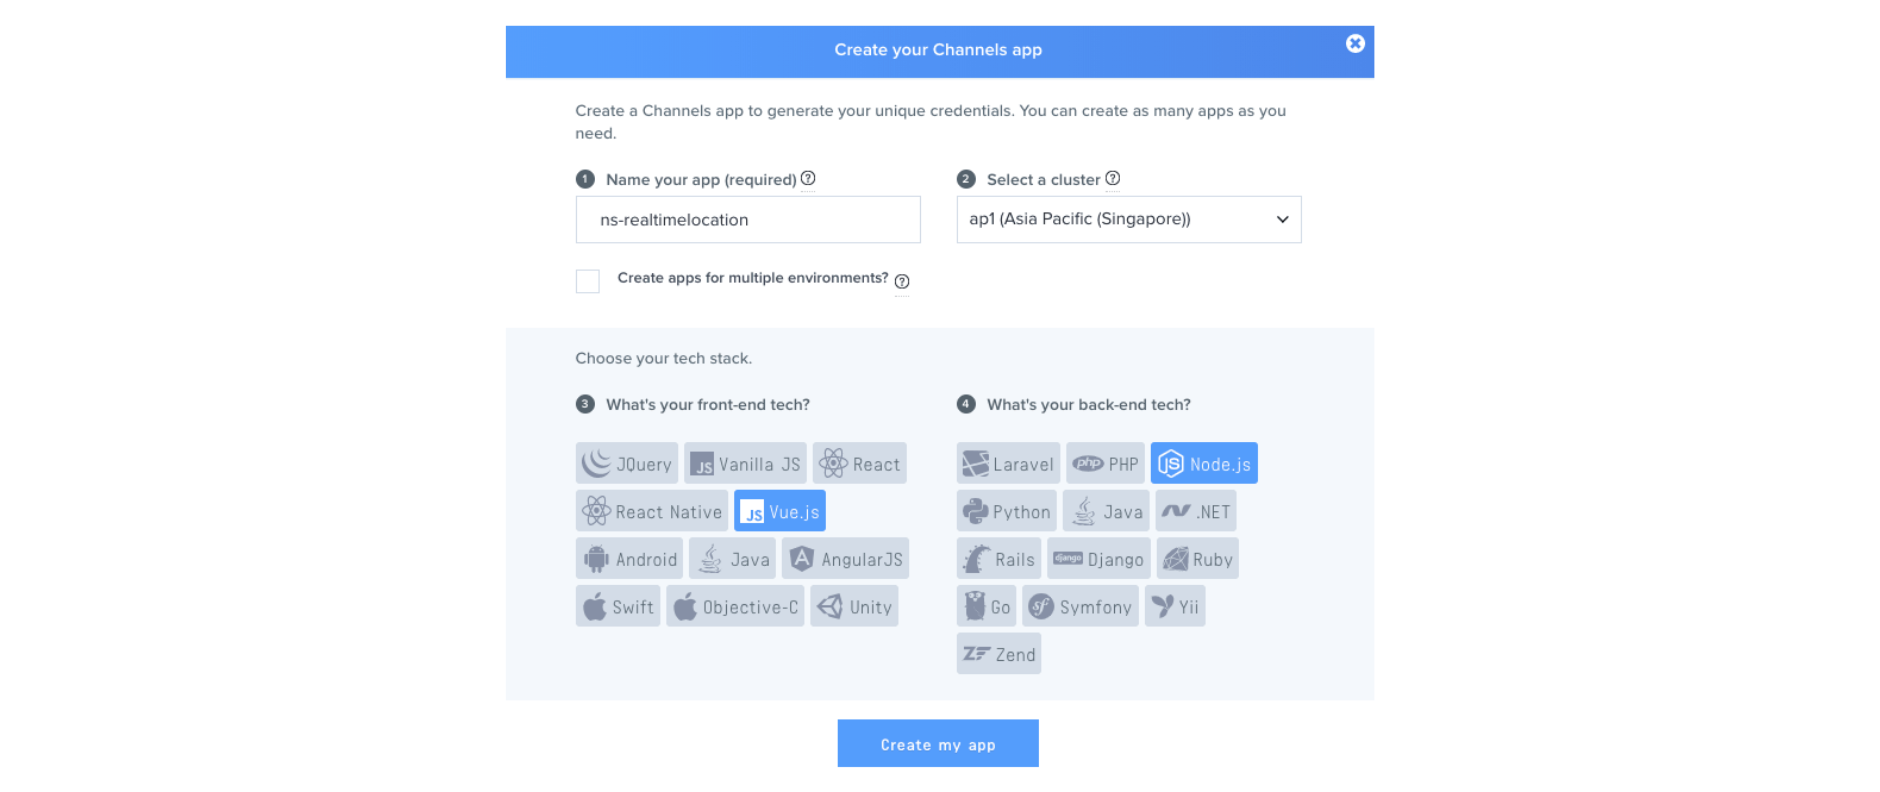
We need a Pusher app instance to use Pusher's services. Go to the Pusher dashboard and create a new Channels app:
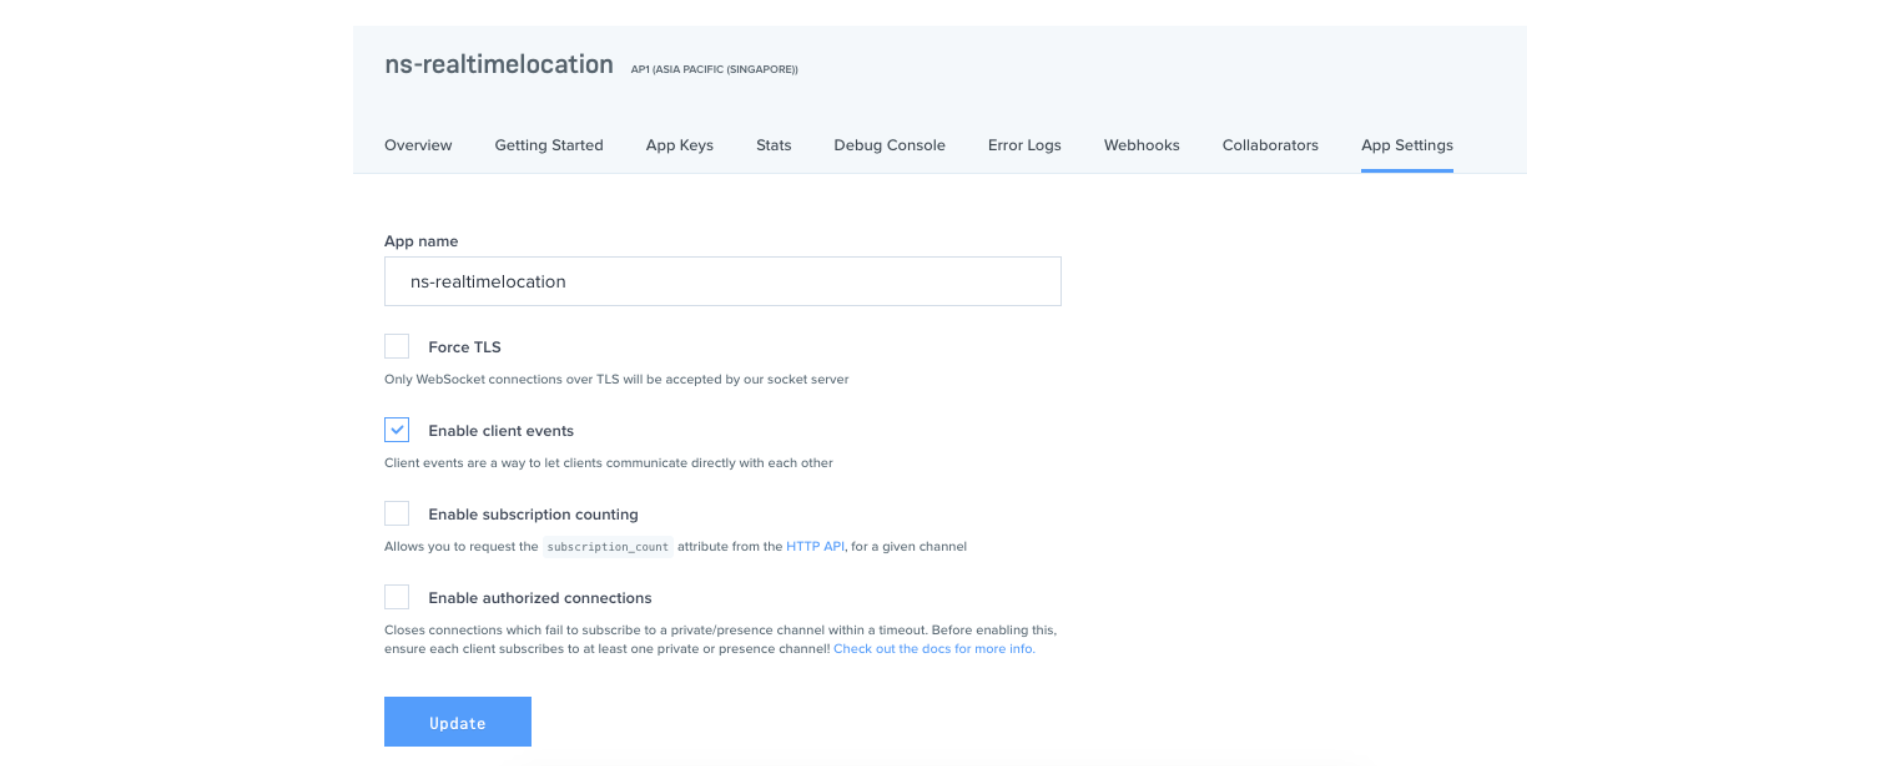
Once the app is created, go to the app settings tab and enable client events. This is what will allow the users to trigger real-time events directly from the client-side:
Setting up Google Maps API
Setting up the Google Maps API requires enabling the Google Maps SDK on the Google Cloud Platform console.
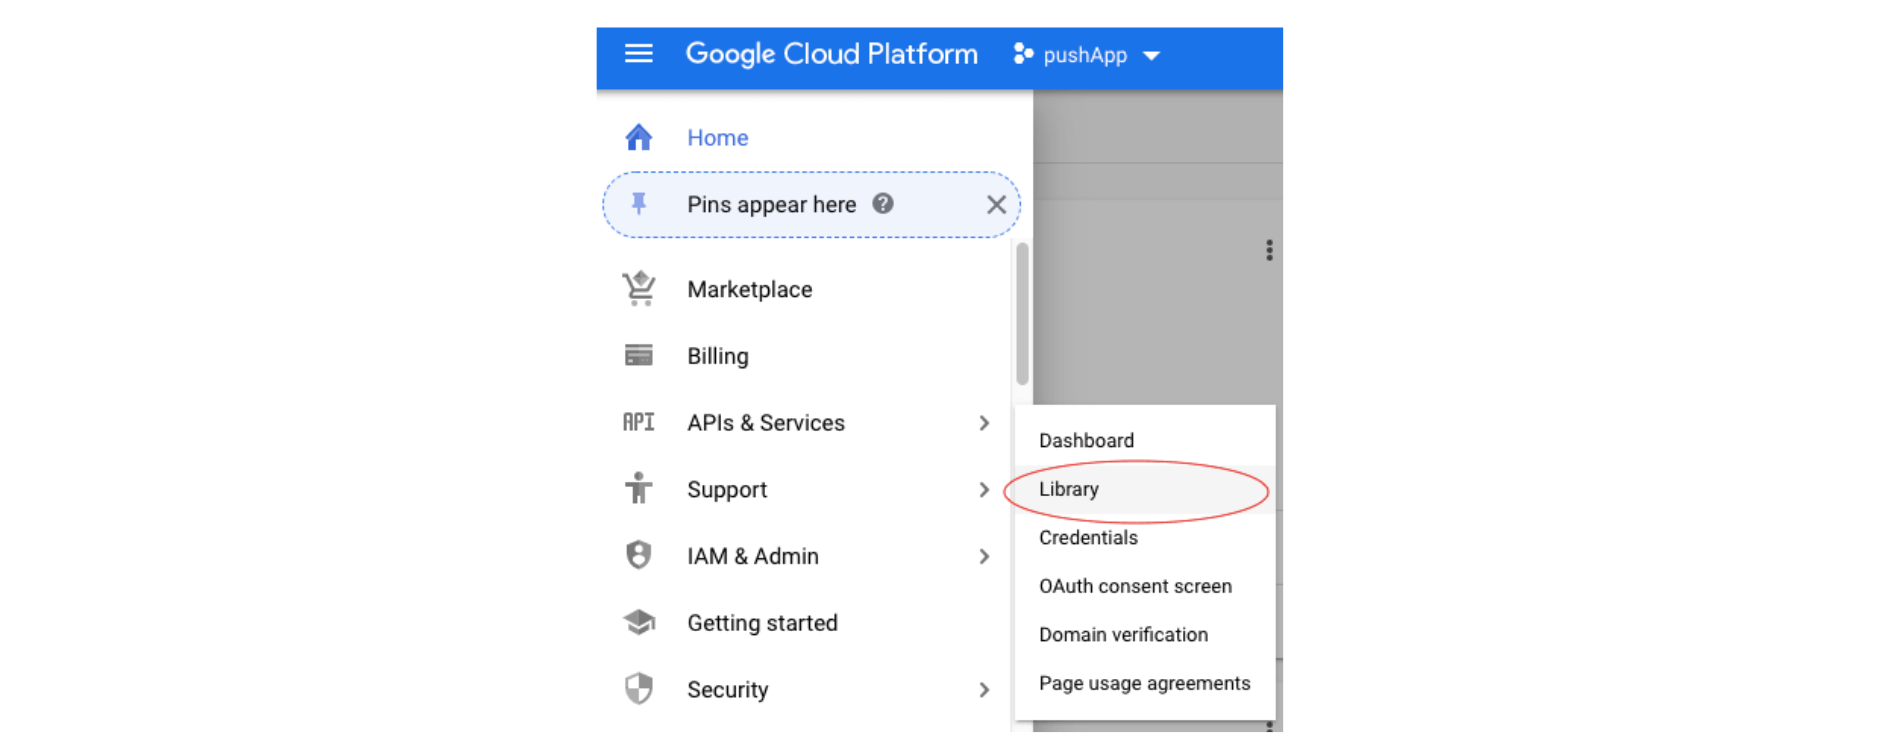
On your dashboard, click on the hamburger menu on the upper left side, hover over APIs and Services, and click on Library.
Once you're on the libraries page, search for Maps SDK, click on Maps SDK for Android, and enable it: Go to API & Services -> Credentials and click on the Create Credentials button. Then, select the API key from the dropdown that shows up:
 That will generate a new API key you can use later in the app. Note that you should restrict access to that key so it can only be used in the app.
Setting up the project
The app will have both a server and an app component. We'll start by setting up the app itself.
Setting up the app
Create a new NativeScript project that uses the Vue template.
tns create LocationTracker --vue
Once that's done, navigate to the newly generated LocationTracker directory and install the dependencies as below:
tns plugin add nativescript-geolocation
tns plugin add nativescript-google-maps-sdk
tns plugin add nativescript-permissions
tns plugin add nativescript-websockets
tns plugin add pusher-nativescript
Next, we need to install the library for generating random strings:
yarn add random-string
Here's a brief overview of the packages we just installed:
nativescript-geolocation: used for getting the user's current location.
nativescript-google-maps-sdk: NativeScript library for working with the Google Maps SDK.
nativescript-permissions: used for asking for permissions in Android.
nativescript-websockets: WebSocket library for NativeScript. Pusher uses WebSockets, so this is a dependency for pusher-nativescript.
pusher-nativescript: NativeScript library for Pusher integration.
random-string: for generating random strings that will serve as the unique ID for users who want to share their location.
Once everything is installed, update the app/App_Resources/Android/src/main/AndroidManifest.xml file. Add the following permissions so we can access the user's current location:
<manifest>
    <<!-- ... -->
    <uses-permission android:name="android.permission.INTERNET"/>

    <!-- add these-->
    <uses-permission android:name="android.permission.ACCESS_COARSE_LOCATION"/>
    <uses-permission android:name="android.permission.ACCESS_FINE_LOCATION"/>
    <uses-permission android:name="android.permission.ACCESS_NETWORK_STATE"/>
</manifest>
Then, under <application>, add the <meta-data> for the Google API key:
<application>
    ...
    <meta-data android:name="com.google.android.geo.API_KEY" android:value="YOUR_GOOGLE_API_KEY" />
</application>
Setting up the server
For the server, create a server folder inside your working directory and create a package.json file with the following contents:
{
  "name": "ns-realtime-server",
  "version": "1.0.0",
  "description": "",
  "main": "index.js",
  "scripts": {
    "test": "echo \"Error: no test specified\" && exit 1",
    "start": "node index.js"
  },
  "author": "",
  "license": "ISC",
  "dependencies": {
    "body-parser": "^1.19.0",
    "cors": "^2.8.5",
    "dotenv": "^8.2.0",
    "express": "^4.17.1",
    "pusher": "^3.0.0"
  }
}
Once that's done, execute yarn inside the server folder to install all the packages.
Here's a brief overview of the packages we just installed:
express: for creating a server.
dotenv: allows fetching environment variables (app config) in a .env file.
cors: allows the app to make requests to the server.
body-parser: for parsing the request body into a JavaScript object.
pusher: for real-time communications.
Building the app
Now, we're ready to build the app. We'll start by adding the server code, then proceed to add the code for the app itself.
Adding the server code
Create an index.js file and add the following. This will import all the packages that we need:
const express = require("express");
const bodyParser = require("body-parser");
const cors = require("cors");
require("dotenv").config();
const Pusher = require("pusher");
Next, initialize Pusher. This is what will allow us to connect to the Pusher app instance we created earlier:
const pusher = new Pusher({
    appId: process.env.PUSHER_APP_ID,
    key: process.env.PUSHER_APP_KEY,
    secret: process.env.PUSHER_APP_SECRET,
    cluster: process.env.PUSHER_APP_CLUSTER
});
Next, initialize the Express server. Here, we need to enable CORS (Cross-origin resource sharing) so that the app can make a request to the server:
const app = express();
app.use(cors());
app.use(bodyParser.urlencoded({ extended: false })); // disables nested object in the request body
For the server, we'll only need a couple of routes: one for testing if the server is running and the other for authenticating users of the app so that they can trigger messages directly from the client-side:
app.get("/", (req, res) => {
    res.send("ok");
});

app.post("/pusher/auth", (req, res) => {
    const socketId = req.body.socket_id;
    const channel = req.body.channel_name;
    const auth = pusher.authenticate(socketId, channel);
    res.send(auth);
});
The authentication code above simply authenticates every request that comes in. In a production app, you would need to check in your database if the user who made the request exists.
Lastly, expose the server:
const PORT = 5000;
app.listen(PORT, err => {
    if (err) {
        console.error(err);
    } else {
        console.log(`Running on ports ${PORT}`);
    }
});
Adding the app code
Now, we're ready to add the code for the app. Start by opening the app/app.js file and registering the MapView component.
We need to do this because, by default, the Google Maps library for NativeScript doesn't support Vue. The code below is used to manually register the MapView element so we can use it in our templates:
// app/app.js
Vue.registerElement(
    "MapView",
    () => require("nativescript-google-maps-sdk").MapView
);
Next, open the app/components/Home.vue file, clear its contents, and add the following template. This is going to render the map inside a StackLayout. Its height is set to 85% so that there will be space for the buttons that the user will use to either share or track their location.
The MapView uses the latitude, longitude, and zoom values that we will set later as the data for this component:
<template>
    <Page actionBarHidden="true" backgroundSpanUnderStatusBar="false">

        <StackLayout height="100%" width="100%" >
            <MapView
                :latitude="latitude"
                :longitude="longitude"
                :zoom="zoom"
                height="85%"
                @mapReady="onMapReady">
            </MapView>
            <Button text="Stop Sharing Location" @tap="stopSharingLocation" v-if="isSharingLocation"></Button>
            <Button text="Share Location" @tap="startSharingLocation" v-else="isSharingLocation"></Button>

            <Button text="Stop Tracking Location" @tap="stopTrackingLocation" v-if="isTrackingLocation"></Button>
            <Button text="Track Location" @tap="startTrackingLocation" v-else="isTrackingLocation"></Button>
        </StackLayout>
    </Page>
</template>
Right below the component UI, we add the JavaScript code. Start by importing the packages we need:
import * as geolocation from "nativescript-geolocation";
import * as dialogs from "tns-core-modules/ui/dialogs";
import { Position, Marker } from "nativescript-google-maps-sdk";
import { Accuracy } from "tns-core-modules/ui/enums";
import Pusher from "pusher-nativescript";
const randomString = require("random-string");
Next, add the Pusher app configuration. Leave the SERVER_BASE_URL for now; that will have to be an internet-accessible URL. So, we'll use ngrok to expose the local server:
const PUSHER_APP_KEY = "YOUR PUSHER APP KEY";
const PUSHER_APP_CLUSTER = "YOUR PUSHER APP CLUSTER";
const SERVER_BASE_URL = "YOUR PUSHER AUTH SERVER URL";
Next, initialize the data to be bound to the component:
export default {
    data() {
        return {
            // current coordinates being displayed on the map
            latitude: "",
            longitude: "",

            zoom: 17, // map zoom level

            mapView: null, // map view being rendered

            marker: new Marker(), // google map marker
            watchID: null, // unique ID for the watch location instance

            isSharingLocation: false, // whether the current user is sharing their location or not
            isTrackingLocation: false, // whether the current user is tracking someone else's location or not

            ownID: null, // unique ID of the current user for tracking
            trackingID: null, // unique ID of the person being tracked
            socket: null, // pusher socket

            ownChannel: null, // current user's own channel for triggering events
            trackingChannel: null // channel of the user being tracked by the current user
        };
    }

    // next: add mounted()
};
After this, add the methods to be bound to the component. First is onMapReady(), which we've attached to the mapReady event of MapView. This gets called once the MapView component is ready for use. args.object represents the map itself. Assigning it to data bound to the component allows us to manipulate the map later on.
methods: {
    onMapReady(args) {
        this.mapView = args.object;
    }
}
Next, add the mounted() method. This gets fired when the component is mounted. This is where we generate a unique ID for location sharing.
Once that's done, we check if Geolocation (location services) is enabled. If it isn’t, then we request it from the user by calling geolocation.enableLocationRequest(). If the user enabled it, we proceeded to get their current location and update the map:
methods: {
    onMapReady() {
        // ...
    }
},

mounted() {
    this.ownID = randomString({length: 5}); // unique ID for sharing location
    let that = this

    geolocation.isEnabled().then(function(isEnabled) {
        if (!isEnabled) { // GPS is not enabled
            geolocation.enableLocationRequest(true, true).then(() => {

                geolocation
                    .getCurrentLocation({
                        timeout: 20000
                    })
                    .then(location => {
                        if (!location) {
                            dialogs.alert('Failed to get location. Please restart the app.');
                        } else {
                            // show the user's current location in the map and add the marker
                            that.updateMap(location);
                            that.mapView.addMarker(that.marker);
                        }
                    });
            }, (e) => {
                console.log("error: " + (e.message || e));
            }).catch(ex => {
                console.log("Unable to Enable Location", ex);
            });
        } else {
            // GPS is enabled
            geolocation
                .getCurrentLocation({
                    timeout: 20000
                })
                .then(location => {
                    if (!location) {
                        dialogs.alert('Failed to get location. Please restart the app.');
                    } else {
                        that.updateMap(location);
                        that.mapView.addMarker(that.marker);
                    }
                });
        }
    }, function(e) {
        console.log("error: " + (e.message || e));
    });

    // next: subscribe to own Pusher channel

},
Once that’s done, initialize Pusher and subscribe to the user's own channel. This is where we use the unique ID we generated earlier to subscribe to a private channel. We're using a private channel because we only want authenticated users to use it.
this.socket = new Pusher(PUSHER_APP_KEY, {
    cluster: PUSHER_APP_CLUSTER,
    authEndpoint: `${SERVER_BASE_URL}/pusher/auth`
});

this.ownChannel = this.socket.subscribe(`private-${this.ownID}`);

this.ownChannel.bind("pusher:subscription_error", () => {
    dialogs.alert("Failed to connect. Please restart the app.");
});
Below, we have the updateMap() function. This sets the map coordinates to the location passed as an argument. After that, it also changes the marker position:
updateMap(loc) {
    this.latitude = loc.latitude;
    this.longitude = loc.longitude;
    this.marker.position = Position.positionFromLatLng(
        loc.latitude,
        loc.longitude
    );
},
Next, add the startSharingLocation() method. This will show the user their unique ID so that they can share it with someone.
After that, the app will begin to watch the user's current location via the geolocation.watchLocation() method. This accepts the success callback as the first argument and the error callback as the second. The third argument is the option.
In this case, we're setting the updateDistance to 5 meters so that it will only fire the success callback if the change in the distance traveled is 5 meters or more.
On the other hand, minimumUpdateTime is the minimum time interval between each location update. desiredAccuracy refers to the level of accuracy of the coordinates.
Accuracy.high is the finest location available, so it consumes more battery. When the success callback is fired, it's going to update the map and trigger the client-location-changed event. The current location is passed to this so whoever subscribes to that same event will get updates in real-time:
methods: {
    onMapReady() {
        // ..
    },

    startSharingLocation() {
        dialogs.alert(`Your unique ID is: ${this.ownID}`);
        this.isSharingLocation = true;

        this.watchID = geolocation.watchLocation(
            (loc) => {
                if (loc) {
                    this.updateMap(loc);
                    this.ownChannel.trigger('client-location-changed', {
                        latitude: loc.latitude,
                        longitude: loc.longitude
                    });
                }
            },
            (e) => {
                dialogs.alert(e.message);
            },
            {
                updateDistance: 5, // 5 meters
                minimumUpdateTime : 5000, // update every 5 seconds
                desiredAccuracy: Accuracy.high,
            }
        );
    },

    // next: add stopSharingLocation()
}
Next, add the code for stopping the location sharing. This is where we use this.watchID to stop watching the location:
stopSharingLocation() {
    this.isSharingLocation = false;
    geolocation.clearWatch(this.watchID);
},
For users who want to track the location of another user, we ask them to enter a unique ID. From there, we simply subscribe to the channel with that ID and bind to client-location-changed to receive real-time updates:
startTrackingLocation() {
    dialogs.prompt("Enter unique ID", "").then((r) => {

        this.trackingID = r.text;
        this.isTrackingLocation = true;
        this.trackingChannel = this.socket.subscribe(`private-${this.trackingID}`);
        this.trackingChannel.bind('pusher:subscription_succeeded', () => {

            this.trackingChannel.bind('client-location-changed', (loc) => {
                this.updateMap(loc);
            });
        });
    });
},
Lastly, add the code for stopping the location tracking:
stopTrackingLocation() {
    this.socket.unsubscribe(`private-${this.trackingID}`);
    this.isTrackingLocation = false;
},
Running the app
At this point, we're ready to run the app. First, start the server:
node server/index.js
Next, expose the server using ngrok:
./ngrok http 5000
Then, update the app/components/Home.vue file with the ngrok URL:
const SERVER_BASE_URL = 'YOUR NGROK HTTPS URL';
You can run the app either on the emulator or a real device:
tns debug android
However, since the nature of the app requires us to change locations, it's easier if you use an emulator for testing. This way, you can easily change the location by searching for a specific location or pointing to a specific location via a map interface. The Genymotion emulator allows you to do it very easily.
Alternatively, you can also use a fake location app such as Floater on your Android device.
This will allow you to spoof the current location and specify a different one via a map interface — though I've had an issue with this method. It seems that it switches the current location and the fake location back and forth, which beats the whole purpose because you can't properly test the functionality.
Conclusion
That's it! In this tutorial, you learned how to create a real-time location-tracking app in NativeScript.
Along the way, you learned how to work with the NativeScript Vue template, rendering Google Maps, watching the user's current location, and publishing it in real-time.
As always, we recommend that you protect your JavaScript source code when you're developing commercial or enterprise apps. See our tutorials on protecting Vue and NativeScript.
Jscrambler
The leader in client-side Web security. With Jscrambler, JavaScript applications become self-defensive and capable of detecting and blocking client-side attacks like Magecart.
View All ArticlesMust read next
How to use React Native Geolocation to get Postal Address
In this tutorial, let's learn how you can implement a feature to get the current location of a device in a React Native app. To do this we’ll be using an API provided by Expo.
February 25, 2021 | By Aman Mittal | 8 min read
Jscrambler transformations: what you can expect from Rename Local
If you don’t know our renaming source code transformations, they basically replace identifier names with meaningless ones. Check them here!
September 30, 2014 | By Filipe Silva | 4 min read
