End-to-End Testing with Vue and Cypress
May 3rd, 2023 | By Ezekiel Lawson | 8 min read

Testing our entire application to identify bugs, website performance, and poor UI/UX functionalities is essential. End-to-end testing can assist in solving all of these issues as it involves testing our entire application from start to finish, ensuring that all the components and modules are working properly before being launched.
In this article, we will discuss what E2E testing is and how to perform E2E testing with Cypress and Vue in our application.
Prerequisites
Before we proceed to the next step in this article, we need to have the following:
Node.js updated version
Vue project created
Ensure Cypress supports our operating system
What is end-to-end testing?
E2E (end-to-end) testing is functional testing that involves testing your entire application. When using this testing method, we don't break down the components into smaller parts to test them. End-to-end testing ensures that all system components are integrated, working properly, and meeting user requirements.
E2E testing helps us interact with our application just as users in the real world. For instance, we can build a test to determine whether a user fills in the correct details and what error the user will receive on the page if he or she fails. There are numerous E2E tests we can perform in our application.
Why use Cypress for end-to-end testing?
Cypress is a modern open-source automation testing JavaScript framework that performs end-to-end testing. It is a user-friendly testing tool that operates directly in the browser using a special DOM manipulation technique. It also offers an interactive test runner that runs all of our tests.
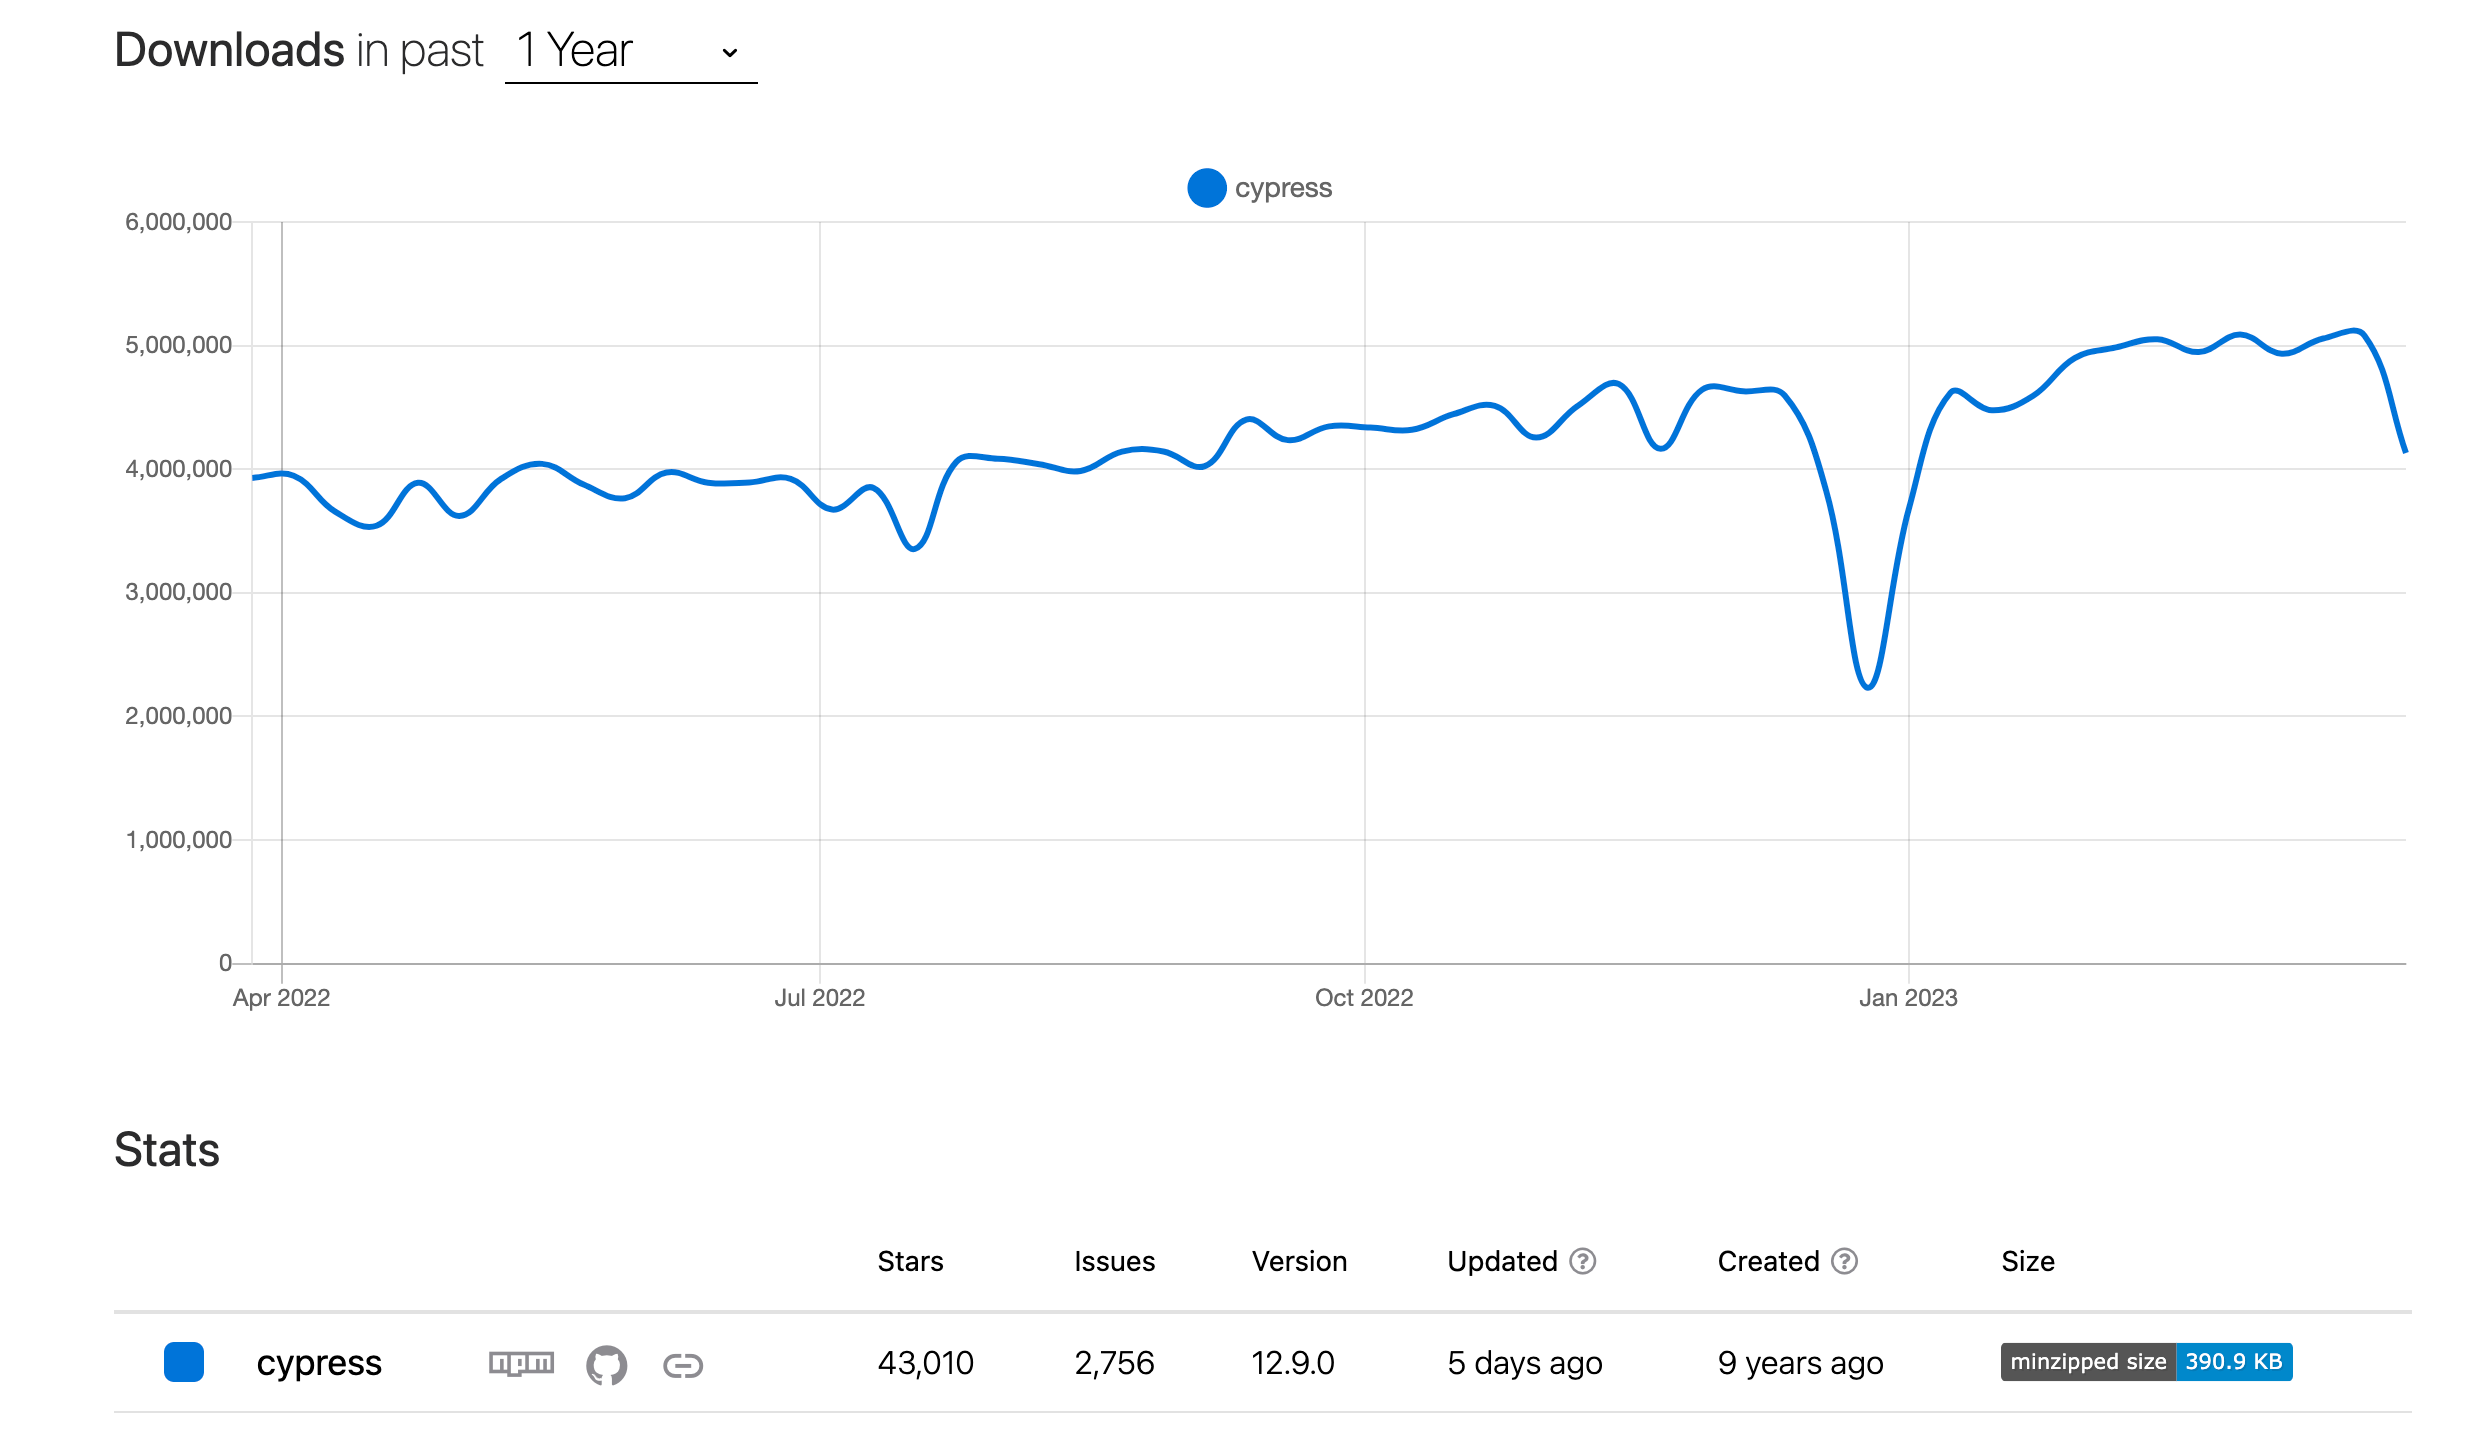
According to the NPM trend Cypress is one of the most used automation testing frameworks for E2E testing.
Cypress provides a built-in debugging feature and allows us to set up automatic retries and waits so we can schedule our test execution within our CI/CD pipeline.
One of the unique advantages of using Cypress is that we can write our tests in Javascript syntax, providing clean and accurate results when testing single applications. Aside from that, there are other great reasons why Cypress is ideal, some of which are:
Cypress executes our test in real time as we type our commands, providing us with visual feedback on our test.
Cypress has friendly documentation that supports creating our E2E test cases.
The Cypress package provides us with built-in features, that way, we don't need to configure or install any dependencies.
Debugging with Cypress is easier.
Due to its expansion, Cypress has a sizable community that assists in curating resources and instructions to simplify testing with Cypress.
Cypress offers various types of automation tests, such as E2E tests, visual regression tests, accessibility tests, component tests, and performance tests.
Cypress Installation and Setup
Before we proceed with installing Cypress, we need to be sure we meet the prerequisites, as that will aid the development process. While creating a new project with Vue, we have the option to integrate Cypress, but in this post, we'll learn about an alternative method that involves integrating Cypress into an already-existing Vue project.
Next, we will cd into the directory of our Vue project:
cd cypress-app
To install Cypress, use the following command:
npm install cypress --save-dev
or
yarn add cypress --dev
The command above adds Cypress to our project as a development dependency.
Next, we will configure and set up Cypress. To do that, we will run the following command:
npx cypress open
or
yarn cypress open
By doing so, the Cypress Test Runner will launch, allowing us to customize and choose the test files to run and interact with our application through a web browser. Check out a diagram of how our Cypress Test Runner should be after using the above command.
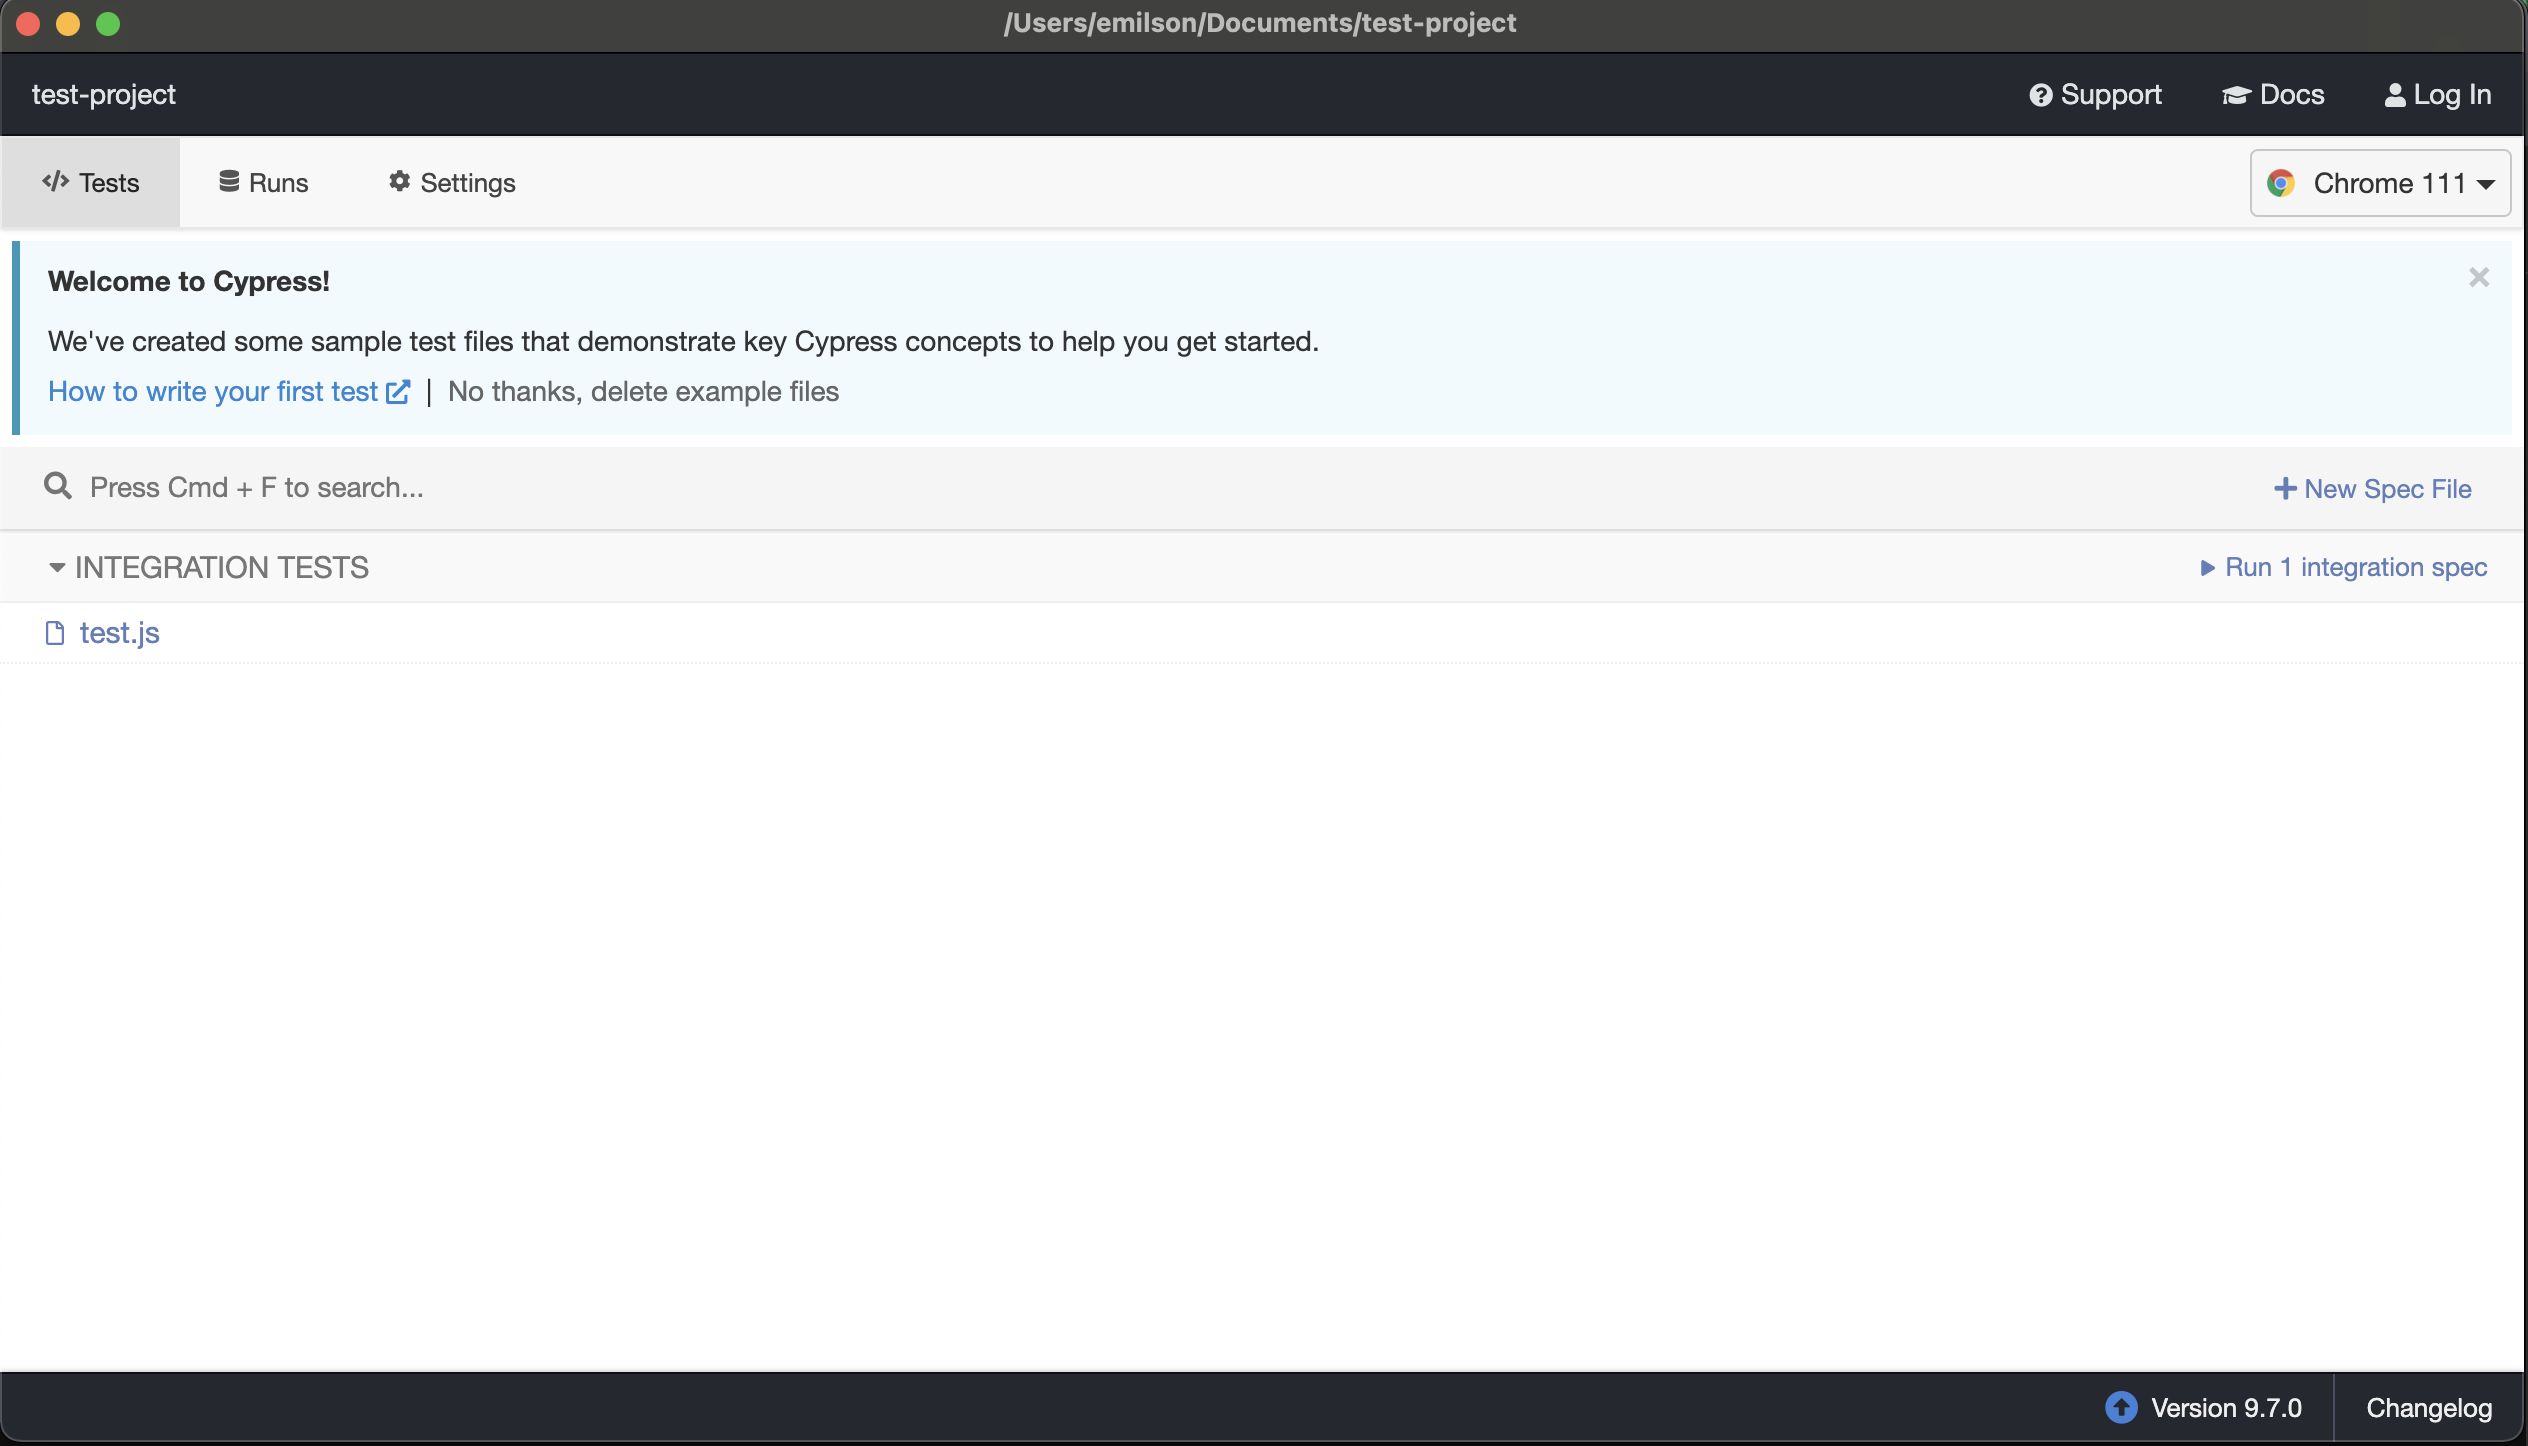
To assist us in getting started, Cypress' default settings build an example test file. If the sample test is something we do not want, we can delete it and create our own test file.
Now that we have installed and set up Cypress, let’s move on to the next stage: creating our first simple test.
Write our first Cypress Test
First, we are going to run an external test on the Vue documentation. We are going to check if the document contains the specific information we are looking for. To do that, copy the code below and paste it into the default test file Cypress created for us:
describe('Testing Vue Documentation', () => {
it('Contains required contents in the document, () => {
cy.visit('https://vuejs.org/guide/introduction.html');
cy.contains('Introduction');
cy.get('.demo').click();
cy.contains('<button @click="count++">Count is: {{ count }}</button>');
cy.contains('Try it in the Playground');
});
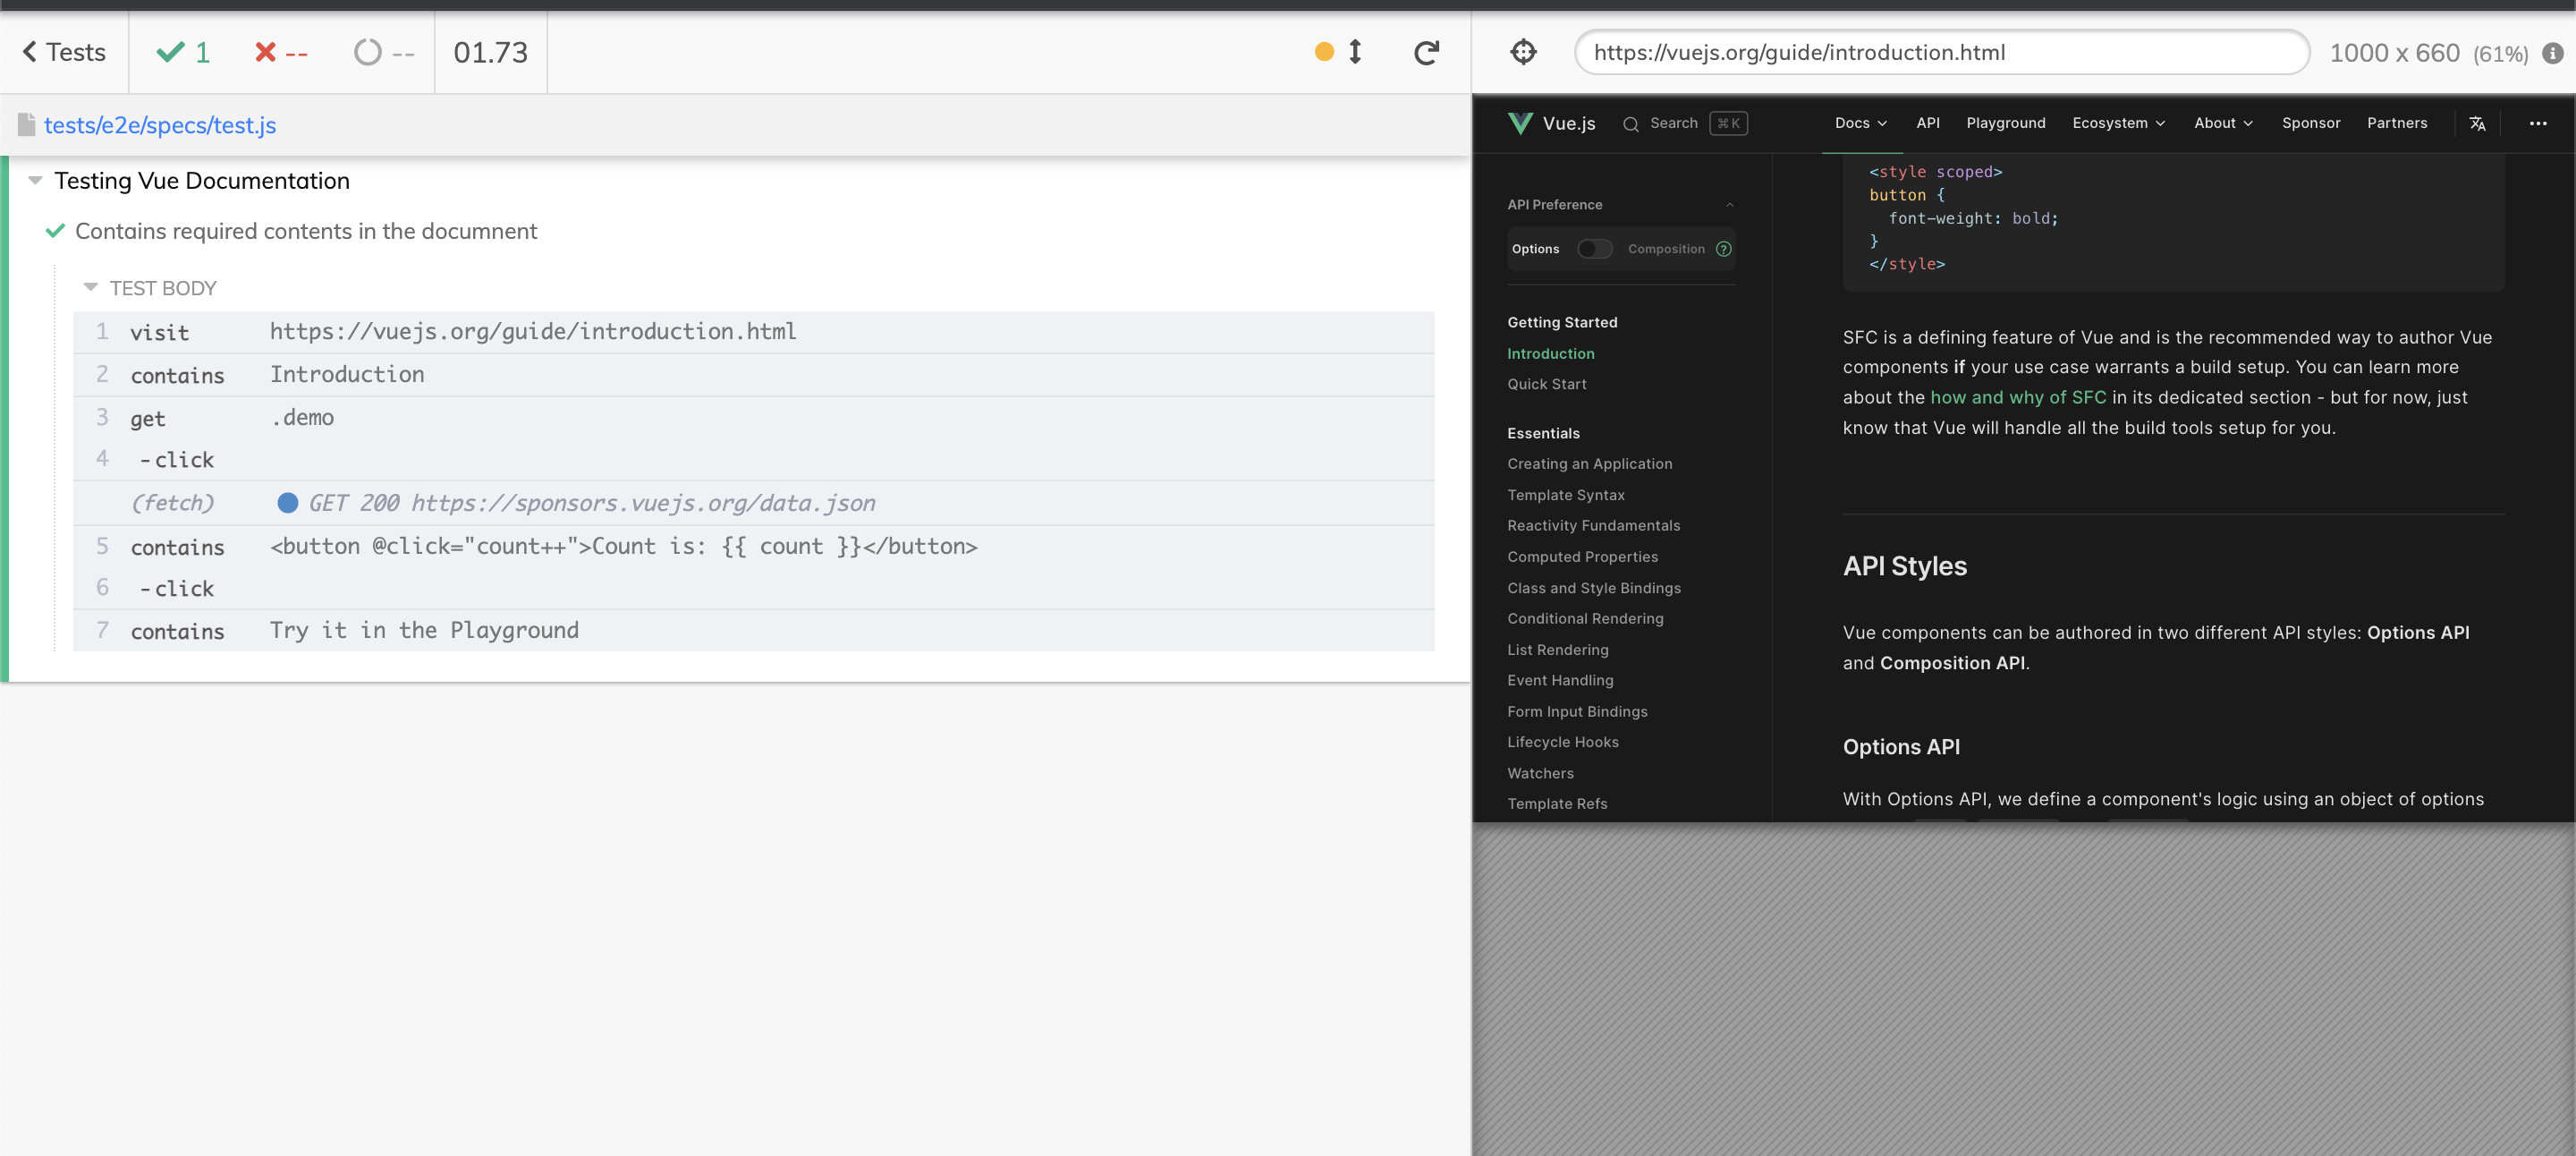
});In the preceding code example, the test will pass if all of the information we verified in the documentation is there, but it will fail if only one of those pieces of information is present. This is an example of a test that was successful.
When using Cypress to run tests, if the first test fails, Cypress won't execute subsequent tests that pass the criteria until the problem has been resolved. Example of a test that failed.
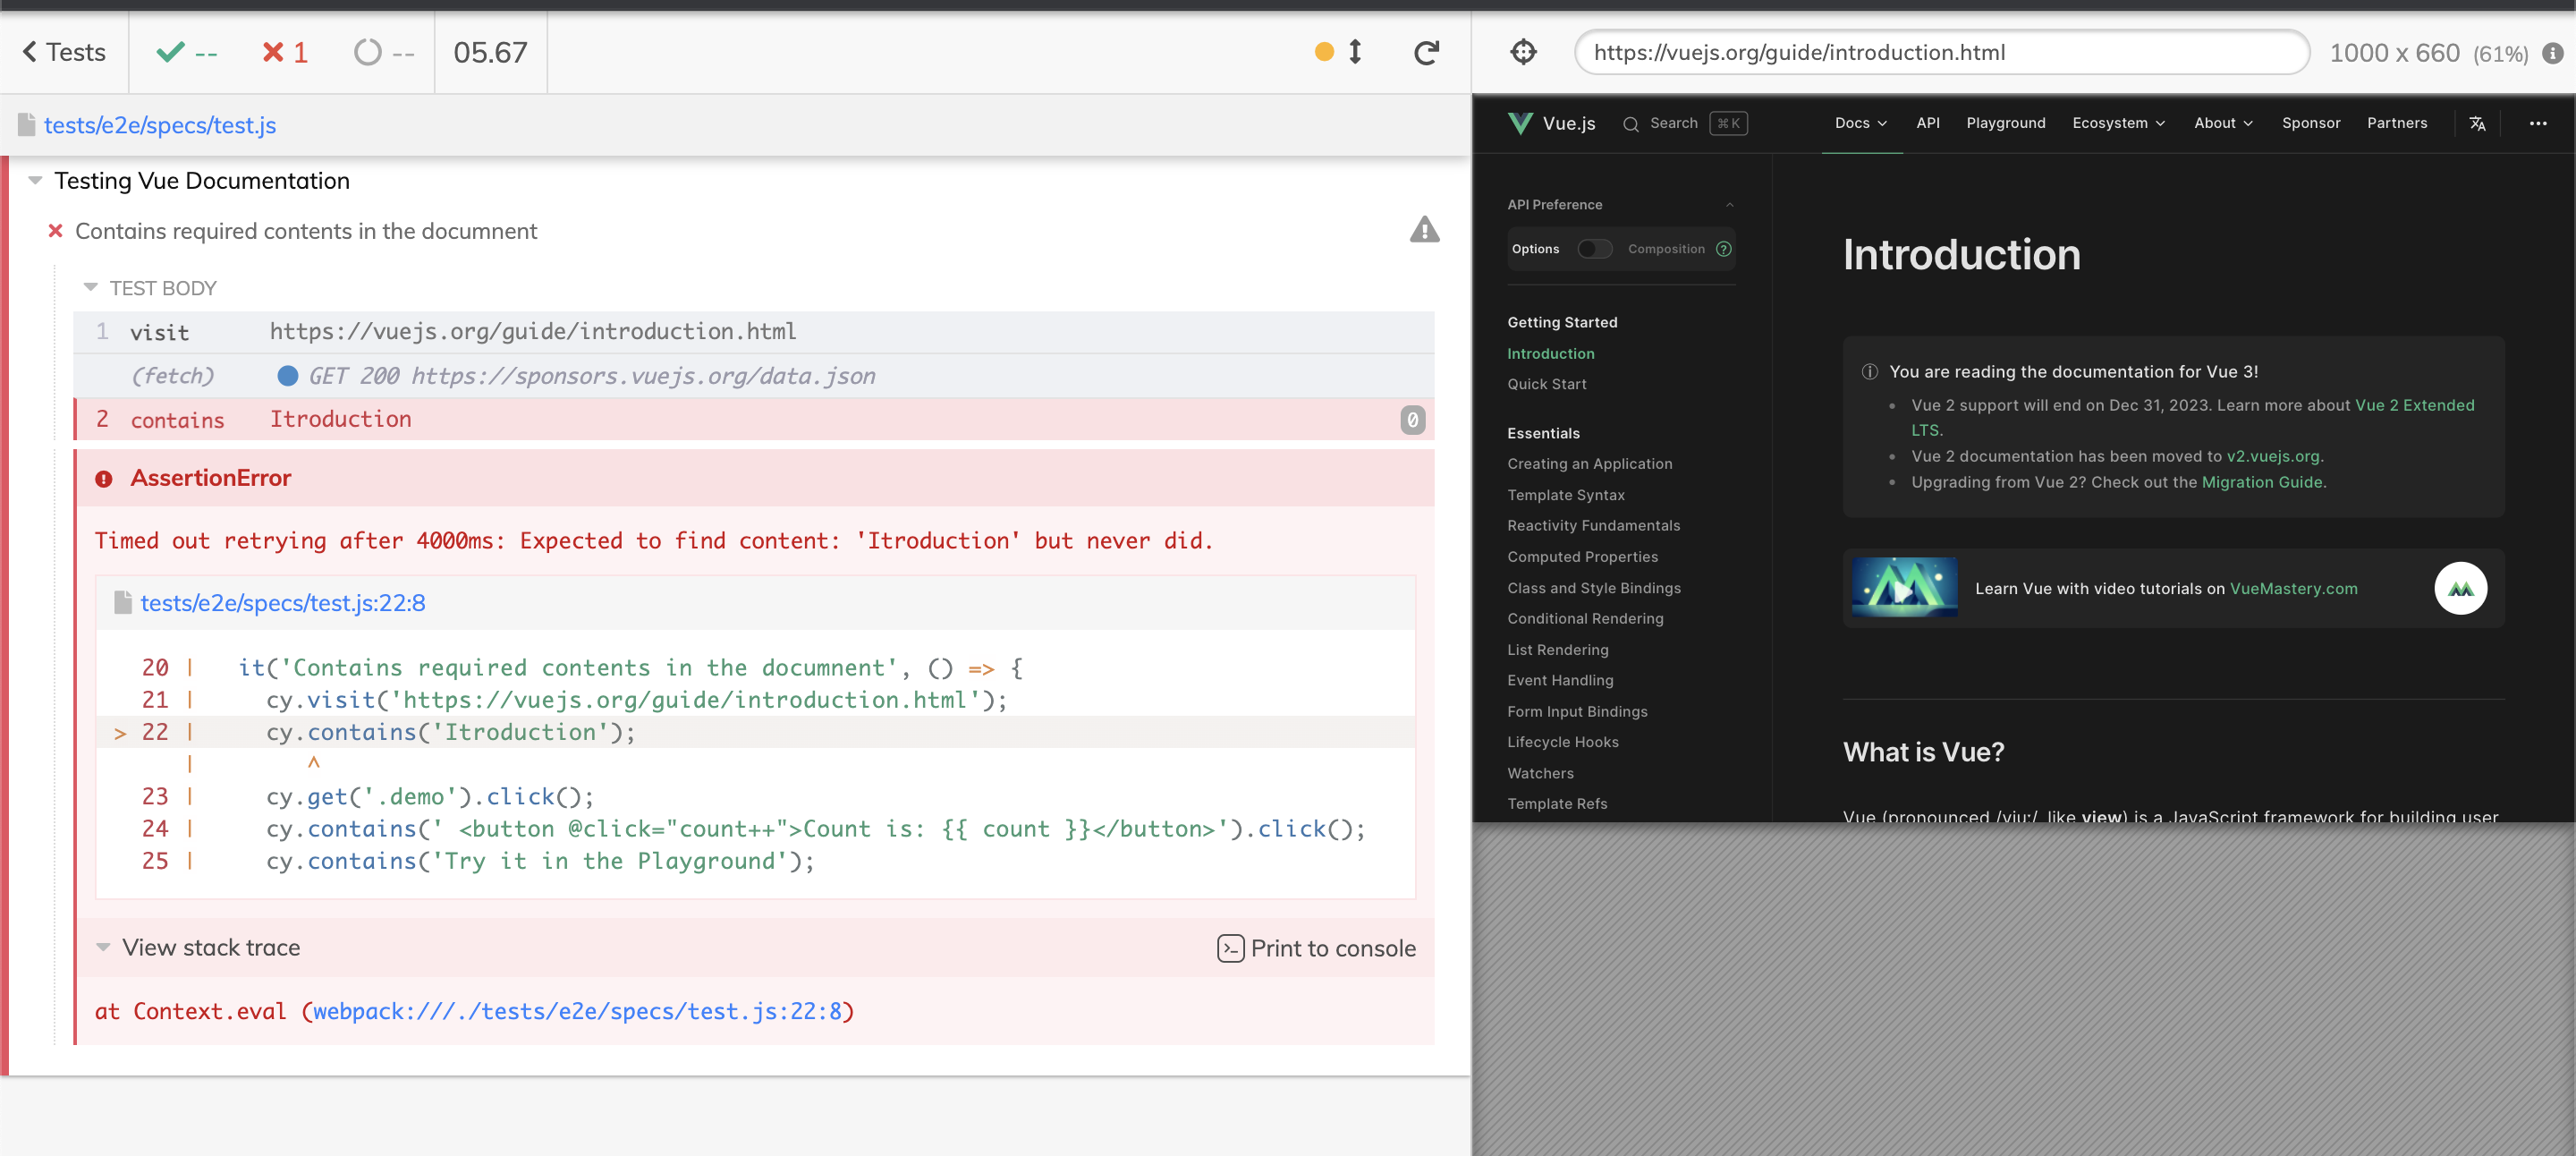
One distinctive feature of Cypress is that it shows the stack trace, the code frame, and a link to the IDE where the test failed. As shown in the above graphic, Cypress, for instance, included a link to tests/e2e/specs/test.js:22:8 in the IDE, indicating the location of the problem that caused the test to fail.
We've now seen how to use Cypress to generate successful and unsuccessful tests. The following phase will involve testing the entire application to make sure all the specifications are met.
We will create a new test file contact-form-test.js after creating our test file, we will create a component ContactForm.vue Copy the code below, and paste it into the AuthForm.vue component.
<template>
    <section class="text-gray-600 body-font relative section">
        <div class="container px-5 py-24 mx-auto">
            <div class="flex flex-col text-center w-full mb-12">
                <h1 class="sm:text-3xl text-2xl font-medium title-font mb-4 text-gray-900">Contact Us</h1>
                <p class="lg:w-2/3 mx-auto leading-relaxed text-base">Do you have any idea you or question, please kindly
                    fill the form below</p>
            </div>
            <div class="lg:w-1/2 md:w-2/3 mx-auto">
                <form @submit.prevent="submitForm" class="flex flex-wrap -m-2">
                    <div class="p-2 w-1/2">
                        <div class="relative">
                            <label for="name" class="leading-7 text-sm text-gray-600">Name</label>
                            <input type="text" id="name" placeholder="name"
                                class="w-full bg-gray-100 bg-opacity-50 rounded border border-gray-300 focus:border-red-500 focus:bg-white focus:ring-2 text-base outline-none text-gray-700 py-1 px-3 leading-8 transition-colors duration-200 ease-in-out"
                                v-model="user.name">
                        </div>
                    </div>
                    <div class="p-2 w-1/2">
                        <div class="relative">
                            <label for="email" class="leading-7 text-sm text-gray-600 action-email">Email</label>
                            <input type="email" id="email" placeholder="email"
                                class="w-full bg-gray-100 bg-opacity-50 rounded border border-gray-300 focus:border-red-500 focus:bg-white focus:ring-2 text-base outline-none text-gray-700 py-1 px-3 leading-8 transition-colors duration-200 ease-in-out"
                                v-model="user.email">
                        </div>
                    </div>
                    <div class="p-2 w-full">
                        <div class="relative">
                            <label for="message" class="leading-7 text-sm text-gray-600">Message</label>
                            <textarea id="message" placeholder="message"
                                class="w-full bg-gray-100 bg-opacity-50 rounded border border-gray-300 focus:border-red-500 focus:bg-white focus:ring-2 h-32 text-base outline-none text-gray-700 py-1 px-3 resize-none leading-6 transition-colors duration-200 ease-in-out"
                                v-model="user.message"></textarea>
                        </div>
                    </div>
                    <div class="p-2 w-full">
                        <button
                            class="flex mx-auto text-white bg-red-500 border-0 py-3 px-12  hover:bg-white rounded text-lg  submit-button">Submit</button>
                    </div>
                </form>
            </div>
        </div>
    </section>
</template>


<script>
export default {
    data() {
        return {
            user: {
                name: '',
                email: '',
                message: ''
            }
        }
    },
    methods: {
        submitForm() {
            console.log('Success:form has succesfully been submitted:', this.user);
            // You can also send the form data to an API endpoint here
        }
    }
}
</script>
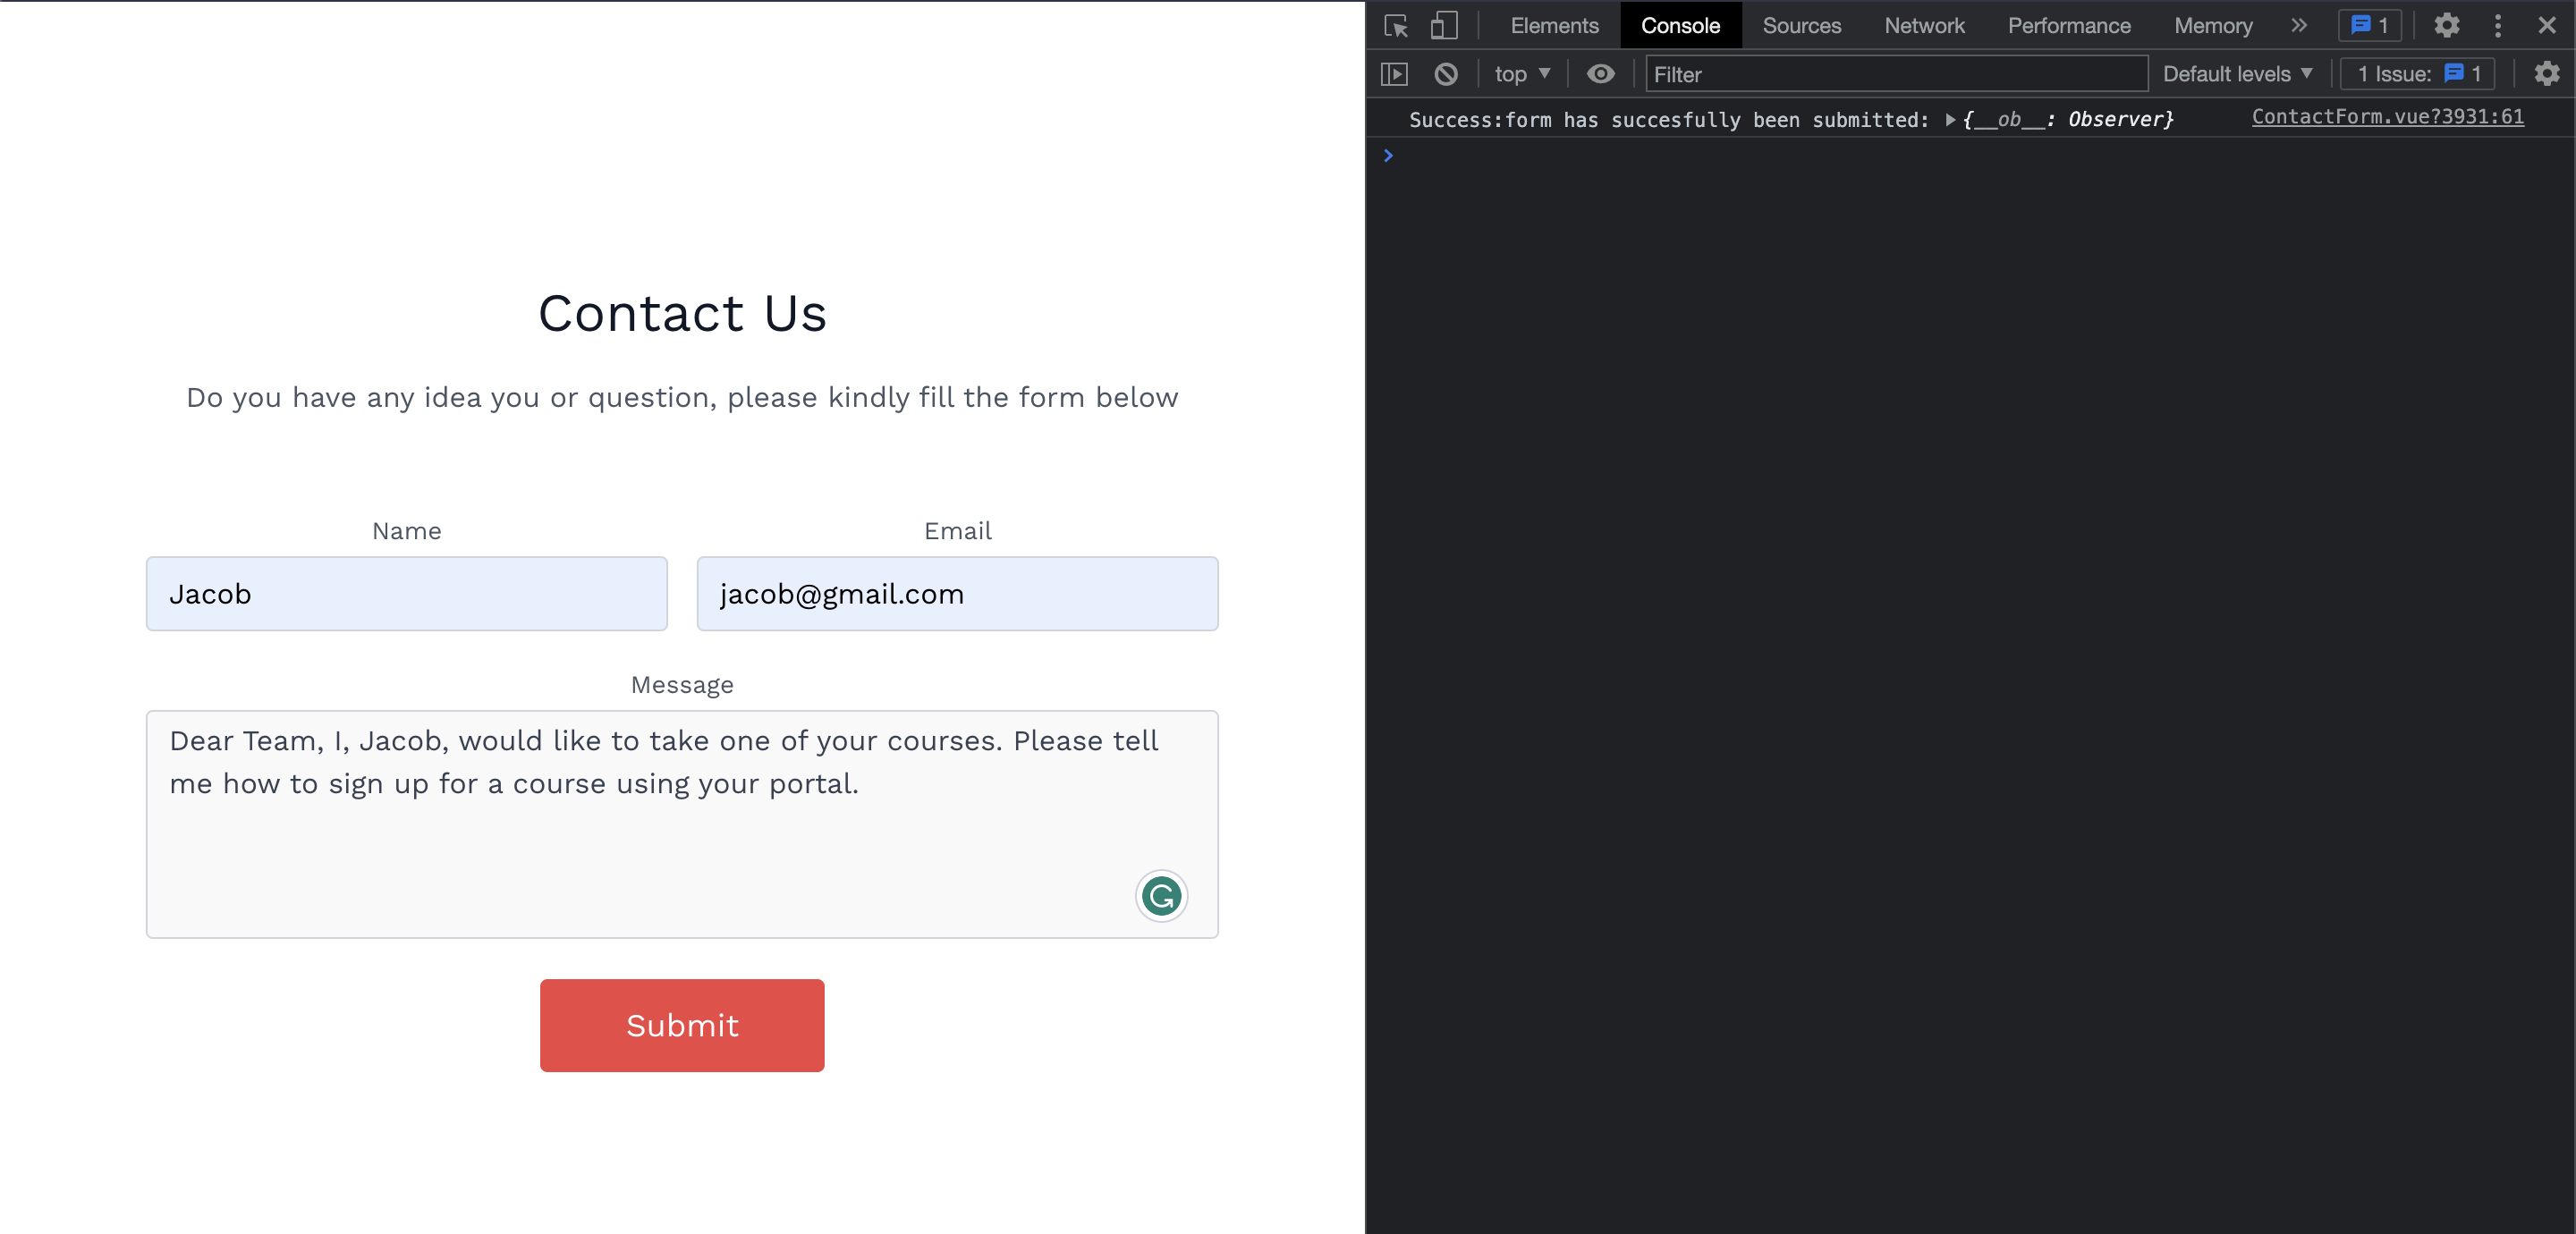
The code above shows how our form application's layout appears after we send the form's data to our console.
Please keep in mind that we are sending the form to our console because this is a sample example; however, you can also apply the same strategies described in this article to a fully functional application. View a sample diagram of our form that was submitted to the console below.
Testing our Form Application
We will create a test for our form application in order to see if users can enter their information into the form. For instance, we'll see if the user can enter a name, email, and message. We'll also see if the submit button functions as intended and actually sends the data when the user clicks on it. See the code example below:
describe('Testing contact form', () => {
    it('allows users to input the right information', () => {
      cy.visit('http://localhost:8080/');
    //   cy.get('form')
      cy.get('input[placeholder="name"]')
      .type("Jacob")
      .should("have.value", "Jacob");
    cy.get('input[placeholder="email"]')
      .type("[email protected]")
      .should("have.value", "[email protected]");
    cy.get("textarea")
      .type("Dear Team, I, Jacob, would like to take one of your courses. Please tell me how to sign up for a course using your portal.")
      .should("have.value", "Dear Team, I, Jacob, would like to take one of your courses. Please tell me how to sign up for a course using your portal.");
      cy.get("form").click();
    });
  });
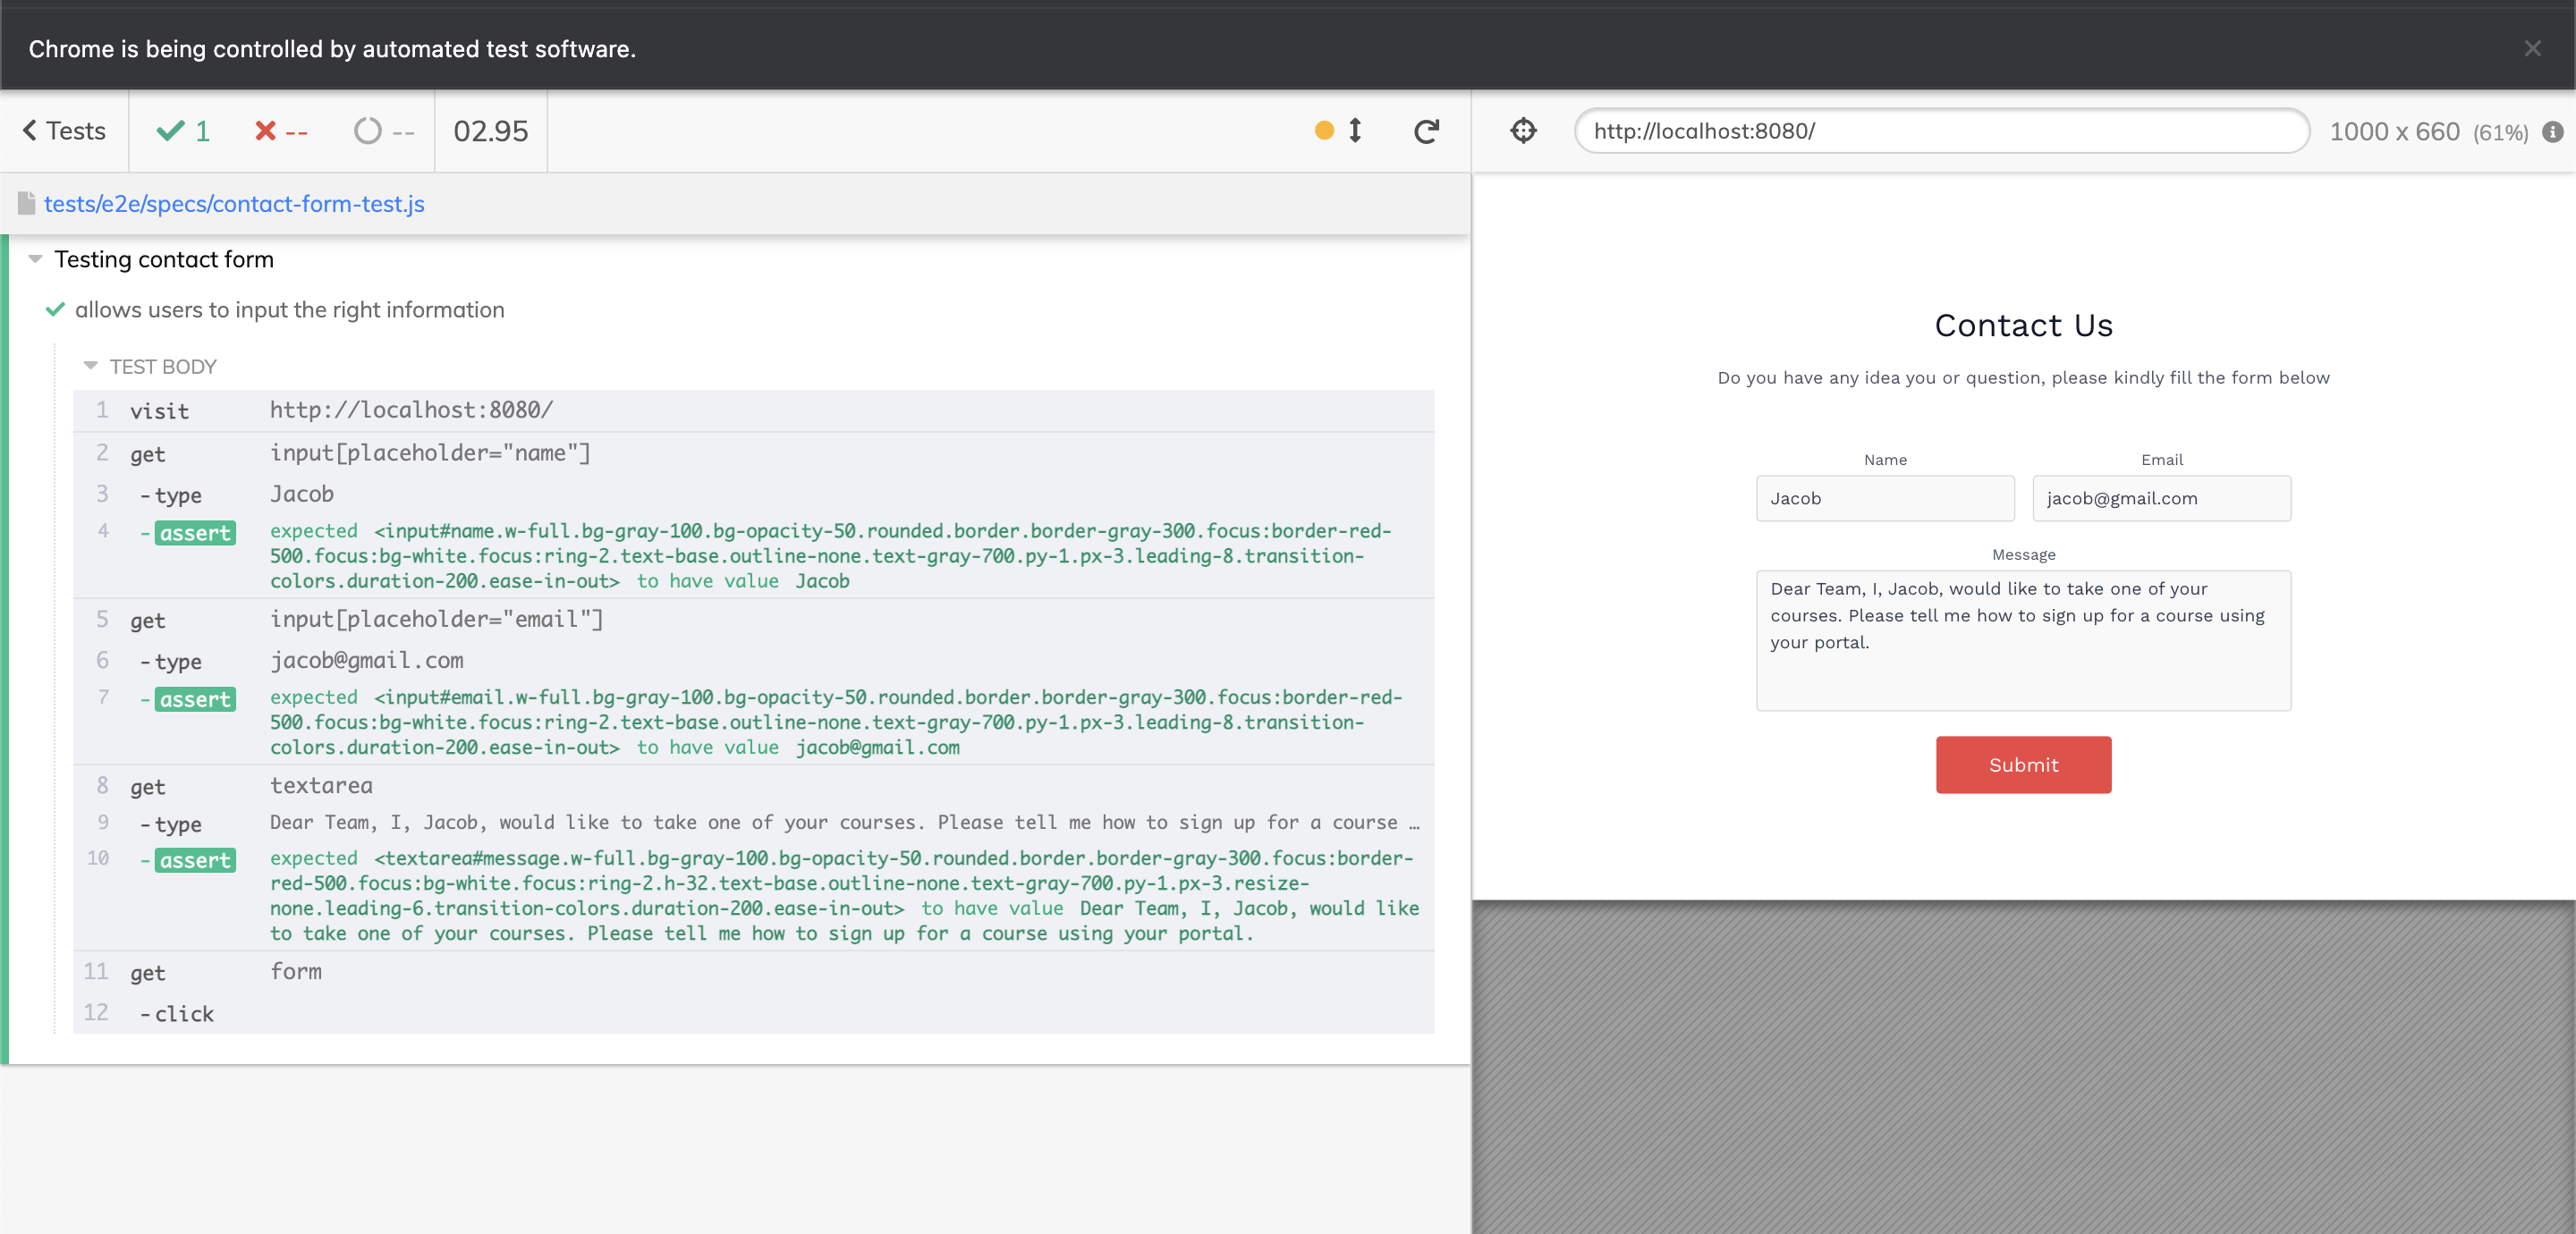
In the above code sample, Cypress assertions were used to determine whether users could enter their information. For instance, while testing the user name, we also add the value that must be provided by the user in order for the test to pass. In this case, if we test the name input with a different value than what Cypress was expecting in our code, the test will fail since the expected value was not provided.
See the example of the successful test.
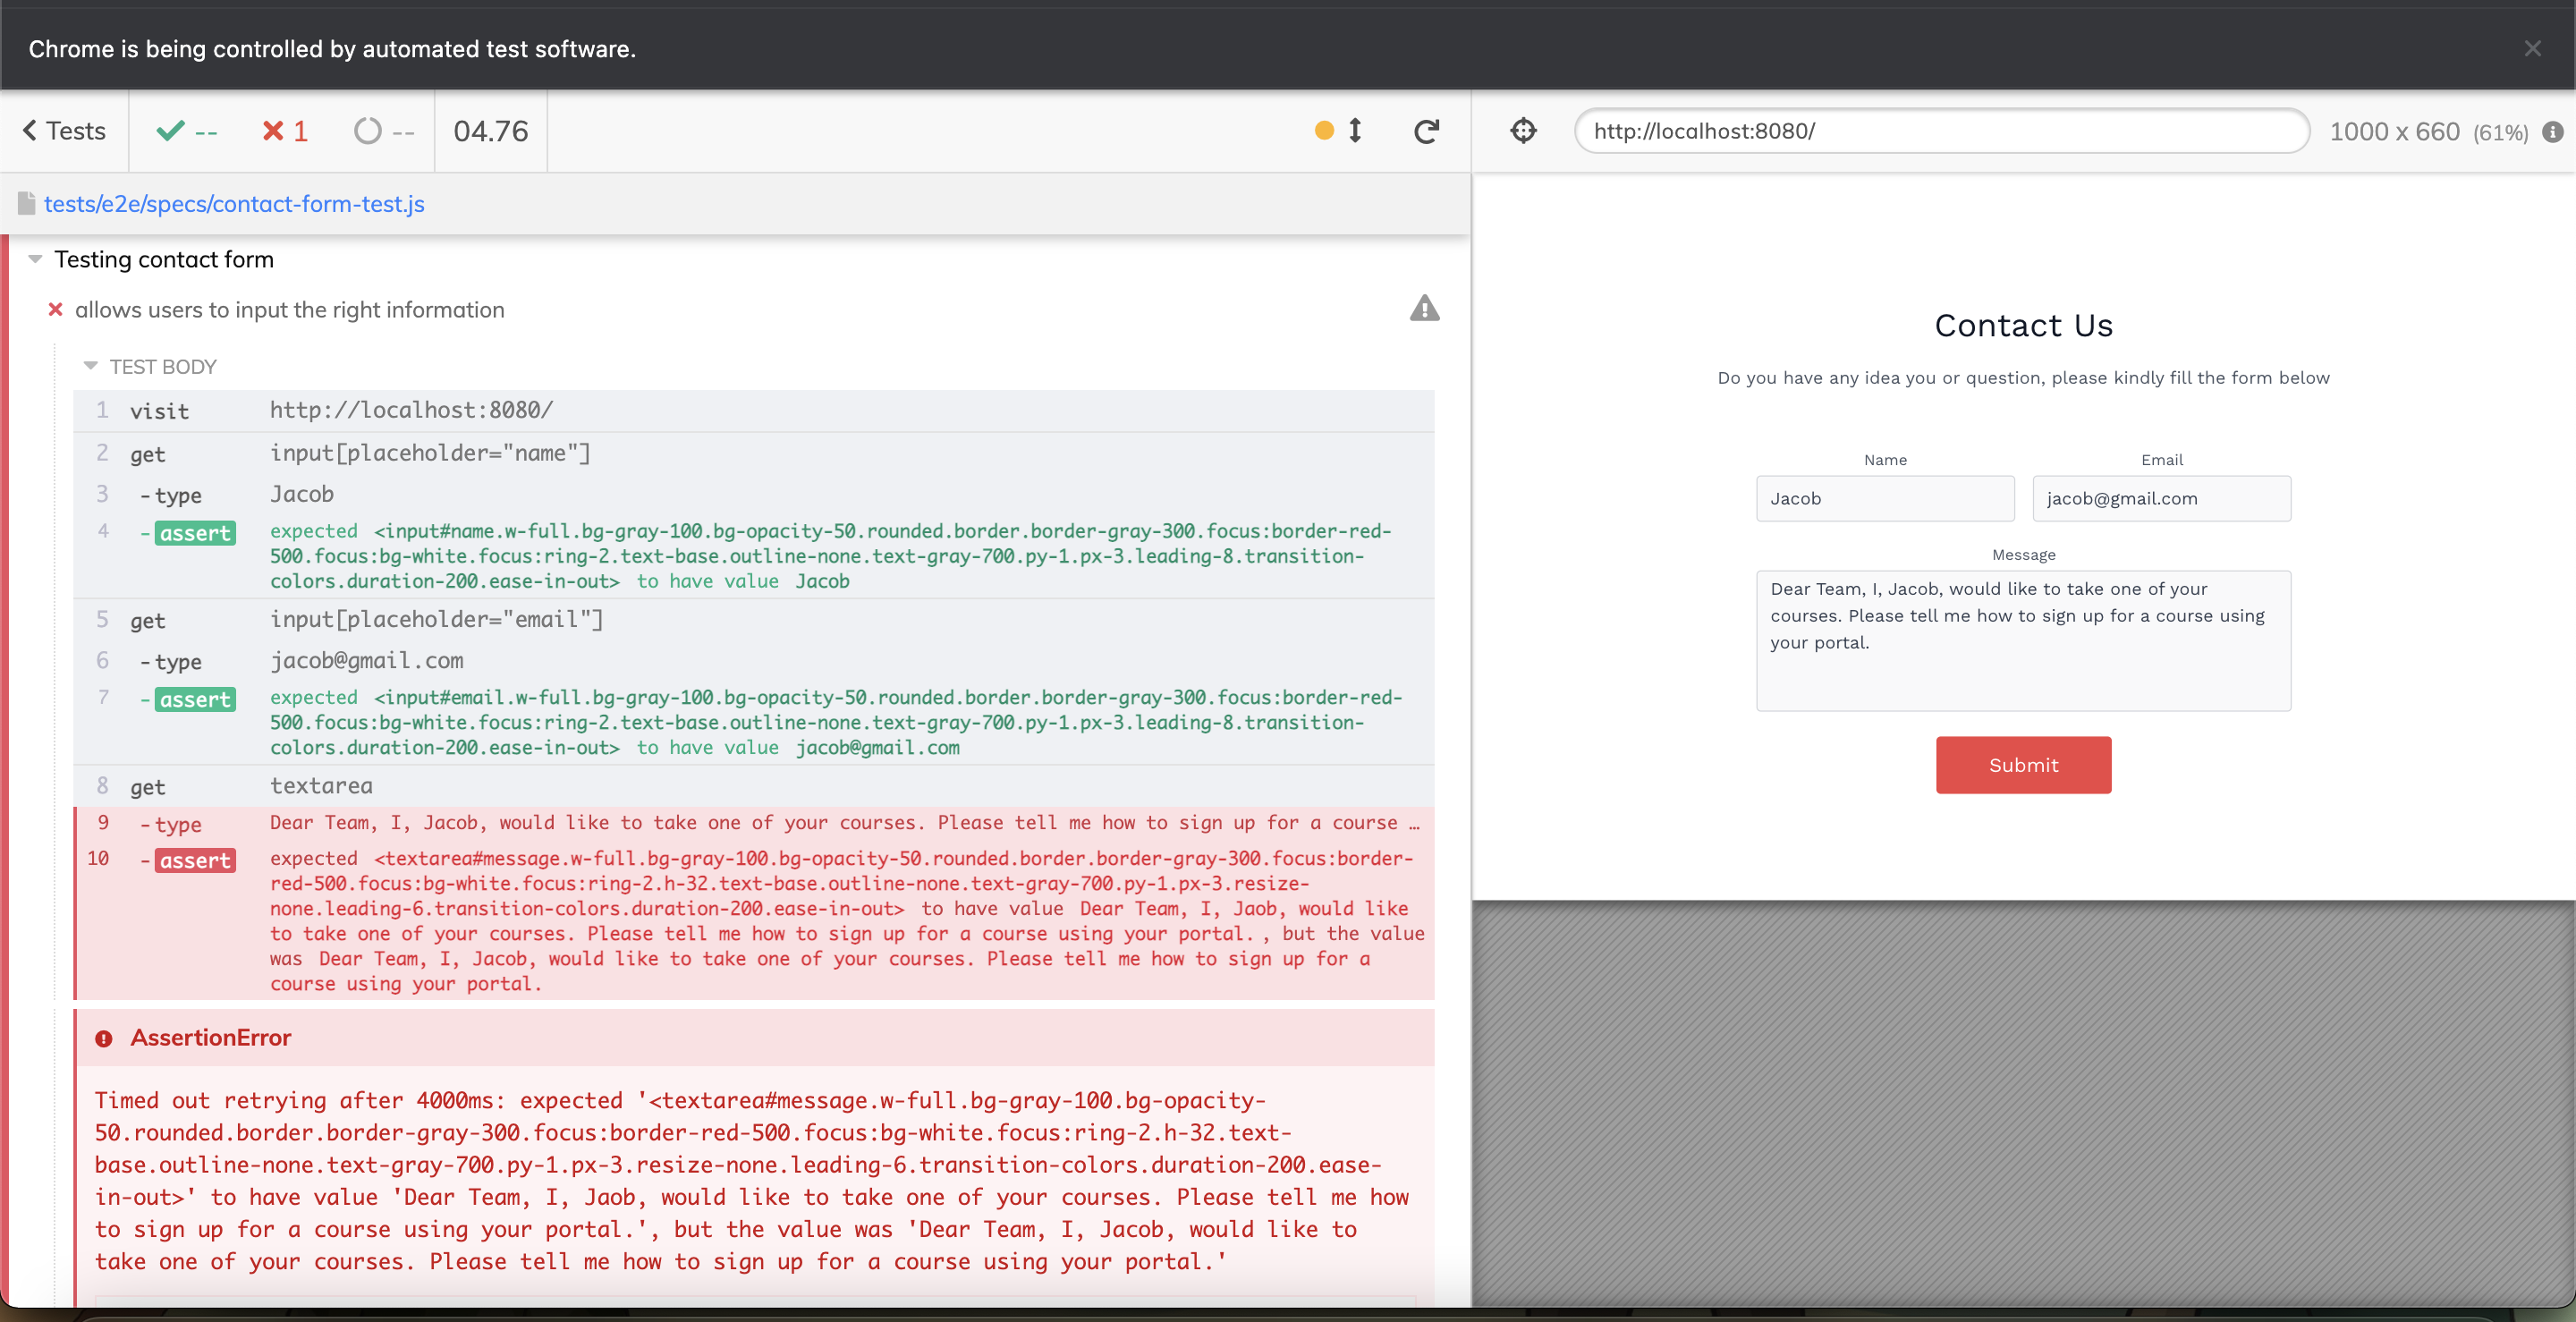
See another example of a failed test. The correct value was not inputted.
Conclusion: End-to-end testing with Vue and Cypress Guide
End-to-end testing guarantees that our application is functional and meets user needs.
Cypress is a strong tool with an easy-to-use interface and helpful starting instructions that make end-to-end testing simpler. If this is your first time working with Cypress, don't be afraid because plenty of resources are available to assist you.
Jscrambler
The leader in client-side Web security. With Jscrambler, JavaScript applications become self-defensive and capable of detecting and blocking client-side attacks like Magecart.
View All ArticlesMust read next
Advanced Vue Features: Directives, Filters, and Mixins
Some more advanced Vue features can help you solve more specific code needs. In this tutorial, we explore directives, filters, and mixins.
April 13, 2020 | By John Au-Yeung | 9 min read
Creating a Functional Component in Vue.JS
In this article, you will learn how to create functional components in Vue.js.
September 30, 2022 | By Jscrambler | 4 min read
