Implementing Authentication in JavaScript with Express.js and MongoDB
September 26th, 2023 | By Antonello Semeraro | 19 min read

This article walks you through implementing authentication in JavaScript with Express.js and MongoDB.
In today's digital age, ensuring the security of web applications is more paramount than ever. When you sign into an application or buy online, mechanisms work behind the scenes to protect your identity and data. Two of the fundamental pillars of this security framework are authentication and authorization.
Authentication vs. Authorization: The Distinction
Both authentication and authorization might sound similar, but they have distinct roles in the web security world.
Authentication: At its core, this is about identity. When users provide credentials (a username and password, a fingerprint, or a facial scan), the system checks these details against a stored record. If they match, the user is authentic. It's the process of ensuring you are who you claim to be.
Authorization: After determining who a user is through authentication, we decide what they can and cannot do. That's where authorization comes in. It grants or denies permissions, like viewing a particular page, editing a document, or accessing certain functionalities.
In summary, authentication verifies users, and authorization defines user permissions.
Setting Up the Environment
Let’s navigate through the complexities of these processes, in which a structured environment is crucial.
Express.js will be our go-to framework for this guide. Through its strong presence in the world of web development, it offers the tools we need to create a robust backend system. Then there's MongoDB, our chosen database. Suitable for handling vast amounts of data and known for its performance, MongoDB provides a sturdy foundation for our user data storage needs.
In this article, as we move forward, we'll dive deep into the technicalities, ensuring that by the end, you have a solid grasp of implementing and managing authentication in web applications, always with authorization in mind.
List of Technologies for Authentication and Authorization
We want to remind you that building a robust authentication and authorization system is no small feat. It requires a combination of tools and technologies to ensure user data is secure and access is granted only to those who have the appropriate permissions.
Let's break down the technologies we'll be using for this tutorial.
1. Backend Framework: Express.js
Why Express.js?
Well, it’s a minimalistic yet powerful web application framework for Node.js. Also, it is flexible, easy to use, and has extensive middleware support. For our purpose, Express.js will serve as the backbone, managing our routes, requests, and responses.
2. Database: MongoDB
MongoDB is a NoSQL database that uses a document-oriented data model. This property makes MongoDB highly scalable and versatile, especially for applications with vast amounts of data or a need for flexibility in the data structure.
MongoDB will store user details, credentials, and roles for our authentication and authorization system.
3. Token Management: jsonwebtoken
JSON Web Tokens (JWT) provide a compact and self-contained method for securely transmitting information between parties.
In our setup, after the authentication of a user, they will be issued a JWT, which they can use to prove their identity for subsequent requests. The jsonwebtoken library makes creating and verifying these tokens straightforward.
In the coming sections, we'll delve deeper into how these technologies interplay to provide a cohesive and secure system for managing user identity and permissions.
Setting Up User Registration and Login
1. Modeling Users: Setting up a User Schema or Model
When building a system that requires user registration and login, a foundational step is defining what information we need to store about each user, better known as the user schema (or model).
In the context of MongoDB and many other databases, a schema defines the structure of data: the attributes a dataset will hold, their type, and any default values or constraints they might have.
User Schema Basics
Username: A unique identifier for each user, either an email address or a unique username, depending on your preference.
Password: To securely store passwords, we'll never save them in plain text. Instead, we'll hash them using a cryptographic function, which turns the password into a string of characters. Even if someone gains unauthorized access to our database, deciphering the original password from the hash should be computationally challenging.
Roles: Depending on the complexity of your application, a user might have different roles, such as user, admin, or moderator. This field will store that role information, which will later inform our authorization system.
Date Created: An often overlooked but relevant attribute, this timestamp can help understand user demographics and some security protocols.
To set up this schema in a MongoDB and Express.js environment, we would typically use a package like Mongoose. This choice allows for easy modeling of our data and provides helpful validation and query-building tools.
Example User Schema with Mongoose: With the schema defined, we're now ready to handle user registration and login, ensuring that each user's data fits and is stored securely.
2. Password Security: Using bcrypt for Hashing and Verifying Passwords
One of the fundamental rules of web security is to never store passwords in plain text.
If an unauthorized individual ever gains access to your database and finds unencrypted passwords, the damage potential is immense. So, how do we protect passwords? With hashing.
What is Hashing?
Hashing converts a piece of data, in this case, a password, into a fixed-size string of bytes. The result, typically, is a seemingly random string of characters. The beauty of hashing is its one-way nature given the hash, as you can't revert to the original password.
Why bcrypt?
There are several hashing algorithms available, but not all are created equal, and some are easily susceptible to brute force attacks or rainbow table attacks: Bcrypt stands out as a robust choice for several reasons:
Salting: bcrypt automatically handles the generation of salt. It is a random value combined with the password before hashing. It will ensure that even if two users have the same password, their hashes will not match.
Adaptive: As computers become more powerful, hashing algorithms can become vulnerable. bcrypt is adaptive; the number of iterations (or the "cost") increases as computers get faster, ensuring the hash remains hard to crack.
Widely Trusted: bcrypt has withstood the test of time and remains a gold standard in password hashing.
Implementing bcrypt in Express.js
To use bcrypt with our Express.js setup, we'll start by installing the library: Then, during user registration and login, we'll leverage bcrypt to hash passwords and compare hashes:
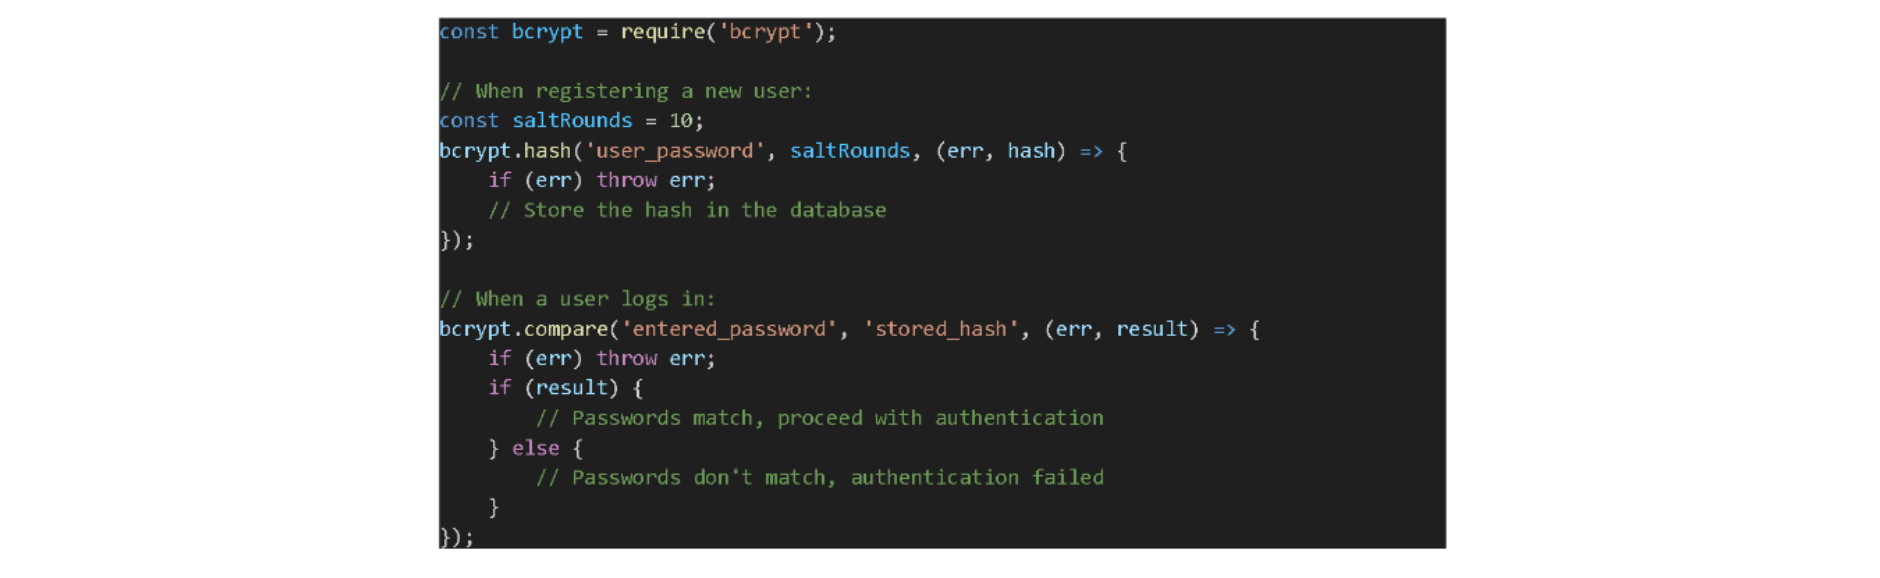 It's essential to note that while bcrypt offers solid password protection, it's just one part of the game because combining it with other security measures ensures a more holistic safety net for your application.
3. Registration Endpoint: Handling New User Sign-ups
Users must register an account to access your application. Setting up a registration endpoint in Express.js allows users to do just that. This endpoint will be responsible for several things, namely:
Collecting user data
Validating the information
Hashing the password
Storing the new user in the database
Here's a step-by-step breakdown:
Setting Up the Route
Start by defining the route that will handle user registration. It is typically a POST request, as you're creating a new resource in the database.
Data Validation
Before we even consider saving data to the database, we must ensure it's valid, and this could involve:
Checking that the required fields are provided.
Ensuring the username or email isn't already registered.
Validating the password meets specific criteria (length, contains numbers/special characters, etc.)
Password Hashing
As discussed earlier, we'll use bcrypt to hash the user's password before saving it.
Saving The User
Once the data is validated and the password hashed, it's time to save the new user to the database.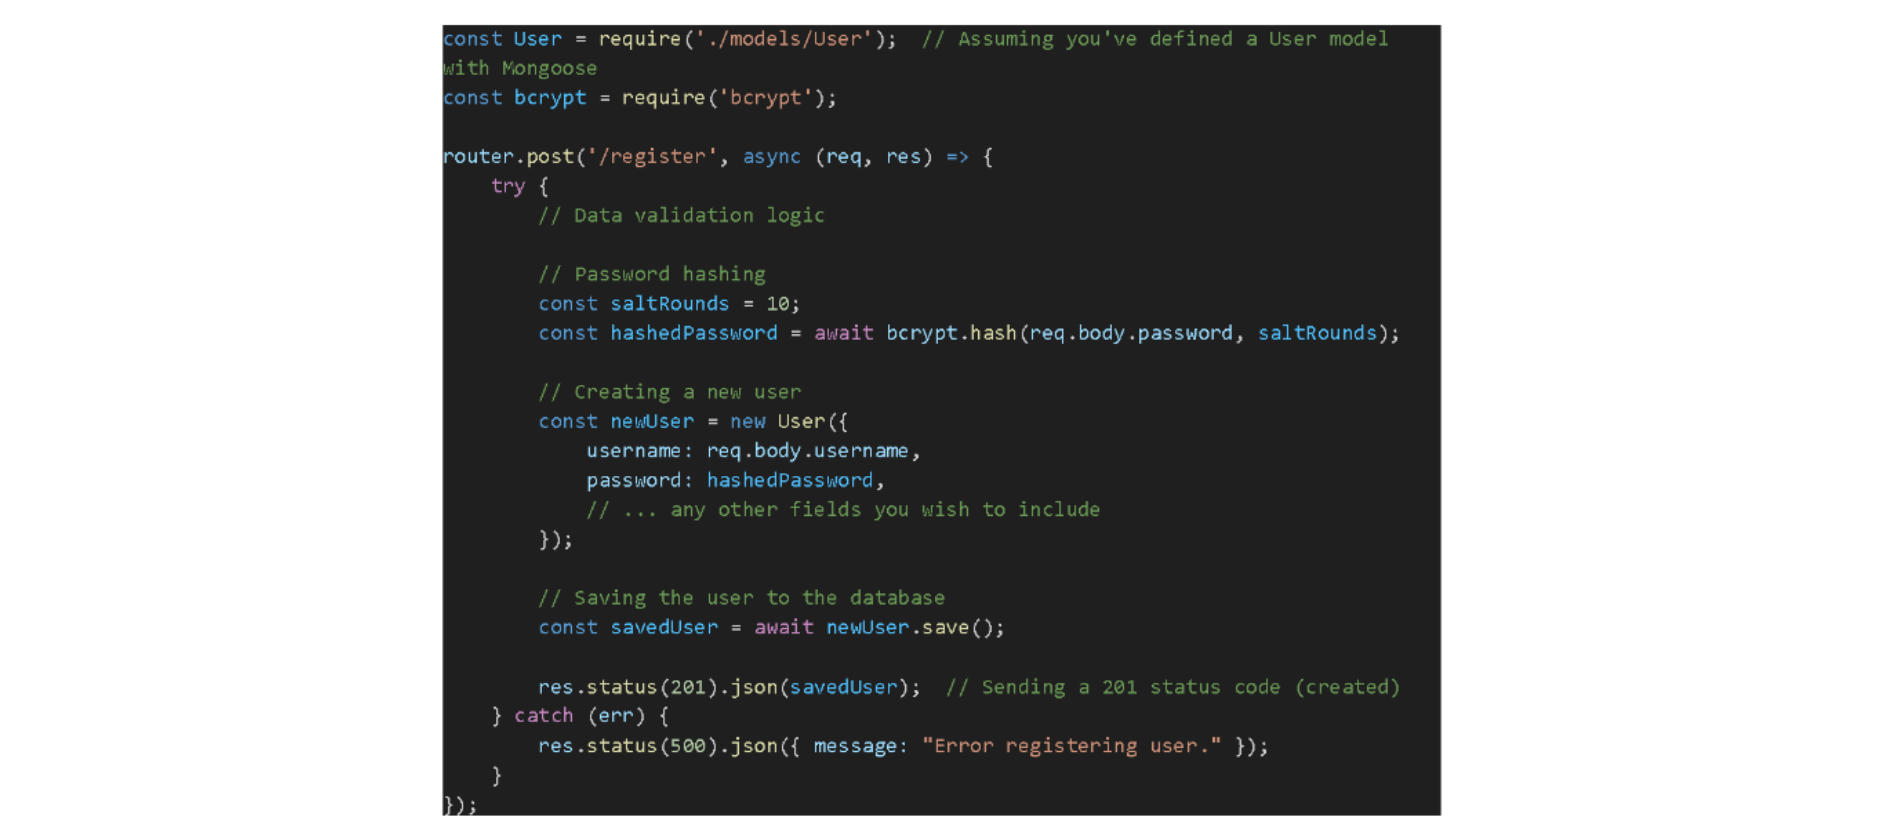
Response
After saving the user, you can respond with a success message or, in some cases, directly log the user in by issuing a JWT, which we'll cover in subsequent sections.
Note: Ensure you exclude sensitive data like the hashed password when sending the user object in the response.
4. Login Endpoint: Validating Credentials and Generating a JWT for Authenticated Users
Once a user has registered, they need a way to log in, which involves verifying the user's credentials and, upon successful validation, providing them with a token to authenticate subsequent requests.
Setting Up the Route
The login route will typically handle a POST request containing the user's credentials (e.g., username and password).
Verifying Credentials
The core of the login process is verifying if the provided credentials are correct, which we describe in detail:
Fetching the user from the database based on the provided identifier (e.g., username or email).
Using bcrypt to compare the stored hashed password with the hash of the entered password.
Generating a JWT
We generate a JWT to authenticate the user for subsequent requests upon successful validation. The token can hold claims about the user, such as their ID and roles.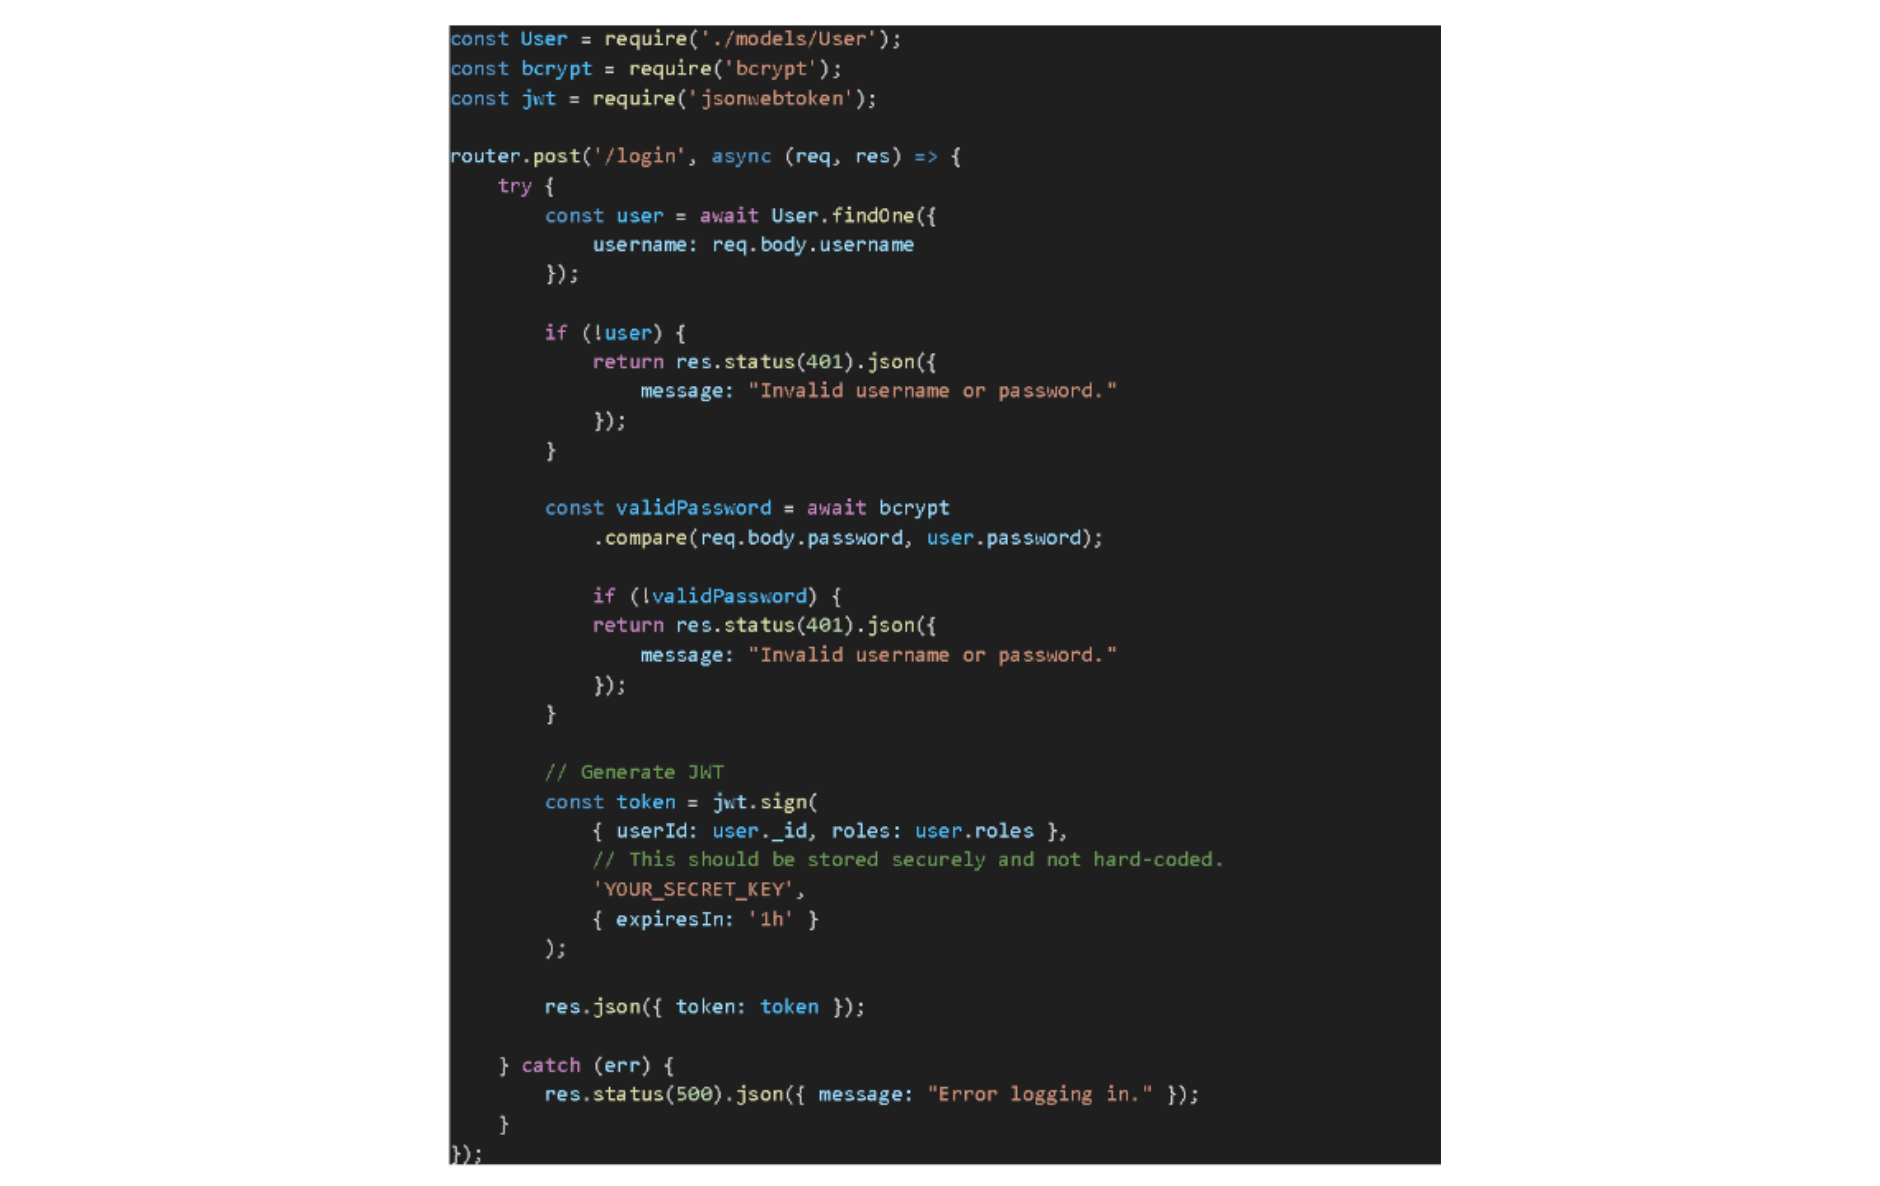
Handling Responses
Successful Login: On successful validation, return the JWT to the user. This token will then be attached to subsequent requests to prove the user's identity and role.
Unsuccessful Login: If the username is not found or the password doesn't match, return a 401 Unauthorized response.
Remember, the JWT's secret key (used for signing the token) should be kept secure and never exposed or hard-coded. Consider using environment variables or configuration management tools to keep it safe.
Implementing Token-based Authentication with JWT
JWT has become one of the most popular methods to implement authentication in modern web applications because its stateless and self-contained nature makes it especially suitable for distributed systems.
1. Generating Tokens: Using jsonwebtoken to Sign Tokens
JWT offers a compact, URL-safe way to represent claims between two parties. Regarding authentication, these "claims" typically represent the user's identity and possibly roles or permissions.
Here's a deeper dive into JWT creation.
Structure of a JWT
A JWT has three parts:
Header: Describes the type of token and the algorithm used for signing.
Payload: Contains the claims or data stored in the token. It can be a user ID, roles, or other data.
Signature: Ensures the integrity of the token. It results from encoding the header and payload using a secret key.
These sections are concatenated with periods, forming a string-like header.payload.signature.
Generating a JWT with jsonwebtoken
The jsonwebtoken library in Node.js makes generating JWTs straightforward. Here's a basic approach:
Payload: Here, we're storing the user ID and roles. The payload can hold other data, but be cautious about not storing sensitive information.
Secret Key: Used to sign the JWT. This key must be confidential. If someone knows this key, they can forge tokens.
Options: The expiresIn option specifies the token's lifetime. After this duration, the token will be invalid. This is a security measure to ensure that if a token is compromised, it won't be valid indefinitely.
Benefits of Using JWT for Authentication
Statelessness: Servers don't need to store session data because every request contains all the information a server needs to authenticate the user.
Scalability: Since there's no session data to store, applications can scale without worrying about where a user gets authentication.
Decoupling: JWTs work across different domains. These domains make them suitable for microservices or systems where the authentication server differs from the resource server.
Sending Tokens: Sending the JWT to the Client upon Successful Login
Once the JWT is generated after the user logs in, the next step is to send this token to the client. This step is proof of authentication for the client's subsequent requests.
Here are the methods for sending tokens to the client.
HTTP Only Cookies
One secure way to send the JWT is by using HTTP Only cookies. An HTTP Only cookie can't be accessed via JavaScript on the client side, reducing the risk of exposing tokens through Cross-Site Scripting (XSS) attacks. Pros:
Pros:
Better security against XSS.
Automatic sending with each HTTP request.
Cons:
Not suitable for cross-domain setups unless CORS settings are properly configured.
Might require additional handling to deal with token expiration and refresh scenarios.
Authorization Header
Another method involves sending the token in the response body after login, and then the client attaches it to the Authorization header for subsequent requests. On the client side, for every request:
 Pros:
Pros:
Flexibility: It can go across domains.
Explicitly managed by client-side code.
Cons:
A token can be vulnerable if not stored securely on the client side.
Requires client-side logic to attach the token for every request.
Response Body
Upon successful authentication, you can send the token in the response body. The client then decides how to store it (e.g., in memory, local storage, etc.). Pros:
Pros:
Straightforward implementation.
It gives the client freedom over where and how to store the token.
Cons:
The response body relies heavily on the client-side to manage the token securely.
The response body might expose the token to XSS if stored improperly.
Final Thoughts on Sending Tokens
Regardless of the chosen method, security should be a top priority. Always send tokens over HTTPS to prevent man-in-the-middle attacks.
Additionally, educate your frontend team (if separate) on the importance of securely managing and storing the token, especially if you're sending it in the response body or using the Authorization header
Implementing Token-based Authentication with JWT
Validating Tokens: Using Middleware to Verify Tokens on Protected Routes
After sending a token to the client, we must ensure the authenticity of that token on subsequent requests. With the token's validity verified, we can be confident about the user's identity and grant access to protected resources.
Middleware in Express.js provides a mechanism to execute functions before reaching the route handlers. We can create a middleware function to validate JWTs.
Creating the Middleware
Before we access a protected route, we'll verify the JWT sent with the request. Here's a simple middleware function for token validation using jsonwebtoken: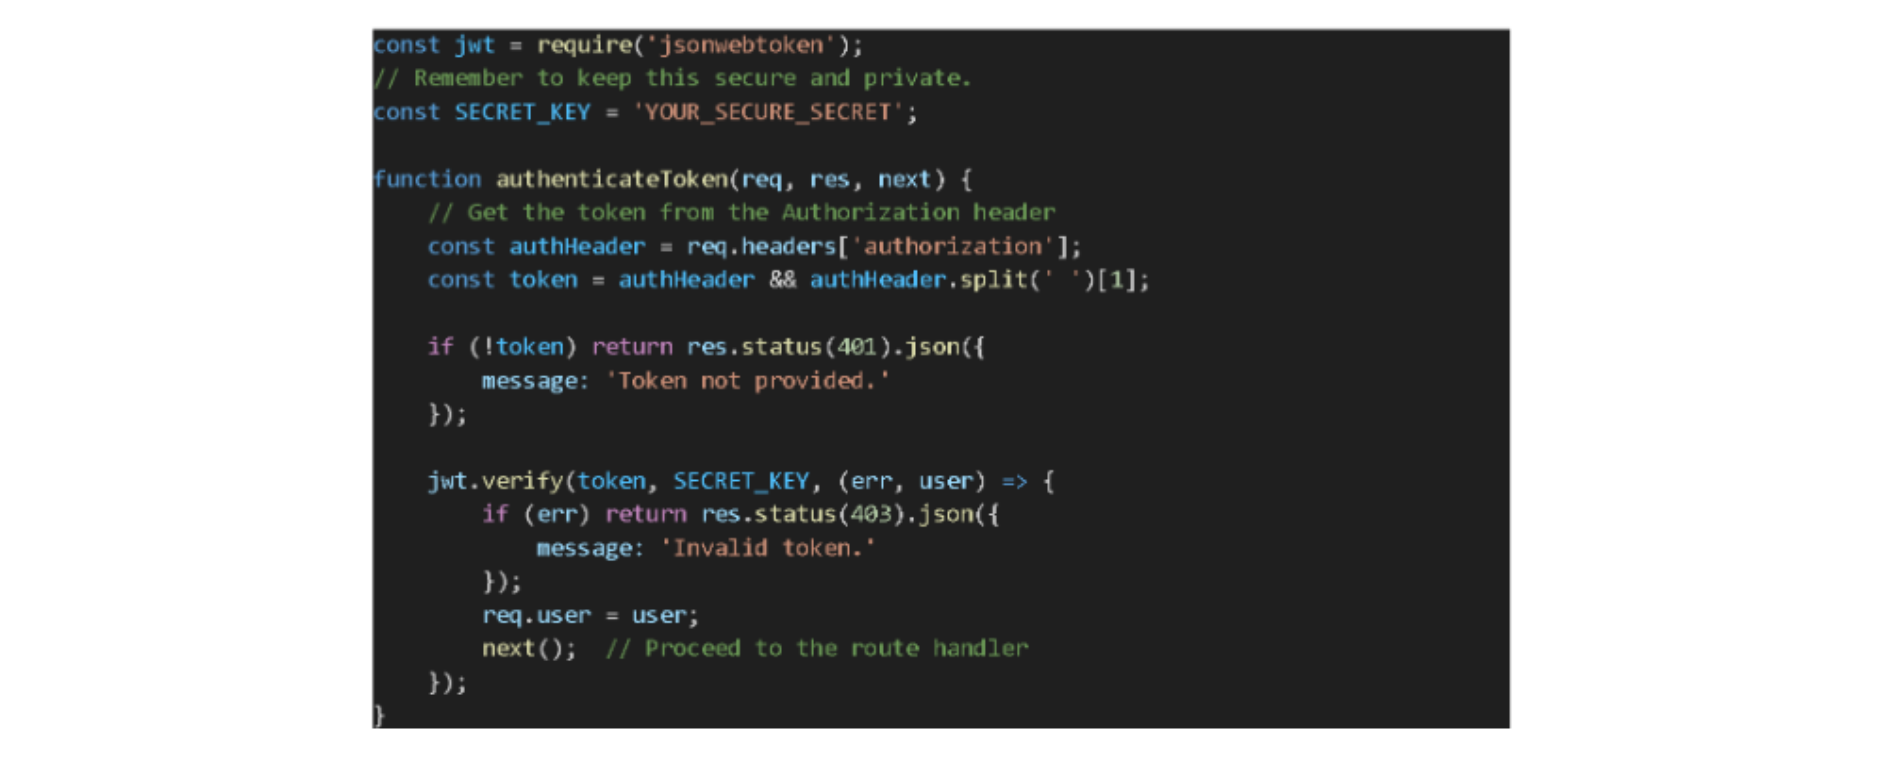
Applying Middleware to Routes
Once the middleware is defined, you can apply it to any route you wish to protect:
Handling the Decoded Payload
After verifying the token, jsonwebtoken decodes the payload, and we attach it to the req.user object. This decoded payload helps route handlers understand more about the authenticated user, such as their roles or user ID.
Advantages of Token Validation:
Security: Protects sensitive routes from unauthorized access.
User Context: Gives route handlers context about the user, such as roles or permissions, which allows them to customize responses.
Flexibility: Middleware can be applied selectively, enabling fine-grained control over which routes are protected.
Potential Pitfalls:
Token Exposure: Ensure tokens are transmitted only over secure channels (HTTPS). Exposing tokens can lead to unauthorized access.
Performance: JWT verification involves cryptographic operations. Though these operations are optimized and fast, in high-traffic scenarios, every millisecond counts. It's relevant to monitor system performance and scale appropriately.
Closing Thoughts: Understanding Our Digital Defenses
Thank you for staying with me through this exploration of authentication. Implementing authentication in JavaScript with Express.js and MongoDB is an essential topic, and I'm glad we could tackle it together.
Here's a quick rundown of what we covered:
We clarified the difference between authentication and authorization. In basic terms, it's about identifying users and determining what they can access.
We highlighted some key technologies and tools. You must know the tools that can best assist us in our mission for better security.
We delved into user management. It's all about securely handling user registration and login processes.
Lastly, we introduced JWTs and their role in token-based authentication. They play a crucial role in making sure our user interactions are genuine.
Web security might seem vast and complex, but breaking it down step-by-step, as we did today, makes it more digestible, and trust me, this foundational knowledge will serve you well as we continue to navigate the landscape of web development together.
Stay tuned for our next article, where we'll dive into Authorization and build upon the groundwork we've laid here.
Jscrambler
The leader in client-side Web security. With Jscrambler, JavaScript applications become self-defensive and capable of detecting and blocking client-side attacks like Magecart.
View All ArticlesMust read next
Authentication & Authorization in Web Apps
Identity and role management in Web Apps can get complicated. Plus, both are security-critical areas. Let's explore these concepts and some best practices.
April 2, 2020 | By Karan Gandhi | 9 min read
Vue.js Authentication System with Node.js Backend
In this tutorial, we'll explore different authentication types for JavaScript applications and build a Vue authentication system with a Node.js backend.
October 18, 2018 | By Lamin Sanneh | 17 min read
