Protect Your Code While Using Webpack
July 26th, 2019 | By Jscrambler | 6 min read

Bundlers like webpack solve a fundamental problem of front-end development.
It is not an understatement to say that front-end tooling moves forward fast. For a while, Grunt was the top task runner. Then, the community adopted Gulp, a streaming alternative.
Even though these tools are relevant, they still require hard work to maintain a build system. This is where bundlers, such as Browserify and Webpack, come in.
Last updated on February 22nd, 2021
Understanding Webpack
Webpack works with the concept of entry point — a JavaScript file that imports all other required files — and output — a single JavaScript file that bundles all entry files together.
The entry and output settings are configured in the webpack.config.js file.
To get a detailed explanation of how webpack works and how you can set it up with an easy configuration for your project, check out our tutorial.
To properly integrate Jscrambler into the webpack build process, we need a sample app to configure Jscrambler.
Setting Up a Simple App that uses Webpack
For this tutorial, we shall use a simple application built with React.js that contains the webpack setup that we explored in a previous webpack tutorial.
We won't be doing the whole setup from scratch, so feel free to check that tutorial if you want to do it step-by-step.
Let's clone the application:
git clone https://github.com/JscramblerBlog/Jscrambler-Webpack-React.git
Now, let's see what we're working with by starting the app:
cd Jscrambler-Webpack-React
npm i
npm run dev
Webpack will bundle our source files, and we can access the app on a development server on localhost:8080/. It should be a page that looks like this:
The simplified project structure of our application is as follows:
Jscrambler-Webpack-React/
|-- .babelrc
|-- package-lock.json
|-- package.json
|-- webpack.config.js
|-- dist/
| |-- css/
| |-- fonts/
| |-- images/
| |-- js/
| |-- index.html/
|-- node_modules/
|-- src/
| |-- main.js/
| |-- print.js/
| |-- index.html/
| |-- style.scss/
package.json contains all the configurations related to npm, such as dependencies, versions, and scripts.
The src directory features all the source code of the application. The sources are then built with webpack and bundled into the dist directory. This is where our protected bundled files will be placed.
How to Configure Jscrambler
If you haven't created a Jscrambler account yet, be sure to do so before moving forward.
All of Jscrambler's configuration will reside inside a single file: .jscramblerrc. As such, we will need to create this file to specify which transformations we wish to use.
The quickest way to achieve this is via the Jscrambler Web App. Once there, create a new app. Now, in the Application Modes tab, select the Language Specifications and application type. Next, select the transformations you want (check the Templates and Fine-Tuning tabs).
In this tutorial, we'll be selecting the Obfuscation template. If you need help with these steps, please refer to our guide.
Now, we simply have to download a JSON file with all this configuration by clicking the blue download button next to the Application Settings.
Let's create a new file named .jscramblerrc on the project’s root folder. Open the jscrambler.json file you just downloaded and copy all its contents to the .jscramblerrc file. Your final .jscramblerrc file should look like this:
{
 "keys": {
   "accessKey": <ACCESS_KEY_HERE>,
   "secretKey": <SECRET_KEY_HERE>
 },
 "applicationId": <APP_ID_HERE>,
 "params": [
   {
     "name": "objectPropertiesSparsing"
   },
   {
     "name": "variableMasking"
   },
   {
     "name": "whitespaceRemoval"
   },
   {
     "name": "dotToBracketNotation"
   },
   {
     "name": "stringConcealing"
   },
   {
     "name": "functionReordering"
   },
   {
     "name": "propertyKeysObfuscation",
     "options": {
       "encoding": [
         "hexadecimal"
       ]
     }
   },
   {
     "name": "regexObfuscation"
   },
   {
     "options": {
       "features": [
         "opaqueSteps"
       ]
     },
     "name": "controlFlowFlattening"
   },
   {
     "name": "booleanToAnything"
   },
   {
     "name": "identifiersRenaming"
   }
 ],
 "areSubscribersOrdered": false,
 "applicationTypes": {
   "webBrowserApp": true,
   "desktopApp": false,
   "serverApp": false,
   "hybridMobileApp": false,
   "javascriptNativeApp": false,
   "html5GameApp": false
 },
 "languageSpecifications": {
   "es5": true,
   "es6": false,
   "es7": false
 },
 "useRecommendedOrder": true
}
Because we got this information directly via the Jscrambler Web App, our accessKey, secretKey, and applicationId fields are already filled. If you wish to retrieve them manually, refer to our guide.
It's important to note that the params section specifies the transformations that will be used to protect your app. These can be hand-picked by you, by selecting them in the Web App or setting them manually.
Integrating Jscrambler into the Build Process
Jscrambler webpack Plugin
We will use our boilerplate app to showcase how to integrate Jscrambler into the webpack build process.
The first step of our integration with Jscrambler is installing the Jscrambler webpack plugin. Simply run:
npm i --save-dev jscrambler-webpack-plugin
To integrate Jscrambler in our application's build process via webpack, we need to add it to the webpack.config.js file. First, by adding this line:
const JscramblerWebpack = require('jscrambler-webpack-plugin');
And then by adding the Jscrambler webpack plugin at the end of the plugin array, so that it looks like this:
plugins: [
    // other plugins
    new JscramblerWebpack({
      enable: true, // optional, defaults to true
      chunks: ['app', 'print'], // optional, defaults to all chunks
      params: [], // optional, can be used to override .jscramblerrc
      applicationTypes: {} // optional
      // and other jscrambler configurations
    })
  ]
If you want to protect specific webpack chunks, you should note which chunks you are currently setting in the config file, by looking at this section:
  entry: {
    app: "./src/main.js",
    print: "./src/print.js"
  },
Our current application has two webpack chunks, app, and print, and we're choosing to protect both chunks with the config shown above chunks: ['app', 'print'].
Here, you might want to split your node_modules/ folder into a different chunk to exclude vendor files from being protected by Jscrambler. If that's the case, read the section below; if not, feel free to skip to the "Building The Protected App" section.
Adding a Separate Chunk For Vendor Files
Since the vendor files from node_modules/ are typically publicly accessible, you might find it unnecessary to protect them, especially if your main concern is intellectual property theft.
Placing them in a separate chunk will allow you to avoid protecting that chunk with Jscrambler. To do that, add the following snippet to the webpack.config.js file:
  optimization: {
    splitChunks: {
      chunks: 'all',
      cacheGroups: {
        vendor: {
          test: /[\\/]node_modules[\\/]/,
          name: 'vendors',
          chunks: 'all',
          minSize: 0
        }
      }
    }
  },
Here, minSize: 0 forces optimization.splitChunks to be applied even if the vendors' bundle is small.
Then, make sure you are not placing vendors in the chunks array.
Building The Protected App
We are now ready to protect our code and build our application with webpack:
npm run buildThis will create the protected production bundle files on dist/js/.
And you're done! Now all your webpack bundle files are protected with Jscrambler against code theft and reverse-engineering. Remember that you can always fine-tune your protections to manage eventual performance hits.
Testing the Protected Application
As a final step, let's check if the app is running successfully with the newly-protected source code. Start by installing the required dependencies:
npm i -g serve
Next, let's simply deploy the app build files to a local development server:
serve -s dist
Now, as you should be able to see on the terminal, you can open the locally served app on localhost:5000.
Let's see what our protected bundled files look like. This can be achieved simply by opening the browser's debugger and opening the files from the "Sources" tab. The protected code should look like this: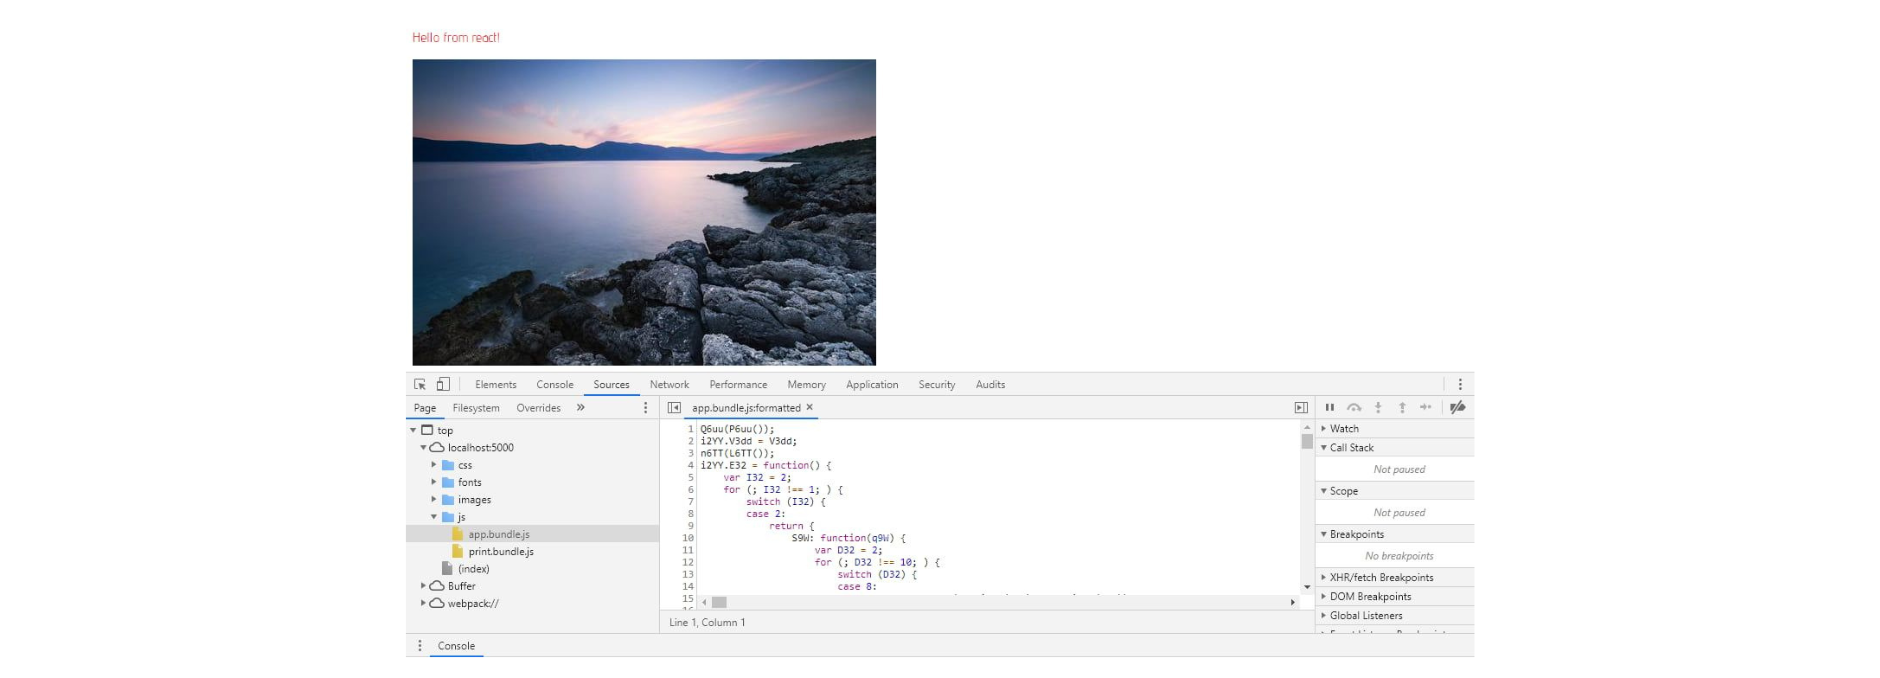
Conclusion
Using a build tool like webpack has become a common practice in web development. So much so that several major frameworks use it, including React's create-react-app.
Protecting bundled webpack code is crucial when you're building commercial applications since it enables preventing abuse, reverse-engineering, licensing violations, and code tampering.
It's worth mentioning that webpack plugins like Uglify or webpack obfuscator only provide basic minification/obfuscation and can be quickly reversed with automated tools. As so, they fail to properly protect webpack bundle files. On the contrary, Jscrambler provides enterprise-grade JavaScript protection which cannot be reversed by automated tools and provides several layers of security, not just obfuscation.
As we saw in this tutorial, integrating Jscrambler into Webpack's build process is simple, thanks to a dedicated plugin. In a couple of minutes, you can set everything up and ensure that your code is protected with the most potent and resilient solution.
This all comes with premium support, so be sure to contact us if you have any questions!
Jscrambler
The leader in client-side Web security. With Jscrambler, JavaScript applications become self-defensive and capable of detecting and blocking client-side attacks like Magecart.
View All ArticlesMust read next
How to Make Your App Faster with Webpack Dynamic Imports
Website speed is a vital metric for user experience and SEO. This tutorial explains how to use webpack dynamic imports to make your application faster.
December 19, 2018 | By Jakob Lind | 5 min read
Easy Custom Webpack Setup for React.js Applications
Webpack is currently the most popular code bundler but can be quite confusing. In this guide, we present a custom configuration for React.js apps.
July 23, 2019 | By Lamin Sanneh | 10 min read
