Protecting Your NativeScript Source Code with Jscrambler
January 26th, 2021 | By Jscrambler | 5 min read

Jscrambler is recommended by Progress Telerik as the solution of choice to protect NativeScript source code applications.
NativeScript is an open-source framework for building native cross-platform mobile apps using JavaScript, which enables sharing and maintaining a single code base across Android and iOS deployments.
Learn how to integrate Jscrambler into your NativeScript app development workflow to protect your JavaScript source code through advanced obfuscation, code locks, anti-tampering, and anti-debugging.
Quoting the NativeScript team when looking at source code protected with Jscrambler:
Good luck figuring out what’s going on there. And even if you run this code through a beautifier or formatting tool, you’ll still have a heck of a time deciphering anything.
This quick tutorial happened with NativeScript version 8.1.5.
To properly integrate Jscrambler into your NativeScript build process, there are two pre-requisites:
Creating a NativeScript app
Configuring Jscrambler.
You must also have set up your NativeScript environment.
Creating Your NativeScript Application
If you are new to NativeScript, check out our Introduction to NativeScript article before moving forward. Skip right ahead and use the official NativeScript Marketplace Demo as an example:
git clone --depth 1 https://github.com/JscramblerBlog/nativescript-marketplace-demo.git
Install all app dependencies using npm:
cd nativescript-marketplace-demo
npm install
The (simplified) base project structure of our NativeScript application is as follows:
nativescript-marketplace-demo/
|-- firebase-database.json
|-- FIREBASE.ms
|-- firebase.nativescript.json
|-- package-lock.json
|-- package.json
|-- references.d.ts
|-- tsconfig.json
|-- tsconfig.tns.json
|-- webpack.config.js
|-- app/
|-- assets/
|-- hooks/
|-- node_modules/
|-- platforms/
| |-- android/
| | |-- app/
| | | |-- build/
Package.json contains all the configurations related to npm, such as dependencies, versions, and scripts.
The app directory features all the source code for the application. The sources are then built and packed into the platform's directory. This is where our protected HTML and JavaScript files will be placed after the build.
And this is pretty much it in terms of our NativeScript app. Now, we will move forward with protecting it with Jscrambler.
Installing the Jscrambler Plugin
If you still do not have a Jscrambler account, create one before moving forward.
Next, install the Jscrambler webpack plugin.
npm i --save-dev jscrambler-webpack-plugin
After that, we need to set Jscrambler’s configuration.
The quickest way to get a ready-to-use configuration file is via the Jscrambler Web App. After creating your account and finishing the Jscrambler demo, create a new app.
Now, you can select a template in the Templates tab and pick individual transformations in the Fine-Tuning tab.
In this tutorial, use the Obfuscation template. Now, we download the jscrambler.json file with this configuration (as shown below) and place it in our app’s root folder.
Your final jscrambler.json file should look like this:
{
  "keys": {
    "accessKey": “<YOUR ACCESS KEY HERE>",
    "secretKey": "<YOUR SECRET KEY HERE>"
  },
  "applicationId": "<YOUR APPLICATION ID HERE>",
  "params": [
    {
      "name": "objectPropertiesSparsing"
    },
    {
      "name": "variableMasking"
    },
    {
      "name": "whitespaceRemoval"
    },
    {
      "name": "identifiersRenaming",
      "options": {
        "mode": "SAFEST"
      }
    },
    {
      "name": "globalVariableIndirection"
    },
    {
      "name": "dotToBracketNotation"
    },
    {
      "name": "stringConcealing"
    },
    {
      "name": "functionReordering"
    },
    {
      "options": {
        "freq": 1,
        "features": [
          "opaqueFunctions"
        ]
      },
      "name": "functionOutlining"
    },
    {
      "name": "propertyKeysObfuscation",
      "options": {
        "encoding": [
          "hexadecimal"
        ]
      }
    },
    {
      "name": "regexObfuscation"
    },
    {
      "name": "booleanToAnything"
    }
  ],
  "areSubscribersOrdered": false,
  "useRecommendedOrder": true,
  "jscramblerVersion": "<7.x>",
  "tolerateMinification": true,
  "profilingDataMode": "off",
  "useAppClassification": true,
  "browsers": {}
}
Note: You may wish to use different transformations based on your use case. Feel free to check out our documentation for more details on what each of these settings does.
With your configuration in place, your last step is to add Jscrambler’s webpack plugin to your webpack configuration. To do that, open the webpack.config.js file at the root of your app.
In this file, as recommended by NativeScript, start by adding webpack-chain so that you can change the configuration:
const webpack = require("@nativescript/webpack");

module.exports = (env) => {
    webpack.init(env);

    webpack.chainWebpack(config => {});

    return webpack.resolveConfig();
};
Then, import Jscrambler at the top of the config file:
const JscramblerWebpack = require("jscrambler-webpack-plugin");
const jscramblerConfig = require("./jscrambler.json");
Next, add the Jscrambler plugin configuration inside the chainWebpack arrow function:
// jscrambler plugin
config.plugin('JscramblerWebpack').use(JscramblerWebpack, [{
      ...jscramblerConfig,
      chunks: ['bundle'],
    }])
Finally, add some additional instructions inside chainWebpack so that Jscrambler only protects the Webpack bundle that contains the app’s source code.
const originalSplitChunks = config.optimization.get('splitChunks');

// jscrambler plugin

config.optimization.splitChunks({
      ...originalSplitChunks,
      cacheGroups: {
        ...originalSplitChunks.cacheGroups,
        loader: {
          test: /[\\/]loader/,
          minSize: 1,
          priority: 10,
          chunks: 'initial',
          name: 'loader',
          reuseExistingChunk: false
        }
      }
})
Your final webpack.config.js file should look like this:
const webpack = require("@nativescript/webpack");
const JscramblerWebpack = require("jscrambler-webpack-plugin");
const jscramblerConfig = require("./jscrambler.json");

module.exports = (env) => {
	webpack.init(env);

	webpack.chainWebpack(config => {
        // jscrambler plugin
        config.plugin('JscramblerWebpack').use(JscramblerWebpack, [{
            ...jscramblerConfig,
            chunks: ['bundle'],
        }]);

        const originalSplitChunks = config.optimization.get('splitChunks');
        config.optimization.splitChunks({
            ...originalSplitChunks,
            cacheGroups: {
              ...originalSplitChunks.cacheGroups,
              loader: {
                test: /[\\/]loader/,
                minSize: 1,
                priority: 10,
                chunks: 'initial',
                name: 'loader',
                reuseExistingChunk: false
              }
            }
        })

   	 });

	return webpack.resolveConfig();
};
And with that, you are ready to protect your NativeScript app with Jscrambler.
Building the Protected App
To protect your app built using Jscrambler, all you have to do is run one of the npm scripts that build NativeScript apps with webpack enabled:
ns build ios
or
ns build android
After the build process completes, you’ll find the build APK file inside the platforms folder, specifically on platforms/android|ios>/app/build/outputs/apk/debug.
Check the resulting code by extracting this APK file and navigating to assets/app. You will find the bundle.js file bundled through Webpack and protected by Jscrambler. Here is an example: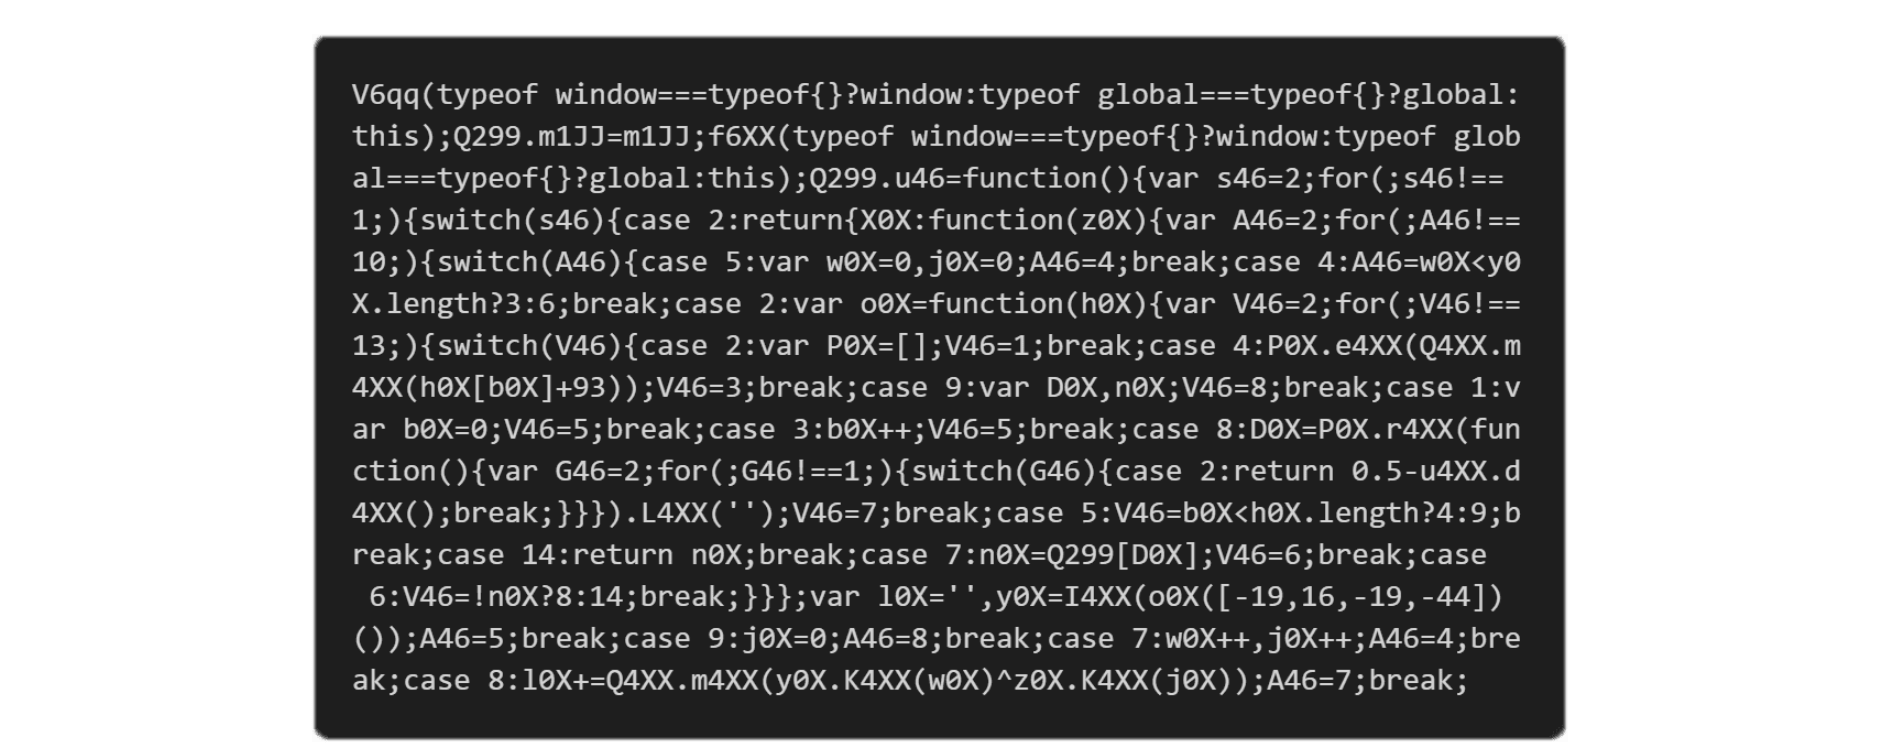
Final Thoughts
Integrating Jscrambler with NativeScript is simple through the Jscrambler Webpack plugin.
With the set of transformations selected, we concealed the source code of our app with the most advanced obfuscation techniques available today.
This will make it extremely hard for anyone to reverse-engineer this code. With the Code Hardening feature, this protection is up-to-date and resilient against reverse engineering tools and techniques.
If you wish to increase the potency and resilience of your protected code further, you can use additional security layers such as Code Locks and Self-Defending. These will ensure that your code has anti-debugging and anti-tampering features.
Jscrambler offers premium support. Contact our client-side experts to see a product demo and answer your questions.
You can also explore Jscrambler's pricing and plans.
Jscrambler
The leader in client-side Web security. With Jscrambler, JavaScript applications become self-defensive and capable of detecting and blocking client-side attacks like Magecart.
View All ArticlesMust read next
The Importance Of Protecting Your App’s Source Code
In this post, we'll explore the importance of protecting your apps' source code to reduce the attack surface.
October 14, 2021 | By Jscrambler | 3 min read
How to Protect Your Source Code With GitLab and Jscrambler
In this tutorial, we will guide you through implementing client-side protection in your GitLab instance using the integration with Jscrambler.
September 10, 2021 | By Pedro Fortuna | 5 min read
