Securing Your Intel® XDK HTML5 App
October 1st, 2015 | By Pedro Fortuna | 8 min read

When it comes to INTEL® XDK HTML 5 app security, the first line of defense for your source code lies in how the app works on a user’s phone. The app runs in an empty browser shell, a Webview, that is stripped of all its browser-like functionality, keeping all your source code from being viewed by the user.
If you’re using Intel® XDK to develop your mobile applications, you’re already familiar with some of its features. They include a user-friendly interface and the possibility of publishing your app on multiple platforms.
The distinction between Native Applications and INTEL® XDK applications
There is a distinction between native applications and INTEL® XDK applications that we must address.
With native applications, the user only accesses the compiled version, making it harder to reverse-engineer.
With Intel® XDK applications, the raw HTML, CSS, and JavaScript that make the app run are stored in the phone’s file system, making it much easier to tamper with.
With this in mind, many developers ask, “What else can I do to protect my source code?”.
Obfuscating Your Code
A popular method to add extra protection to your code is obfuscation.
Obfuscation is the process of methodically transforming your code, making it nearly impossible to read with the naked eye.
The code still works as it should in your application, but the process makes it burdensome to reverse-engineer, thus keeping away virtually all potential attackers.
Tutorial about JavaScript Protection against Code Theft
In this tutorial, we’ll show you how to protect your code using the most resilient option for JavaScript protection: the Jscrambler Code Integrity solution.
Protect Your Application Source Code with Jscrambler
In addition to obfuscating your code, Code Integrity is a client-side security solution for JavaScript in-app protection that offers developers several unique features for JavaScript protection.
Code Integrity advantages
Code Integrity by Jscrambler allows you to:
Optimize and compress your code;
Restrict your code to use in only permitted browsers;
Set expiration dates on your JavaScript functionality, which is great for trial periods;
Incorporate self-defending code into your application.
The self-defending code feature has built-in protection for itself, which is especially useful to secure your Intel® XDK HTML5 App.
Here’s how it works: Users can view or modify the source JavaScript. However, self-defending code can detect these events and break code on purpose, preventing the user from accessing it.
Step-by-step to Use JavaScript Protection Solution by Jscrambler
Step 1: Create a Sample Application
First, let’s start by creating a sample application in INTEL® XDK. For this tutorial, we’ve created a sample game app (available from within the INTEL® XDK suite) and placed it in a folder named “SampleGame” on our desktop for easy access.
Step 2: Log in to JScrambler
Next, login to your Jscrambler account. If you still don't have one, it is time to create one or start your free trial.
Once there, click on the “Get Started Now!” button and login or sign up.
Note: Although the Free plan doesn’t cost you anything, it only offers basic code optimization. There is a one-month trial period that allows you to test the protection features. Explore more about Jscrambler's plans and pricing by speaking with one of our experts.
Step 3: Set Up the Jscrambler API
Although JScrambler does offer you the option to use a web-based interface for obfuscating your code, here we’ll show you how to quickly and easily protect your code right from the command line using an API client. We chose the Node.js version. There are others you can use.
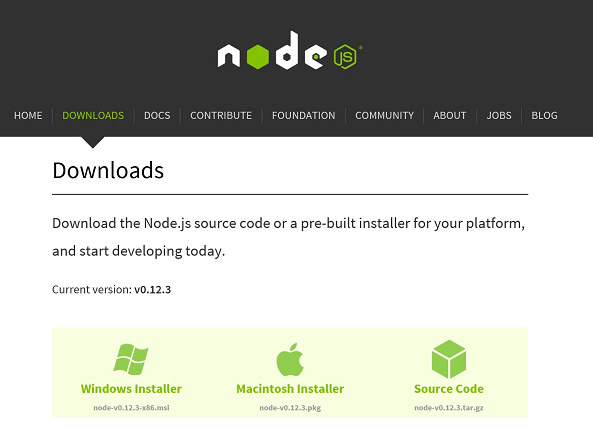
Install Node.js.
First, you’ll need to download Node.js by navigating to /download/ in your browser, clicking on the download button for your operating system, and following the simple on-screen instructions.
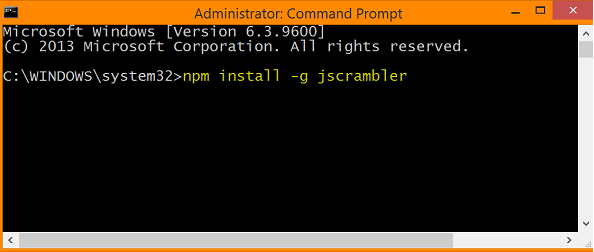
Upload the Jscrambler package.
Once the Node.js installation is complete, you’ll need to install the Jscrambler package. To do this, open your Command Prompt and enter the following command (highlighted in yellow).
Set up your .jscramblerrc file (optional)
Although it is possible to enter all the necessary parameters right from the command line, this can be a bit tedious, especially if you make a single mistake; you’ll have to start again from scratch!
To make your life easier, let’s set up your .jscramblerrc file. This file will store basic information about your access keys and default preferences. The benefit of doing this is that you will only need to do it once, saving you a lot of time down the road.
First, begin by opening your preferred text editor and entering the following code:
{
 "keys”: {
 "accessKey": "XXXX",
 "secretKey": "XXXX"
 },
 "params": {
 "string_splitting": "%DEFAULT%",
 "function_reorder": "%DEFAULT%",
 "function_outlining": "%DEFAULT%",
 "dot_notation_elimination": "%DEFAULT%",
 "expiration_date": "2199-01-01",
 "rename_local": "%DEFAULT%",
 "whitespace": "%DEFAULT%",
 "literal_duplicates": "%DEFAULT%"
 }
}
Note: Jscrambler offers several different pre-set configuration options. You can find these in our GitHub repository. Simply open the package that most closely matches your project type and copy the contents.
Next, you’ll need to replace the “XXXX” sections with your API credentials. To find your credentials, log in to your Jscrambler account, click on the “My Account” button, scroll down to the “Web API Settings” section near the bottom of the page on the right, and click on the “My Credentials” link.
Finally, move or save your new .jscramblerrc file to the home directory of your file system. (An example of your home directory would be C:/Users/YourName.)
Note: If you are using a Windows machine, you may have trouble creating a file beginning with a dot (.) at the beginning. To get around this, you can create a new file from the command prompt by typing the following command:
copy > null .jscramblerrc
This will create a hidden file in your current directory.
Run Jscrambler
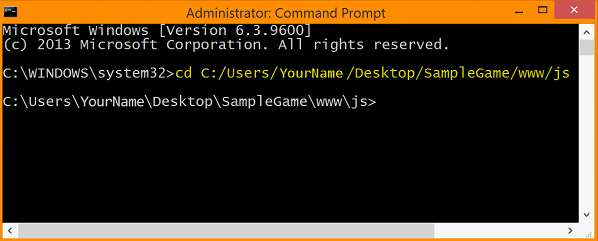
Okay, now that we’ve set everything up, let’s run the program! Begin by opening the Command Prompt. For simplicity’s sake, we’ll navigate to the folder by typing
cd C:/Users/YourName/Desktop/SampleGame/www/js.
on the command line and pressing the Enter key. (This is where the “zombie.js” file that we want to run through Jscrambler is located.)
Passing in Jscrambler parameters
The Jscramblseveralaccepts a number of arguments.
Since we’ve set up our .jscramblerrc file, it is automatically called when the program runs, so all we only need to enter are three arguments, at a minimum:
the name of the program to run (Jscrambler)
the name of the file we want to change (zombie.js)
the name we want for the file after we run the program. (We’ll call it tutorial.js.)
Press Enter, and wait a moment while the program runs. When it is finished, you should see a new file named “tutorial.js” located in the same folder as the original “zombie.js” file.
Entering multiple files
It is very common to have more than one JavaScript file. If you would like to upload more than one file, simply add additional files in the arguments as shown below.

Obfuscating an entire folder
A more efficient method for uploading multiple files is to target all the JavaScript files within a target folder. The syntax to do this is shown below.

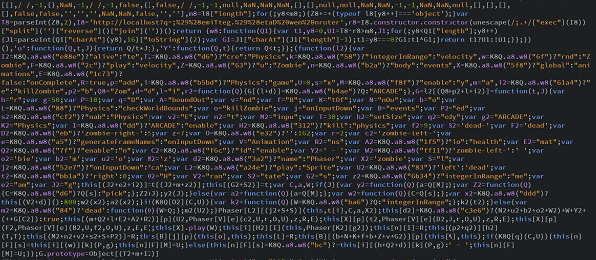
View of Code Before Running Jscrambler API (Notice the organization, comments, and understandable program logic.)

View of Code After Running Jscrambler API
Steps to Upload Your Protected Code to your Intel® XDK APP
Now you have your code protected.
The next step is to actually use it for your INTEL® XDK application. Remember, you still have the original, unobfuscated code in your project file.
Step 1: Move Your Original JavaScript Files
The first thing you’ll want to do is move your original JavaScript files to a safe location, outside of your project file.
Make sure you keep track of where you put them, just in case you need them for troubleshooting later on.
Step 2: Rename Your Protected Code Folder / Files
If you gave the files or folders different names when you went through the obfuscation process, you’ll need to rename them back to their original names. Otherwise, you’ll run into trouble when you try to run the app.
Step 3: Test Your Code in the Intel® XDK Suite
The Intel® XDK’s app development environment is set up to mirror the development process, from developing your app to simulating your app within the Intel® XDK environment to testing it on actual devices.
After you’ve swapped out your original code files with your protected code files, test your app by clicking on the “Emulate” or “Test” tab.
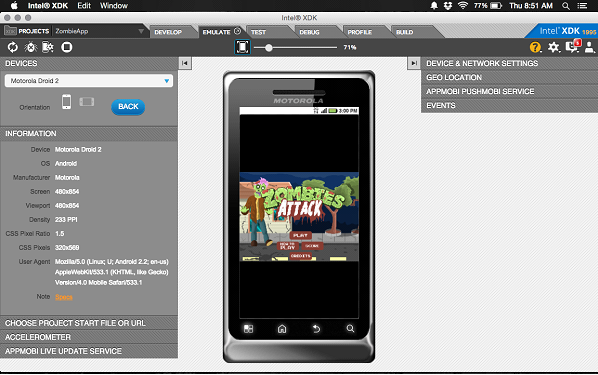
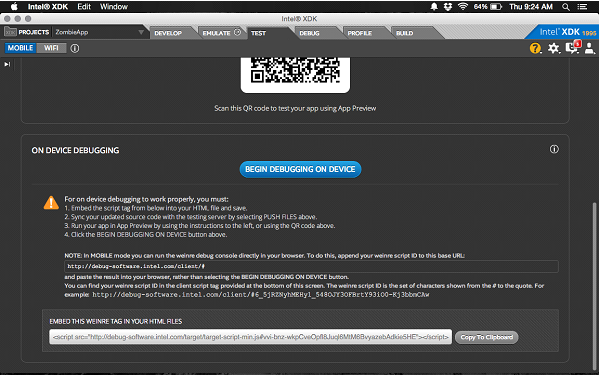
The “Emulate” tab lets you test your app on simulated devices, while “Test” allows you to push your app to any accessible devices running the INTEL® XDK “App Preview” app.
At the bottom of the “Test” screen, you’ll also find instructions for debugging your app directly on the device without connecting via USB.
Step 4: Publish Your Code
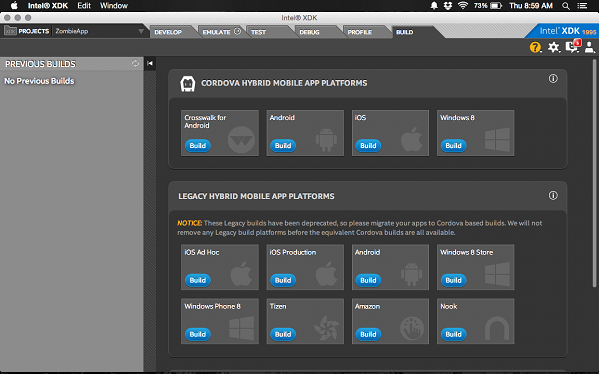
The final step in this process is publishing your newly created app to an app store of your choosing. To do this, click on the “Build” tab. Then, click on the platform you’d like to publish the app to, click the “Build” button for the desired platform, and follow the instructions.
Conclusions: How Intel® XDK helps to keep code secure
In this tutorial, we provided a brief overview of how Intel® XDK helps keep your code secure.
Next, we provided step-by-step instructions to get you up and running with a JavaScript optimizer and obfuscator.
From there, we moved on to walk you through how to run the program, giving you some different options to consider when protecting your code.
Finally, we provided an overview of how to test your app from within the Intel® XDK environment and how to upload it to an app store of your choosing!
As the importance of JavaScript grows, so does the need to protect your Intellectual property and your source code for JavaScript Hybrid and Mobile apps.
Jscrambler
The leader in client-side Web security. With Jscrambler, JavaScript applications become self-defensive and capable of detecting and blocking client-side attacks like Magecart.
View All ArticlesMust read next
JavaScript Obfuscation: The Definitive Guide for 2026
JavaScript obfuscation is a series of code transformations that make JS extremely hard to understand and reverse-engineer. This definitive guide explores it in-depth.
January 13, 2026 | By Jscrambler | 18 min read
Can ChatGPT reverse engineer Jscrambler obfuscation?
As the potential of ChatGPT (and of Generative AI in general) is unveiled, experts and developers keep asking questions and experimenting with the tool. Can it crack even the strongest protections...
June 13, 2023 | By Jscrambler | 6 min read
