Category: Client-Side Security

Generative AI revolution: controlling convenience with client-side protection and compliance

Is Generative AI (GenAI) a victim of its success? This consumer-friendly subset of AI has quickly become embedded in our daily lives. Amid this uptake, and subsequent expansion of the cyberattack surface, the GenAI revolution demands increased client-side protection and compliance to mitigate a common trend: cybercriminals’ determination to target successful new technologies that present fresh vulnerabilities.

What better way to define GenAI than to ask ChatGPT (a form of generative AI that helps with content creation and information retrieval) – the poster child for this disruptive technology – to do it for you? Here’s the answer: “GenAI, short for Generative Artificial Intelligence, refers to a category of artificial intelligence systems designed to generate new content. This content can include text, images, audio, and even code, based on patterns and data it has been trained on.”

The crucial fact ChatGPT forgot to mention is that these requests, which might take a human hour to complete, are performed in a matter of seconds – a supercharged convenience that’s prompted widespread and rapid adoption: 55% of organizations are in piloting or production mode with Generative AI, signaling a surge in GenAI integration.

Generative AI: The Benefits


Like any good technology, GenAI offers the ability to speed up jobs and processes that currently consume time and resources – and for businesses and consumers the benefits are compelling, including:

Businesses


Productivity

GenAI automates repetitive tasks such as data entry, report generation, and routine customer service, freeing employees to focus on more strategic activities. It can also analyze business processes and suggest improvements, enhancing efficiency and reducing costs.

Customer engagement

GenAI can process and analyze customer data in real-time to create personalized marketing campaigns, deepening engagement and conversion rates. AI-powered chatbots can handle inquiries and resolve issues efficiently around the clock.

Decision-making

GenAI can provide insights and forecasts that help businesses expedite and inform decision-making. It can identify potential risks and suggest mitigation strategies, helping to avoid costly mistakes.

Cost savings

GenAI helps businesses optimize resource utilization by automating tasks and improving processes, leading to significant cost savings. Automating routine and repetitive tasks can reduce the need for manual labor, lowering labor costs.


Consumers

Personalization

GenAI can provide tailored recommendations for products, services, and content based on individual preferences and behavior. AI-powered chatbots and virtual assistants can offer personalized interactions and support.

Efficiency

GenAI can automate routine tasks like scheduling, data entry, and email responses, saving consumers time and effort. It can also make research and decision-making faster and more efficient.

24/7 support

GenAI can provide round-the-clock assistance via tools like chatbots and voice bots, addressing queries and resolving issues promptly.

Financial management

GenAI can help users manage their finances, track spending, and plan budgets. It can also provide personalized investment advice and financial insights.


Generative AI: The Security Risks


The more businesses empower customers to leverage the benefits of GenAI by integrating it into applications and processes, the more client-side protection and compliance become a consideration amid the proliferation of cyber-attacks targeting it.
 

Like most new technologies that enhance consumer convenience online, GenAI has attracted close attention from cybercriminals. These nefarious groups and individuals are developing new tools and techniques, and tweaking existing ones, to target vulnerabilities on the client side, including:

Phishing

By weaponizing generative AI and the large language models (LLMs) that underpin them, cybercriminals can scale their phishing attacks with greater speed and complexity than ever before. Not only does this allow them to compromise more data; but it also helps them avoid detection more easily.

Cross-site Scripting (XSS)

Injecting malicious scripts into GenAI-powered web pages viewed by other users can lead to unauthorized actions performed on behalf of the user or theft of session tokens and cookies to gain unauthorized access to the system – compromising data security.

Session Hijacking

This can occur through methods like man-in-the-middle attacks (MitM) or cookie theft. MitM attacks occur when cybercriminals intercept and alter communication between the client and the GenAI service, leading to data tampering or eavesdropping on sensitive information.

Browser Fingerprinting

Collecting detailed information about a user’s specific browser and device configuration to track and profile them. This information can be used to target individuals with more precision in further attacks.

Malicious Plugins or Extensions

Exploiting browser plugins or extensions to manipulate or steal data processed by the GenAI applications. Malicious extensions can capture keystrokes, screen data, or modify the behavior of web applications.

GenAI and Client-side Protection

Against this backdrop of unauthorized access, data breaches, and manipulation of AI models, there’s a growing recognition of the need for client-side protection: 91% of organizations recognize they need to do more to reassure their customers that their data is being used only for intended and legitimate purposes in AI.

To achieve this, they must prioritize key cybersecurity factors: 

  1. Data privacy

GenAI systems typically rely on large datasets, bringing the privacy of client data into sharp focus for businesses. This includes implementing robust encryption, secure storage, and data anonymization techniques to protect sensitive customer information from unauthorized access and breaches.

  1. Security threats

As GenAI technologies evolve and become increasingly integrated into our daily lives, they become potential targets for cyberattacks. Ensuring strong cybersecurity measures, including regular vulnerability assessments and updates, is essential to protect against client-side attacks.

  1. User authentication

Strengthening user authentication mechanisms, such as multi-factor authentication (MFA) and biometric verification, helps ensure that only authorized users can access GenAI systems and the data they handle.

  1. Ethical use

Ensuring that GenAI systems are used morally correctly involves setting clear guidelines and monitoring for potential misuse like generating deepfakes, misinformation, or biased content.

GenAI and Client-side Compliance


There needs to be more than technical client-side protection measures. They must be augmented by regulatory compliance to foster trust in GenAI among users and stakeholders. By understanding the regulations that govern GenAI deployment and management, organizations can adopt a proactive approach to compliance.  

Data protection 

Organizations must comply with various regulations and standards related to data protection depending on their location, such as GDPR in the EU and UK, CCPA in California, and HIPAA across the US. This includes conducting regular audits, maintaining transparency about data usage, and ensuring that data processing practices align with legal requirements.

Industry standards

Adhering to industry-specific standards and best practices is critical. For example, in the healthcare sector, compliance with standards like HL7 and FHIR ensures the secure and standardized exchange of health information.

Transparency and accountability

Implementing transparent policies and procedures for the proper development, deployment, and use of GenAI technologies in line with regulations and standards is essential. Organizations should establish accountability frameworks to ensure all stakeholders, including developers, users, and regulators, understand how these systems work and can trust their outputs.

Bias and fairness 

Ensuring that GenAI systems are fair and unbiased is crucial to achieving compliance with ethical standards and regulations. This involves regularly testing and updating models to identify and mitigate biases that may arise from the training data or the algorithms themselves.

Comprehensive GenAI security and defense strategy


Client-side protection and regulatory compliance are key components of a comprehensive and proactive GenAI security strategy. Their value has been amplified and accelerated by the rapid evolution and adoption of this transformative technology.

Working in tandem, they create a safer, more reliable, and ethical environment for the development and deployment of GenAI systems. This synergy not only protects sensitive data and ensures legal adherence; it fosters user trust and promotes the ethical use of associated technologies.

Data Privacy in Financial Services: Why and How?

The evolution of the financial services industry has seen bricks replaced by clicks as our reliance on the internet becomes all-consuming. To keep pace with this shift online, the integration of digital technologies and data-driven solutions has become a strategic imperative for dynamic organizations in the sector.

In a bid to remain competitive, meet evolving customer expectations, and drive operational efficiency, traditional brick-and-mortar infrastructure has given way to online banking, mobile apps, and contactless payments – making digital data the lifeblood of the industry.

The provision of this online convenience comes with a huge responsibility for financial service providers: they must ensure the deluge of customer data they handle in the ordinary course of business is not misused or accessed without authorization.

Failure to do so, leading to the accidental or unlawful destruction, loss, alteration, or unauthorized disclosure of, or access to, personal data, can result in serious consequences – notably, reputational damage and financial penalties for non-compliance amid an increasingly stringent regulatory environment. 

Consequently, data privacy has been shoved to the top of the corporate agenda for firms in the sector. This touchstone of reputability provides consumers with the trust they crave when sharing their personal information. This data privacy guide will help develop your understanding of this essential discipline within the financial services industry.

Data privacy in financial services: what is it and what needs protecting?


According to IBM, “Data privacy, also called ‘information privacy’, is the principle that a person should have control over their personal data, including the ability to decide how organizations collect, store, and use their data.”

Data privacy within the financial services space refers to the protection of personally identifiable information (PII) from misuse or unauthorized access. PII in the context of the industry typically refers to any data that can be used to identify an individual in relation to their financial affairs. This includes:

  • Personal information: Full name, home address, and date of birth.

  • Contact Information: Phone numbers, email addresses, and sometimes social media handles.

  • Identification Numbers: National Insurance number (UK), Social Security Number (US), passport number, driver’s license number, and any other government-issued identification numbers.

  • Financial Information: Bank account numbers, credit/debit card numbers, account balances, transaction history, income details, and credit scores.

  • Authentication Data: Passwords, security questions/answers, PINs, and biometric data used for authentication purposes.

The inherent need for financial firms to gather, organize, and exchange everything from email addresses to credit card numbers creates a data economy. Embedding data privacy within this ecosystem requires proactive steps like obtaining user consent before processing data, protecting data from misuse, and enabling users to actively manage their data.

Five fundamental principles of data privacy


Organizations typically use data privacy frameworks to guide their strategy, including the NIST Privacy Framework and the Fair Information Practice Principles. If we distill them and the regulations that underpin them, five common principles appear that are used to inform data privacy policies, processes, and controls within financial services.

1. Access

Data subjects have a right to know what personal data an organization holds on them. They should be able to access their data on demand and update or amend it as required.

2. Transparency

Data subjects have a right to know who holds their personal data and what they do with it. Therefore, organizations should communicate what they are collecting and how they intend to use it. Once collected, organizations should keep them informed about data processing, including any changes to how data is used and any third parties the data is shared with. 

3. Consent

Data subjects should be able to provide organizations with consent for data storage, collection, sharing or processing whenever possible – and withdraw it at any time. If consent is not provided, organizations should have a compelling reason to keep or use the personal data, such as a public interest use or legal obligation. 

4. Quality

To avoid inaccuracies that lead to privacy violations, organizations should ensure the data they collect, and hold is accurate. For example, if a company holds an old address, it could send sensitive documents to the wrong party accidentally. 

5. Security

Organizations should implement processes and controls to protect the confidentiality and integrity of user data – from training employees around compliance and working with third parties with robust privacy controls to implementing technical controls like Identity and access management (IAM) solutions.

What regulations govern data privacy?

The regulatory screw has been tightened across the globe in a bid to protect the privacy of the digital data that underpins industries like financial services. Examples of robust regulations that have been implemented include the General Data Protection Regulation (GDPR) and the California Consumer Privacy Act (CCPA) – both of which came into effect in 2018.

GDPR

The GDPR is designed to give individuals more control over their data and harmonize data protection regulations across Europe. It imposes strict rules on how organizations collect, store, process, and transfer personal data. It also grants individuals various rights regarding their data, such as the right to access, rectification, erasure, and the right to be forgotten. 

GDPR applies to any organization that processes the personal data of individuals residing in the EU, regardless of where the organization is located. Penalties for non-compliance can be as high as €20m or 4% of annual global turnover, whichever is higher.

The UK GDPR is the UK’s post-Brexit version. It’s very similar to the EU GDPR, so organizations that comply with it are likely to comply with the UK version.

CCPA

The CCPA grants California residents various rights regarding their personal information held by businesses, including:

  • Right to know: Consumers have the right to request disclosure of what personal information is collected, used, shared, or sold by a business.

  • Right to delete: Consumers have the right to request the deletion of their personal information held by a business.

  • Right to opt-out: Consumers have the right to opt-out of the sale of their personal information. Businesses must provide a clear and conspicuous link on their website titled “Do Not Sell My Personal Information” to facilitate this opt-out.

  • Right to non-discrimination: Businesses are prohibited from discriminating against consumers who exercise their privacy rights under the CCPA, such as denying goods or services or charging different prices.

The CCPA applies to businesses that meet certain criteria, including those that do business in California, collect personal information of California residents, and meet specific revenue or data processing thresholds. How can financial service providers ensure data privacy?

The following steps can help organizations establish a robust data privacy program that meets compliance requirements and protects sensitive information.

Data inventory

They should start by understanding the data compliance regulations that are relevant to them. This generally depends on their industry and geographical location. An inventory should then be developed outlining the types of data the business acquires, handles, and retains, including how it’s obtained, where it’s stored, and who has access to it.

Access controls

Robust access controls – such as user authentication, role-based access, and the encryption of sensitive data – will ensure that only authorized personnel can access PPI. An up-to-date identity and access management program can enhance this.

Data storage

They should implement robust measures that ensure data is stored securely, both physically and digitally. This typically involves deploying encrypted storage solutions, firewalls, and access logs.

Compliance training

By educating staff about data compliance, they can make sure every level of the organization understands the regulations, the significance of data privacy, and their role in achieving it. Regular training sessions can help ensure everyone stays informed about this dynamic requirement. 

Data handling policies

By establishing transparent data handling policies and procedures throughout the organization everyone will understand the correct data management practices – from collection, use, and processing to transfer, disposal, and sharing.

Regular audits

Periodic audits will verify the effectiveness of data compliance measures and help identify potential vulnerabilities and areas that need improving.

Response plan

A well-defined response plan will empower the organization to respond proactively to a data incident. Knowing how to respond effectively and promptly will minimize damage and comply with the requirements of regulatory frameworks.

Data privacy: the future 


As the amount of data, handled by financial service providers, continues to grow exponentially amid consumer demand for online convenience, their responsibility to ensure the privacy of this data is evolving – from complying with new regulations to managing the proliferation of artificial intelligence technologies.

To maintain regulatory compliance, a robust security posture, and competitive advantage, they must adopt a proactive approach to data privacy that keeps pace with its rapid evolution by monitoring change and instilling the agility needed to adapt to it. 

Understanding Protected Routes in Next.js 14

An application has many sections to it. Certain parts of the application will be restricted only to authorized users or to users with special privileges and some will be public. Publicly available parts need not be validated but requests to authorized sections need to be validated.

In this tutorial, we’ll be learning about `middlewares` and how it helps to control access to different parts of the application.

Getting Started with Understanding Protected Routes in Next.js 14


We’ll be using Next.js 14 for this tutorial so please make sure you have Node.js 18 or later. From your terminal prompt type in the following command,

npx create-next-app@latest


As seen in the above command, we are using `create-next-app` to create our Next.js project. The above command prompts you to install the `create-next-app` package. Type in yes,

[email protected]
Ok to proceed? (y)


Once you type in `y` it installs the package. Next, it will ask a couple of questions related to your project. Type in the following responses:

√ What is your project named? ... next-protected
√ Would you like to use TypeScript? ... Yes
√ Would you like to use ESLint? ... No
√ Would you like to use Tailwind CSS? ... No
√ Would you like to use `src/` directory? ... Yes
√ Would you like to use App Router? (recommended) ... Yes
√ Would you like to customize the default import alias (@/*)? ... No

Once done you will have your Next.js 14 project created with some boilerplate code.


Navigate to the project directory and try to run the project,

cd next-protected
npm run dev


Navigate your browser to http://localhost:3000/ and you will have the application running.

Creating an API Route


Let’s start by creating an API route that returns some JSON data as a response. For creating an API route, navigate to your `src/app` folder and create an `api` folder which will contain the code for your API endpoints. Inside `api` create a folder called `photos` and inside `photos` create a file called `route.ts`.

Now this `route.ts` file serves as the root file for the API endpoints of `photos`. Inside the `route.ts` file let’s add a `GET` method which will handle the GET request to the `api/books/` endpoint.

const GET = async () => {
    const data = await fetch('https://jsonplaceholder.typicode.com/photos').then(res => res.json());
    return Response.json({"status":200, "data": data});
}
export {GET}


As seen in the above `GET` method, we are querying another external API using fetch and returning the response as result for `/api/books` GET request.

Save the above changes and restart the application.

npm run dev


Try hitting the endpoint `http://localhost:3000/api/books` either using POSTMAN client or simply in your web browser and it will return an API response.

The above endpoint is public and no matter whoever tries to access the above endpoint will get the request response.

Now let’s try to make the above API route protected.

Creating a Protected API Route


For protecting an API route or request, Next.js 14 provides `Middleware`. A Middleware is something that comes in between your request and before it hits the route.

From the official documentation,

“Middleware allows you to run code before a request is completed. Then, based on the incoming request, you can modify the response by rewriting, redirecting, modifying the request or response headers, or responding directly.”

For creating a middleware go to your `src` folder and create a file called `middleware.ts`. Inside the `middleware.ts` file create a method called `middleware` and export it.

import { NextRequest } from "next/server";

const middleware = (request : NextRequest) => {
    console.log('request is ', request);
}

export default middleware;

Save the above changes and try to hit the API endpoint `http://localhost:3000/api/books`. Once the API returns the response, check the project terminal for the console log from the middleware function.

As seen from the logs, before hitting the endpoint the request passed through the middleware function. So let’s say we are only allowing requests to the endpoint with a particular API key in headers. You can validate it in the middleware and reject invalid requests.

typescript
import { NextRequest, NextResponse } from "next/server";

const middleware = (request : NextRequest) => {
    const {headers} = request;
    if(headers.get('x-api-key') !== "zoomba"){
        return Response.json(null,{status:400, statusText:'Unauthorized request'});
    }
}

export default middleware;


In the above code, we are checking for `headers` from the request. Inside the headers we are checking for `x-api-key` which must be passed with a value `zoomba` for it to be a valid request. In case the request doesn’t have a valid `x-api-key` it will return 400 responses. This way the API route is protected against invalid requests.

Save the above changes and try to make an API request to the endpoint `http://localhost:3000/api/books`. 

If you try to make a GET request from the browser to `http://localhost:3000/api/books` you will get `null` response since the required header `x-api-key` is not being passed.

status-400-bad-request-example

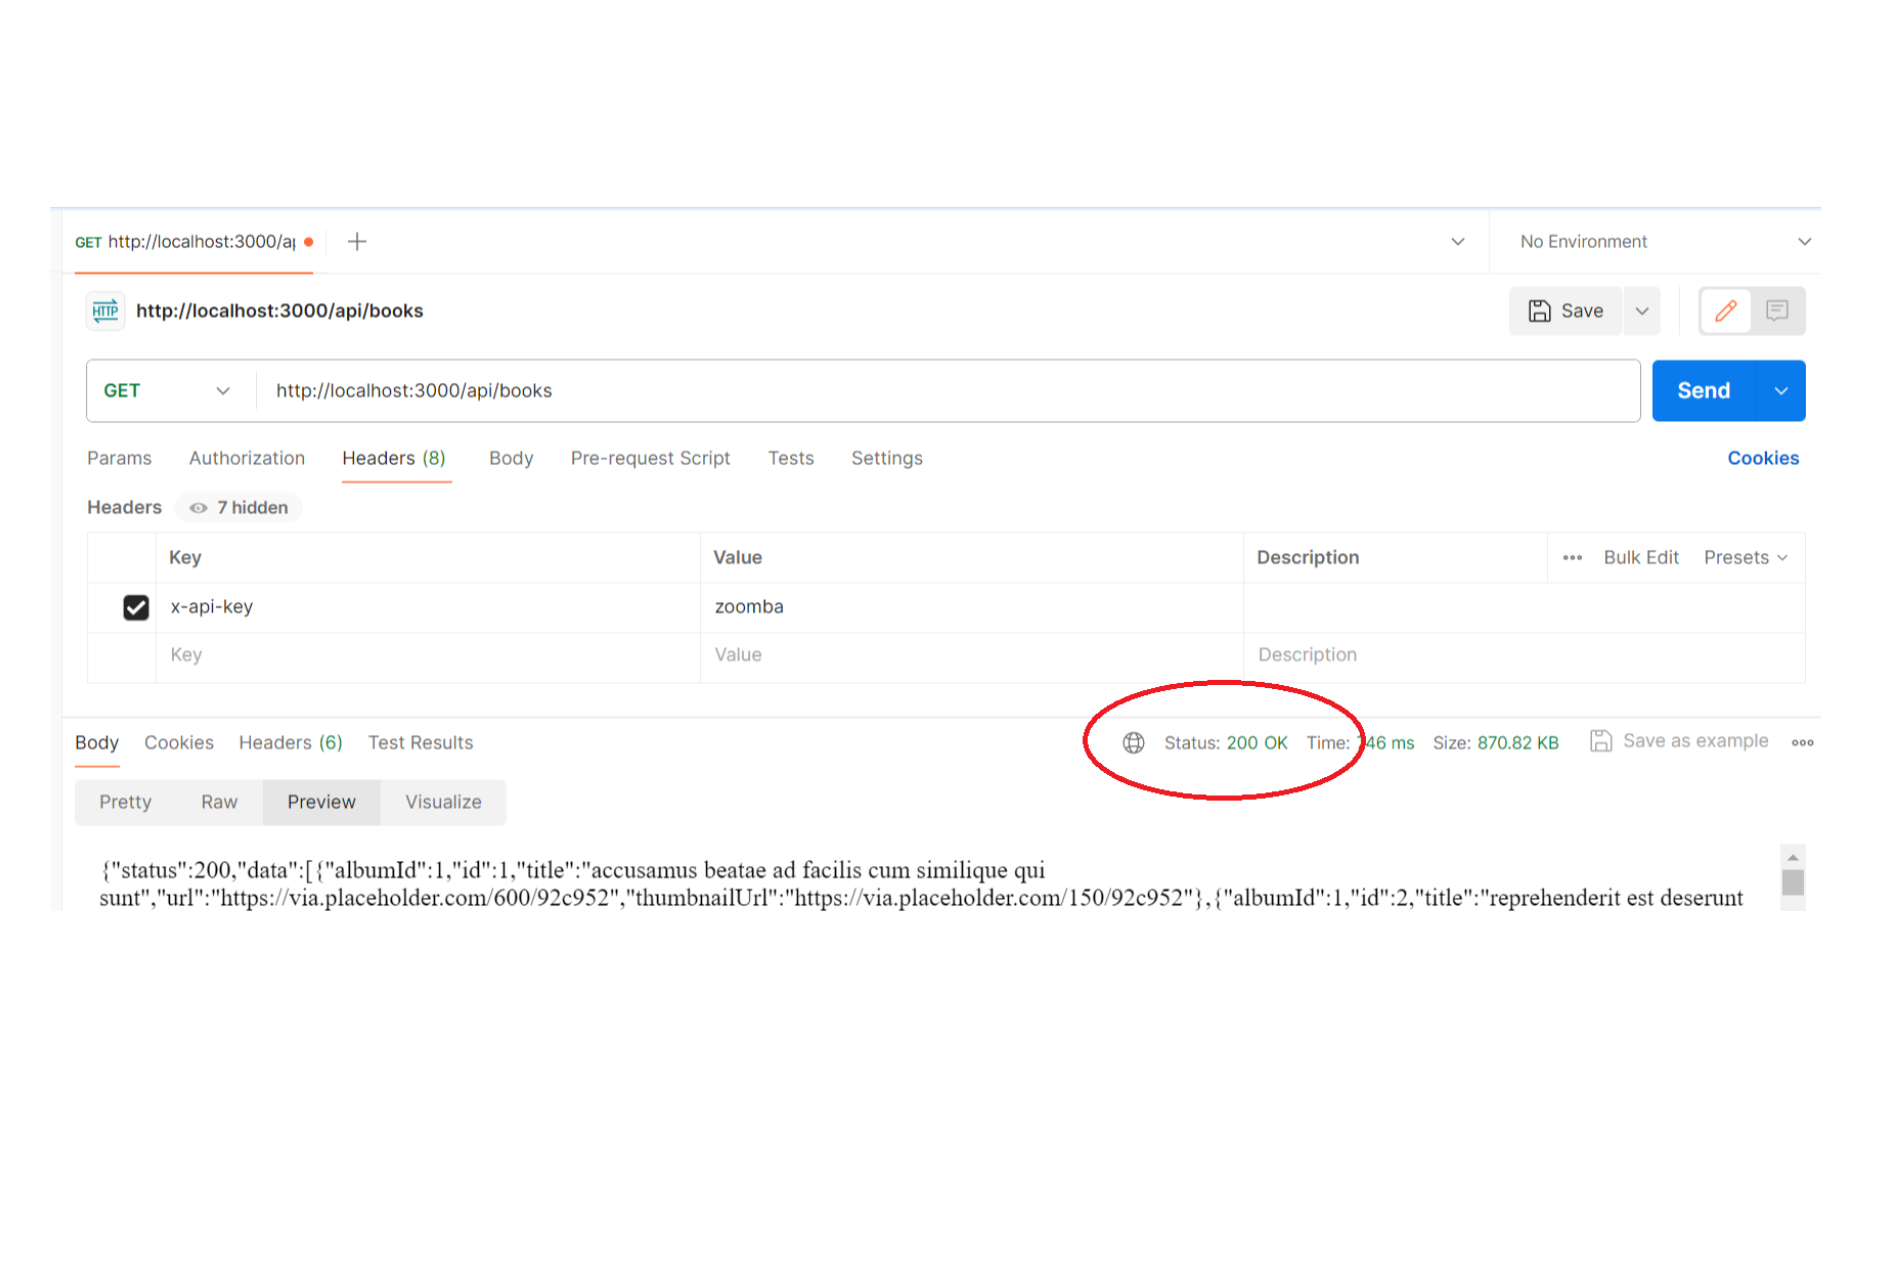
Next, let’s try to make a GET request to the endpoint with the required header `x-api-key`. 

status-200-ok-example

I’m using a POSTMAN client for testing the API endpoint, you can use the same or any other.

Note: The `x-api-key` being used is a hard-coded one. It’s just for this tutorial. You can use a dynamic encrypted string that can be encrypted on the client side and decrypted on the server side to make sure it’s authentic.

Next up, let’s try adding Middleware logic to Next.js pages.

Adding Middleware to Page


Some pages might not be available to all users. And we can handle page-level restrictions too in the `middleware.ts` file.

Try to navigate to http://localhost:3000/ and the application will return `null`. It’s because we have added a generic restriction to the middleware logic.

if(headers.get('x-api-key') !== "zoomba")


We are checking for `x-api-key` in all requests in our middleware. Let’s modify it a bit to check for only `/api/`.

typescript

const middleware = (request : NextRequest) => {
    const {headers, nextUrl : {pathname}} = request;
    if(pathname.startsWith('/api/') && headers.get('x-api-key') !== "zoomba"){
        return Response.json(null,{status:400, statusText:'Unauthorized request'});
    }
}

By checking if the request pathname starts with `/api/` we can distinguish between API and page requests.

Save the changes and now you will be able to render the application page. 

This way, there is no validation for pages. Let’s add one that checks for a session cookie if the user tries to visit the page.

typescript
const middleware = (request : NextRequest) => {
    const {headers, nextUrl : {pathname}, cookies} = request;
    console.log('cookies ', pathname);
    if(pathname.startsWith('/api/') && headers.get('x-api-key') !== "zoomba"){
        return Response.json(null,{status:400, statusText:'Unauthorized request'});
    }

    if(!cookies.get('session')?.value){
        return Response.json('Access denied',{status:400, statusText:'Access denied!!'});
    }
}

Save the changes and try reloading the application and you’ll get `Access denied`, since the `session` cookie is not found.

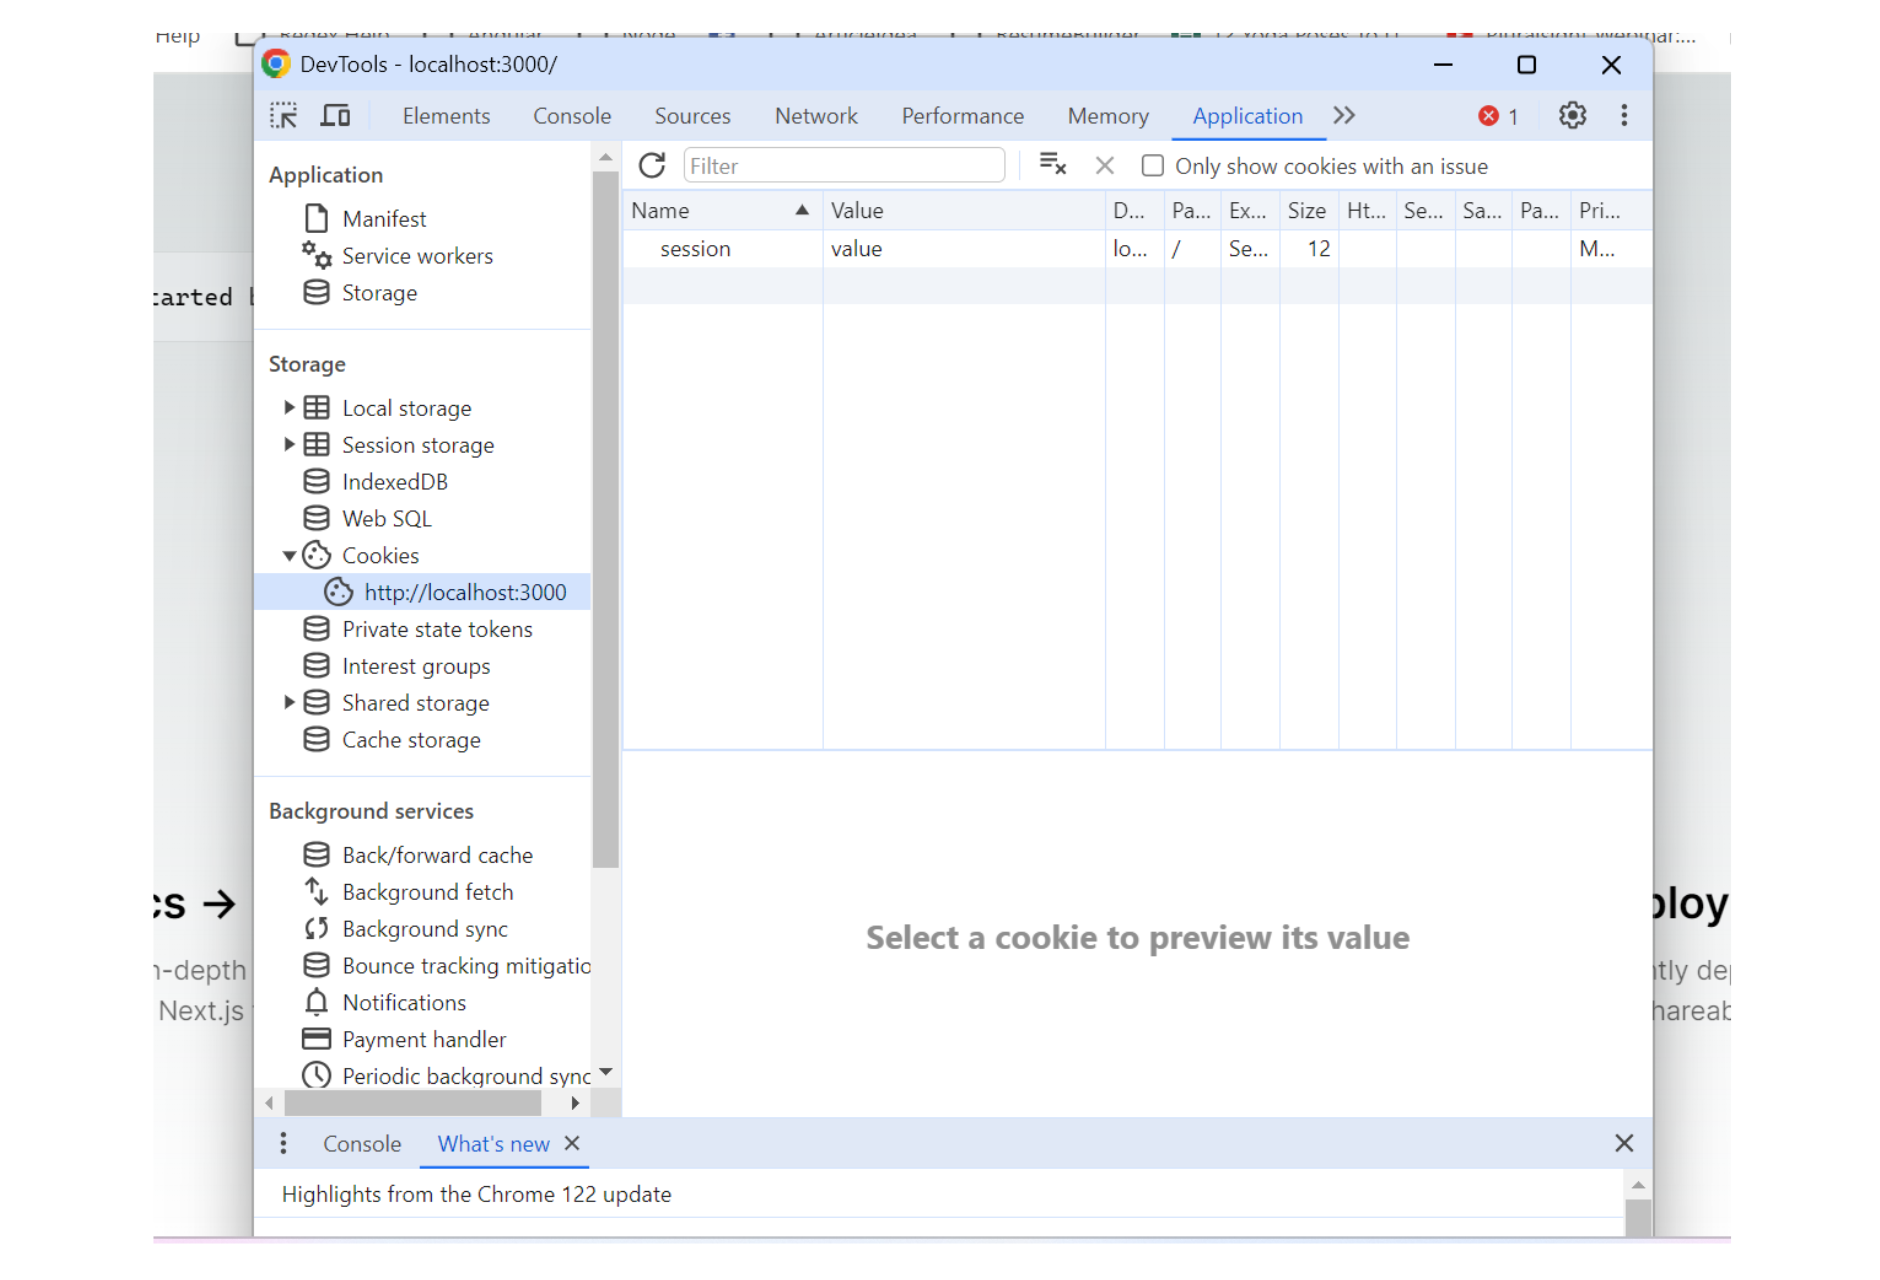
Let’s add a cookie to the application. For that go to your application tab in the developer console. From the left side go to storage, cookie, and click on the site URL. There you can add cookies to the application.

select-a-cookie-to-preview-its-value

Now try refreshing the application and the page will appear since the `session` cookie is present. So this way you can add the middleware logic to control access to pages and API endpoints.

Wrapping it up

In this tutorial, you learned about protected routes in Next.js. You learned how to protect API routes and pages using Middleware. This helps in protecting your application data from unwanted access and data breaches.

Reflecting on the CrowdStrike Incident: It’s Not Them, It’s Us

This article was originally published on LinkedIn, on July 20th 2024. It’s been updated and reposted here, having incorporated information from the RCA report that was released by CrowdStrike.

The now infamous CrowdStrike incident was accidental rather than an intentional attack. A misconstructed “content” update was distributed, automatically updating thousands of Windows servers and computers with CrowdStrike’s Falcon sensor installed. The situation has since been resolved, as 99% of all servers are back online, but it’s important to reflect on the incident and understand what it means. A lot of the discussion is focusing on the vendor angle, and what they could have done to prevent this. I believe it’s equally important to reflect on what companies could’ve done better.

What caused the CrowdStrike incident?

Falcon hooks into the Microsoft Windows OS as a Windows kernel process, providing it with high privileges to monitor system operations in real-time. However, a logic flaw in Falcon sensor version 7.11 later caused it to crash. This deep integration with the Windows kernel led to a system crash and a Blue Screen of Death (BSOD), affecting the overall stability of the Windows system, and the consequences we witnessed this past July.

What can be done to minimize the risks of these outages?

Anyone in the software development business knows that, regardless of how good your testing and QA processes are, sooner or later you’ll ship a bug to production. It’s a risk that everyone – developers and users alike – accepts as intrinsic to a world where software development is prone to human error. That being said, there’s a lot that the software manufacturer could have done to minimize the risk of this happening. 

Some examples include:

Employ file integrity validations

Create file checksums to detect any corruption potentially introduced between the moment they were created and the moment they are about to be used. Formalize a structure for updating files or ‘content’  that can be validated before usage. It is now known that “the sensor expected 20 input fields, while the update provided 21 input fields”. Detecting this mismatch before applying the patch would’ve saved the day. Another approach could focus on code signing of updates during testing. Anything after that tampers or corrupts the update, would not have the key to generate a valid signature. The sensor must validate this signature, otherwise, the update should be rejected;

Proper testing before shipping

Installing the update on test machines before shipping. CrowdStrike might have done this, but the update might have been corrupted after testing and before being installed. Their RCA report doesn’t mention the corrupted update file, so we have to assume that it was a misconstructed content update, and a failure to validate the update before applying it. CrowdStrike’s official RCA does not clarify exactly what their testing procedures are. 

Staged rollout updates

Before issuing an update to all the customers, roll them a tiny fraction to confirm that they landed well. This can limit the impact of any problem;

Reboot loop protection

A simple technique implemented by kernel-level drivers that when they boot, it first detects if they crashed and, if so, avoids running fully again to prevent reboot loops;

Move the agent into user space

The BSOD problem is caused by a crash in kernel-space code. Moving this to user space would solve the BSOD problem, as the program would just crash without taking the whole system with it;

Move to a memory-safe language

Rust would be most people’s top preference here.

Is it fair to say that companies that use CrowdStrike could’ve done better?

It’s difficult to say what the right answer is. Let’s think about it carefully. When a company decides to install software like CrowdStrike on their servers, it means that they trust this company not to do anything malicious. After all, it’s a $86B valued company. Why would it jeopardize their reputation? 

I bet you are already spotting the fallacy here. The biggest problem isn’t the vendor’s desires or motivations, but rather unintentional failures, such as failure to properly manage the integrity of updates or to validate them – or being compromised by a threat actor. These issues, combined with the trust that companies are putting on vendors, can lead to significant damages.

Should we trust the vendors that we use blindly? Auto-updates, especially those related to security, are definitely a trend. Is this the right approach? I believe it is. Auto-updates offer more benefits than risks, and the problem is not that they can fail us. The problem is that we don’t always consider updates to the software we depend on as part of our productive system. If we do, then we must ensure updates don’t break our services. That is also valid for security testing. We should run static analysis, dynamic analysis, and other types of security checks even if the only change is a patch to a third-party dependency.

We can never be sure that we’ll be able to catch every issue before shipping. Therefore, we need to assume components that we use might cause dependent services to become unavailable. IT managers know how to plan for business continuity, often by having secondary systems in place for situations like this. But they know better not to have exact copies of the system. At the end of the day, this is also a business decision, because the cost versus the risk of a catastrophic failure could result in the company just accepting the risk and the impact if it happens.

The scale of this incident made me think about what this means for cyber resilience.

In light of the world’s current economic struggles, is there a trend towards “monoculturization” in cyber defense? If there is, that could mean that companies are increasingly relying on a single vendor (or fewer vendors) to defend their assets. It doesn’t help that we have been seeing a lot of consolidation in the cybersecurity sector, with increased M&A activity in response to the economic downturn.

Lack of diversity doesn’t cause the problems, but it makes the consequences harsher when they happen. It arguably attracts more threat actors, as they prefer focusing on more ubiquitous systems that offer them more bang for the buck.

So here we are blaming the vendor when we have so many things in our control that would have helped:

  1. Introduce redundancy (with diversity) to be more resilient to failures and impose a much higher cost to attackers, who then have to defeat multiple systems to succeed.

  2. Treat the supply chain as part of our application – if we are applying a patch on a component our production system depends on, then we should test it as thoroughly as we test any other app we develop and deploy – we should patch a staging environment first. If the service passes the tests, then we apply the patch to the production environment

  3. A “content update” is still a production update – some people pointed out that it wasn’t a driver update but just a ‘content update.’ However, there’s a possibility that a content update, or any type of update, could trigger the existing driver in an unexpected way, potentially causing a catastrophic failure. Therefore, any update should be treated as a production change that requires thorough testing (including security testing).

  4. Isolate components that we use so that in the event of failure, they don’t compromise the whole system. In the case of CrowdStrike, this is easier said than done, as it is deployed to monitor every system. However, the principle still stands for other components that might fail.

  5. Avoid “monoculturization” inside our organization. Ensure that in our threat model, we consider every dependency our production systems have, which can be compromised or become unavailable. How should we address it?

As lawsuits start to unfold, and while we should demand accountability from CrowdStrike, this incident should also serve as a warning that we shouldn’t see our supply chain third-party components as another company’s problem. We should plan for failure in these components the same way we plan for failure in the components we develop. It’s not about dismissing CrowdStrike’s responsibility. It’s about admitting that there are things that we can control and focusing on that.

So, it’s not them, it’s us.

Jscrambler Introduces the PCI DSS Quick Start Program

As the deadline for PCI DSS v4 compliance is approaching, companies that rely on online payment pages to bring in revenue start to feel the pressure of finding a solution quickly and fulfilling compliance requirements 6.4.3 and 11.6.1 without expending internal resources

With simplicity and efficiency in mind, Jscrambler developed a PCI DSS Quick Program aimed at removing obstacles to PCI DSS compliance for Merchants and removing the stress of finding an appropriate solution that is reliable and cost-effective. The changes in version 4.0.1 of the Standard only confirmed the necessity of keeping a close eye on the vendor inventory and having an alert mechanism in place for monitoring changes. 

5 Areas of Focus to Accelerate Efficient Compliance

The PCI DSS Quick Start Program consists of the following areas that ensure fast onboarding and continuous compliance. 

Payment Page Inventory Report (Prepare)

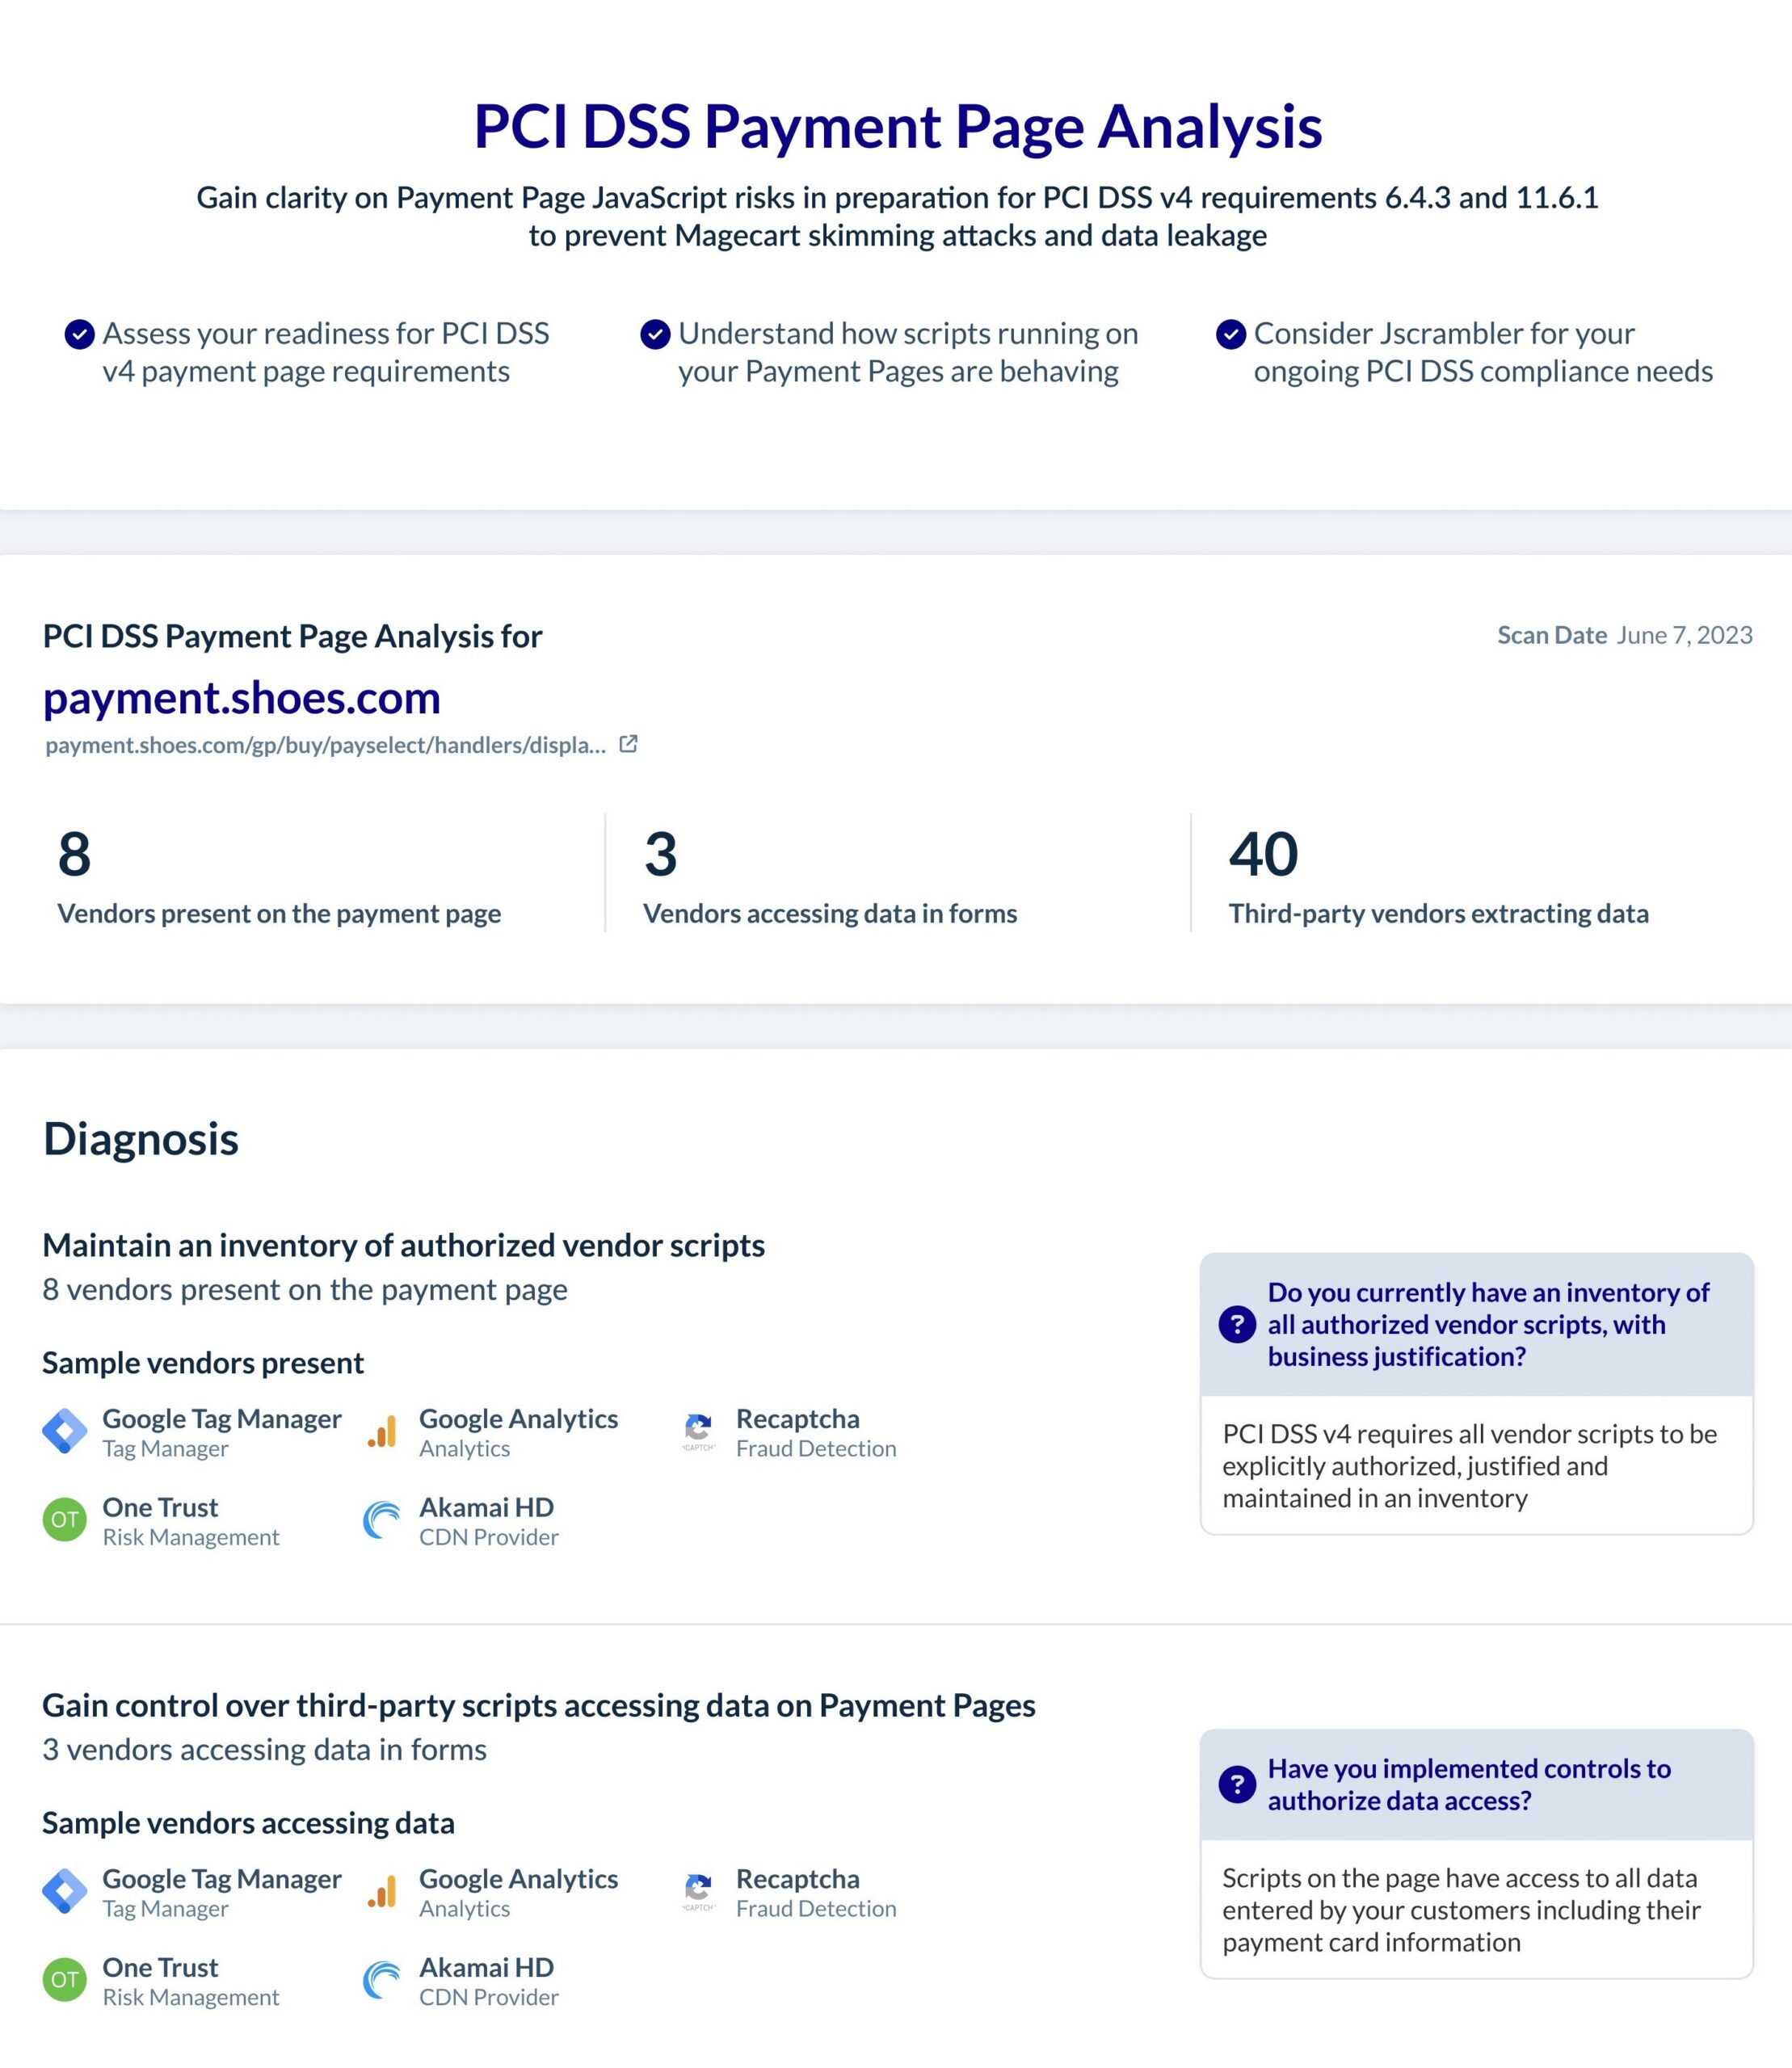
One of the core parts of the new requirements is keeping a vendor inventory: “An inventory of all scripts is maintained with written business or technical justification as to why each is necessary.” To help merchants prepare and gain visibility of vendors present on their payment pages, Jscrambler offers a free Payment Page Analysis Report. It is a one-time upfront analysis of your payment page inventorying every script present, while also detailing which scripts are accessing sensitive data and exfiltrating data to external IP addresses, domains, and vendor sites. 


Every report is delivered within 48 hours of the request to help prepare for ongoing compliance. 

This is designed as the first step as there is no commitment and no contract is required. Anyone can benefit from this Jscrambler tool. 

pci-dss-payment-page-analysis-magecart-skimming-attacks-data-leakageThis is an example report that gives an overview of vendors present on the payment page with more details in the Diagnosis section.


Unified Hybrid Architecture (Deploy)

After clarifying which vendors are present on your website, Jscrambler facilitates a fast onboarding process and analysis of your payment pages by giving you the flexibility to start with an agentless deployment, accelerating time-to-value and compliance. Jscrambler’s WPI PCI DSS Hybrid Architecture enables organizations of any size or complexity to utilize both Agentless Monitoring and Agent-Based Protection for enhanced security and compliance.

All you need to start with Agentless is to provide your payment page URLs and recurring payment page analysis is ready to be activated without any configuration to your website. 

This is a perfect solution for companies that don’t have the luxury of a long vendor evaluation process and who are selecting a comprehensive client-side protection and compliance solution before satisfying the basic PCI DSS v4 compliance requirements. It is also something that doesn’t require any manual effort from your team.

Automated Payment Page Compliance (Comply) 

Here’s how the automated recurring payment page monitoring will work to fulfill the compliance requirements. The payment page analysis will be executed either 24/7 or every seven days to meet the recurrence requirements outlined by PCI DSS. The analysis results include the inventory, authorization, detection, monitoring, and alerting needed to meet PCI DSS requirements 6.4.3 and 11.6.1. 

Requirement 6.4.3 Based on Behavior

PCI DSS v4 Requirement 6.4.3 is designed to minimize the attack surface and manage all payment page scripts that are loaded and executed in the consumer’s browser.

Jscrambler provides a solution for PCI DSS v4.0 Requirement 6.4.3 by ensuring active management of JavaScript on payment pages:

  • Script Inventory Maintenance

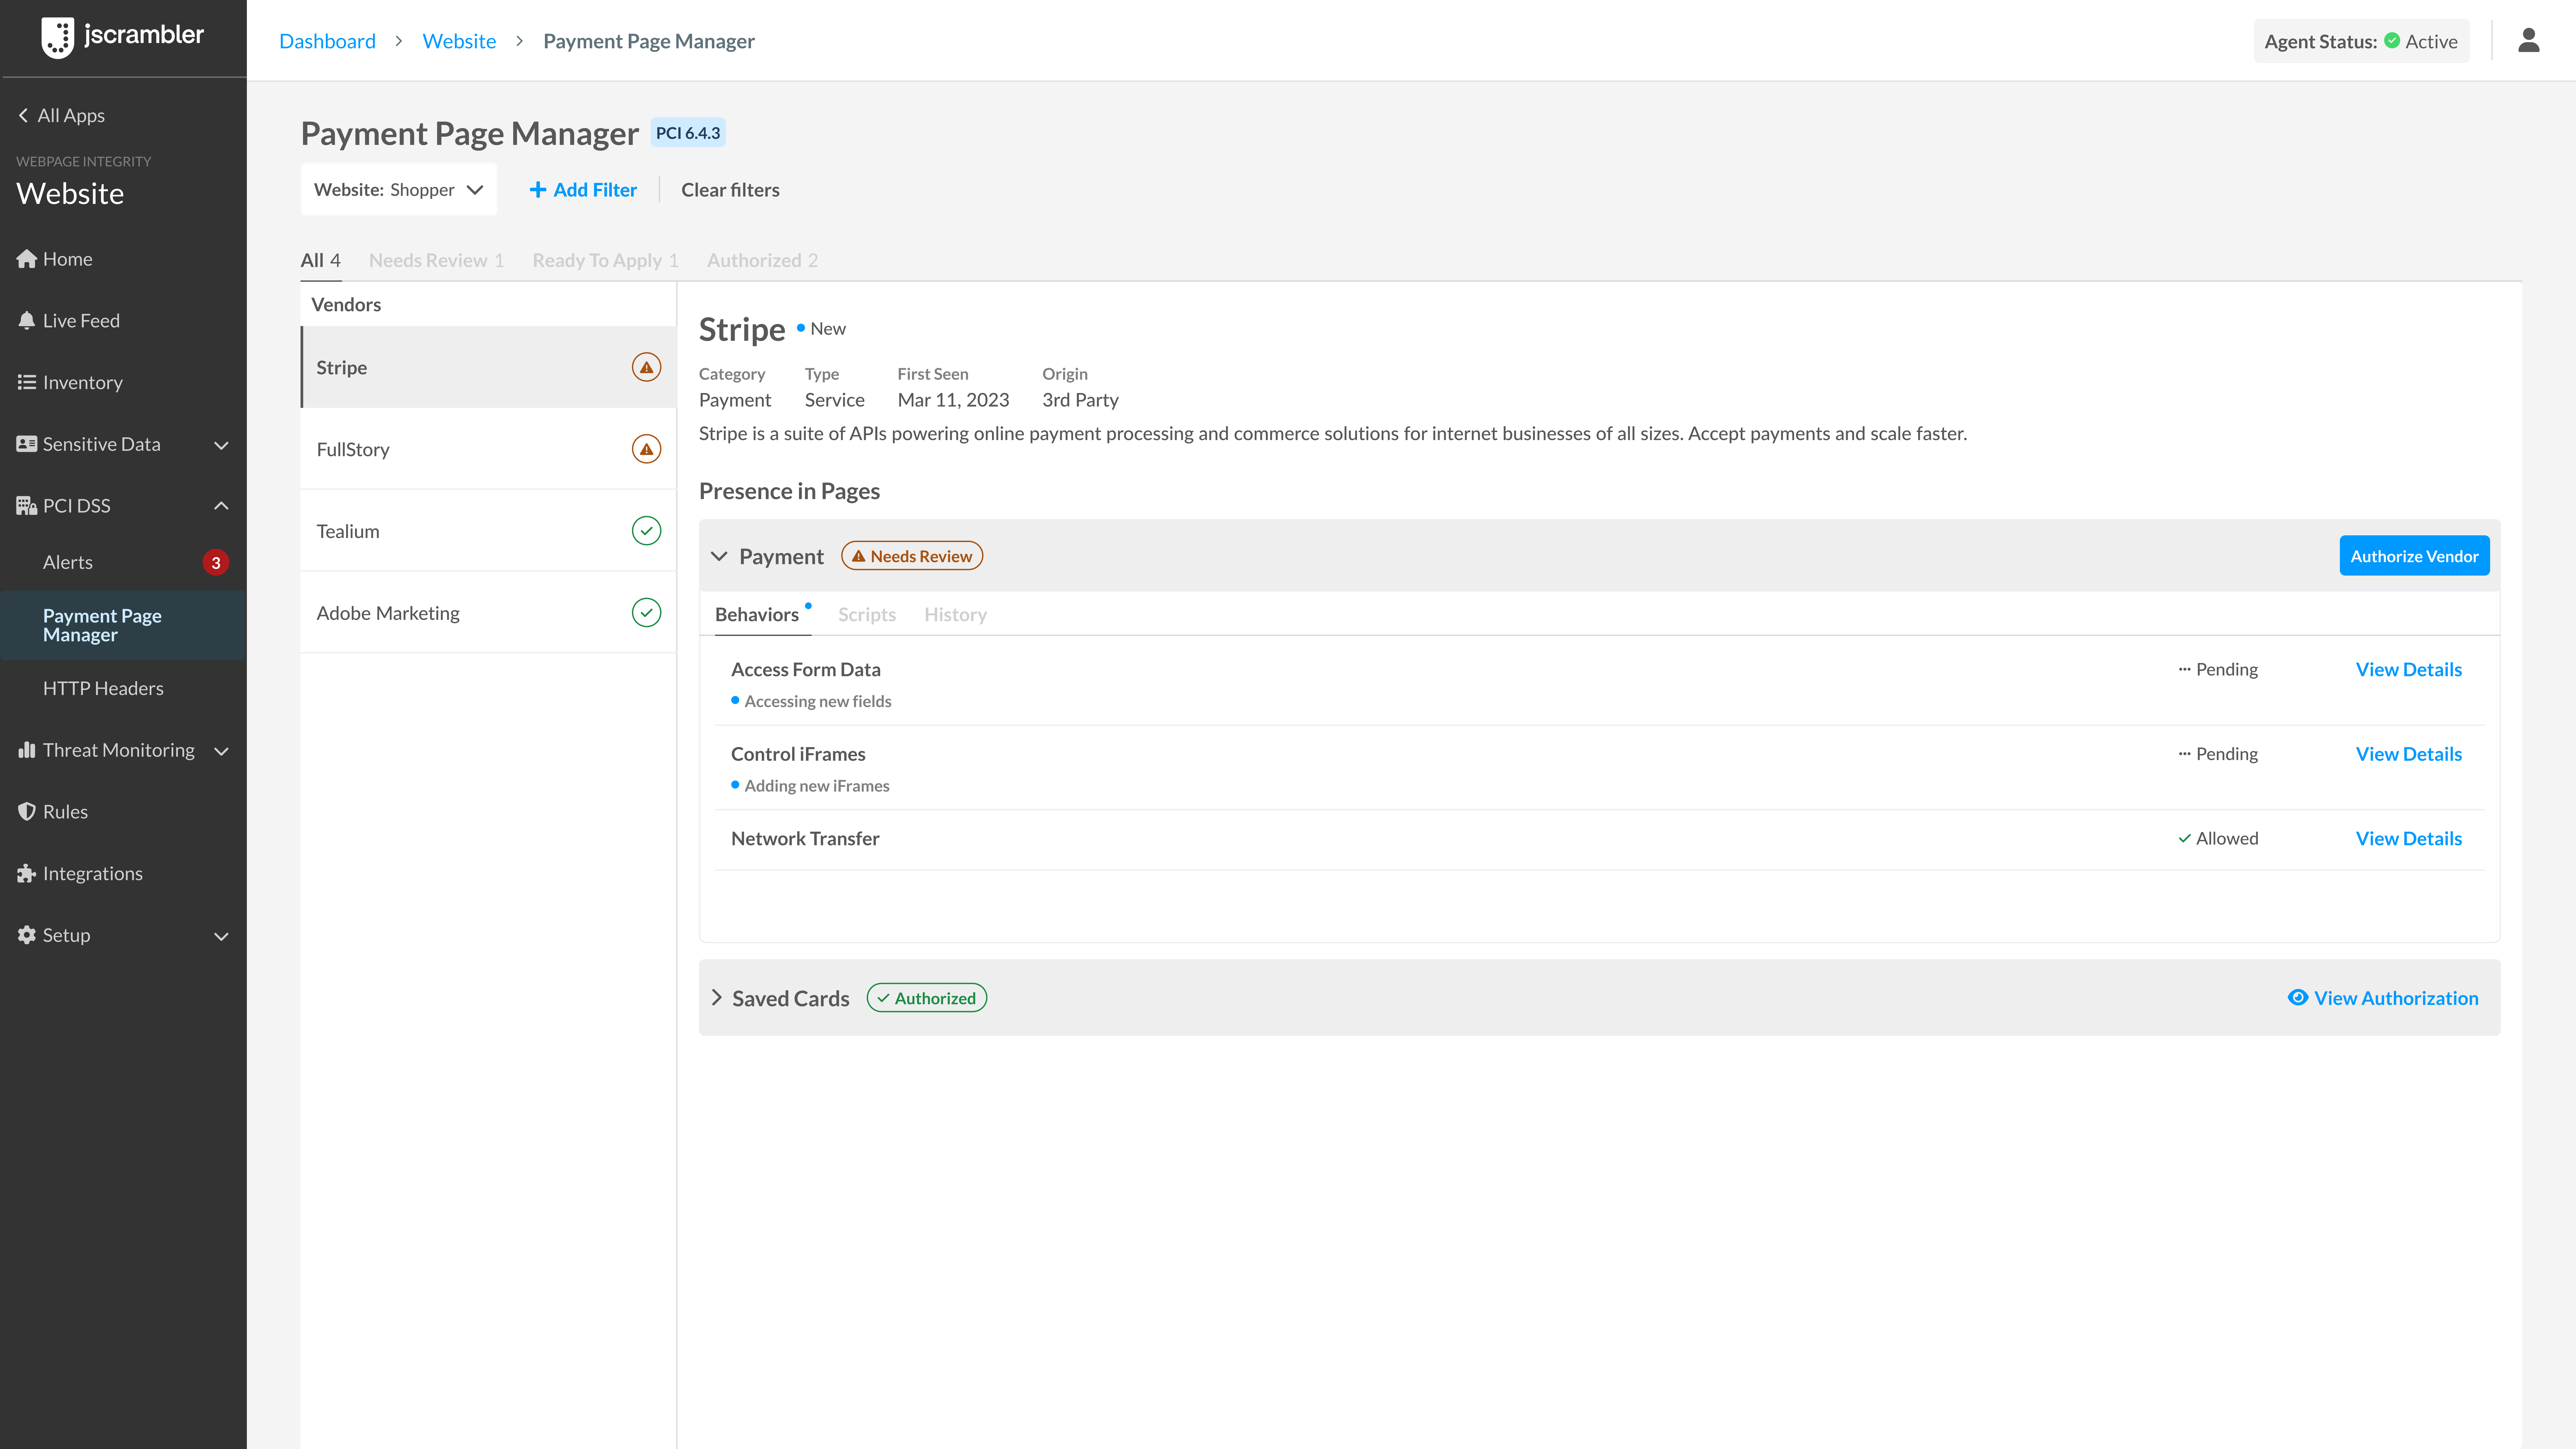
Jscrambler maintains a real-time inventory of all scripts running on payment pages, along with justifications for their necessity and compliance status, helping organizations to keep track of and justify the use of each script as required by PCI DSS v4.

  • Script Authorization

Jscrambler implements methods to confirm each script is authorized, aligning with the requirement to verify script legitimacy. Jscrambler also blocks unauthorized scripts and malicious behaviors. 

  • Script Integrity Assurance

The integrity of each script is maintained through Jscrambler’s solutions, ensuring that scripts are not tampered with and remain secure. Jscrambler provides validation of the integrity of the scripts with tamper detection mechanisms and alerts in case of unauthorized modification of the contents of the payment page. 

Requirement 11.6.1 Header and Integrity Compromise Detection

Jscrambler addresses PCI DSS v4 Requirement 11.6.1 by deploying a mechanism on payment pages that detects and alerts on integrity changes or tampering:

  • HTTP Header Modification Alerts

Jscrambler sends alerts on unauthorized modifications to HTTP headers, ensuring data transmission security.

  • Content Integrity Monitoring

Jscrambler monitors the content of payment pages as received by the consumer’s browser, alerting to any unauthorized modifications, thereby preserving the integrity of the payment process.

  • Configuration for Evaluation

The mechanism is configured to evaluate received HTTP headers and payment pages, functioning in real time and on a session-by-session basis to ensure continuous protection and compliance with PCI DSS v4.

  • Configurable Alerting

Alerts can be configured to be sent automatically by email, through the SIEM dashboard or via a dedicated Slack channel. 


pci-6.4.3.-payment-page-manager-jscrambler-dashboard


QSA Payment Page Inventory Tool (Verify)

The easier it is for QSAs to verify compliance, the faster the PCI process will be completed for Merchants. Jscrambler offers a free Payment Page Inventory Report to a Merchant’s QSA. The report includes an analysis of merchant payment page script inventory, authorization, and risk level. This is available directly to your QSAs to accelerate PCI DSS compliance verification.

In addition, our QSA Alliance Program is designed to provide QSA professionals with up-to-date PCI DSS enablement, marketing and event support, QSA tooling, and expert PCI DSS insights. This is all to ensure that there is no misunderstanding about how PCI DSS v4 compliance can be achieved technically and what solutions in the market today fully satisfy the requirements 6.4.3 and 11.6.1.

Jscrambler has been working jointly with a number of large QSAs, including Coalfire and Integrity360 among others, providing education on PCI DSS compliance topics through webinars and virtual summits. 

Delegated Compliance  (Manage)

Jscrambler also simplifies the entire PCI DSS payment page analysis process by offloading manual script authorization from your internal business stakeholders. Jscrambler works with your team to establish agreed-upon authorization policies enabling expedited authorization review and approval. This significantly cuts back on hours spent each month by internal resources on script approval and compliance management.  

Jscrambler is a PCI SSC Principal Participating Organization and a member of the PCI SSC Board of Advisors. With over a decade of experience protecting JavaScript and providing comprehensive client-side protection, active participation in the PCI DSS community has greatly enhanced the expertise needed to support Merchants in their PCI DSS journey. 

Benefits of the Quick Start Program

Streamlined Management

The Jcsrambler product is designed to streamline script authorization management. There are fewer approvals due to Vendor Service grouping. Moreover, you only approve behaviors, not individual scripts, because it’s very common for scripts to change and for vendor service to rely on tens or hundreds of different pieces of JavaScript. So you’re doing all those in one pass.

Flexibility with Hybrid Architecture

With the Jscrambler Hybrid Architecture, you have a lot of flexibility available. For example, if you acquire another company, or another brand, and you need to quickly bring their payment pages into compliance, you can use Agentless Monitoring to have them being monitored and under compliance close to the same day. All can be done within a few hours without having to go through change management because you’re not affecting the website itself.

Once you identify the sections of the business that might be more or less dangerous, and might have more or less risk, that’s where you might look to include the Agent so that you can have direct control over those particular pages or experiences.

Proactive Control & Data Leakage Prevention

Proactive control and prevention allow you to set up rules ahead of time and identify those third-party vendors that should always have access to cardholder data while blocking everyone else. For example, if Strike is your payment processor or PayPal, you allow these vendors to handle cardholder data. Other vendor services will not have access to cardholder data on payment pages. The Jcrambler solution will take care of all that automatically on the client side.

Simplified Workflows with Delegated Compliance

You can use Jscrambler to delegate certain compliance tasks over if your organization is either small or just doesn’t have a lot of experience with JavaScript or wants another helping hand. You can give a lot of the approval tasks over to the Jscrambler team where we can go in and actually do certain approvals for you.

PCI DSS Expertise

The Webpage Integrity (WPI) product has been in the market for 5 years. The anti-skimming capabilities of WPI were developed long before the PCI DSS v4.The Jscrambler WPI PCI module is designed with input from the industry and QSA partners. It has a purpose-built user interface and it’s easy to use the solution and manage your workflows.

Key Takeaways


Protecting your payment page in accordance with PCI DSS v4 is crucial to safeguard sensitive customer information and reduce the risk of data breaches, and complying now ensures that your business remains secure and avoids potential fines and reputational damage. Jscrambler has developed a Quick Start Program to help you: 

  • Fully comply with PCI DSS requirements 6.4.3 and 11.6.1.

  • Establish trust with your QSA advising and verifying payment pages. 

  • Avoid stressful vendor evaluation processes and last-minute urgent fixes via smooth onboarding and deployment with Jscrambler.

  • Get an opportunity to delegate all the strenuous authorization work to Jscrambler in 2025 after the Standard implementation deadline. 

  • Rely on Jscrambler as PCI DSS experts capable of interpreting the requirements thanks to the close collaboration with PCI SSC’s representatives and authors of the PCI DSS version 4 requirements.

If you’d like to inquire about the Program, contact us.

BaaS tools: Top Tools to Use for your Backend Projects

In software development, producing powerful and feature-rich apps requires a well-structured backend capable of handling data storage, user authentication, APIs, and more. Backend-as-a-service (BaaS) tools come into play here, revolutionizing how developers build applications by delivering pre-built backend solutions. 

The primary goal of this article is to provide developers with an overview of the top Backend-as-a-Service (BaaS) technologies available for their projects. By the end of this article, readers should have a solid understanding of the advantages and capabilities offered by these tools, enabling them to choose the most suitable BaaS solution that aligns with their project’s scope, requirements, and long-term objectives.

What is a BaaS tool?

The backend-as-a-service tool simplifies and automates the backend development process. It cuts out the repetitive process of building mobile or web applications. The BaaS tool allows developers to focus on building the frontend application while it handles the backend services. 

BaaS providers support different applications, such as mobile apps, web apps, and IoT devices. They simplify backend development by managing all necessary backend functionalities, thereby accelerating development, facilitating learning of new technologies, and easing the onboarding process for novice developers.
Why Is the BaaS Tool Important?

the-importance-of-BaaS-tool

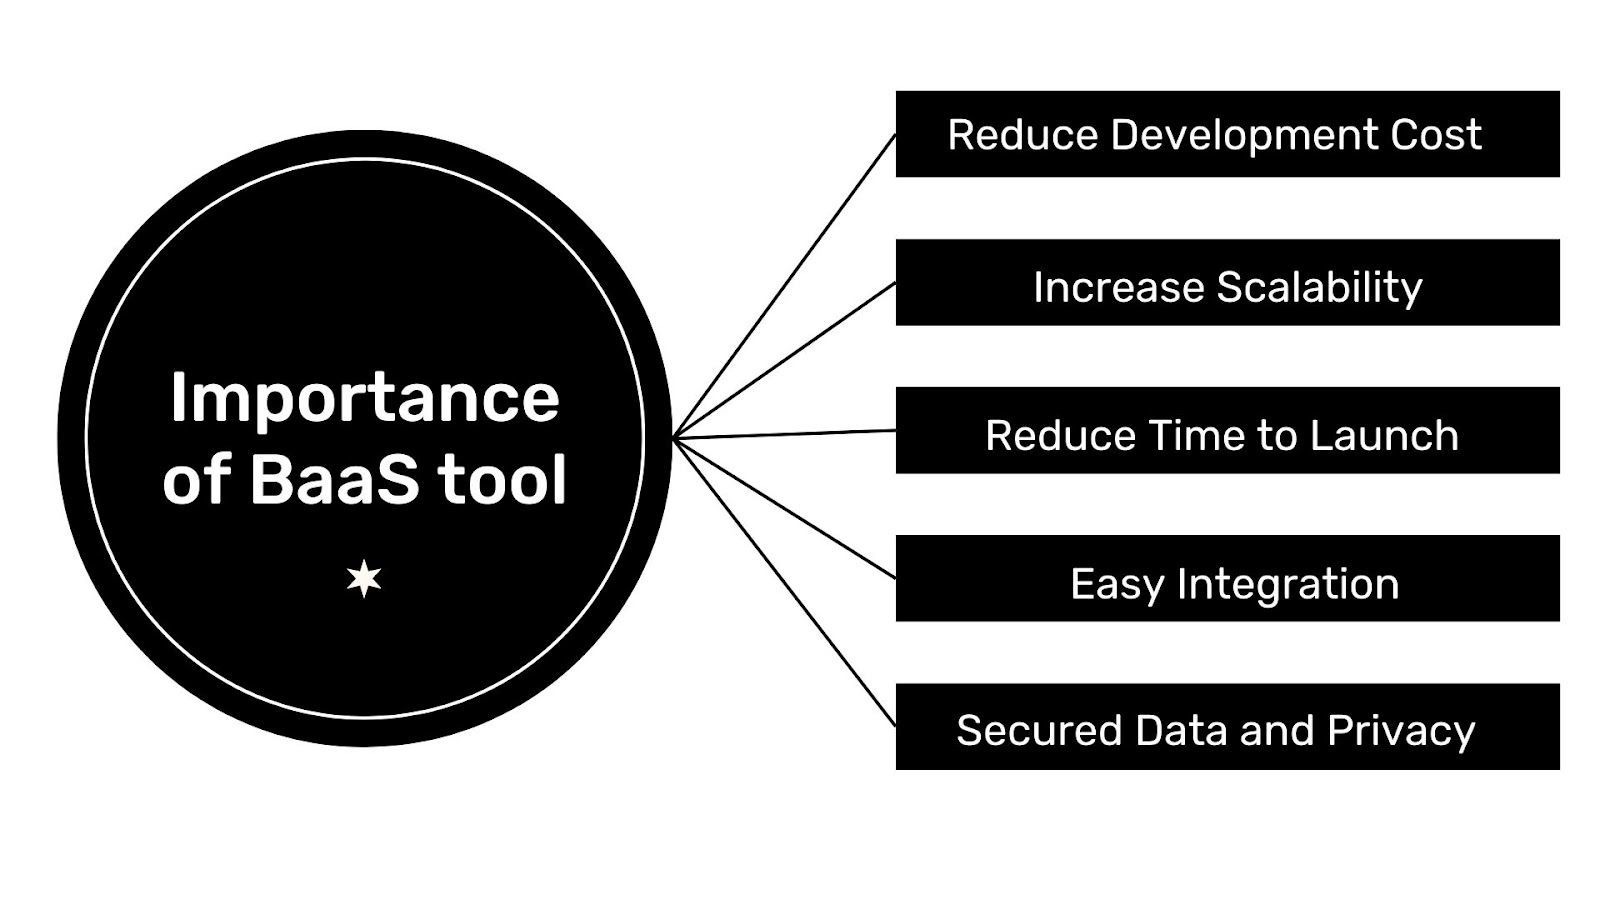
BaaS tool provides built-in tools to help you create backend code quickly. Utilizing its pre-built capabilities, such as expandable databases, APIs, cloud code functions, seamless social media integrations, file storage, and push notifications, all of these features can effortlessly accelerate your application’s development process. The benefits don’t end there using a BaaS tool means you can:

  • Reduce Development Cost: Using a BaaS tool saves costs by streamlining your app to include only essential resources and services; this will help eliminate those features and third-party tools you don’t need. Aside from that, it removes the cost of building your backend from scratch. 

  • Increase Scalability: The BaaS platform provides scalability features that ensure your application can handle expansion and increased demand without jeopardizing its performance or dependability.

  • Reduced Time to Launch: BaaS provides pre-built features and functions to speed up development and reduce product time launch. 

  • Easy Integration: BaaS solutions provide seamless integration, enabling your product to connect with various projects, services, and systems quickly. This integration not only improves the functionality of your product but also dramatically raises its value in the more significant technical landscape.

  • Secure Data and Privacy: Many BaaS providers offer robust security functions and best practices to help protect your application and data.

Top BaaS Tools for Your Project

These tools are ranked based on performance, downloads, GitHub ratings, and usage from the previous year and months.

Top-BaaS-Tools-for-Your-Project

Firebase

firebase-app-development

Firebase, a powerful BaaS tool built by Google, allows developers to build, test, and deploy apps confidently. Offering robust features such as authentication, hosting, deploying, chat/messaging, and analytics, Firebase is versatile and adaptable. With support for platforms like Web, iOS, Android, and frameworks including Flutter, Unity, and C++, It is an excellent collection of tools upon which developers can depend to create and scale applications according to user demand. In addition to this, Firebase offers resources for integrating machine learning features into apps.

Google Firebase offers a variety of features to assist organizations. Among the standout features of the Google Firebase platform are:

Realtime Database: The Firebase Realtime Database is a cloud-hosted NoSQL database that facilitates storing and synchronizing data among users in real-time. Its successor, Cloud Firestore, extends this functionality globally, enabling app data storage, synchronization, and querying. Utilizing the real-time database allows mobile and web SDKs to be used for app development without server dependency.

Additionally, one of the key advantages is that the Realtime Database SDKs utilize local device cache to serve and store changes when users go offline, automatically synchronizing with the server when the device reconnects online.

Authentication: One factor that improves an application system and retains users is Authentication. Firebase provides an easy authentication system while enhancing the sign-in and onboarding experience for end-users. It offers an end-to-end identity solution, supporting email and password accounts and phone authentication. Firebase Auth systems provide easy sign-in with platforms such as Google, Twitter, Facebook, and GitHub for users who dislike the stress of typing their email and password frequently when accessing an application.

The Firebase Auth system alleviates the long process of constructing your authentication system and the cost of hiring engineers to maintain it, all with just a few lines of code. Additionally, it allows you to manage complex scenarios like account merging.

Cloud messaging: Firebase Cloud Messaging facilitates the connection between your server and devices, enabling you to deliver and receive messages and notifications on iOS, Android, and the web for free. It provides an A/B testing tool. This solution allows you to test different versions of your notification messages and choose the one that best achieves your goals. 

You can customize your message to deliver immediately or at the user’s local time zone. In all this, you don’t need coding experience to send notifications to users, as notification messages are fully integrated with Google Analytics for Firebase, providing access to detailed engagement and conversion tracking.

Hosting: Firebase hosting prioritizes security by offering a built-in Secure Socket Layer (SSL) seamlessly integrated into your hosting environment. It eliminates the need for manual setup or configuration to encrypt SSL in your application hosting, streamlining the process and ensuring secure data transmission without extra effort.

Crashlytics: This real-time crash reporting service is a component of the Firebase suite of tools Google provides. It assists in identifying, prioritizing, and resolving stability issues within your apps. Crashlytics automatically gathers and arranges crash reports from app users, delivering comprehensive details about the events leading to the crash.

Firebase extension: Firebase provides prepackaged solutions, including third-party tools, to assist you in building performant applications that align with your project goals. Some of these extensions collect real-time updates, integrate efficient search queries into your application, send personalized email marketing campaigns, and control access to your paid content. These extensions are open-sourced and built on Firebase and Google Cloud products that you’re familiar with, requiring no maintenance once deployed.

App check: This additional layer of security from Firebase safeguards your app and user data by verifying that incoming traffic originates from your app and blocking unauthorized access. This solution effectively defends your backend against abuse, including billing fraud, phishing, app impersonation, and data tampering. You can seamlessly integrate this feature with your Firebase products or custom backend for enhanced protection.

Pros

  • Firebase lets you integrate your favorite tools such as Google Ads, Jira, Slack, Google Playstore, slack, Android Studio, and Data Studio. Etc

  • You can quickly get started with Firebase using just the CDN

  • It has extensive community support and available resources to guide you or help you solve problems. 

  • Famous companies like Duolingo, the New York Times, Alibaba, and Wattpad use the tool. This helps to foster the community support system. 

Cons

  • Since Google created Firebase, it may tie you into Google’s ecosystem, making it challenging to transition to other platforms.

  • While Firebase offers a free plan, costs can escalate as applications grow or demand additional features, so it is necessary to weigh the cost of picking Firebase over other solutions. 

  • Firebase supports so many third-party services and infrastructure provided by Google, which means any disruptions or changes to these services could impact the functionality of your application. 

Supabase

supabase-app-development

Supabase is an open-source alternative to Firebase, offering a variety of tools and services for developing and deploying web and mobile applications. Designed to be user-friendly, scalable, and secure, Supabase is a comprehensive platform for modern app development and deployment. Supporting multiple platforms such as web, Android, and iOS, Supabase is seamlessly integrated with other tools and services, making it an ideal choice for developers.

Supabase doesn’t have as many features as Firebase, but it has all the core features like:

File Storage: Supabase Storage offers the functionality to store images, videos, documents, and any other file type of your choice. It features a built-in image optimizer, allowing you to resize and compress oversized media files for swift delivery. Additionally, Supabase Storage speeds up file loading globally by using a Content Delivery Network (CDN), which stores copies of your files in various server locations near users. This helps to boost speed, protect against cyberattacks, and ensure constant file availability.

Authentication: Supabase offers a simple auth system with built-in authentication, authorization, and User management that doesn’t require a single external authentication service. It gives you full access to your data without problems with third-party privacy issues. You can integrate social logins such as Google, Facebook, GitHub, Azure (Microsoft), Gitlab, Twitter (X), Discord, and many more to give users quick access to log in.

Database: Supabase uses PostgreSQL, one of the most scalable databases available, enabling developers to craft applications that seamlessly reflect data changes without manual refreshing. Moreover, developers have the flexibility to either import their current Postgres database or transition away from it whenever needed. With built-in JWT authentication, Supabase offers precise control over user access privileges, ensuring heightened security for your application.

Edge Function: Supabase Edge Functions enable developers to run serverless functions directly at the edge, providing fast deployment and reduced latency. They are ideal for executing code for sensitive use cases or interacting with third-party services.

Pros

  • Migrating data in Supabase is simple because it utilizes PostgreSQL, allowing you to import data via a .sql file.

  • Supabase streamlines the process of building your API code by automatically generating a web API for your database, saving you the time to build from scratch.

  • Supabase simplifies the process of deploying your app or service to the cloud, making it quick and straightforward.

  • With Supabase, generating a REST API for your PostgreSQL database is quick and easy.

Cons

  • It doesn’t have a large community/resources to help solve problems

  • Supabase exclusively supports PostgreSQL databases, which can pose challenges for projects requiring different database systems.

  • Supabase poses a significant learning challenge, presenting difficulties for developers who lack familiarity with the platform.

Appwrite
appwrite-app-development

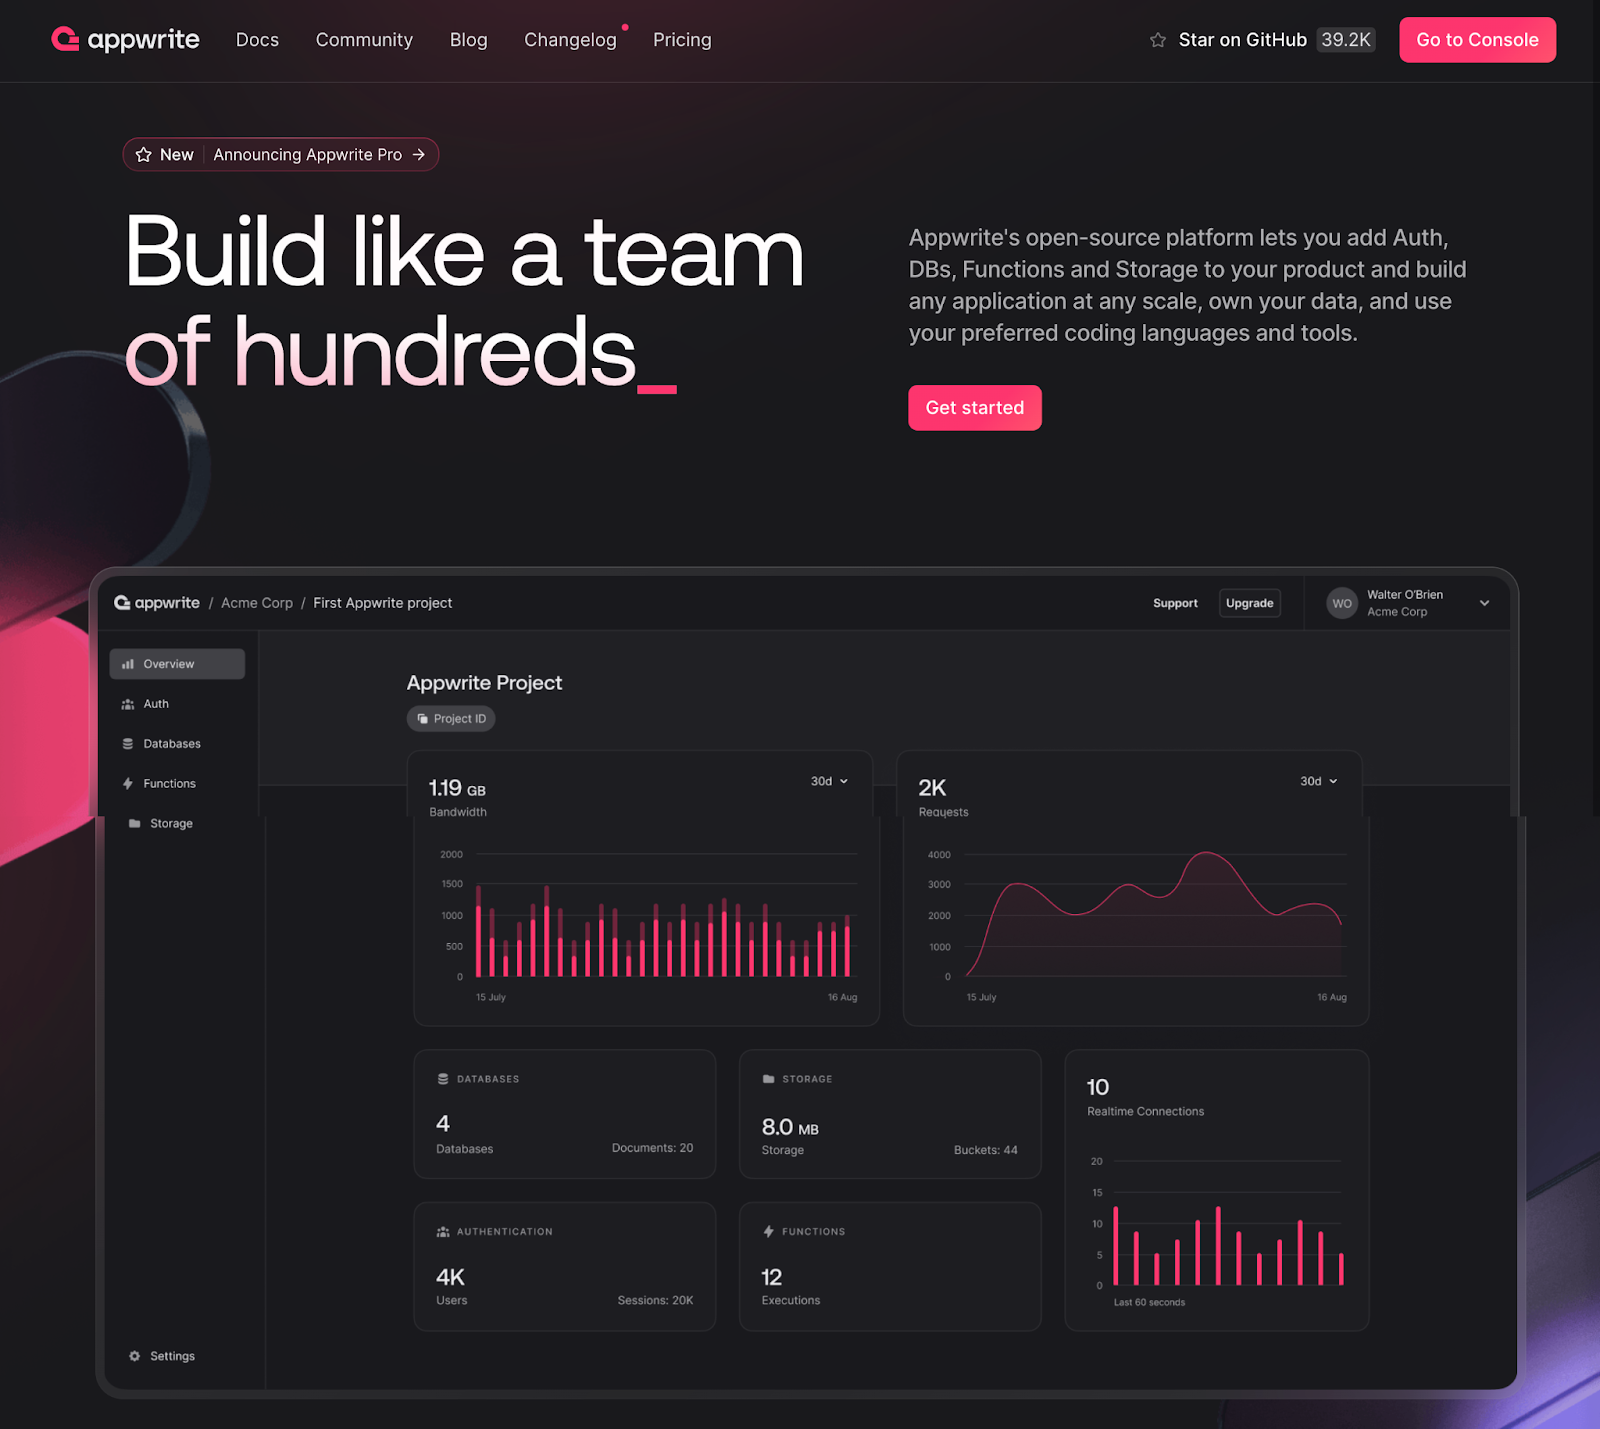
Appwrite is an open-source and self-hosted Backend as a Service (BaaS) solution that handles the essential backend needs. It offers user-friendly REST APIs and simplifies the complexity and redundancy involved in constructing a contemporary backend API from the ground up. This enables developers to create applications faster and with enhanced security. With Appwrite, programmers can swiftly create and integrate applications.

Appwrite introduced a cloud-based version known as Appwrite Cloud. This solution relieves the stress of hosting an Appwrite project in the cloud by providing developers with diverse tools and services for managing backend tasks. As a result, developers can focus more on development rather than handling infrastructure.

Appwrite provides a variety of services, including:

Database: Appwrite uses a NoSQL database to store and manage structured data effectively. It covers collection management, document CRUD activities, filtering, and sorting functionalities. Additionally, the database offers features like data validation, indexing, and real-time data updates to streamline data management processes. Leveraging Appwrite’s role-based access control, you can establish precise permissions to regulate data access and modifications.

Authentication: Appwrite features an integrated user authentication and management system supporting various verification methods. Appwrite increases data security against brute-force attacks. It employs the Bcrypt method to encrypt API keys and passwords, thwarting attackers’ attempts to decrypt saved passwords or access API keys.

Storage: Utilizing Appwrite storage, you can securely and efficiently upload, download, and manage your files. Appwrite’s server includes a built-in feature for compressing and encrypting files, although this applies solely to smaller files.

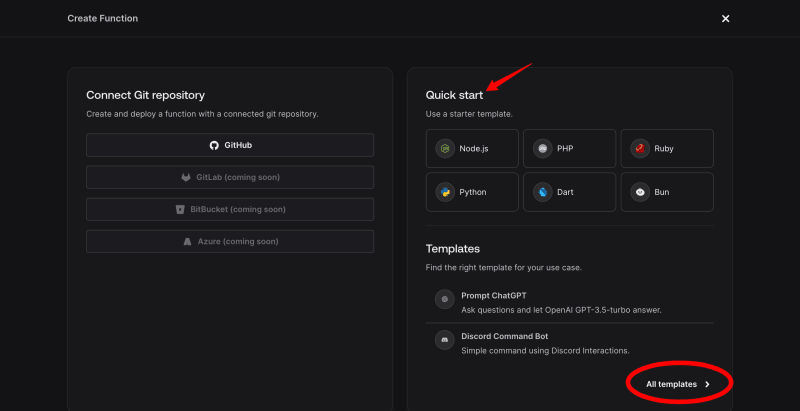
Function: Appwrite’s serverless functions allow developers to craft, deploy, and manage customized backend logic effortlessly, eliminating the need for server management. These functions support your favorite programming languages, such as Node.js, Python, and others. With Appwrite functions, you can leverage quick-start templates or templates with pre-built integrations to swiftly incorporate features into your application with Web, Flutter, Android, or iOS platforms. It serves as an excellent option for developers seeking a flexible and cost-effective open-source Backend as a Service (BaaS) platform.
connect-with-GIT-repository-quick-start

Pros

  • It has a simple learning curve and other good resources to get you started.

  • It gives you complete access control to your data and files. 

  • Appwrite is built on Docker, which makes scalability easy as Docker is a containerization platform that enables easy scaling to accommodate the evolving needs of expanding applications.

  • It is open-source and self-hosted 

  • Appwrite maintains an active community channel on Discord, providing a platform for users to create and contribute to issues and engage with other community members.

  • It provides a GraphQL option for developers.

  • It has a built-in Anti-virus file scanner 

  • Supports different technology

Cons

  • Appwrite lacks an extensive ecosystem or ample learning resources on past issues.

  • Appwrite lacks significant backup support, unlike Firebase, which benefits from Google’s backing.

AWS Amplify

AWS-Amplify-front-end-web-mobile

Amazon Web Services (AWS) offers frontend web and mobile developers a comprehensive suite of tools and features tailored to build and host full-stack AWS applications quickly. Using AWS Amplify, you can configure a backend for your web or mobile app, design your app’s UI, and efficiently manage app content outside the AWS console. Connecting your back end to your front end requires just a few lines of code, making it accessible even to those without prior cloud experience.

Utilizing AWS Amplify, you can build a diverse range of applications, including server-side rendered applications, native iOS and Android apps, and cross-platform applications like Flutter and React Native apps, leveraging Amplify’s libraries and backend resources.

AWS provides a variety of features, including:

Storage: Amplify Storage provides a straightforward solution for handling user-generated content and app data. Whether it’s photos, audio, or video files, you can securely store them on your device or within cloud storage modules, with options for public, protected, or private access.

Your application data resides in a NoSQL database supported by Amazon DynamoDB and is accessible through a REST API and Lambda function. Additionally, you can monitor your activities in real time by collecting and downloading metrics and gaining insights into trends and user interactions within your app.

Authentication: Amplify Auth offers an easy way to establish secure authentication for your applications with a fully managed user directory. With built-in authorization features, you can control user access to your mobile and web apps. Plus, AWS provides pre-built user interface components for adding authentication workflows to your app with just a few lines of code, compatible with your preferred language or framework.

Function: AWS uses a serverless computing service called Lambda, which enables you to execute code without the need to manage servers. The service handles all necessary tasks to run and scale your code with high availability by uploading your code to AWS Lambda.

Realtime analytics: Aws provides auto-tracking features that help you to track user sessions or website metrics and create custom user attributes for analytics.

Push notification: Amazon Pinpoint enables you to customize your content and engage with your audience across various channels, such as email, text messages, and push notifications. This functionality is currently available for applications created using the React Native CLI.

Pros

  • AWS has an extensive user base and developer community.

  • It is easier to launch a WordPress site with Amazon Lightsail.

  • AWS is a fast and reliable cloud service.

  • AWS has a diverse array of tools to kickstart your development.

  • It provides high-end security configurations and networks for business. 

  • Provides fast deployment for your application in multiple regions. 

Cons

  • Vendor lock-in

  • Limited resources

  • AWS offers a varying technical support fee, which can be costly for businesses, especially as they scale up their usage.

  • AWS imposes service limitations in specific regions.

  • AWS provides excellent services but suffers from a significant drawback in its pricing system.

Picking the Right Tool: What You Should Know

Selecting the most suitable tools for your projects can be a challenging task. It’s crucial to consider your project’s specific needs and requirements when making these decisions. Some key factors to consider include the available features, pricing, support options, and security features. Here are some valuable tips to help you determine which tools would be the most effective choice for your project:

1. Compatibility: It’s crucial to emphasize that platform compatibility is paramount. You wouldn’t want to develop an application that’s limited to only a few platforms. Therefore, it’s essential to thoroughly check whether the tool you’re using is compatible with your intended application across a variety of platforms.

2. Check product reviews: While it might seem like a non-essential step, the importance of checking for reviews before selecting a tool cannot be overstated. Doing so helps you uncover the strengths and weaknesses of the tool, enabling you to determine its suitability for the specific type of application and user base you aim to serve.

3. Community and Support: An active developer community brings significant value to a tool or product by establishing a network for knowledge sharing, problem-solving, and access to third-party resources. Many of these developers have experience in building diverse applications using various tools. This community can be invaluable in guiding you through any obstacles and ensuring a seamless developer experience.

4. Pricing: While some of these tools are open-source or free to use, they also have some features that come with upgrading your plan before accessing those features, so you must consider the pricing.

5. Check for Vulnerability or Updates: Some Backend as a Service (BaaS) tools support third-party services. It’s essential to check for updates and vulnerabilities in these services regularly. Even minor issues with third-party tools can potentially attract malicious attackers to your application, leading to data exposure and leaving your application vulnerable.


Conclusion

While this BaaS tool may be a leading option, it’s essential to acknowledge its limitations, including less flexibility, standardized architecture, and reliance on third-party tools. However, the benefits outweigh these drawbacks, as BaaS tools revolutionize how developers create and launch applications.

Selecting a BaaS solution that aligns with your project objectives is crucial to maximizing the benefits, thus mitigating potential issues like slow development processes or high development costs.


Building API Using Next.js

In this tutorial, you’ll learn how to build APIs using Next.js 14. The newer version of Next.js provides the platform to create APIs using the App router. 

Let’s start by creating our Next.js 14 project. As a prerequisite, you’ll be required to have Node.js 18.17 or later to work with Next.js 14. You can check the Node.js version currently installed in your system. For that open your command prompt and type in the following command,

node --version

which will output something like,

v20.10.0

If you already have the required version installed you are good to go. Otherwise, you can install the latest Node.js version.

Once you have the required Node.js installed, you can start by creating a new Next.js project using `create-next-app`.

npx create-next-app@latest

The above command will prompt for a couple of questions related to the project creation,

√ What is your project named? ... next-14-api
√ Would you like to use TypeScript? ...Yes
√ Would you like to use ESLint? ... No
√ Would you like to use Tailwind CSS? ... No
√ Would you like to use `src/` directory? ...Yes
√ Would you like to use App Router? (recommended) ... Yes
√ Would you like to customize the default import alias (@/*)? ... No

Fill in the response as shown above and once done you will have the boilerplate Next.js project ready to run.

Navigate to the project directory and run the project.

cd next-14-api

npm run dev

Point your browser to http://localhost:3000 and you will have the default project running.

Building API Using Next.js: Project Structure

You have the ‘ src ‘ folder inside the project folder, `next-14-api`. All the project source code resides inside the `src` folder. Inside the `src` folder create a folder called `api` which will serve as the main folder for our Next.js APIs.

Once you have the `api` folder, create a folder called `users`, and inside `users` create a file called `route.ts`. Every API endpoint will have a file called `route.ts`. 

Here in our case, since there is `route.ts` inside the `api/users/` folder, the API endpoint will be `/api/users`.

GET API Endpoint

To begin with, let’s create an API endpoint inside the `route.ts` file. Start by defining a function for a GET request as shown.

typescript
const GET = () => {
    return Response.json({"status":200, "message":"SUCCESS"})
}
export {GET}

As seen in the above method, we are returning a JSON response for the API endpoint’s GET request.   To test the GET request API endpoint, you can restart the application. Once the application is up and running try accessing the endpoint using http://localhost:3000/api/users and you will be able to see the response.

{"status":200,"message":"SUCCESS"}

In addition to what we defined in the above GET method, let’s make it a bit more realistic by adding an API call inside the GET method. For that, you need to mark the method as `async` since we’ll be using `await` to fetch the data from API.

typescript

const GET = async () => {
    const response = await fetch('https://jsonplaceholder.typicode.com/users');
    const responseData = await response.json();
    return Response.json({"status":200, "data": responseData})
}

export {GET}

In the above code, we are making an API request to an external API endpoint and then returning the received data as the response from our `/api/users` endpoint.

Save the above changes and try making a GET request to http://localhost:3000/api/users and you’ll be able to see a JSON response with data from the external API endpoint.

Now, let’s have a look at how you can read the query parameters from the API endpoint. Here is how you can pass a query parameter to the endpoint:http://localhost:3000/api/users?id=1. To read the query parameter passed to the endpoint, add a `request` parameter to the GET method.

const GET = async (request:any) => {
    const response = await fetch('https://jsonplaceholder.typicode.com/users');
    const responseData = await response.json();
    return Response.json({"status":200, "data": responseData})
}

Next let’s create a URL using the `url` from `request`.

typescript
const { searchParams } =  new  URL(request.url);

Once you have the `searchParams` you can get the expected query string parameter being passed.

typescript
const  userId  =  searchParams.get('id');

Now let’s try passing the `userId` along with the API endpoint URL to filter the API response as per the `id`.

Here is the modified GET method,

typescript
const GET = async (request:any) => {
    const { searchParams } = new URL(request.url);
    const userId = searchParams.get('id');
    const response = await fetch(`https://jsonplaceholder.typicode.com/users?id=${userId}`);
    const responseData = await response.json();
    return Response.json({"status":200, "data": responseData})
}

Save the above changes and try to do a GET request by passing a query string as http://localhost:3000/api/users?id=1 and you will get the id-specific response.

Moving on, let’s have a look at how to create a POST API endpoint.

POST API Endpoint

To create a POST API endpoint, you need to create another method called POST and export the method.

typescript
const POST = () => {
    return Response.json({"status":200, "data": "Data updated successfully"});
}
export {POST}

Save the above changes and once you make a POST request to http://localhost:3000/api/users you’ll get the following response,

json
{
    "status": 200,
    "data": "Data updated successfully"
}

While posting data to an endpoint you might be sending in some data to the API endpoint. Further, let’s see how to read data posted to the POST API endpoint.

Inside the POST method, you can define a parameter called `request`. We’ll be using the `request` parameter to read the data posted to the endpoint.

Doing `request.json()` would return the parameters passed in the body of the request. Let’s use it to read the request body and return the data in response.

typescript
const POST = async (request: any) => {
    const params = await request.json();
    const name = params['name'];
    return Response.json({"status":200, "data": "Data updated successfully", "name": name});
}

Save the above changes and try sending a POST request with `name` in the request body. The value of the `name` parameter will be returned in the response.

json
{
    "status": 200,
    "data": "Data updated successfully",
    "name": "Roy"
}

Next, let’s see how you can create an API endpoint for DELETE requests.

DELETE API Endpoint

Create a function called DELETE in the `app/api/users/route.ts` file and also export the function.

typescript
const DELETE = async (request:any) => {
    return Response.json({status : 200, message : "Data deleted successfully"});
}

export {GET, POST, DELETE}

Now if you try to make a DELETE request to the API endpoint http://localhost:3000/api/users you will be able to get the following response,

{
    "status": 200,
    "message": "Data deleted successfully"
}

Passing data to the DELETE endpoint will be required. It can be either as a query string that we saw in the GET method or in the request body as we saw in the POST method.

Let’s try passing in the body as we tried in the POST request. Here is how the modified DELETE method looks:

typescript
const DELETE = async (request:any) => {
    const params = await request.json();
    return Response.json({status : 200, message : "Data deleted successfully", params});
}

Now if you save the above code and hit the API endpoint with a DELETE request with some data in the request body, that data would be returned in the response.

So, when I hit the endpoint with the following JSON data,

json
{
    "name": "Roy"
}

The response from the API is as shown,

json
{
    "status": 200,
    "message": "Data deleted successfully",
    "params": {
        "name": "Roy"
    }
}

Similar to how we created API endpoints for GET, POST, and DELETE requests, endpoints for PUT, and PATCH requests can also be created.

Wrapping it up

In this tutorial, you learned how to create API endpoints in Next.js 14 using App routers.

You learned how to create an API that accepts GET, POST, and DELETE requests. You can further extend it to create requests for PATCH and PUT requests.

Jscrambler Launches QSA Alliance Program to Share Insights and Expertise that Help Organizations Achieve Zero Friction Compliance with PCI DSS v4 Requirements

PORTO, Portugal – July 24, 2024 

Jscrambler, the pioneering platform for client-side protection, today announced its QSA Alliance Program in support of its Zero Friction Compliance vision. The new program provides training, marketing, product, and expert resources to PCI Qualified Security Assessors (QSA), delivering members key insights and tools that can be used to help customers expedite compliance with PCI DSS v4 requirements 6.4.3 and 11.6.1.

As a Principal Participating Organization in the Payment Card Industry Security Standards Council (PCI SSC), Jscrambler has a seat at the table to understand and provide technical expertise to help the development of the PCI DSS standard. Jscrambler co-founder and CTO Pedro Fortuna also serves as a member of the PCI SSC Board of Advisors. This insight has been applied directly to the company’s client-side protection and PCI DSS solutions to help online merchants, and payment service providers secure their payment pages against skimming attacks through the discovery, authorization, control, and monitoring of payment page scripts. 

Through its new QSA Alliance Program, Jscrambler is leveraging this expertise and unique capability set to provide training, PCI tools, technical support, and educational resources that enable QSAs and merchants to achieve compliance faster and more efficiently without compromising the security of cardholder data.

“Merchants and PSPs alike are keen to find information on how to address the new payment page requirements added to PCI DSS v4,” said Martin Petrov, CTO PCI at Integrity360. “Joining Jscrambler’s QSA Alliance Program enhances our existing capabilities further through access to knowledge sharing, enhanced compliance solutions, and improved client outcomes. Integrity360 was able to offer a bespoke high-value session to our clients, leveraging payment security and compliance experts with deep knowledge of the requirements and their applicability. Each client walked away with a better understanding of the new PCI requirements, preventative steps to address web skimming attacks, and a practical approach to prepare and meet the April 2025 compliance deadline.”

“PCI DSS Compliance needs to be easy, scalable, and verifiable to ensure cardholder data remains secure. But that’s not all. Businesses need to act now as the April 1, 2025, compliance deadline for the new requirements in version 4 of PCI DSS is closing in fast,” said Carlos Rocha Gonçalves, Jscrambler Vice President of Partnerships & Growth. “Jscrambler’s QSA Alliance Program allows us to share our experience in implementing these new requirements, offer PCI DSS solutions purpose-built for QSAs, and offer enablement sessions with our QSA partners to better serve our merchants to accelerate meeting compliance of the upcoming PCI DSS requirements 6.4.3 and 11.6.1.” 

The Jscrambler QSA Alliance Program offers access to expert QSA training sessions, exclusive QSA Summits, a monthly newsletter with industry and product-relevant news and updates, and a designated QSA program manager. Program features include: 

PCI DSS Training and Enablement

  • Recurring QSA training on PCI DSS v4 requirements 6.4.3 and 11.6.1, digital skimming threats and patterns, and Jscrambler PCI DSS solution product updates. All wrapped in a monthly QSA newsletter.


Marketing Webinars, Summits & Events 

  • Strategic planning and coordination of co-events designed to educate merchants and PSPs on PCI DSS v4 requirements 6.4.3 and 11.6.1 and solutions, in addition to blogs, webinars, and regional events.

Free QSA Payment Page Inventory Tool

  • Easy-to-use automated tool that enables QSAs to inventory merchant payment pages for vendors, scripts and iframes to enable PCI DSS preparation as well as verification of compliance.

Expert Resources & Insights 

  • Direct collaboration and access with Jscrambler security and PCI DSS experts to gain instant access to PCI DSS updates, interpretations, and approaches to compliance


The Jscrambler QSA Alliance Program is available with no contractual agreement required. To sign up and start receiving the newsletter, visit the QSA Alliance Program page. To learn more about Zero Friction PCI DSS Compliance, register for Jscrambler’s August 1 webinar here

About Jscrambler


Jscrambler is the leader in Client-Side Protection and Compliance. Jscrambler is the first to merge advanced polymorphic JavaScript obfuscation with fine-grained third-party tag protection in a unified Client-Side Protection and Compliance Platform. Jscrambler’s integrated solution ensures a robust defense against current and emerging client-side cyber threats, data leaks, misconfigurations, and IP theft, empowering software development and digital teams to securely innovate online with JavaScript. Jscrambler’s Code Integrity product safeguards first-party JavaScript through state-of-the-art obfuscation and exclusive runtime protection. Jscrambler’s Webpage Integrity product mitigates threats and risks posed by third-party tags, all while ensuring compliance with the new version 4 of PCI DSS.


With Jscrambler, businesses adopt a unified, future-proof client-side security policy, all while achieving compliance with emerging security standards.  Jscrambler serves a diverse range of customers, including top Fortune 500 companies, online retailers, airlines, media outlets, and financial services firms whose success depends on safely engaging with their customers online.

For more information, visit the website, or follow Jscrambler on LinkedIn or X.

6 Tips to Fully Use Your Client-Side Risk Assessment

Cyber threats lurk around every corner, and safeguarding client-side assets has become paramount for businesses of all sizes and industries. Client-side risk assessment is a crucial (free) tool and security measure to detect and defend from client-side attacks that should be used to build a digital fortress against malicious actors. 

Continuous risk assessment provides ongoing vigilance and a dynamic approach to identifying, evaluating, and mitigating risks. Here are six key value areas where continuous risk assessment outperforms a one-time assessment.

Key Value Areas of Continuous Client-Side Risk Assessment

  1. Real-Time Threat Detection and Response

    • One-Time Risk Assessment – Provides a snapshot of the risk environment at a single point in time.

    • Continuous Risk Assessment – Monitors for threats in real-time, allowing for immediate detection and response to new and evolving threats.

  2. Dynamic Risk Management

    • One-Time Risk Assessment: Assesses risks based on static data, which may quickly become outdated.

    • Continuous Risk Assessment: Adjusts to changes in the risk environment dynamically, ensuring risk management strategies are always current.

  3. Improved Accuracy and Insights

    • One-Time Risk Assessment: Limited to the data and context available at the time of the assessment.

    • Continuous Risk Assessment: Continuously collects and analyzes data, leading to more accurate risk profiles and deeper insights into potential vulnerabilities.

  4. Compliance and Regulatory Adherence

    • One-Time Risk Assessment: This may leave gaps in compliance as regulations and standards evolve.

    • Continuous Risk Assessment: Ensures ongoing compliance with the latest regulations and standards, reducing the risk of penalties and enhancing governance.

  5. Proactive Risk Mitigation

    • One-Time Risk Assessment: Reactive, often leading to delayed responses to new risks.

    • Continuous Risk Assessment: Enables proactive identification and mitigation of risks before they materialize into significant issues.

  6. Cost Efficiency and Resource Optimization

    • One-Time Risk Assessment: This can result in higher long-term costs due to the need for repeated assessments and potential losses from undetected risks.

    • Continuous Risk Assessment: Optimizes resource allocation and reduces costs by continuously managing risks and preventing major incidents.

Client-Side Risk Assessment: What and How to Assess

1. Clearly define its scope

Begin by defining the scope of your client-side risk assessment in detail. Identify all endpoints, devices, and applications that interact with your systems.

This inclusive approach ensures that potential vulnerabilities are identified, providing a holistic view of your risk landscape.

2. Monitor in real-time

Embrace the advantages of real-time monitoring to stay one step ahead of evolving threats. 

Implement solutions that offer continuous surveillance of client-side activities, enabling prompt detection and response to suspicious behavior. By proactively monitoring, you can block threats before they escalate into full-blown breaches.

3. Analyze the typical user behavior and gather information on the context

By understanding typical user behavior, you can pinpoint anomalous actions that may signify unauthorized access or malicious intent. Also, context is essential when it comes to assessing client-side risks. 

Augment your risk assessment process with contextual intelligence gathered from diverse sources such as threat intelligence feeds, user behavior analytics, and historical data. 

4. Integrate the risk assessment with your security measures

Integrate your client-side risk assessment seamlessly with existing security controls to create a unified defense posture. These primary security measures to prevent, detect, and defend your web apps from client-side attacks, like skimming, include:

5. Thrive for continuous improvement

Client-side risk assessment is not a one-time effort but a continuous journey. Regularly evaluate and refine your risk assessment strategies in response to evolving threats and organizational changes.

Solicit feedback from stakeholders and incorporate lessons learned from past incidents to enhance the robustness of your risk management practices.

6. Keep educating the workforce

Empower your workforce with the knowledge and skills necessary to contribute to client-side risk assessment efforts.

Provide comprehensive training on cybersecurity best practices, threat awareness, and incident response protocols. By fostering a culture of security awareness, you can enlist employees as vigilant guardians of your digital assets.

Final Thoughts on Client-side Security Basics

In conclusion, client-side risk assessment reports anchor every company’s cybersecurity arsenal, offering invaluable insights into potential vulnerabilities and threats.

Organizations can bolster their defenses by adopting a proactive and holistic approach to risk assessment. Implementing the tips above will empower you to fully utilize your client-side risk assessment capabilities, ensuring resilience in adversity.

Are you curious about this client-side risk assessment by Jscrambler?


Uncover security vulnerabilities within the client-side security landscape with Jscrambler. Is your website’s use of cookies and tracking pixels enhancing your customer’s personal data privacy and protection?

See what sensitive data your website collects and shares with third parties – also useful for CCPA (California Consumer Privacy Act), PCI DSS v4, GDPR, and ePrivacy Directive (ePR) compliance.

The ultimate risk assessment for client-side protection and compliance

Learn everything you need about client-side protection and compliance to enhance your JavaScript web applications and customer data security. 

The client-side risk assessment report by Jscrambler provides guidance to secure your business in the current digital landscape in two relevant ecosystems: the first-party and the third-party code. 

This custom snapshot of your web app client-side risks includes:

  • Client-side security score. 

  • Likelihood of data breach and data vulnerability findings. 

  • JavaScript vulnerabilities.

  • Inventory of all third-party scripts.

  • Third-party script misbehaviors.

  • Identification of risky vendors.

  • Third-party code supply chain analysis (open source, scripts, images, documents, among others).

  • Insights about the exposure of client-side assets to attacks and threats. 

  • Identify the pages with high-risk profiles.

  • PCI DSS v4 assessment insights.

  • First audit trail to reduce compliance and legal risks.

Discover if your website is hiding vulnerable or malicious code. 

Allowlisting vs Blocklisting: Benefits and Challenges

In cybersecurity, the strategic control of network access plays a pivotal role in safeguarding digital assets. Allowlisting vs. blocklisting emerge as two fundamental approaches in this endeavor, each offering distinct benefits and challenges. Allowlisting involves granting access only to pre-approved entities, promoting a proactive defense against potential threats. On the other hand, blocklisting aims to thwart known malicious entities swiftly, offering simplicity and quick response capabilities.


This exploration delves into the intricacies of allowlisting and blocklisting, dissecting their advantages and limitations.

As organizations grapple with the relentless surge of cyber threats, understanding the nuanced dynamics between these two methods becomes essential for establishing robust and adaptive security measures.

Importance of Allowlisting and Blocklisting in Cybersecurity


In the constant battle against cyber threats, allowlisting and blocklisting stand as essential tools in any cybersecurity arsenal. While seemingly opposites, they work together to create a layered defense, offering complementary benefits that significantly enhance overall security.

Allowlisting:

  • Reduced Attack Surface: By explicitly defining and approving only authorized entities, you shrink the potential entry points for threats, minimizing the damage they can inflict. This “trust-but-verify” approach offers proactive protection in a world teeming with unknown malware.

  • Simplified Management: Maintaining a whitelist of known good entities is often easier than keeping track of ever-evolving bad actors. This efficiency translates to faster response times and a reduced administrative burden.

  • Compliance Adherence: Many regulations require specific restrictions on data access or software usage. Allowlisting ensures automatic compliance, simplifies regulatory adherence, and reduces risk.


Blocklisting:

  • Proactive Threat Prevention: By actively blocking known malicious actors, spam, and harmful content, you prevent them from reaching your systems in the first place. This proactive approach stops threats before they can even attempt infiltration.

  • Reduced Damage Potential: Even the most robust defenses can be breached. Blocklists act as a secondary line of defense, mitigating the damage caused by successful attacks by restricting the attacker’s movement within your network.

  • Improved Productivity and Control: Blocking unproductive websites and applications can enhance user focus and productivity. Additionally, content moderation becomes easier through targeted blocking, creating a safer and more controlled online environment.

Allowlisting


Allowlisting, also known as whitelisting, employs the core concept of “zero trust” to block access by default, allowing only expressly approved sources to access an asset. Whitelisting can be used on any asset (network, endpoint, application, etc.) to grant particular access to any sort of source.

Consider your company’s network to be a tightly secured entrance, with your admin serving as the diligent security guard in the front. Allowlisting works in the same way that security guards confirm employees with approved IDs. It maintains an exclusive list of accepted applicants, allowing only well-vetted personnel to enter. 

Allowlisting Use Cases


Allowlisting should be utilized when access can be clearly defined, such as for internal resources. Examples of effective allowlisting use cases are:

  • Email security program, allowlisting email addresses ensures proper email delivery from trusted senders.

  • IP address allowlisting in a firewall for branch offices

  • Web address allowlisting on a server to restrict the potential external connections for a susceptible asset.

  • Device Allowlisting MAC addresses and programs for network access and internal database access.

  • User allowlisting for an internal company application.

Benefits and Challenges of Allowlisting


Though blocklisting was formerly popular, the recent exponential surge in malware implies that it is no longer effective.

Allowlisting only enables a few programs to operate, effectively reducing the attack surface. Furthermore, creating an allowlist is much easier because the number of trusted programs is significantly lower than the number of distrusted ones. Allowlisting can help businesses adhere to tight regulatory compliance requirements.

Allowlisting has some drawbacks, despite its many advantages. Building an allowlist may appear simple, but one mistake might result in a backlog of help desk inquiries for the administrator. The inability to access important apps would hinder a variety of critical tasks. Furthermore, deciding which programs should be allowed to run is a time-consuming task.

As a result, administrators often implement extremely wide allowlisting policies. This mistaken faith might jeopardize the entire company. Another downside is that, whereas blocklisting can be partially automated with antivirus software, allowlisting requires human participation to function properly.

Blocklisting


Blocklisting, also known as Blacklisting, is a security mechanism that prevents known dangerous people, IP addresses, websites, devices, or programs from accessing an organization’s resources.

Many security systems have a blocklist as part of their anti-malware or attack-blocking features, which organizations can manually add to. Blocklisting does not adhere to the principles of zero trust because the default condition for access is to typically allow access until blocklisted.

Blocklisting is one of the oldest computer security techniques, and most antivirus software uses it to block harmful organizations.

The process of blocklisting applications is compiling a list of all the applications or executables that could constitute a hazard to the network, either through malware assaults or simply by interfering with productivity. Blocklisting might be viewed as a threat-centric technique.

Blocklisting Use Cases

When potential access sources are difficult to establish, such as with public resources, blacklisting is frequently the preferred option. Examples of effective blacklisting use cases are:

  • Email security software, email addresses that are known to convey spam or viruses are blacklisted.

  • In a firewall, IP addresses are blacklisted as the source of harmful assaults.

  • DNS server blacklists pornography websites and MAC addresses of known botnets.

  • Application blacklisting, like malware signatures in an antivirus program

  • User blacklisting of users who violated community rules in a discussion forum.

Benefits and Challenges of Blocklisting

The obvious advantage of blocklisting is its simplicity. Administrators can quickly disable known malicious applications while running everything else. This ensures that users have access to all of the applications they require, lowering the number of admin tickets raised or vital applications disabled. Blocklisting is an effective strategy for businesses looking to take a more liberal approach to application restrictions.

However, merely blocking anything that is distrusted, while simple and efficient, may not always be the best strategy. Every day, over 200,000 samples of malware are developed, making it hard for an administrator to maintain a complete and up-to-date list of harmful apps. And, given that 30 percent of malware targets zero-day vulnerabilities, a security breach could occur before the vulnerable programs are added to the blocklist.

Unfortunately, in the event of a zero-day attack, organizations will be left susceptible, regardless of their security strategy. The increasing increase in targeted attacks aimed at obtaining confidential data from organizations should likewise concern administrators. Predicting and stopping these types of assaults by blocklisting would be useless.

Application Allowlisting or Blocklisting


Application Allowlisting or Blocklisting is sometimes mistaken with Allowlisting and Blocklisting. Although application allowlisting and blocklisting are components of allowlisting and blocking, they function under more flexible rules.

Application Allowlisting

Application allowlisting is similar to an elite club membership, guaranteeing that only the most trustworthy IP addresses, domains, and apps are given the red-carpet treatment. It is the process of compiling a list of approved entities, such as domains and applications, that are permitted to access a specific resource or take a specific activity.

The United States National Institute of Standards and Technology (NIST) has released a Guide to Application Whitelisting, which proposes utilizing two of the following attributes together to define an application for whitelisting.

  • File Path permits all apps to execute within a given file path or directory, however it is a broad property that cannot prevent malicious software from operating in the correct location.

  • File Name permits a certain naming convention to be used but does not check for renamed dangerous files or malware-infected files.

  • File Size merely checks the file size and can easily allow malware with the right file size to execute.

  • A digital signature can provide a unique value to an application, but it may become obsolete when fixes and upgrades are performed.

  • Cryptographic Hash provides the most unique and least spoofable value for whitelisting, but it will be invalidated if the software is patched or updated.

Application Blocklisting

Application blocklisting: the ultimate antivirus or firewall. It’s like having your squad of security guards, ready to face known aggressors. Consider a list of malicious IP addresses that are blocked from your network, guaranteeing that they never gain access. What about those spam email addresses? Blocklisting also helps to keep your inbox clean. 

Alternative Names

Allowlisting and Blacklisting as stated earlier can also be called Whitelisting and Blacklisting, While these are common terms, there’s a growing movement to use more neutral alternatives. This shift reflects concerns that the color-based terms can be insensitive and perpetuate harmful associations.

Several platforms have already adopted new terminology. To ensure you understand the latest options within your security tools, here are some updated terms:

Allowlisting:

  • Whitelisting(Superseded)

  • Allow-listing

  • Permitted listing

  • Approved listing


Blocklisting:

  • Blacklisting(Superseded)

  • Denylist

  • Deny-list

  • Blocked list

  • Disapproved list


Conclusion


Both allowlisting and blocklisting offer valuable tools for managing access and security, each with distinct benefits and challenges.

Choosing the right approach depends on your specific needs and priorities. For maximum protection, consider a hybrid strategy that combines the strengths of both. Allowlisting provides a foundation of trust, while blocklisting offers a safety net against unforeseen threats.


Remember, security is an ongoing process, and regularly updating and adapting your approach is crucial to navigating the ever-evolving digital landscape. By understanding the advantages and limitations of each method, you can craft a defense that keeps your system secure, productive, and compliant.