Category: Client-Side Security

Say Hello PCI DSS v4

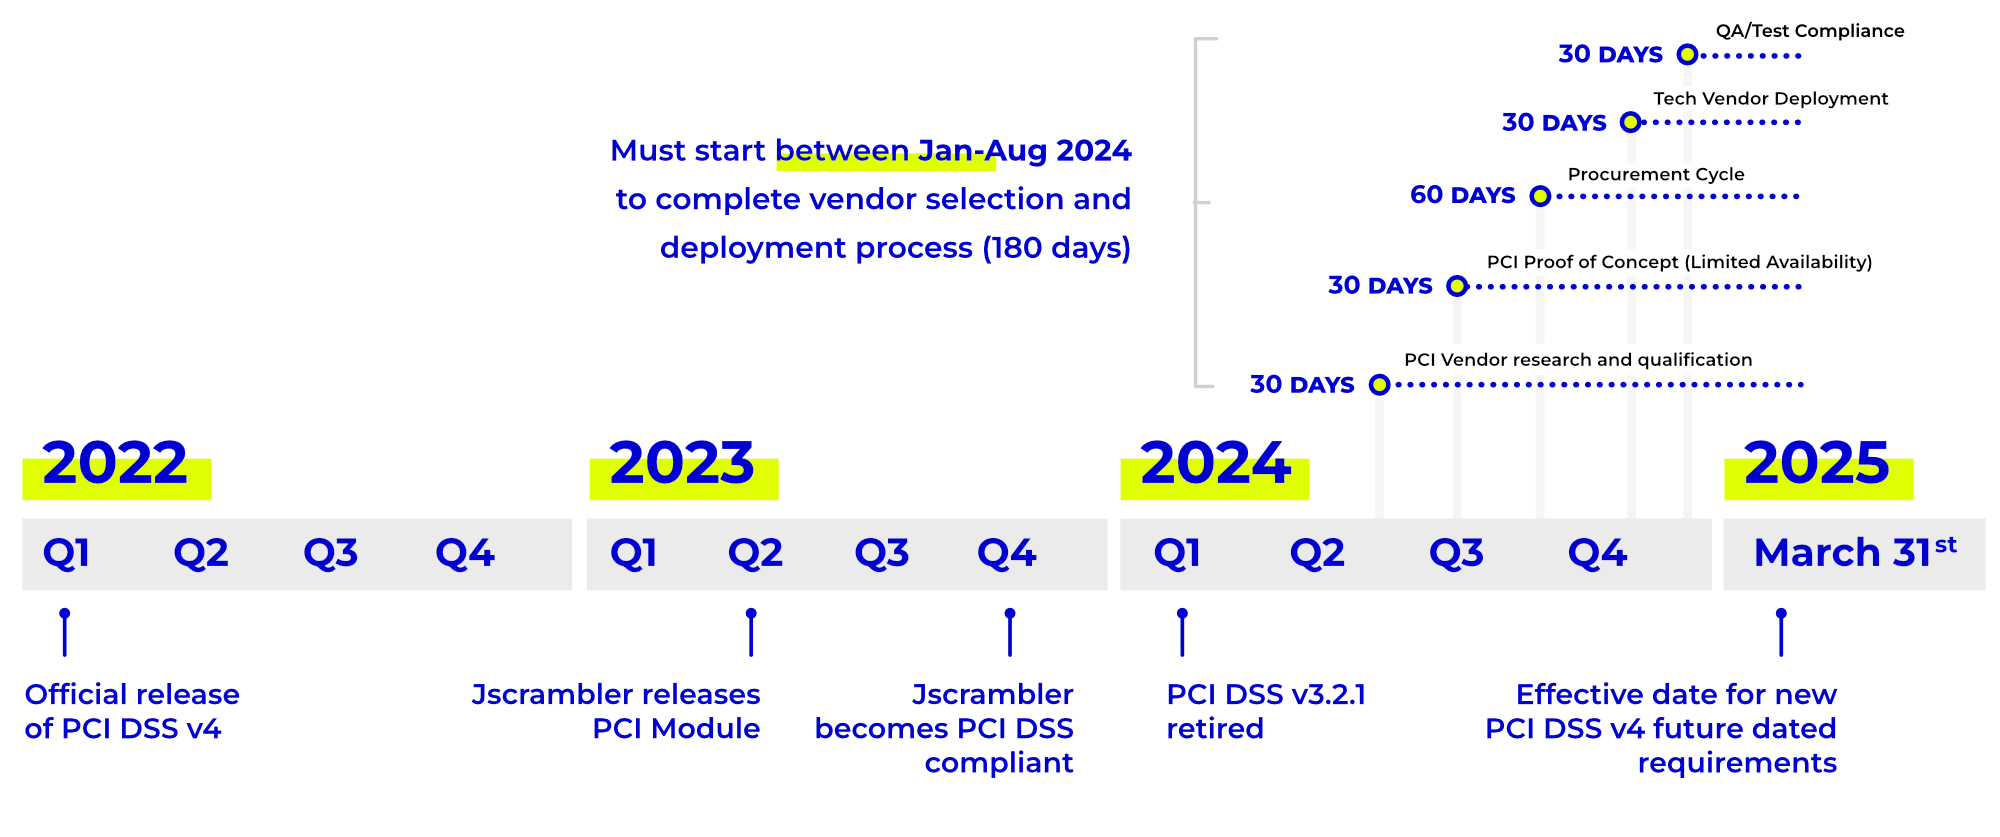
For two years, PCI DSS v4, the latest version of the PCI DSS standard, has been at the forefront of professionals from the payment industry. Version 4 was first released in March 2022, with two years of transition for v3.2.1.

As of March 31, 2024, we’ve officially waved goodbye to this latest iteration and the clock keeps ticking. Like many new requirements in the standard, the ones designed to defeat E-commerce skimming attacks will only become mandatory after April 1, 2025. Until that date, they are described as best practices.

This means they will not be evaluated in a formal PCI DSS assessment until “after March 31, 2025”.

Although it seems there is still some time left to worry about it, it’s highly recommended that companies do not delay the implementation of the new security requirements as these E-commerce skimming attacks continue to be increasingly popular today and all e-commerce websites are at risk.

Say Hello to PCI DSS v4-jscrambler-compliance


The requirements in PCI DSS v4

The fourth iteration of the standard contains 64 new requirements that organizations seeking compliance must fulfill. Two of these new requirements are focused on the integrity of pages where payment is taken on an e-commerce website and aim to stop e-commerce skimming (Magecart) attacks.

PCI DSS applies to all businesses that accept cards, regardless of how they trade. Let’s explore these two requirements:

Requirement 6.4.3  (Preventative)

The first new requirement is designed to minimize the attack surface and manage all JavaScript present on the payment page by requiring an approval process and justification for each script added to the payment page.

It is designed to ensure that all JavaScript included in the payment page is actively managed. Additionally, the requirement wants a way of validating the integrity of a script to be defined to ensure that malicious scripts are not placed on the payment page.

Requirement 11.6.1 (Detective)

The second new requirement aims to detect tampering or unauthorized changes to the payment page, which can indicate a skimming-type attack.

In addition to detecting changes, the requirement demands that an alert be generated when such changes are detected. There is no requirement to block changes or malicious activity, to send an alert.

The business impact of V4

Any organization that wants to accept a transaction with a payment card issued by a PCI SSC participating card brand is required to sign a contract that will contain references to the card brand’s rules, which will specify that:

  • The organization has to comply with PCI DSS.
  • The organization must ensure that all of their third-party service providers that can affect the security of cardholder data comply with PCI DSS.

Merchants must gain visibility, risk management, and control over JavaScript before the standard requires it to protect payment card data and guarantee compliance with the new PCI DSS requirements.


Jscrambler’s Solution to Help Achieve PCI DSS v4.0 Compliance

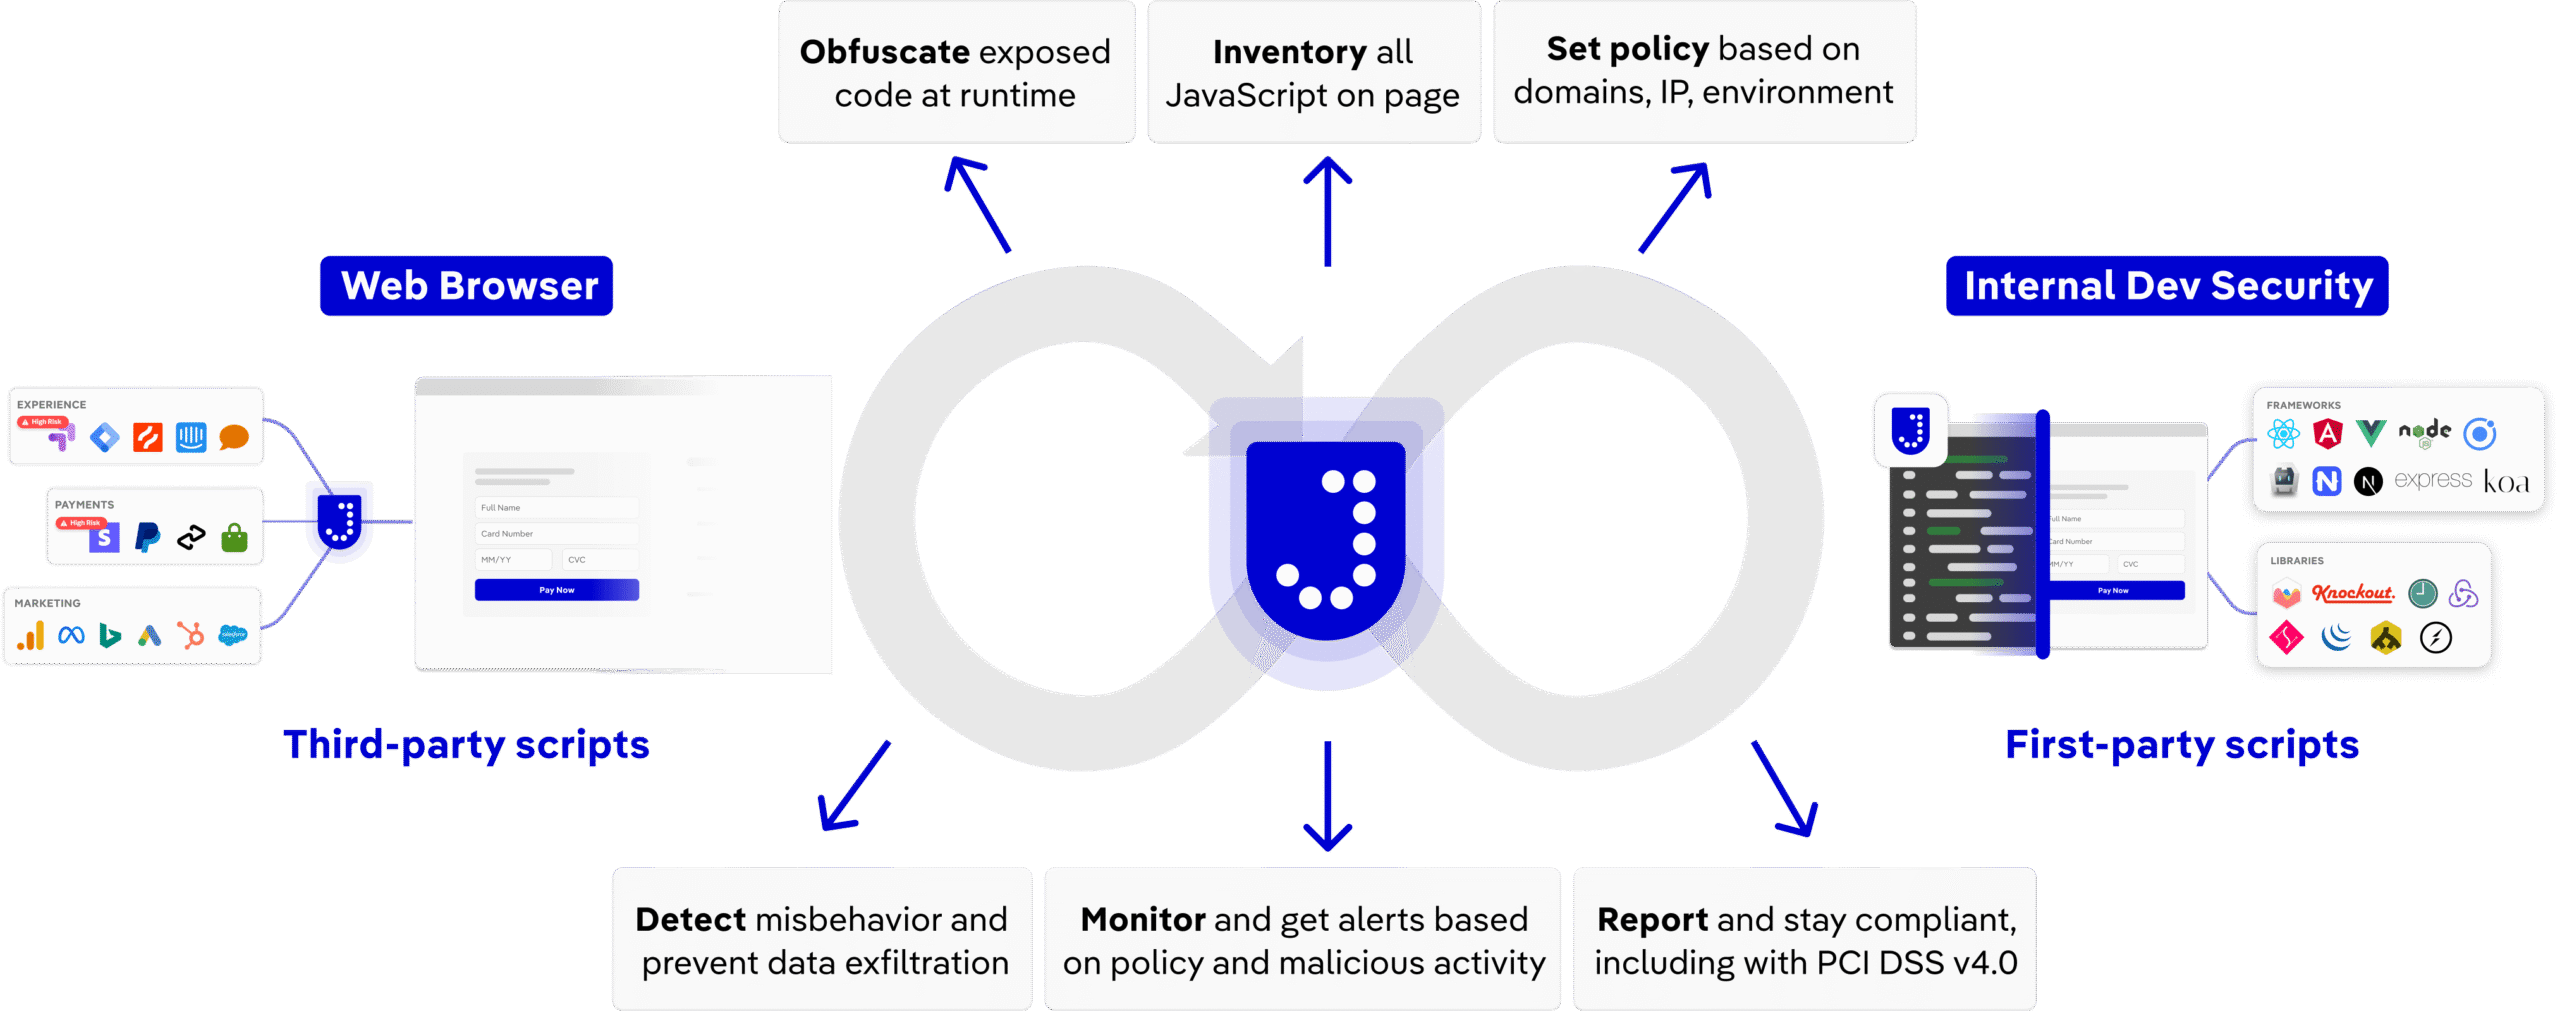
Jscrambler’s Solution allows companies to achieve compliance with the new requirements of PCI DSS v4.0, developed to prevent and detect e-commerce (e.g., Magecart) skimming attacks.

More specifically, we are helping Merchants achieve compliance with requirements 6.4.3 and 11.6.1 of PCI DSS v4.0 and QSAs to validate compliance. Our solution provides merchants with visibility, risk management, and control of all JavaScript running on their websites.

The new requirements mandate that e-commerce businesses maintain a full inventory of every script on their payment page. Businesses are also expected to validate the integrity of every script to ensure that those loaded into the consumer’s browser haven’t been tampered with.

Jscrambler goes one step further than the new requirements and can be configured to automatically block all attempts to skim cardholder data from e-commerce transactions.

To help clear any questions about PCI DSS v4, watch our on-demand webinar – Goodbye PCI DSS v3.2.1, Hello PCI DSS v4. Jscrambler’s experts joined Jeremy King, Regional Head of Europe at PCI SSC.

Hidden dangers? Tax software companies must take measures to protect against the leaking of customer data

Every year, like clockwork, tax season arrives, and as Benjamin Franklin proclaimed, “In this world, nothing can be said to be certain, except death and taxes.” This undeniable fact has driven the growth of tax software companies to offload what can often be an intimidating and time-intensive exercise for most households.

Using software means faster preparation time, fewer errors, reduced chance of an audit, and refunds being issued in a shorter timeframe (averaging 21 days from the filing date).

The fiscal year of 2023

In the fiscal year of 2023, the IRS (Internal Revenue Service) processed more than 162 million federal individual tax returns and supplemental documents. American taxpayers spend 1.7 billion hours and $31 billion on tax preparation, with the average person spending 13 hours and $270 to file, per year. 

A survey commissioned by The College Investor to 1,200 Americans discovered that 46% of Americans use tax software to file their taxes, 27% use a full in-person service, and 16% still use pen and paper. It was also determined that the majority of those using software used TurboTax 51% of the time, H&R Block 14% of the time, with several other software vendors in the 4%-5% range.

The biggest reason users selected the software they decided to go with…ease of use.

Taxes and customer data

While tax preparation software has become an indispensable tool for convenience and efficiency, this convenience has also come with inherent risks, particularly concerning safeguarding Personally Identifiable Information (PII).

Credit cards are used to pay for the software each year or for auto-renewals, home addresses are used for payments and to set up accounts, and social security numbers are required for identity verification.

The problem is that the PII being entered to purchase the software and file the tax return is also being secretly monitored and collected by third-party vendor tags, putting both the user and tax preparation software business at risk. 


The tax software tools that stand out for consumers and businesses include Intuit’s TurboTax, H&R Block, Jackson Hewitt, and TaxAct as among the leading platforms relied upon by millions during tax season.

They are practical tools that save users time and money but their widespread use and popularity also make them prime targets for data leakage and malicious actors seeking to exploit them.

Here are a few areas that need to be actively addressed when  attempting to mitigate consumer data leakage, data privacy issues, malicious threats, and non-compliance with PCI:

1. Software Purchases & Digital Skimming

Tax software companies routinely handle transactions, that require the collection and storage of users’ credit card information.

When purchasing software online through a tax preparation software vendor’s website the common practice is to use a credit or debit card for either a one-time purchase or annual subscription. 

Digital skimming has grown over the years as a common online threat actor practice to collect and exfiltrate credit card information for malicious purposes.

2. PCI DSS Compliance

Companies, like tax preparation software vendors, that transact and store credit card information also need to comply with PCI DSS v4

The two new payment page security requirements 6.4.3 and 11.6.1 require organizations to justify and validate that scripts have a business purpose, scripts maintain their integrity, and personnel are alerted when scripts change.

3. Personal Information & Data Leakage

Tax software platforms often require users to input sensitive personal details such as filing status, social security numbers, and addresses.

Unauthorized access to such information can have severe consequences, ranging from identity theft to financial fraud. Any third-party tag present on the website or software has unfettered access to this information with the ability to collect and pull back to the vendor site.

4. Seasonal Account Creation and High Traffic Volume

Creating an account on tax software platforms can inadvertently expose users to data breaches, as a wealth of personal and financial information is stored within user profiles.

As tax season builds so do website traffic and software updates that include third-party script updates that become unmanageable for security and development experts to handle manually.

Client-side security risks

Each of these tax preparation software use cases has significantly increased the risk to the consumer as well as the business given the collection of this data occurs uncontrolled on the client side of the transaction.

As users input data into open-field forms, they do so blindly and completely unaware of third-party vendors also collecting this sensitive information.

Quite often, the vendors collecting this information could be analytics, performance, marketing, or payment service JavaScript tags.

While others could be digital skimming attacks injecting JavaScript to maliciously monitor, collect, and monetize consumer information.

The urgent need for enhanced security measures

What can be done to avoid these malicious or inadvertent data breaches?

Tax software companies must fortify their defenses against potential breaches and cyber attacks. In 2023, a US Senate report showed that some of the country’s largest tax-prep companies have spent years sharing Americans’ sensitive financial data with tech corporations such as Meta and Google in a potential violation of federal law.

In addition to typical personal details like names, phone numbers, and email addresses, the shared information encompassed specific taxpayer data regarding individuals’ filing status, adjusted gross income, the extent of their tax refunds, and even insights into the buttons and text fields they interacted with during their tax form submissions.

The report highlights the pressing need for tax software companies to prioritize security enhancements, leveraging cutting-edge solutions and best practices to fortify their platforms against emerging threats.

Comprehensive  control with expertise that instills customer trust


Still, like many other merchants in different industries, tax companies need to collect and store sensitive customer data to operate their business efficiently.

The question ultimately lies in how can tax preparation software vendors effectively protect customer data while also enabling their businesses to operate and innovate.
 

When researching security vendors to support these requirements every tax preparation software vendor should be evaluating a client-side protection solution based on the following criteria:

1. Comprehensive Platform

First-Party JavaScript Obfuscation

The platform should facilitate the implementation of standardized, state-of-the-art code obfuscation for all internally developed JavaScript throughout the product life cycle, spanning from development to runtime. 

Fine-Grained Third-Party Tag Control

The platform should offer consistent, fine-grained visibility and control over the behavior and data consumption of all third-party tags’ JavaScript across the entire business.

2. Best of Breed & Quality

The ideal client-side protection and compliance platform should be entirely dedicated to client-side security and compliance. It should provide a comprehensive solution to protect businesses from emerging client-side risks and mitigate security threats, data leakage, IP theft, and compliance breaches.

This includes a solution that focuses on controlling credit card data on the payment page but also access to personal information often input including name, address, filing status, and social security numbers. 
 

3. Top Notch Tax Season Performance

The platform must have the capability to scale and support the largest and most demanding websites without causing any slowdown or disruption to the online user experience. 

Given tax preparation software is impacted based on seasonal increases in web traffic it’s imperative the solution selected can scale up or down based on performance needs. 

4. Sweeping Client-Side Security & Compliance Policies 

A key feature of the ideal solution ought to be its ability to support the formulation by all involved teams (e-comm, product management, software development, fraud mitigation, security, digital, marketing as well as governance, risk, and compliance) of a centralized security policy encompassing all client-side related risks and regulatory compliance requirements including PCI DSS.

5. Client-Side Expertise

The chosen vendor should provide full customer support at every step.

Clients can get help choosing the right first-party JavaScript obfuscation techniques for their needs. For third-party tags, skilled consultants are available to guide them in setting up the best risk mitigation strategies, including suitable data fencing tactics. And if desired a fully managed service should be offered.

A vendor with the right level of expertise will enable business operations while instilling customer trust.

By adopting a proactive stance towards security, companies can fortify their defenses against evolving cyber threats and ensure a safer, more secure, and trusted tax filing experience.

Creating a Modal notification with Vue SweetAlert

While the JavaScript Popup box has been the solution for creating a prompt notification, these popup windows can display crucial messages, confirmations, warnings, and other information. However, effortlessly applying them necessitates using the appropriate tools and procedures. Vue Sweetalert enters the picture as an aid for developers at this point.

Vue Sweetalert is a simple plugin that connects with Vue.js applications, allowing developers to create pleasing and configurable modal notifications easily.

This article will teach us how to create a responsive and customizable modal using the Vue plugin SweetAlert and the fundamentals of JavaScript Popup-box before moving on to the plugin to assist us in understanding how it works.  

What is Vue Sweetalert

Vue Sweet Alert is a JavaScript library that simplifies the creation of customizable popup messages and modal dialogs. It is a versatile alternative to traditional JavaScript popup boxes and functions as a wrapper component with server-side rendering (SSR) support.

Furthermore, Vue SweetAlert empowers us to showcase a wide range of popup messages, including success notifications, error alerts, confirmations, and more, all while allowing us to tailor styling and content to our specific needs. This flexibility enables us to craft engaging and visually appealing popup dialogs on our websites.

Creating a Basic Modal Notification with Javascript

Before we delve into integrating SweetAlert into our application, let’s take a moment to explore basic code examples of the three types of popup boxes that JavaScript offers. These popup boxes are alert boxes, prompt boxes, and confirm boxes. Let’s dive into the code examples to see how they work:

        <script>
            // Example of an alert box
            function showAlert() {
                alert("This is an alert box. Click OK to continue.");
            }
            // Example of a prompt box
            function showPrompt() {
                const result = prompt("Please enter your name:", "");
                if (result !== null) {
                    alert("Hello, " + result + "! You entered your name.");
                }
            }
            // Example of a confirm box
            function showConfirm() {
                const isConfirmed = confirm("Are you sure you want to proceed?");
                if (isConfirmed) {
                    alert("You clicked OK!");
                } else {
                    alert("You clicked Cancel!");
                }
            }
        </script>
    <div>
        <button onclick="showAlert()">Show Alert Box</button>
        <button onclick="showPrompt()">Show Prompt Box</button>
        <button onclick="showConfirm()">Show Confirm Box</button>
    </div>

The code example above illustrates the functionality of JavaScript popup boxes, showcasing how they operate differently in various scenarios. Feel free to copy and paste the code into your code editor or development environment to observe the results firsthand. This hands-on experience will give you a clear understanding of how these popup boxes function before moving to a new alternative called SweetAlert.

Setting Up Development Environment

The initial action outlined in this post involves creating a new Vue project. To begin, open a terminal, locate the directory where you would like the new project to be created, and run the following command:

npm init vue@latest

Afterward, we will receive a prompt message requesting confirmation for specific additional dependencies we intend to include in our project. The command provided will create a folder structure for our newly created project.

Integrating Vue Sweetalert in Vue Project

The next step is to install and configure sweetalert in our Vue project so we can get started. Navigate to the new project we created and use the following command to set sweetalert in our new project:

       npm install -S vue-sweetalert2

        or

        Yarn add vue-sweetalert2

In addition to installing SweetAlert through the npm package, we can use our project’s CDN file for quick integration. There is also a separate stylesheet file available that we can include if required.

Let’s move on to the next phase, setting up SweetAlert in our Vue project to begin using it. Go to the recently created project and copy and paste the following code into our main.js file to enable it to work.

import './assets/main.css'

import { createApp } from 'vue'
import App from './App.vue'

import VueSweetalert2 from 'vue-sweetalert2';
import 'sweetalert2/dist/sweetalert2.min.css';

const app = createApp(App);
app.use(VueSweetalert2);
app.mount('#app');

In the code example above, we imported SweetAlert styles to ensure an appealing design for our popup box. Without these styles, the content within the popup box may appear disorganized.

Creating a Modal notification with Vue Sweetalert

Now that we have successfully integrated the SweetAlert library into our project let’s explore how it functions. In our following example, we will begin with a simple model and then delve into customizing it to create a distinct appearance. To do that, we will create a new file and copy this code into the file created:

    <template>
        <button @click="showAlert">Close browser</button>
    </template>
    <script>
    export default {
      methods: {
        showAlert() {
          this.$swal({
            title: 'Close all tabs ?',
            text: 'You have 8 tabs open in this browser window. If you close this browser you will lose all your tabs.',
            type: 'warning',
            showCancelButton: true,
            confirmButtonText: 'Close all',
            cancelButtonText: 'Cancel',
            showCloseButton: true,
            showLoaderOnConfirm: true
          })
        },
      },
    };
    </script>


The following example will teach us to customize our popup box further by incorporating a conditional statement, an icon, and a tailored button. This hands-on demonstration will illustrate how to personalize popup notifications to meet specific requirements and enhance user interactions. To do that, copy the code below and replace it with the previous code example in the new file we created 

    <template>
      <div class="wrapper">
        <button @click="showAlert">Delete file</button>
      </div>
    </template>
    
    <script>
    export default {
      methods: {
        showAlert() {
          this.$swal({
            title: 'Delete file?',
            text: 'Deleting this file will also delete it from our database.',
            type: 'warning',
            showCancelButton: true,
            confirmButtonColor: '#4CAF50',
            cancelButtonColor: '#f44336',
            confirmButtonText: 'Yes, delete this file',
            cancelButtonText: 'Cancel',
            showCloseButton: true,
            showLoaderOnConfirm: true
          }).then((result) => {
            if (result.value) {
              this.$swal('Deleted', 'You have successfully deleted this file, and it has been removed from our database.', 'success')
            } else {
              this.$swal('Cancelled', 'Your file has been saved', 'info')
            }
          })
        },
      }
    }
    </script>


The examples above show how easily we can integrate SweetAlert into our Vue project and create appealing modal notifications. SweetAlert can be used in many ways, such as when authenticating a user, for cookies display, and for newsletter apps. Generally, it is used for sharing popup messages or information with users. 

Conclusion

SweetAlert provides many versatile functions, enabling us to craft highly customizable modal notifications. These capabilities include incorporating images, icons, GIF files, custom HTML tags, animations, and timers.

Each feature is crucial in helping us design visually appealing and engaging notifications.

To explore these functionalities in-depth, I encourage you to review the documentation to comprehensively understand what SweetAlert offers.

Optimizing Code Logic with Switch Statements in JavaScript

In the realm of JavaScript programming, optimizing code logic is a fundamental aspect of enhancing performance, readability, and maintainability. One powerful tool in achieving these goals is the switch statement.


While often overshadowed by its more prevalent counterpart, the if-else statement, the switch statement offers a concise and structured approach to handling multiple conditions. Allows you to evaluate an expression against multiple possible values. It provides a concise and organized way to handle a series of conditions. 

Advantages of Switch Statements


Switch statements in JavaScript offer several advantages, making them a valuable tool in certain scenarios. Here are some of the key advantages of using switch statements:

Readability and Maintainability

  • Switch statements can enhance the readability of the code, especially when dealing with a large number of conditions. The structure is often more concise and easier to follow than a series of nested if-else statements.


Efficient Execution

  • Switch statements can be more efficient than equivalent if-else chains, especially when there are many conditions. The interpreter or compiler can optimize the switch statement for faster execution.


Structured Code

  • Switch statements provide a structured and organized way to handle multiple cases. Each case is explicitly defined, making it clear which code block corresponds to each possible value of the expression.


Handling Multiple Conditions

  • Switch statements are well-suited for scenarios where a single expression needs to be compared against multiple possible values. This makes them particularly useful in scenarios such as menu selection, state machines, or handling different types of input.


Default Case

  • The inclusion of a default case in a switch statement allows you to specify a block of code to execute when none of the cases match. This can help handle unexpected or undefined cases gracefully.


No Need for Strict Equality

  • Switch statements use strict equality (===) for comparisons, which means they do not perform type coercion. This can be an advantage when you want to ensure both value and type match.


Understanding Switch Statements


The switch statement in JavaScript provides a concise way to evaluate an expression against multiple possible case values. The basic syntax and structure of a switch statement are as follows:

switch (expression) {
  case value1:
    // Code to be executed if expression matches value1
    break;
  case value2:
    // Code to be executed if expression matches value2
    break;
  // Additional cases as needed
  default:
    // Code to be executed if none of the cases match expression
}


Here’s a breakdown of the components:

  1. switch keyword: Initiates the switch statement.

  2. (expression): The expression is evaluated once. The resulting value is then compared with the values specified in the case clauses.

  3. case value: Defines a case to match against the evaluated expression. If the expression matches the value, the associated block of code is executed. If a break statement is encountered, the switch statement exits. If not, it “falls through” to subsequent cases until a break or the end of the switch statement is reached.

  4. break: Terminates the switch statement, preventing fall-through to subsequent cases. If omitted, execution will continue to the next case.

  5. default: Optional. Specifies the code to be executed if none of the cases match the evaluated expression. Similar to an “else” statement in an if-else structure.

Here’s a simple example:

let day = 3;
let dayName;

switch (day) {
  case 1:
    dayName = "Monday";
    break;
  case 2:
    dayName = "Tuesday";
    break;
  case 3:
    dayName = "Wednesday";
    break;
  default:
    dayName = "Unknown day";
}

console.log(dayName); // Output: Wednesday


In this example, the switch statement evaluates the value of the day variable and assigns the corresponding day name to the dayName variable.

How do switch statements work compared to if-else statements?


Switch statements and if-else statements are both control flow structures in JavaScript used to make decisions based on the value of an expression. However, there are notable differences in how they work and when to use them.

Switch Statements

  1. Expression Matching: Switch statements are particularly useful when you have a single expression whose value you want to match against multiple possible values (cases).

  2. Multiple Conditions: Switch statements are concise when dealing with multiple conditions. Each case checks a specific value, and if a match is found, the associated block of code is executed.

  3. Fall-Through: One unique feature of switch statements is “fall-through.” If a case does not contain a break statement, execution will continue to the next case, potentially allowing for multiple cases to execute.

switch (expression) {
 case 1:
   // Code for case 1
   break;
 case 2:
 case 3:
   // Code for case 2 and 3 (fall-through)
   break;
 
default:
   // Code for default case}


4. Readability: Switch statements can enhance the readability of the code, especially when dealing with a large number of conditions.

If-Else Statements:

  1. Expression Comparison: If-else statements are more flexible and can handle complex conditions. They are suitable when you need to evaluate multiple expressions or conditions.

  2. Boolean Conditions: If-else statements are often used when the conditions are based on boolean expressions or when the conditions are more complex than simple value matching.

if (condition1) {
 // Code for condition1
} else if (condition2) {
 // Code for condition2
} else {
 // Code if none of the conditions are true
}
  1. No Fall-Through: Unlike switch statements, if-else statements do not have fall-through. Only the block of code corresponding to the first true condition is executed.

  2. Individual Conditions: If-else statements are more suitable when each condition requires a distinct set of instructions, and there is no desire for fall-through behavior.

Choosing Between Them:

  • Use switch statements when you have a single expression with multiple possible values and the conditions are straightforward.

  • Use if-else statements when dealing with more complex conditions, boolean expressions, or when each condition requires a unique set of instructions.


In practice, the choice between switch and if-else often depends on the specific requirements of the code and the nature of the conditions being evaluated.

Best Practices for Using Switch Statements


When using switch statements in JavaScript, following best practices can contribute to writing clean, maintainable, and efficient code. Here are some best practices for using switch statements:

  • Use Switch for Multiple Conditions

Switch statements are most effective when there are multiple conditions based on the value of a single expression. If there are only one or two conditions, an if-else statement might be more appropriate.

  • Keep it Concise

Aim for concise switch statements. If the logic within each case becomes too complex, consider encapsulating it in separate functions or methods to maintain readability.

  • Avoid Fall-Through Pitfalls

Be cautious with fall-through behavior. While it can be useful in certain cases, make sure it’s intentional and well-documented. Include comments indicating that fall-through is deliberate to prevent confusion.

switch (day) {
 case 1:
 case 2:
 case 3:
   console.log("Weekday");
   break;
 case 4:
 case 5:
   console.log("Workday");
   break;
 default:
   console.log("Weekend");
}
  • Use Default Case Wisely

Include a default case to handle unexpected values or provide a fallback option. This can prevent silent failures when none of the cases match.

switch (color) {
 case "red":
   // Code for red
   break;
 case "blue":
   // Code for blue
   break;
 default:
   console.log("Unknown color");
}
  • Avoid Complex Expressions

Keep the switch expression simple. Avoid complex expressions or calculations within the switch parentheses. If needed, calculate the expression beforehand and use the result in the switch statement.

  • Use Strict Equality

Switch statements use strict equality (===) for comparisons. This means both the value and the type must match. Be aware of this behavior to avoid unexpected results.

switch (value) {
 case 1:
   // Code for value 1   
break;
 case "1":
   // This case will not match for value "1" due to strict equality
   break;
}
  • Encapsulate Complex Logic

If a case requires complex logic, consider encapsulating that logic in a function or method. This keeps each case block focused and maintains readability.

switch (condition) {
 case "case1":
   handleCase1();
   break;
 case "case2":
   handleCase2();
   break;
 default:
   handleDefault();
}
  • Avoid Duplicate Code

If multiple cases share the same code block, consider reorganizing the code to avoid redundancy. This promotes maintainability and reduces the chance of introducing bugs during updates.

Alternatives and Considerations

While switch statements are a powerful tool for handling multiple conditions, there are alternative approaches and considerations that developers should be aware of. Choosing the most appropriate control flow structure depends on the specific requirements of the code. Here are some alternatives and considerations to switch statements in JavaScript:

  1. if-else Chains:

If-else statements provide a more flexible approach when dealing with complex conditions or boolean expressions. They are particularly useful when each condition requires a distinct set of instructions.

if (condition1) {
 // Code for condition1
} else if (condition2) {
 // Code for condition2
} else {
 // Code if none of the conditions are true
}
  1. Object Mapping:

Instead of using a switch statement, consider using an object to map values to functions or outcomes. This can be especially beneficial when each case involves a significant amount of code.

const caseHandlers = {
 case1: () => {
   // Code for case1
 },
 case2: () => {
   // Code for case2
 },
 default: () => {
   // Code for default case 
}
};

// Usage
caseHandlers[expression] ? caseHandlers[expression]() :
 caseHandlers.default();
  1. Array Indexing:

In some cases, an array can be used for mapping values to specific actions or outcomes. This is particularly useful when the cases are numeric or can be easily indexed.

const caseHandlers = [
 () => {
   // Code for case 0
 },
 () => {
   // Code for case 1
 },
 // ... more handlers
 () => {
   // Code for default case
 }
];

// Usage
caseHandlers[expression] ? caseHandlers[expression]() :
 caseHandlers[defaultCaseIndex]();
  1. Ternary Operator:

For simple binary conditions, the ternary operator (? 🙂 provides a concise and expressive way to handle alternatives.

const result = condition ? "Value for true" : "Value for false";
  1. Function Dispatch:

Create separate functions for each case and use function dispatch to call the appropriate function based on the expression.

function handleCase1() {
 // Code for case1
}

function handleCase2() {
 // Code for case2
}

function handleDefault() {
 // Code for default case
}

// Usage
switch (expression) {
 case 1:
   handleCase1();
   break;
 case 2:
   handleCase2();
   break;
 default:
   handleDefault();

Conclusion


Mastering the art of optimizing code logic through the strategic application of switch statements in JavaScript can significantly elevate the quality of your programming endeavors.

As we’ve explored the syntax, advantages, and best practices associated with switch statements, it becomes evident that their judicious use can lead to code that is not only more concise but also more readable and maintainable.


By embracing the strengths of switch statements and understanding their nuanced intricacies, developers can navigate complex conditions with elegance and efficiency. However, it is essential to strike a balance and recognize that while switch statements offer compelling benefits, they may only sometimes be the silver bullet for some situations.

Continuous learning, experimentation, and an astute understanding of alternative constructs contribute to a holistic approach toward code optimization.

Jscrambler and Evanssion Partner to Offer Client-Side Protection in the Middle East

Porto and Dubai, United Arab Emirates, March 26, 2024: Jscrambler, the pioneering platform for client-side protection, and Evanssion, a leading cybersecurity and cloud-native security distributor announce a new strategic partnership to distribute Code Integrity and Webpage Integrity to customers in the Middle East.

More than 98% of all websites use JavaScript as their go-to client-side coding language. It is easy to use, enables rapid development, and is considered one of the best ways to create exceptional web applications and user experience. However, its simplicity and elegance also make it highly vulnerable.

JavaScript client-side innovation exposes businesses to new security threats, intellectual property (IP) theft or data leakage risks, and compliance challenges.

Client-side Protection and Compliance by Jscrambler


Jscrambler is the only purpose-built comprehensive client-side protection and compliance platform dedicated to securing first- and third-party client-side JavaScript.

Its Code Integrity product safeguards first-party JavaScript through state-of-the-art obfuscation and exclusive runtime protection. On the other hand, Webpage Integrity product mitigates threats and risks posed by third-party tags all while ensuring compliance with the new PCI DSS v4 standard.

“JavaScript is a foundational technology for the worldwide web and has increasingly played a central role in creating advanced online user experiences,” said Ahmad Al Qadri, CEO at Evanssion. “By integrating Jscrambler’s distinctive client-side protection into our services for customers and partners across the Middle East, we address the critical need for compliance with the latest PCI DSS v4 requirements. Jscrambler’s solutions provide the assurance organizations need to ensure the security and compliance of their websites and client sessions, maintaining the highest standards.”

“We’re thrilled to partner with Evanssion to increase Jscrambler’s reach within the EMEA region,” said Carlos Gonçalves, VP of Growth at Jscrambler. “Evanssion’s deep knowledge of the Middle East market segment, reputation for successful and seamless execution, and domain expertise in cybersecurity make them an ideal partner.”

About Jscrambler


Jscrambler is the leader in Client-Side Protection and Compliance.

client-side-security-and-compliance-platform-by-jscrambler

JavaScript obfuscation with fine-grained third-party tag protection

Jscrambler is the first to merge advanced polymorphic JavaScript obfuscation with fine-grained third-party tag protection in a unified Client-Side Protection and Compliance Platform.

Jscrambler’s integrated solution ensures a robust defense against current and emerging client-side cyber threats, data leaks, misconfigurations, and IP theft, empowering software development and digital teams to securely innovate online with JavaScript.

Jscrambler’s Code Integrity product safeguards first-party JavaScript through state-of-the-art obfuscation and exclusive runtime protection.

Jscrambler’s Webpage Integrity product mitigates threats and risks posed by third-party tags, all while ensuring compliance with PCI DSS v4.

With Jscrambler, businesses adopt a unified, future-proof client-side security policy, all while achieving compliance with emerging security standards. 

Jscrambler serves a diverse range of customers including top Fortune 500 companies, online retailers, airlines, media outlets, and financial services firms whose success depends on safely engaging with customers online.

Jscrambler Wins Client-Side Security Award at the 20th Annual Globee® Awards for Cybersecurity

Porto, March 25, 2024: Jscrambler, the pioneering platform for client-side protection, today announced that its Client-Side Protection Platform has been named a Gold Globee winner in the Client-Side Security category at the 20th Annual 2024 Globee Cybersecurity Awards.

The Globee® Awards are the leading authority in recognizing business excellence globally.

Client-side protection platform lets businesses develop advanced online experiences using JavaScript while preventing client-side cyber threats, data leaks, and IP theft.

E-commerce and Application Security Teams


Marketing and e-commerce teams continue to embed tags on websites at an accelerated rate. While they help to improve functionality and gather key insights, they’re also being added without the consent of development and application security teams.

With security teams in the dark, data including private customer information, is either maliciously exfiltrated off the client browser or inadvertently leaked unknown to the business and once it’s out the damage is done.

The Client-side Protection and Compliance Platform

Jscrambler offers the industry’s first comprehensive client-side protection and compliance platform and the only one that covers first-party JavaScript obfuscation and third-party tag monitoring and protection.

These capabilities provide a blanket security and compliance policy encompassing all client-side related risks and regulatory compliance requirements. As a result, businesses gain visibility and fine-grained control of third-party scripts that mitigate areas of risk while enabling businesses to innovate online.

“We are excited to be recognized for Jscrambler’s success in helping businesses realize the benefits of using third-party vendors without inheriting all of the risks that come with it, such as digital credit card skimming and user data leakage,” said Rui Ribeiro, CEO & Co-Founder of Jscrambler. “With the Jscrambler Client Side Protection platform, companies can now create exceptional web apps and user experiences while being protected from data leakage and compliance violations. So we are allowing companies to move fast, improve, and evolve but in a secure manner.” 

The Globee Cybersecurity Awards spotlight the achievements of companies and individuals excelling in risk management, threat detection, cloud security, data privacy, and beyond. This accolade underscores Jscrambler’s commitment to securing digital infrastructures and safeguarding against cyber threats.

Explore the complete list of the 2024 Globee Cybersecurity Awards winners.

About Jscrambler


Jscrambler is the leader in Client-Side Protection and Compliance.

client-side-security-and-compliance-platform-by-jscrambler

JavaScript obfuscation with fine-grained third-party tag protection

Jscrambler is the first to merge advanced polymorphic JavaScript obfuscation with fine-grained third-party tag protection in a unified Client-Side Protection and Compliance Platform.

Jscrambler’s integrated solution ensures a robust defense against current and emerging client-side cyber threats, data leaks, misconfigurations, and IP theft, empowering software development and digital teams to securely innovate online with JavaScript.

Jscrambler’s Code Integrity product safeguards first-party JavaScript through state-of-the-art obfuscation and exclusive runtime protection.

Jscrambler’s Webpage Integrity product mitigates threats and risks posed by third-party tags, all while ensuring compliance with PCI DSS v4.

With Jscrambler, businesses adopt a unified, future-proof client-side security policy, all while achieving compliance with emerging security standards. 

Jscrambler serves a diverse range of customers including top Fortune 500 companies, online retailers, airlines, media outlets, and financial services firms whose success depends on safely engaging with their customers online.

Build Your Chatbot with OpenAI’s API

How to build a chatbot using OpenAI API?

Chatbots have become increasingly popular and valuable tools in today’s digital landscape. They provide automated and personalized conversational experiences, offering assistance, information, and engagement to users across various platforms. 

Read this step-by-step guide to set up a custom chatbot with Open AI.

Understanding OpenAI’s API


An API serves as a communication framework for software applications to interact. OpenAI’s API facilitates the integration of their advanced language models, empowering developers to incorporate these models into their projects for diverse natural language processing tasks. Here are some key points to understand about OpenAI’s API:

  1. Access to Language Models: OpenAI’s API provides access to state-of-the-art language models that can understand and generate human-like text. These models can answer questions, generate creative content, translate languages, summarize text, and much more.

  2. Integration: Developers can integrate OpenAI’s API into their software, websites, chatbots, or any application that involves natural language processing. This integration is done through HTTP requests, making it relatively straightforward for developers.

  3. Customization: OpenAI’s API allows developers to fine-tune models for specific tasks or applications. This means developers can adapt the language models to suit their particular needs, making them highly versatile.

  4. Usage-Based Pricing: OpenAI’s API typically operates on a pay-as-you-go pricing model, with developers paying for the number of requests or tokens processed. This allows for scalability and cost control.

  5. Language Support: The API supports multiple languages, making it versatile for applications in different regions and languages.

  6. Ethical Considerations: Using OpenAI’s API comes with ethical responsibilities, as it can generate text that may be harmful or biased. Developers must implement safeguards and moderation to ensure responsible use.

Chatbots have become integral in enhancing user interactions and automating customer support, and when powered by OpenAI’s language models, they can engage users in remarkably natural and intelligent conversations. In this journey, we will explore the dynamic synergy of OpenAI’s API, Node.js, and React, learning how to build a chatbot that not only understands and responds to user queries but also seamlessly integrates into your web applications. This article will be divided into two sections:

  1. Chatbot with OpenAI’s API and Nodejs

  2. Chatbot With OpenAI’s API and React

Chatbot with OpenAI’s API and Nodejs


The aim here is to develop a chat application designed to operate exclusively within a text-based command-line environment, such as the terminal or command prompt, and our main backend framework would be Nodejs.

Registering for an OpenAI API key

First and foremost we have to generate an API key, and for us to do that will have to follow the steps below:

  • Create an account on the OpenAI website.

  • To access the menu, log onto your account and click your profile name or icon.

  • Choose the ‘View API Keys’ option from the menu.

  • Select the ‘Create New Secret Key’ button.

  • Copy and paste the API key into a secure location when it has been generated. Keep in mind that the key won’t be shown again, so store it safely.

Setting up the Development Environment

Create a folder for the project first, then inside your folder run the following CLI.

npm init -y


This will create a package.json file inside our project folder to keep track of the project details

Add the following line of code in the package.JSON underneath the script line:

"scripts": {    
"dev": "node script.js"  },


This will help us any time we want to run our js file all we have to do is run the npm run dev command.

Also, Add the following line of code to the file:

"type": "module",


This single code line will enable the ES6 module Import statement.

 Installing necessary libraries and dependencies

 After that,  we install dotenv and openai dependencies.

npm install dotenv openai

This helps our code to recognize the .env file that we’re going to create as well as our script.js.

Next, we create our .env file and paste the API key that was generated.

API_KEY="YOUR_OPENAI_KEY_GENERATED"


Inside the script.js we’ll import config, OpenAI, and readline from dotenv, openai, and readline module:

import { config } from "dotenv";
config()
import OpenAI from 'openai';
import readline from "readline";


Add the following code below after importing your module.

const openai = new OpenAI({
    apiKey: process.env.API_KEY   
});


The code initializes an instance of the OpenAI API with the API key stored in the process.env.API_KEY environment variable, enabling secure access to OpenAI’s services within a Node.js application. You can generate an API key if you don’t already have one by following the steps above.

So we’re going to use the createChatCompletion function created by Openai, so we will type the code below.

const chatCompletion = await openai.chat.completions.create({  
 model: "gpt-3.5-turbo",
 messages: [{"role": "user", "content": "Hello!"}],
});
console.log(chatCompletion.choices[0].message);


The code above calls the createChatCompletion function with a sample input message and then prints the response to the console (chatCompletion.choices[0].message) for you to review and verify if the function is working correctly.

This code snippet uses OpenAI’s Chat API to engage the GPT-3.5 Turbo model in a conversation initiated by a “Hello!” message from a user. It captures the model’s response and logs it to the console, making it a fundamental building block for creating chatbots with OpenAI’s powerful language models.

So when we run the npm run dev command, we get a response from the AI after some time. And there you have it; our chatbot is up and running.

However, it will be advantageous to increase the application’s interactivity by asking the user for feedback rather than hardcoding the message’s text into the code. We can benefit from the readline module in this situation.

For that to happen, we’re going to set up an event listener.

const userInterface = readline.createInterface({
   input: process.stdin,   
   output: process.stdout
})

userInterface.on("line", async input =>{
   const chatCompletion = await openai.chat.completions.create({       
model: "gpt-3.5-turbo",       
messages: [{role: "user", content: "input"}],
     })     
console.log(chatCompletion.choices[0].message.content);     
userInterface.prompt()
})


By creating this userInterface, you enable the application to interact with users by reading their input from the command line (process.stdin) and displaying output to the command line (process.stdout).

We’ll wrap our previous code within the event listener, then create a userInterface.prompt() for the next input. So whenever a user sends a message, they get a reply, and the code prompts the user for the next input message, and it runs like a loop.

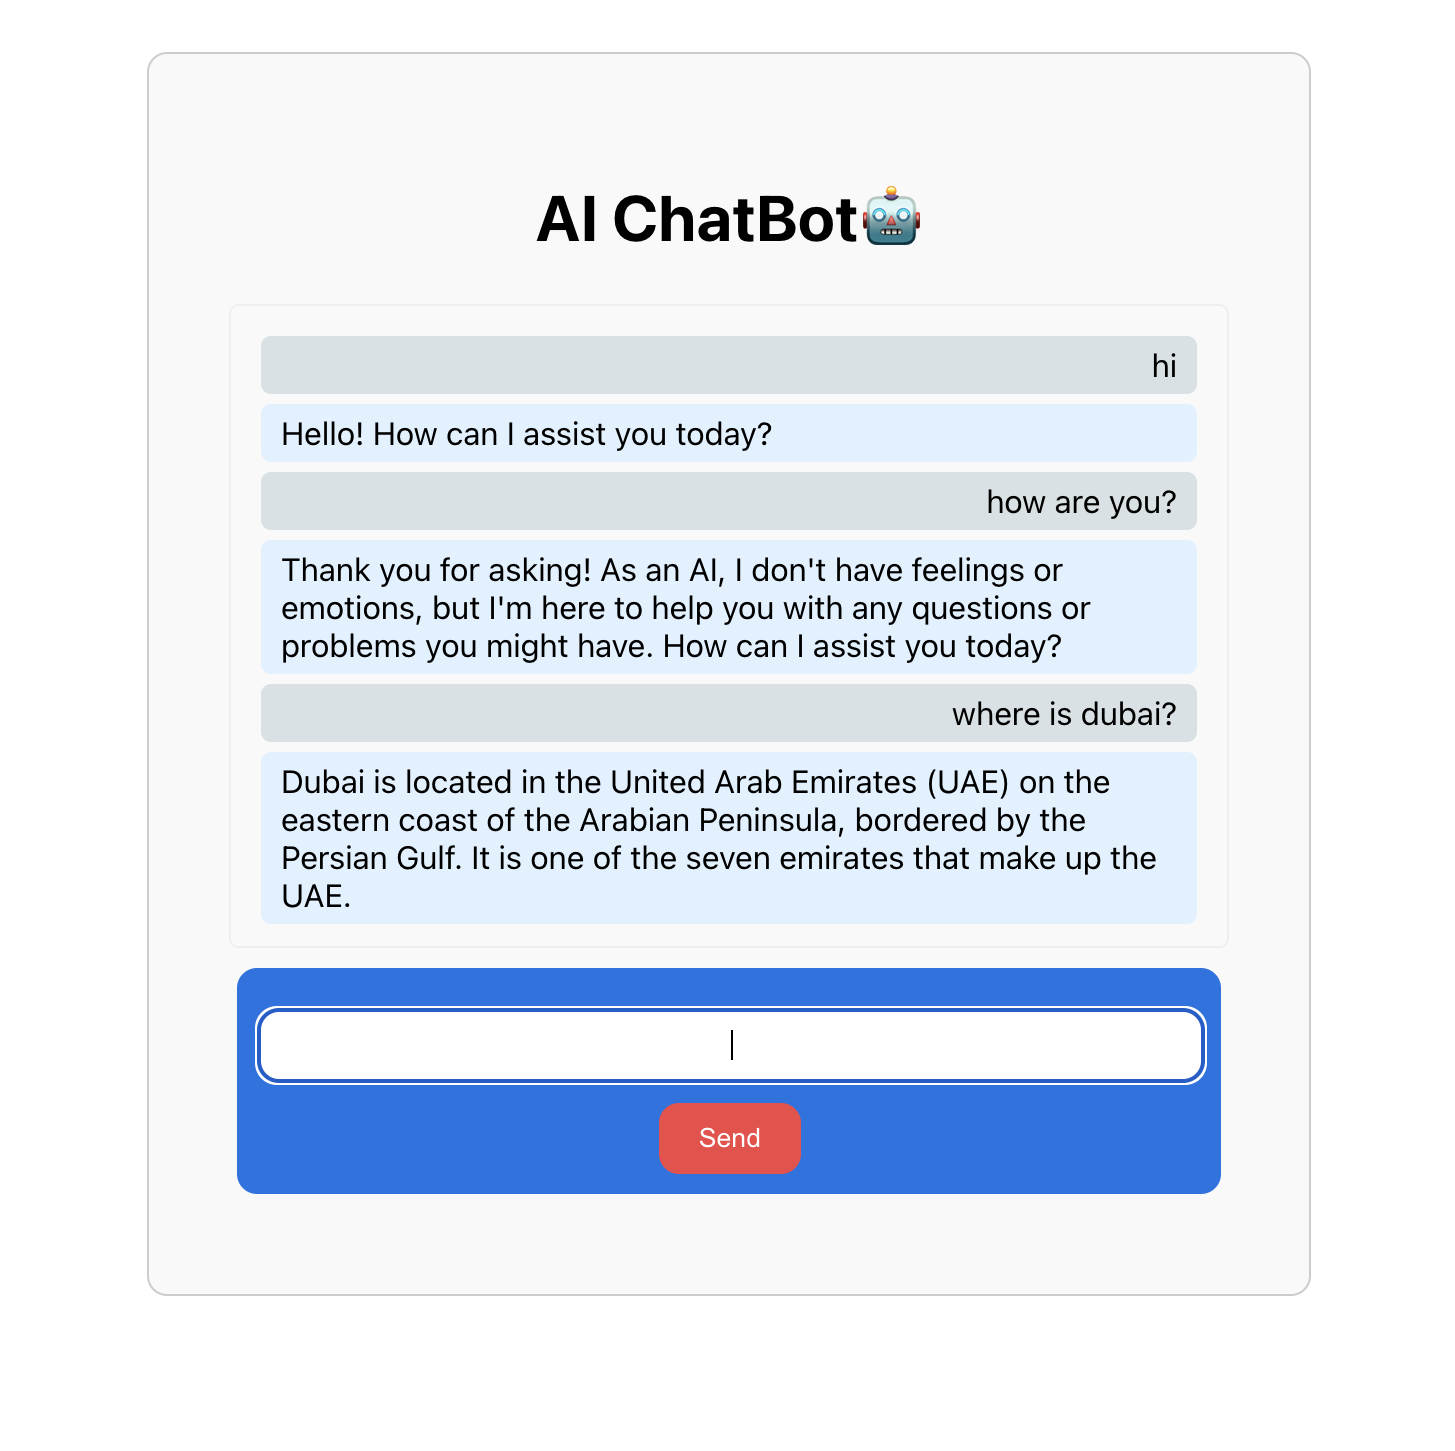
Run the program to engage the AI in conversation. You will see a similar illustration below:

setting-up-an-openai-assistant-api-using-node.js

What about those individuals who might not know how to use a CLI application? They’ll require a more user-friendly product with an improved user interface (UI) and user experience (UX). The creation of that type of application using React will be the main topic of the following section.

Chatbot With OpenAI’s API and React

The goal of this section is to assist front-end developers in becoming familiar with the OpenAI API so they can design better chat applications and user interfaces for improved user experiences, like what we have below.

Chatbot-with-OpenAI’s-API-and-React

The first thing to do is set up a basic React boilerplate by running the command below:

npx create-react-app chatbot

After clearing the bloated files, then install the only dependency we need.

npm i openai

We’ll create a component folder in our react project and also create a Chatbot.js file and that’s where the work needs to be done.

Inside the Chabot.js we’ll import the following module below:

import React, { useState } from “react”;
import OpenAI from “openai”;
import “./ChatBot.css”;

Implementing basic input and output functionality

Let’s define the Chatbot component, which is the main component of the chatbot:

const Chatbot = () => {
  const [input, setInput] = useState(“”);
  const [output, setOutput] = useState(“”);
  const [messageHistory, setMessageHistory] = useState([]);

The Chatbot component uses the useState hook to store the input, output, and message history of the chatbot.

Then we create an instance of the OpenAI API with specific configurations.

const openai = new OpenAI({
    apiKey: “YOUR_API_KEY”,
    dangerouslyAllowBrowser: true
  });


The code initializes the openAI variable, which is an instance of the OpenAI API, with an API key and a configuration that may be used in a browser environment i.e. adding dangerouslyAllowBrowser: true to your code. This allows your application to make requests to OpenAI’s services securely and interact with its language models and AI capabilities.

We’re going to create a function that’s responsible for sending a user’s message to the OpenAI GPT-3.5 Turbo model, receiving the chatbot’s response, updating the conversation history, and clearing the input field for a seamless and organized conversation.

const sendMessage = async () => {
    const chatCompletion = await openai.chat.completions.create({
      model: "gpt-3.5-turbo",
      messages: [{ role: "user", content: input }],
    });
    setOutput(output + chatCompletion.choices[0].message.content + "n");
    setInput("");  };


The sendMessage function is responsible for sending a user’s input message to the OpenAI GPT-3.5 Turbo model through the OpenAI API. It awaits the response from the model and captures it in the chatCompletion variable, allowing you to use the Chatbot’s generated response for further interactions or display to the user.

Create a form-like component, where we can interact with the Chatbot.

const Chatbot = () => {
...  
return (
    <div className="chat-container">
      <h1>AI ChatBot?</h1>
      <div className="bot-message">{output}</div>
      <div className="user-message">
        <input
          type="text"
          value={input}
          onChange={(e) => setInput(e.target.value)}
          className="chat-input"
        />
        <button type="button" onClick={sendMessage} className="send-button">
          Send
        </button>
      </div>
    </div>
  );
};
export default Chatbot;


The input field and the button are both controlled components which means that their values are managed by the React state. The input state variable stores the user’s input, and the output state variable stores the chatbot’s response.

If we try and run our code we’d get something like this below:

result-after-trying-and-running-our-code

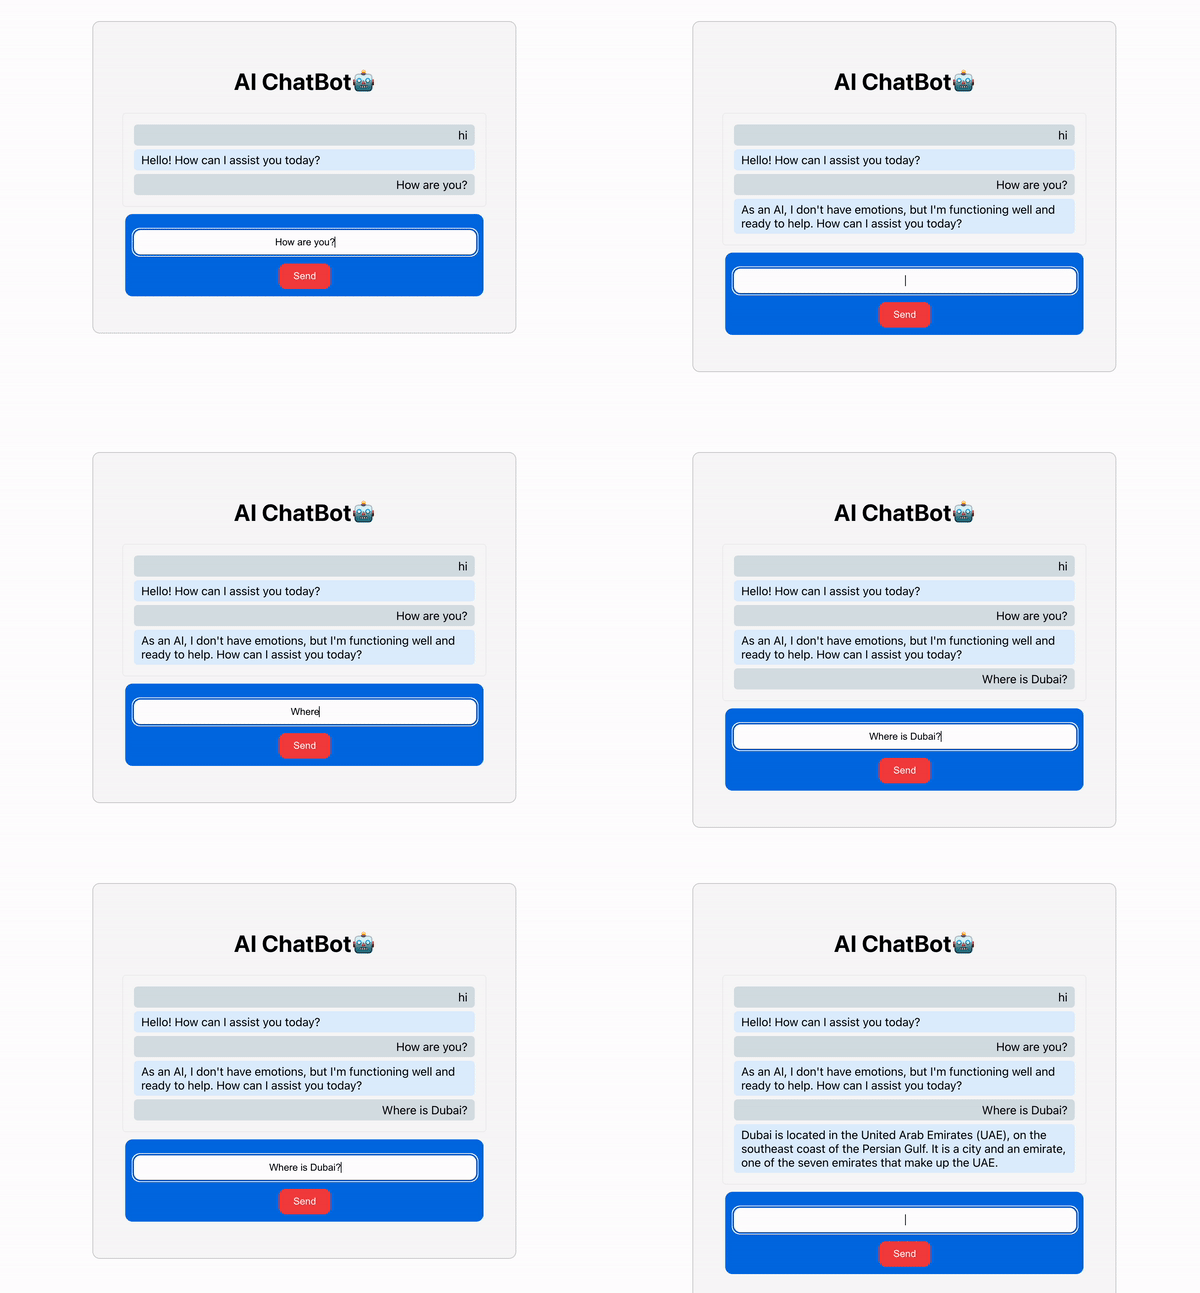
Now, if we ask our ChatBot a question, we hope to get a reply.

chabot-answering-to-our-questions-example

Designing the chatbot’s conversational flow

Structuring the chatbot’s interactions with users by adding some styles, will ensure a smooth and natural flow of conversation. So we styled our Chabot; click on the GitHub link for the complete code.

Designing-the-chatbot's-conversational-flow-example

Best Practices for Chatbot Development


Developing a successful chatbot involves a combination of technical and user experience considerations. Here are some best practices to keep in mind when creating a chatbot:

  • Ensuring user privacy and data security:  Safeguarding user data and maintaining compliance with data protection regulations. Communicate your privacy policy to users.

  • Iterative development and continuous improvement: Continuously test and refine your chatbot. User feedback, analytics, and A/B testing can help improve its performance and user satisfaction.

  • Regulatory Compliance: Ensure that your chatbot complies with relevant industry and regional regulations, especially in highly regulated sectors like healthcare or finance.

Conclusion


Exploring chatbot development using OpenAI’s API provides a chance to utilize advanced AI technology and create innovative conversational agents, benefiting various industries.

Whether you’re a seasoned developer or just starting, OpenAI’s tools empower you to enhance customer service, user experiences, and communication methods, driving innovation in the digital age.

Resources

Implementing Google reCAPTCHA V2 for Next js Application

In this tutorial, you’ll learn how to implement Google reCAPTCHA v2 into your Next.js application.

Google reCAPTCHA v2 into a Next.js application

reCAPTCHA is a service that helps in identifying humans from bots. By using reCAPTCHA, we can reduce spam and bot attacks by a significant number. How does this work? Whenever Google gets suspicious about the visitor, it throws a challenge that can be easily solved by humans but is hard for bots to figure out.

To get started with using Google reCAPTCHA you need to get an API key pair. The key pair contains a site key and a secret. The site key is used to invoke the captcha on the website and create a token and the secret is used on the server side to verify the user response and token.

Now two types of captcha can be used on the client side:

  •  reCAPTCHA v3

  •  reCAPTCHA v2

We’ll be using reCAPTCHA v2 and that too an invisible one. A visible captcha asks the user to tick a checkbox and if required it further asks for challenges. An invisible captcha doesn’t require any checkbox to be checked and is invoked at the click of a button.
 

So let’s start by registering the website to get the site key and secret. 

Setting Up Google Recaptcha


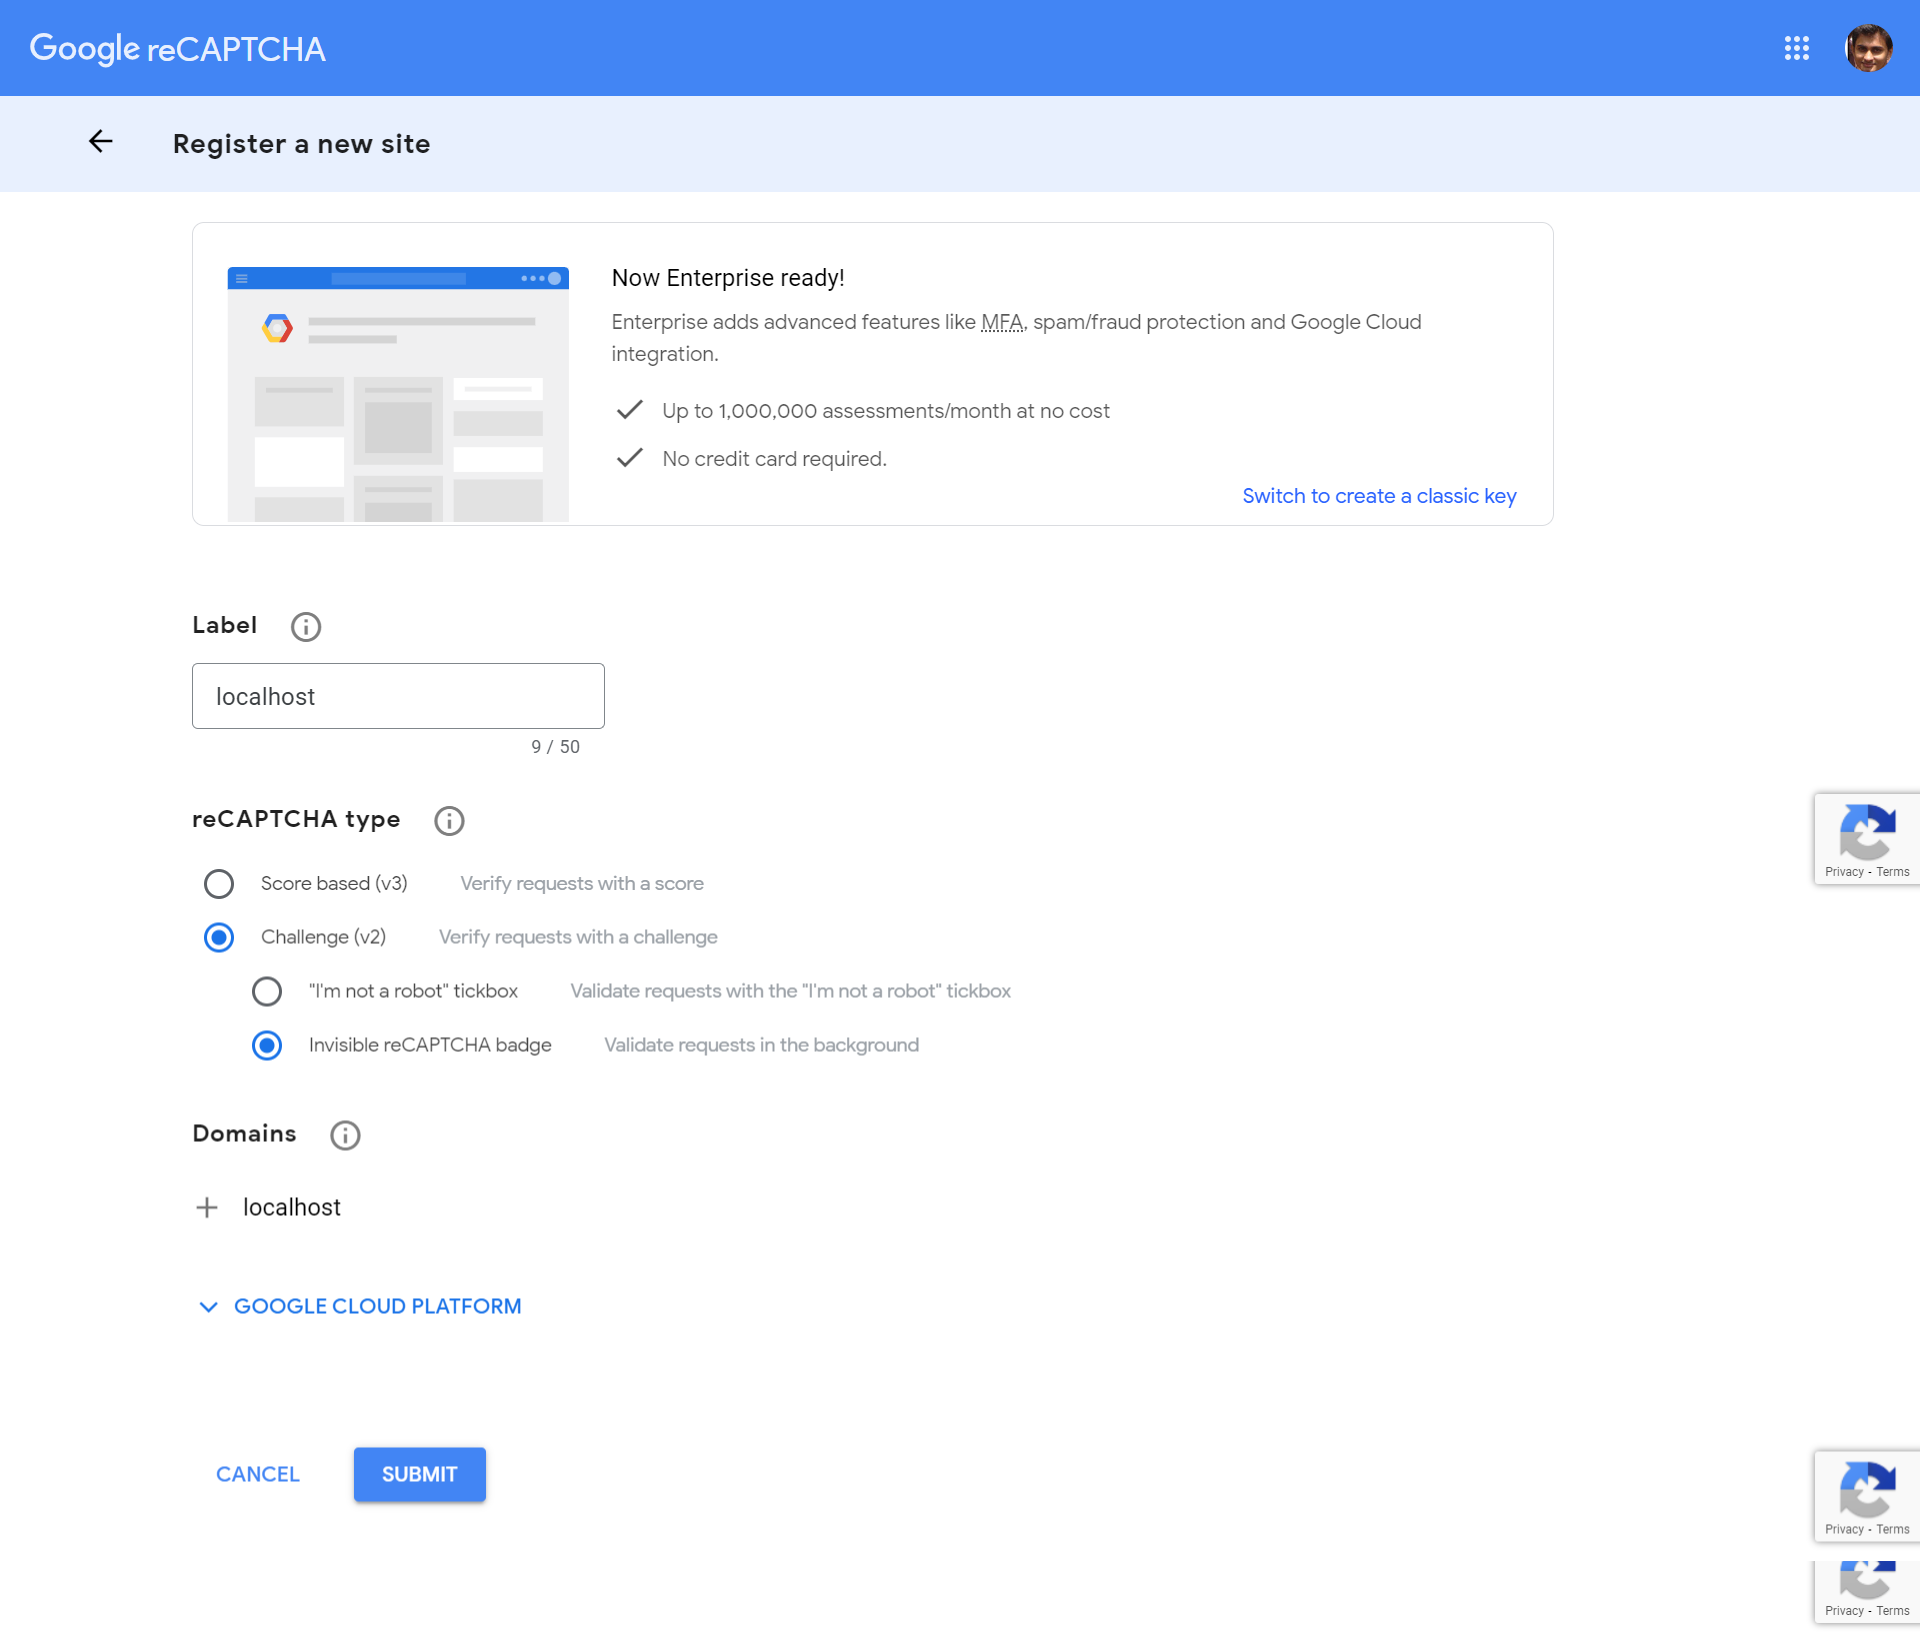
Go to the admin console and register the website with the details as shown.

Setting-Up-Google-Recaptcha

Click submit and you will get the required site key and secret.

Next, let’s create the Next.js application.

Creating your Next.js Application

Make sure you have Node.js 16.14 or later installed in your system. We’ll be using `create-next-app` to create the Next.js app. Start by installing it using `npx`.

bash
npx create-next-app@latest

The above would prompt you to enter a couple of details,

√ What is your project named? ... nextjs-captcha
√ Would you like to use TypeScript? ... Yes
√ Would you like to use ESLint? ... No
√ Would you like to use Tailwind CSS? ... No
√ Would you like to use `src/` directory? ... Yes
√ Would you like to use App Router? (recommended) ... No
√ Would you like to customize the default import alias (@/*)? ... No


Just make the selection as shown above to create a boilerplate code. Once done you can navigate to the project directory and run the application.

bash
cd nextjs-captcha
npm run dev

And you will have the project running at http://localhost:3000/. 

Next, let’s see how we can integrate reCAPTCHA into our Next.js app.


[LEARN MORE] How To Protect Next.js Apps with Jscrambler


Integrating Google reCAPTCHA in Next.js

We’ll be using the ‘react-google-recaptcha’ module for integrating reCAPTCHA into our app. Let’s start by installing the node module.

npm install react-google-recaptcha --save
npm install @types/react-google-recaptcha --save-dev

Along with the modules we also installed the required types for `react-google-recaptcha`.

Once the required modules are installed, you need to import and add the reCAPTCHA to the app layout.

Inside our `src/pages/_app.tsx` file import the `react-google-recaptcha`.

import  ReCAPTCHA  from  "react-google-recaptcha";


Alongside the `Component` please add the `ReCAPTCHA` component as shown:

<ReCAPTCHA
       ref={recaptchaRef}
        size="invisible"
        sitekey="your site key"
        onChange={onChange}
        asyncScriptOnLoad={asyncScriptOnLoad}
      />


And here is how the entire `_app.tsx` file looks:

jsx
import '@/styles/globals.css'
import type { AppProps } from 'next/app'
import React from 'react';
import ReCAPTCHA from "react-google-recaptcha";

export default function App({ Component, pageProps }: AppProps) {

  const recaptchaRef :any = React.createRef();

  const onChange = () => {
    // on captcha change
  }

  const asyncScriptOnLoad = () => {
    console.log('Google recaptcha loaded just fine')
  }
  return (
    <>
      <Component {...pageProps} />
      <ReCAPTCHA
        ref={recaptchaRef}
        size="invisible"
        sitekey="your site key"
        onChange={onChange}
        asyncScriptOnLoad={asyncScriptOnLoad}
      />
    </>
  )
}


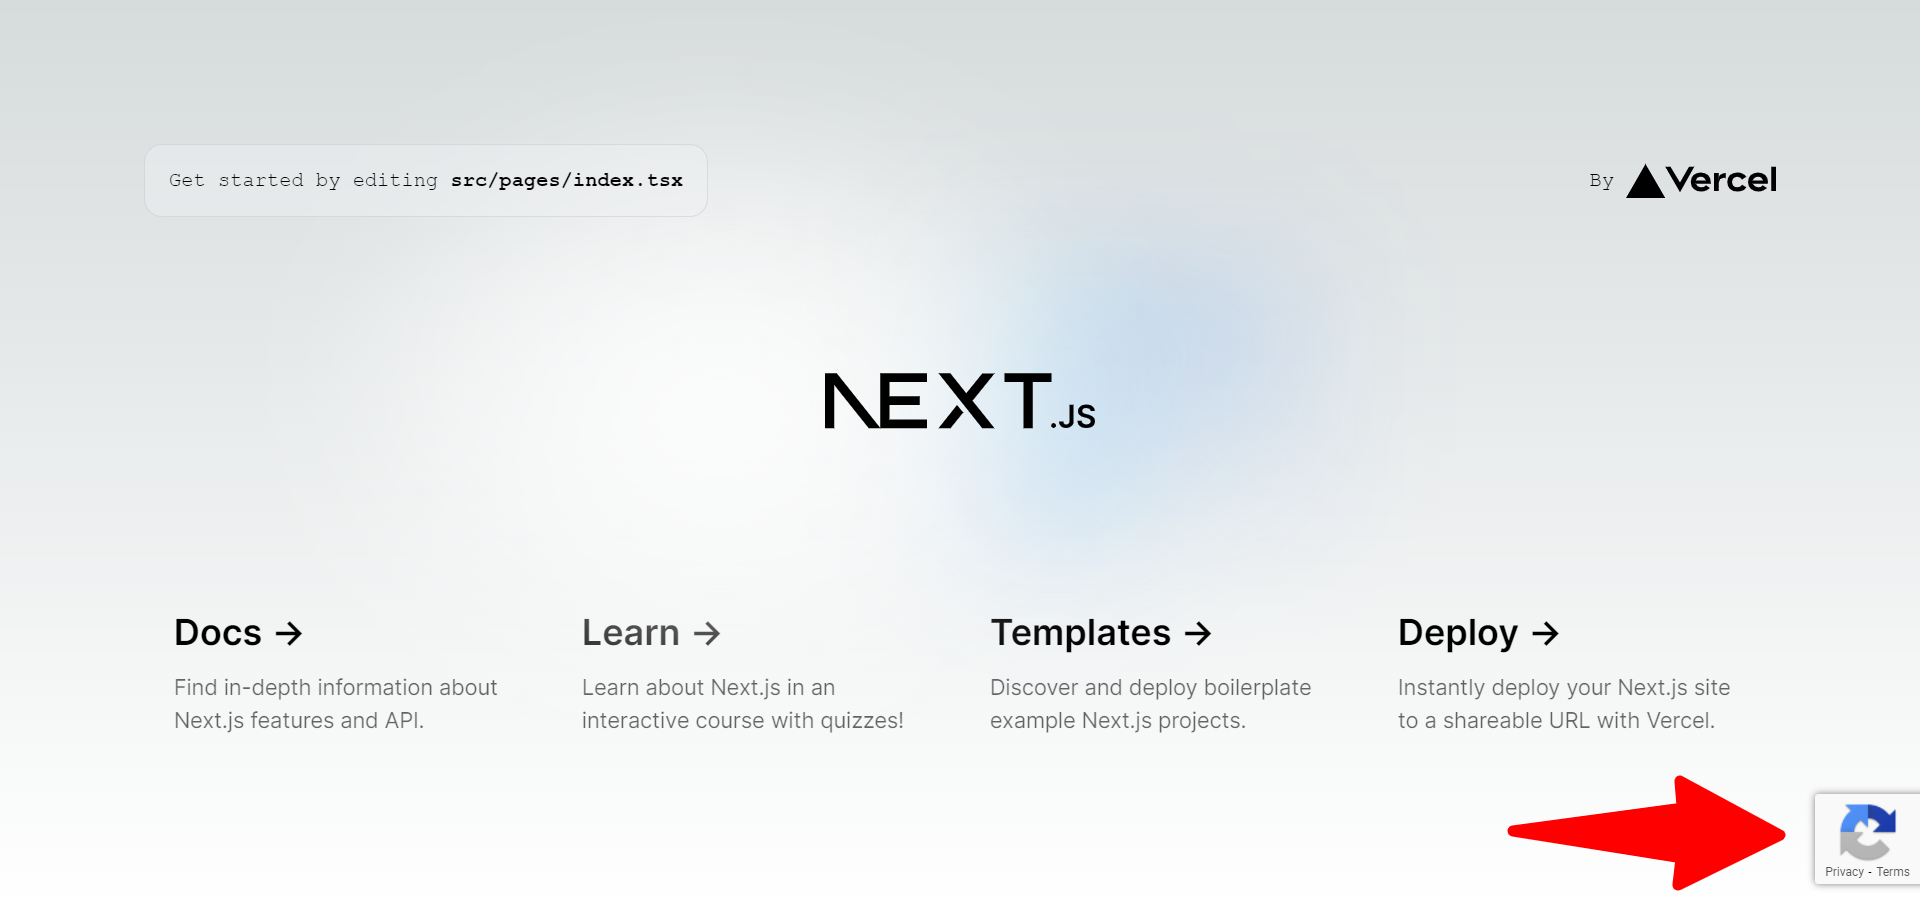
Save the above changes and go to your application. If the reCAPTCHA is loaded fine, you should be able to see the console log in the browser: `Google recaptcha loaded just fine`, and also there will be a Google reCAPTCHA icon on your web page.

Google-recaptcha-loaded-just-fine-example

Now Google reCAPTCHA is integrated into our Next.js app. Next, we need to see how to trigger the captcha on the form submission.

So, for that, we’ll just create a simple form. On the form submit we’ll trigger the captcha. If Google suspects anything is wrong, then a challenge would be thrown for the user to clear.

Creating the Form and triggering Captcha


We’ll be adding a form inside the `index.tsx` file which is our Home component. Remove the existing code from inside the main block and replace it with the code below.

html
<main className={`${styles.main} ${inter.className}`}>
    <form>
      <input type="text" />
      <button onClick={handleClick}>Click</button>
    </form>
</main>


Here is how the complete `index.tsx` file looks:

jsx
import Head from 'next/head'
import { Inter } from 'next/font/google'
import styles from '@/styles/Home.module.css'
const inter = Inter({ subsets: ['latin'] })

export default function Home({ recaptchaRef }: any) {

  return (
    <>
      <Head>
        <title>Create Next App</title>
        <meta name="description" content="Generated by create next app" />
        <meta name="viewport" content="width=device-width, initial-scale=1" />
        <link rel="icon" href="/favicon.ico" />
      </Head>
      <main className={`${styles.main} ${inter.className}`}>
        <form>
          <input type="text" />
          <button onClick={handleClick}>Click</button>
        </form>
      </main>
    </>
  )
}


Add a click handler to the button inside the form as shown above. This button click with trigger the captcha to generate the token for verification.

Now you need to pass the reference to the captcha element defined in the `_app.tsx` file. So go to the `_app.tsx` file and pass the `recaptchaRef` as prop to the `Component`. Here is how it looks:

typescript
<Component  {...pageProps}  recaptchaRef={recaptchaRef}  />

Once it’s passed you can destructure it inside the `index.tsx` file’s `Home` component as shown below:

typescript
export default function Home({ recaptchaRef }: any) {  
}


With a button click, you can access the `recaptchaRef` and trigger the captcha challenge using the `executeAsync` method to generate the token asynchronously.

typescript
import Head from 'next/head'
import { Inter } from 'next/font/google'
import styles from '@/styles/Home.module.css'
const inter = Inter({ subsets: ['latin'] })

export default function Home({ recaptchaRef }: any) {

  const handleClick = async ($event: any) => {
    $event.preventDefault();
    try {
      recaptchaRef.current.reset();
      const token = await recaptchaRef.current.executeAsync();
      console.log('token is ', token);
      if (token) {
        alert('Form submitted');
      } else {
        alert('Error getting token');
      }
    } catch (error) {
      console.log('error in handleClick ', error);
    }
  }

  return (
    <>
      <Head>
        <title>Create Next App</title>
        <meta name="description" content="Generated by create next app" />
        <meta name="viewport" content="width=device-width, initial-scale=1" />
        <link rel="icon" href="/favicon.ico" />
      </Head>
      <main className={`${styles.main} ${inter.className}`}>
        <form>
          <input type="text" />
          <button onClick={handleClick}>Click</button>
        </form>
      </main>
    </>
  )
}

As seen in the above code’s `handleClick` method, we are using the `executeAsync` method to generate the token. If everything is ok, no challenge will be thrown. Now once the challenge is cleared and a token is generated, this token needs to be verified at the server side to confirm the authenticity of the token generated.

Captcha Verification

This section needs to be created on the server end where your APIs are being written. For the sake of this tutorial, I’ll create a Next.js endpoint API endpoint where we’ll verify the captcha token.

Create a file called `verifyCaptcha.ts` inside `pages/api`. In the `pages/api/verifyCaptcha.ts` create an `async` handler function. This will make an API call to the Google verification service to validate the authenticity of the generated token.

Here is the Google service endpoint that we’ll be using to validate the captcha token: /recaptcha/api/siteverify . While making a POST request to the above endpoint you need to pass your client secret and the generated captcha token.

Here is how the `verifyCaptcha.ts` file looks:

typescript
import type { NextApiRequest, NextApiResponse } from 'next'

type Data = {
  success: boolean
}

export default async function handler(
  req: NextApiRequest,
  res: NextApiResponse<Data>
) {
  try{
    const secret = 'xxxxxxxxxxxxxxxxxxxxxxxxxx';
    const {response} = req.query; 
    const fetchQuery = await fetch(`/recaptcha/api/siteverify?secret=${secret}&response=${response}`,{
      method: 'POST',
      headers: {
        'Accept': 'application/json',
        'Content-Type': 'application/json'
      },
    })
    const apiResponse = await fetchQuery.json();
    res.status(200).json({ success: apiResponse?.success }) 
  } catch(error:any){
    res.status(500).json({ success: false }) 
  }
}

In the above code please replace your secret with the one that you generated from the admin console.

Now on the button click once the token has been generated you need to make an API call to the `verifyCaptcha` API endpoint to check the authenticity of the captcha token.

In your `index.tsx` file modify the `handleClick` method as shown:

typescript
  const handleClick = async ($event: any) => {
    $event.preventDefault();
    try {
      recaptchaRef.current.reset();
      const token = await recaptchaRef.current.executeAsync();
      if (token) {
        const apiQuery:any = await fetch(`/api/verifyCaptcha?response=${token}`)
        const {success} = await apiQuery.json();
        if(success){
          alert('Form submitted successfully');
        } else {
          alert('Form submission failed');
        }
      } else {
        alert('Error getting token');
      }
    } catch (error) {
      console.log('error in handleClick ', error);
    }
  }

Save the above changes and your Google invisible captcha is ready for testing. Once you click the button if the generated token is validated correctly, you’ll get the form submission message. If the button click is challenged by the captcha you’ll be required a pass a challenge like the one shown below,

select-all-images-with-crosswalks-recaptcha-v2-example

Wrapping It Up


As we explored in this tutorial, Google reCAPTCHA is a service that we can use to limit bots and spam.

Along with reCAPTCHA v2, Google also provides reCAPTCHA v3 where the user is never interrupted by a challenge or click. However, it generates a score based on which we can decide if it’s human or bot.

What Does it Mean to be PCI Compliant?

The payment card industry data security standard, or PCI DSS, is 20 years old in December of this year. Over the last two decades, it’s amazing – although not entirely surprising – how many urban myths, legends, and misunderstandings have grown up around the standard and around what it means to be PCI compliant.

We go back to basics to look at two key questions:

  • Who must comply with PCI DSS?

  • How can you keep your customers’ data and business safe?

Who Must Comply with PCI DSS? 

PCI DSS is a global standard that applies to any business of any size that stores, processes, or transmits cardholder data.

That’s a short sentence with a long list of implications. Let’s unpack them.

The standard is global so it applies to businesses wherever in the world they’re based.

And that’s any business. It doesn’t matter what you sell – products or services – or your industry sector. Aviation, construction, entertainment, financial services, healthcare, hospitality, retail and so on. They’re all within the scope of PCI DSS. 

Don’t get hung up on the word ‘business’ either. PCI applies even if you’re not engaged in commercial business, such as a non-profit organization, charity, educational institution, or government agency.

There are also a whole range of businesses behind the scenes, that may also store, process or transmit cardholder data. They’re in scope, too. 

That’s service providers, third-party organizations that handle payment card data on behalf of merchants or other service providers. Or financial institutions like banks, credit card companies, and other financial institutions involved in the payment card ecosystem.

Size doesn’t matter. PCI DSS still applies, irrespective of sales, turnover, number of employees or any other metric used to measure business size. And whether you accept one or one million card payments annually. 

What you do to validate your compliance may differ depending on how many card transactions you process a year. But small businesses are not out of the scope of PCI DSS just because they’re small.

You just have to accept cards to be in scope. That’s in physical stores, online through a website or mobile app, mail order, telephone order – however you trade.

When it comes to “cardholder data”, it’s the data that’s significant. And the fact that you’re storing, processing, or transmitting it, rather than the nature of your customers or cardholders. They could be consumers, other businesses, large corporations, multinationals, or even government departments.

Your customers could be using a Visa card, Mastercard, Amex card, or JCB card. This could be a credit, debit, prepaid, or commercial card. It could exist as a physical plastic card or a digital version on a mobile device – any type of payment card. All the major card brands are signed up to PCI DSS. And if you accept those cards, PCI DSS applies to your business.

Your customers cannot consent to you storing, processing, or transmitting their card data. Or indemnify you for its loss, theft, and so on. Adherence to PCI DSS requirements is a contractual matter between your business and the organization that provides your card acceptance facility.

How Can You Keep Your Customers’ Data and Business Safe?

The first step in keeping your customers’ data safe is understanding the threats out there. The four most common ones are:

  • Web app attacks – hackers exploit holes in your website to harvest personal and sensitive data, including cardholder data.

  • Malware – malicious software that criminals use to gain control of computers to access and steal data.

  • Skimming – copying card data to make counterfeit cards to steal money or buy things to sell for profit.

  • Unauthorized access – sneaking into computers or card terminals to steal card data.

Next, put in place controls that can protect your customers’ data and business against these threats. Here are some examples:

  • Firewalls – install and maintain software that controls data flow in and out of your network and computers.

  • Passwords – a string of characters that allows access to a computer system or service. Don’t use vendor-supplied default passwords or those that are easy to guess.

  • Logins – username and/or password for gaining access to a computer, database, or system. Assign a unique ID to each person with computer access.

  • Encryption – software that protects data by making it unreadable. Encrypt cardholder data across open, public networks at a minimum.

  • Tokenization – swapping sensitive data for a token that stands for this in various business processes to protect data when it is being processed, transmitted, or stored.

  • Anti-virus – designed to detect and destroy computer viruses. Use and regularly update anti-virus software.

  • Patches – software updates that fix mistakes in coding to help develop and maintain secure systems and applications. Used only tested products and suppliers.

  • Data fencing – restricts access to data to people who don’t need to know it and systems that don’t need to connect to it.

  • Secure card machines – fix or attach physical card terminals to prevent them from being taken away or lost. Deploy remote monitoring to send alerts if terminals are unplugged or tampered with.

  • Access tracking – tracks and monitors all access to network resources and cardholder data.

  • Policies – A written-down course of action or set of principles that your organization stands behind. Write and maintain a data security policy for all staff.

  • Testing – test all the above regularly, make improvements, monitor, and test again in a continuous cycle.

These examples are based on the twelve PCI DSS requirements against which business must validate their compliance. This helps protect not only your customers’ data but also your business, your reputation, your ability to trade and keep trading, and, ultimately, your bottom line. This is what it means to be PCI DSS compliant.

Implementing Authorization in JavaScript with Express.js and MongoDB

If you’ve followed our previous article on authentication, first off, thank you! Now, it’s time to take our understanding a step further and dive into the world of authorization, an area that’s as crucial as authentication, yet distinctly unique.

A Quick Refresher on Our Authentication Journey

In our previous article, we laid down the foundation of understanding user identification, and we explored how to securely register users, ensure they are who they say they are, and use JWTs to verify their interactions. 

Laying the Ground for Authorization

At its core, authorization is simply about permissions, or look at it as the logic and rules that determine what actions a user can perform in an application, based on their identity and, often, other factors.

Whether it’s allowing a regular user to view content, an author to edit their articles, or an admin to manage user accounts, authorization governs these decisions.

Roles and Permissions: Building a Structured Access Framework

When it comes to determining what a user can and cannot do within an application, roles, and permissions form the bedrock of our authorization strategies.

The Essence of Roles

Roles are broad categories or labels that we assign to users, representing their position or function within an application, and common examples you might have encountered include roles like ‘user’, ‘admin’, or ‘moderator’.

A role is, in essence, a collection of permissions bundled under a descriptive name. For instance, an ‘admin’ might have permission to add or remove content, manage user accounts, and view system settings, while a regular ‘user’ might only view content.

Drilling Down to Permissions

Permissions represent specific actions or tasks a user can perform, where they’re the granular, often binary decisions: can a user read this article? Can they delete this comment?

Permissions can be simple, like ‘read’, ‘write’, or ‘delete’, but they can also be more specific, such as ‘edit_own_content’ or ‘view_user_data’. As you can guess, with clear-cut permissions, we can tailor the user experience and ensure that users only access what they’re supposed to.

The Significance of Clear Role and Permission Boundaries

Establishing well-defined roles and permissions is more than just an organizational task; remember it’s about security, and it’s a fundamental aspect.

When we’re explicit about what each role can do and what permissions they have, it reduces ambiguities and potential security loopholes, and there’s a principle in security known as the “Principle of Least Privilege“, which asserts to give users only the permissions they need to perform their tasks, and demarcating roles and permissions ensures that users don’t accidentally get more access than they should.

As we move forward, we’ll be looking at how to implement these roles and permissions effectively, ensuring both functionality and security for our application.

Implementing Role-based Authorization

Role-based authorization, often abbreviated as RBAC, is a popular approach to structuring permissions, and thanks to it we assign roles to users and then define what each of those roles can do. Let’s see how we can put this into action with Express.js and MongoDB.

Assigning Roles to Users

Whether during registration or later, there comes a time when we must decide on a user’s role; here’s a simple way to assign a role during the registration process using Express.js and MongoDB (let’s use the same User schema we defined in the previous authentication article):

const express = require('express');
const User = require('./models/User'); // Assuming you have a User model

const router = express.Router();

router.post('/register', async (req, res) => {
  try {
    const user = new User({
      username: req.body.username,
      password: req.body.password,
      role: 'user' // Default role
    });
    await user.save();
    res.status(201).send({ message:
'User registered successfully!' });
  } catch (error) {
   
res.status(500).send(error.message
;
  }
});

Checking Roles Using Middleware

Middleware functions in Express.js are excellent for executing code before our main route handlers, so we can use middleware to check if a user has the right role. Here’s a simple middleware to ensure that only admins access specific routes:

function ensureAdmin(req, res, next) {
  if (req.user && req.user.role === 'admin') {
    return next();
  }
  res.status(403).send('Access denied. Admins only.');
}

// Then use the middleware
router.get('/admin-dashboard', ensureAdmin, (req, res) => {
  // Handle the admin dashboard view
});

Role Inheritance

In some systems, roles might have a hierarchical structure. A ‘moderator’, for example, might have all the rights of a regular ‘user’, plus some additional permissions, so instead of duplicating permissions, we can build on existing roles; here’s a conceptual example:

const roles = {
  user: ['read'],
  moderator: ['read', 'edit', 'delete_own_content'],
  admin: ['read', 'edit', 'delete_any_content', 'manage_users']
};

In this model, if a route requires ‘read’ permission, both the user and admin roles would qualify.

Dynamic and Attribute-based Authorization

Role-based authorization offers a structured approach to defining what users can do based on their roles. However, sometimes we need more granularity and flexibility in our authorization mechanisms, and here dynamic and attribute-based authorization help us.

Moving Beyond Roles

Roles are an excellent starting point, but they might not capture every nuance of our application; for instance, consider a blogging platform, where a user role might allow someone to create a post: how do we make sure that only the author of that post can edit or delete it?

router.put('/edit-post/:postId', async (req, res) => {
  const post = await Post.findById(req.params.postId);

  if (req.user.id !== post.authorId) {
    return res.status(403).send('Access denied. Only the author can edit.');
  }

  // Continue with the edit logic
});

Attribute-based Authorization

Attribute-based authorization (ABAC) considers various attributes: user attributes, action attributes, and environmental attributes; for instance, consider a scenario where only users from a certain region can view content, or content can be edited only during certain times of the day.

function canEditContent(user, content, currentTime) {
  return user.role === 'editor' &&
         user.region === 'US' &&
         (8 <= currentTime.getHours() && currentTime.getHours() <= 17);
}

router.put('/edit-content/:contentId', (req, res) => {
  const currentTime = new Date();

  if (!canEditContent(req.user, req.content, currentTime)) {
    return res.status(403).send('Access denied. Check your permissions or the editing time window.');
  }

  // Continue with editing logic
});

Context-aware Authorization

Sometimes, the context in which an action occurs is as crucial as the action itself; for example, a user might be able to delete their comments, but only within 24 hours of posting.

router.delete('/delete-comment/:commentId', async (req, res) => {
  const comment = await Comment.findById(req.params.commentId);

  const timeElapsed = Date.now() - new Date(comment.createdAt).getTime();
  const oneDayInMilliseconds = 24  60  60 * 1000;

  if (timeElapsed > oneDayInMilliseconds) {
    return res.status(403).send('Access denied. You can only delete your comments within 24 hours of posting.');
  }

  // Proceed with deletion logic
});


Dynamic and attribute-based authorization methods offer a high degree of customization.

You can be sure that our application’s authorization logic aligns closely with our business requirements and with a combo of these techniques with role-based authorization, we can craft a comprehensive and robust authorization system that scales with our application’s complexity.

Bridging Backend Authorization with User Experience

After setting up a detailed authorization system on the backend, it’s essential to synchronize this logic with the front end to provide a seamless user experience. We don’t want users trying to access features they’re not entitled to only to be hit with errors.

Requesting Role or Permission Data

To determine which features and options to display to a user, the front end often needs to be aware of the user’s roles or permissions. It can be achieved with an API endpoint:

router.get('/user-permissions', (req, res) => {
  const user = req.user; // Assuming user is attached to the request
  res.json({ permissions: user.permissions });
});

On the front end, after logging in, you might make a call to this endpoint and then store the permissions in the application’s state.

Displaying Content Based on User Permissions

With the permissions available on the front, conditional rendering can be used to show or hide features; using a frontend framework like React, this can look like this:

function DeleteButton() {
  const { permissions } = useContext(UserContext);

  if (!permissions.includes('delete')) {
    return null; // Don't render the button if the user lacks the 'delete' permission
  }

  return <button>Delete</button>;
}

Handling Authorization Failures

Despite our best efforts, there might be times when a user tries to perform an unauthorized action, perhaps due to outdated permission data on the front end, and it’s really important to handle these cases gracefully:

  • Prompting the User: If a user’s action is denied, a user-friendly message can inform them of the denial reason.

  • Refreshing Permission Data: In some cases, you might choose to re-fetch the user’s permissions if an authorization failure occurs to ensure the front end is in sync with the backend.

  • Redirecting: For more severe breaches, such as trying to access an admin-only section, you could redirect the user to a different page or even log them out.


For example, handling a 403 Forbidden response in a fetch call:

fetch('/admin-data')
  .then(response => {
    if (response.status === 403) {
      alert('You do not have permission to access this data.');
      // Handle redirection or other responses here
    }
    return response.json();
  })
  .then(data => {
    // Handle data if fetched successfully
  });

Navigating the Tricky Waters of Authorization

Authorization is not just about setting up a system but ensuring its continued reliability and integrity.

Even with the best initial setup, there are common pitfalls that developers can fall into, and keep in mind that knowing these and the best practices to counteract them can save a lot of future headaches.

Addressing Common Mistakes in Implementing Authorization

  • Overly Broad Permissions: Granting permissions that are too broad can expose more data than necessary, so always adopt the principle of least privilege—only give permissions that are strictly required for a task.

  • Hardcoding Roles and Permissions: It might be tempting to hardcode roles or permissions, especially in smaller applications, but as the application grows or requirements change, this can become a significant limitation.

  • Not Updating Permissions: Just as it’s crucial to add permissions when introducing new features, it’s equally important to remove or update permissions if a feature is deprecated.

Best Practices for Maintaining and Updating Authorization Logic

  • Regular Audits: Periodically review and audit your authorization logic and ensure that it aligns with the current requirements and that there are no security loopholes.

  • Use Middleware Effectively: In frameworks like Express.js, middleware offers a clean way to handle authorization, so remember to order middleware correctly, so authentication happens before authorization.

  • Stay Updated: Libraries and frameworks evolve, often addressing vulnerabilities or introducing more efficient methods, and with that in mind regularly update your tools and stay informed about changes.

// Avoid hardcoding roles directly in your code
const isAdmin = (user) => user.role === 'admin'; // Not recommended

// Instead, consider using a configuration or a database to manage roles and permissions
const rolesConfig = {
  admin: {
    canDelete: true,
    canEdit: true,
    // ... other permissions
  },
  // ... other roles
};

const canUserEdit = (user) => rolesConfig[user.role]?.canEdit;
  • Session Hijacking: Ensure that session management is secure because an attacker with access to a user’s session can bypass authorization checks.

  • Permission Escalation: Be wary of endpoints that can change a user’s permissions, and these need to be highly secure to prevent unauthorized role escalation.

  • Feedback Loop: Be cautious about the feedback you provide to unauthorized users, so telling an unauthorized user explicitly why they can’t access something might give away more information than you intend.

Conclusion: Staying Vigilant in a Changing Landscape


Authorization, while technical, is fundamentally about trust, trusting users with access to resources, and trusting systems to regulate that access effectively.

As developers, our role isn’t just to implement these systems. We must ensure they adapt, scale, and remain resilient regarding evolving challenges.

When your application grows, always prioritize revisiting and refining your authorization strategies. The digital realm is fluid, with emerging technologies and changing user behaviors. So, stay proactive, and informed. Always put security first, and you will grant a safer and smoother experience for all your users.

Always remember these two words in the web security and access control worlds: vigilance and evolution.