


Category: Client-Side Security

End-to-End Testing with Vue and Cypress

Testing our entire application to identify bugs, website performance, and poor UI/UX functionalities is essential. End-to-end testing can assist in solving all of these issues as it involves testing our entire application from start to finish, ensuring that all the components and modules are working properly before being launched.

In this article, we will discuss what E2E testing is and how to perform E2E testing with Cypress and Vue in our application.

Prerequisites


Before we proceed to the next step in this article, we need to have the following:

  • Node.js updated version

  • Vue project created

  • Ensure Cypress supports our operating system

What is end-to-end testing?

E2E (end-to-end) testing is functional testing that involves testing your entire application. When using this testing method, we don’t break down the components into smaller parts to test them. End-to-end testing ensures that all system components are integrated, working properly, and meeting user requirements.

E2E testing helps us interact with our application just as users in the real world. For instance, we can build a test to determine whether a user fills in the correct details and what error the user will receive on the page if he or she fails. There are numerous E2E tests we can perform in our application.

Why use Cypress for end-to-end testing?

Cypress is a modern open-source automation testing JavaScript framework that performs end-to-end testing. It is a user-friendly testing tool that operates directly in the browser using a special DOM manipulation technique. It also offers an interactive test runner that runs all of our tests.

According to the NPM trend Cypress is one of the most used automation testing frameworks for E2E testing.
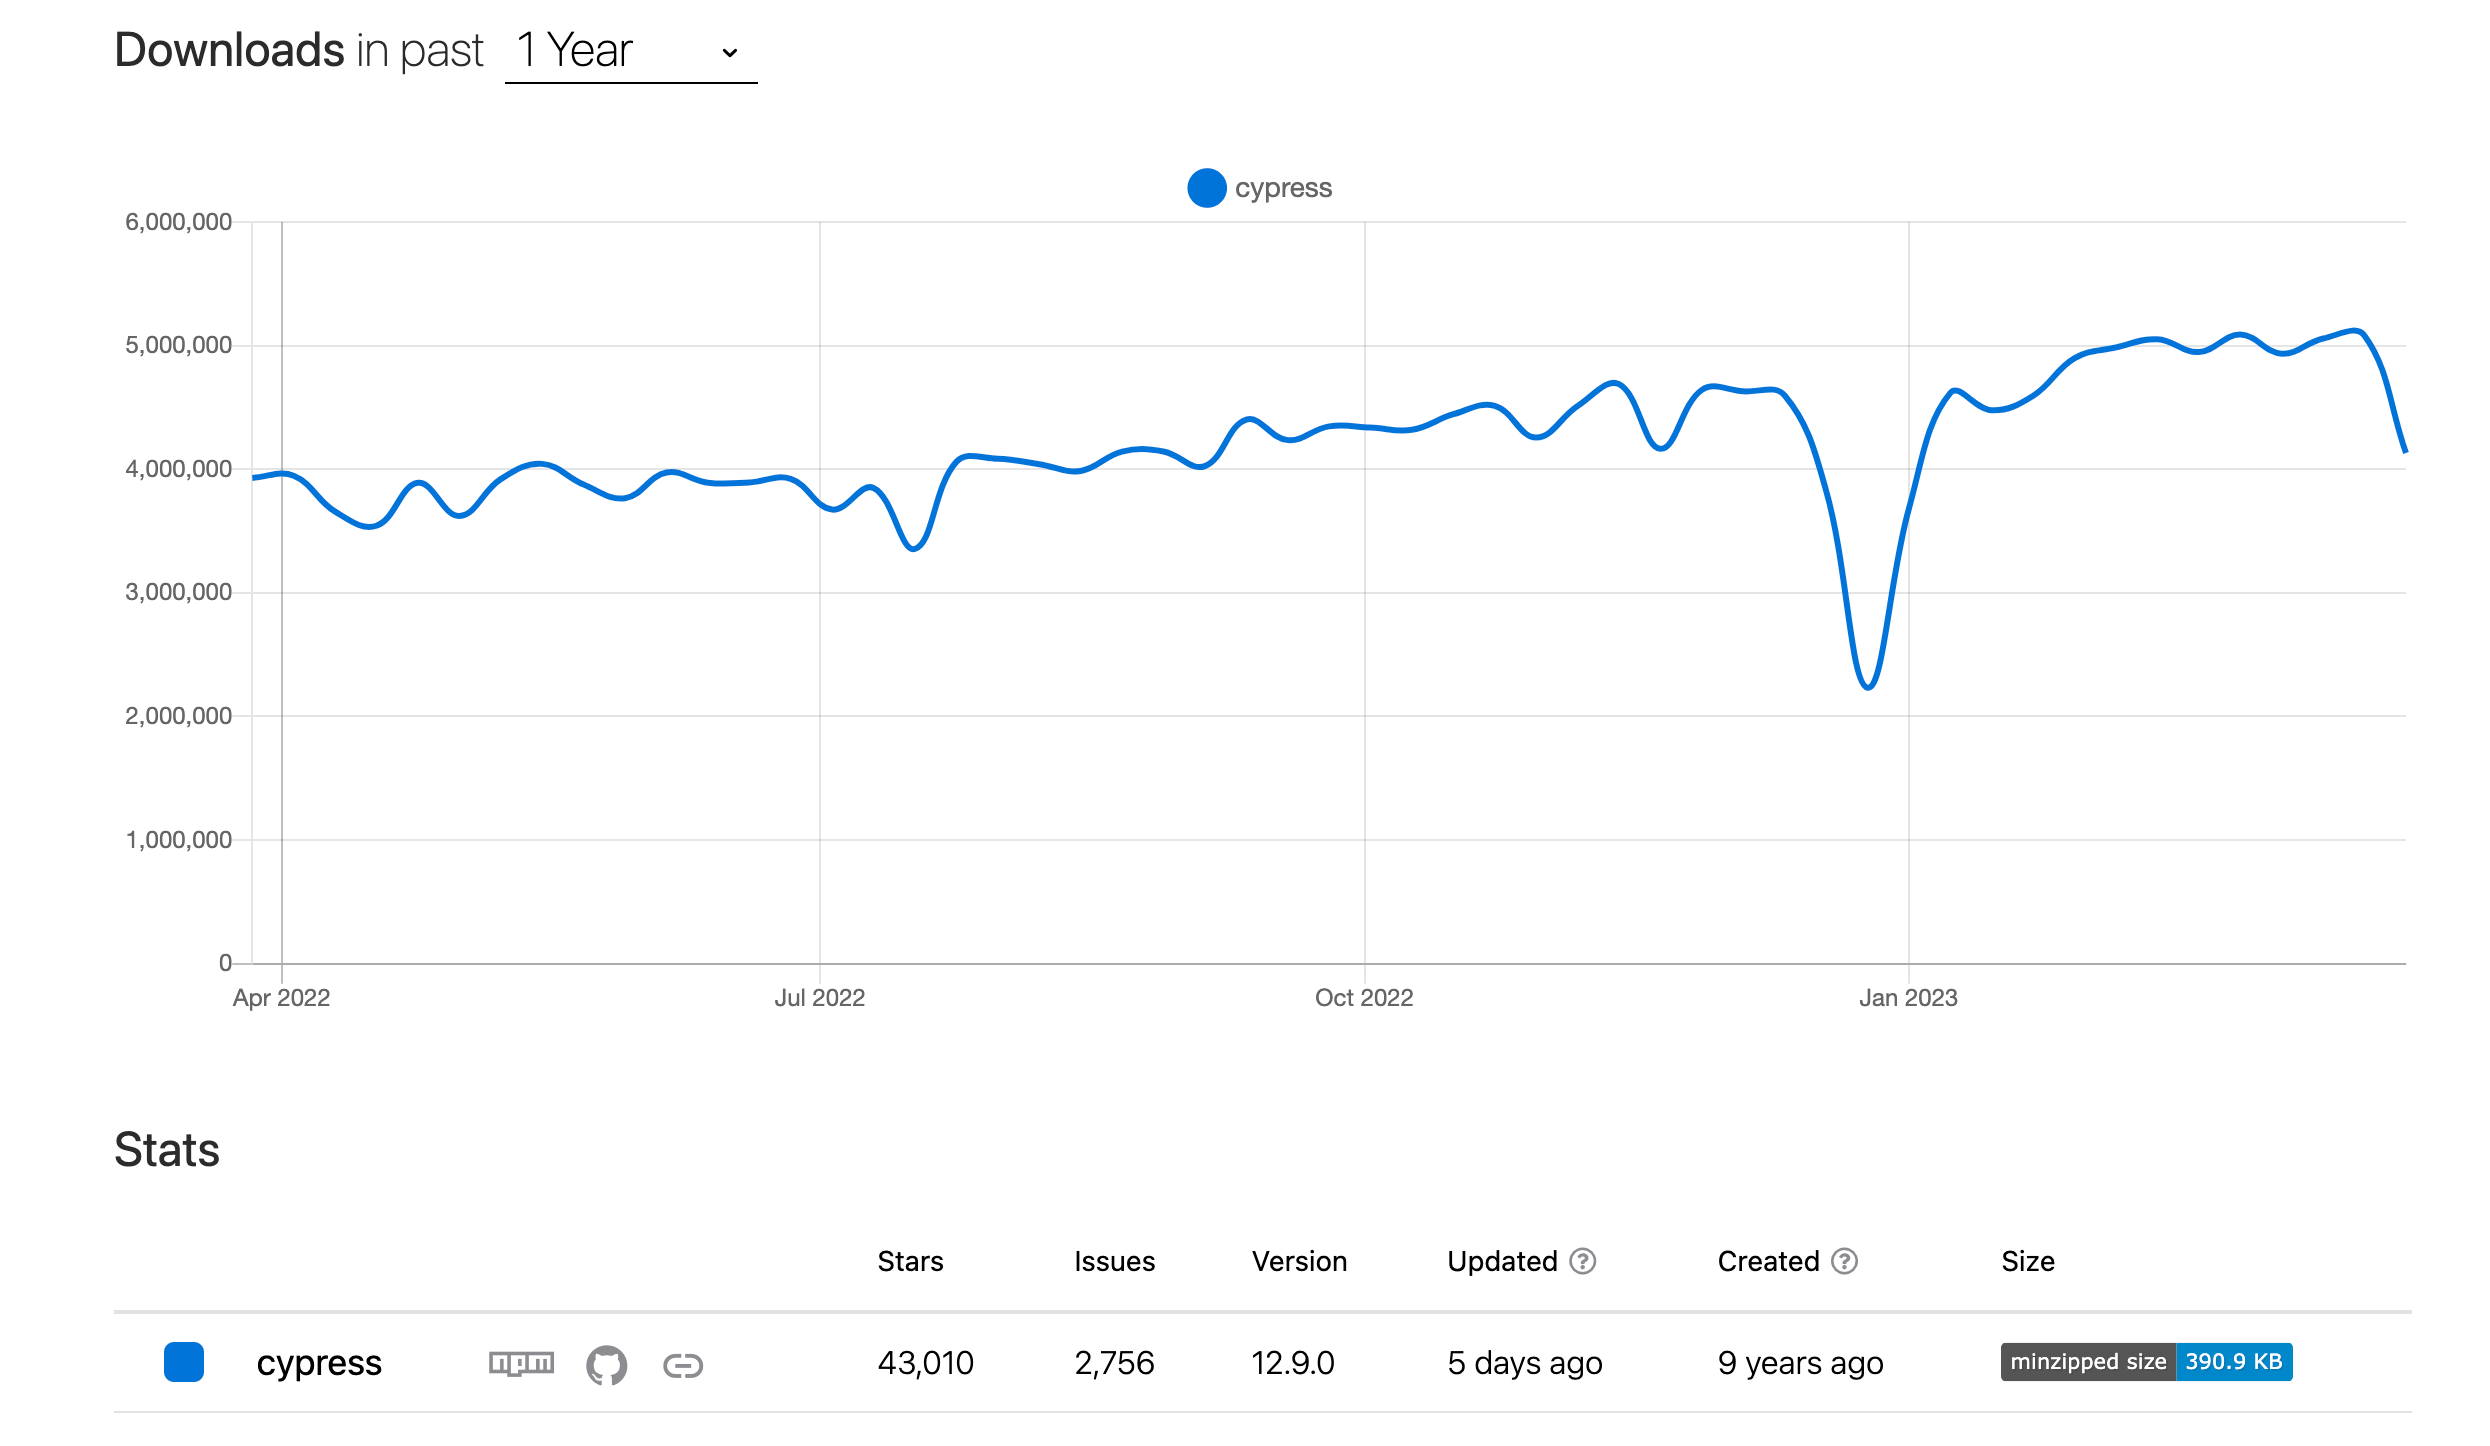
Why Use Cypress for End-to-End Testing? Cypress is a modern open-source automation

Cypress provides a built-in debugging feature and allows us to set up automatic retries and waits so we can schedule our test execution within our CI/CD pipeline.

One of the unique advantages of using Cypress is that we can write our tests in Javascript syntax, providing clean and accurate results when testing single applications. Aside from that, there are other great reasons why Cypress is ideal, some of which are:

  • Cypress executes our test in real time as we type our commands, providing us with visual feedback on our test.

  • Cypress has friendly documentation that supports creating our E2E test cases.

  • The Cypress package provides us with built-in features, that way, we don’t need to configure or install any dependencies.

  • Debugging with Cypress is easier.

  • Due to its expansion, Cypress has a sizable community that assists in curating resources and instructions to simplify testing with Cypress.

  • Cypress offers various types of automation tests, such as E2E tests, visual regression tests, accessibility tests, component tests, and performance tests.

Cypress Installation and Setup

Before we proceed with installing Cypress, we need to be sure we meet the prerequisites, as that will aid the development process. While creating a new project with Vue, we have the option to integrate Cypress, but in this post, we’ll learn about an alternative method that involves integrating Cypress into an already-existing Vue project.

Next, we will cd into the directory of our Vue project:

cd cypress-app


To install Cypress, use the following command:

npm install cypress --save-dev
or 
yarn add cypress --dev


The command above adds Cypress to our project as a development dependency.

Next, we will configure and set up Cypress. To do that, we will run the following command:

npx cypress open
or 
yarn cypress open 


By doing so, the Cypress Test Runner will launch, allowing us to customize and choose the test files to run and interact with our application through a web browser. Check out a diagram of how our Cypress Test Runner should be after using the above command.
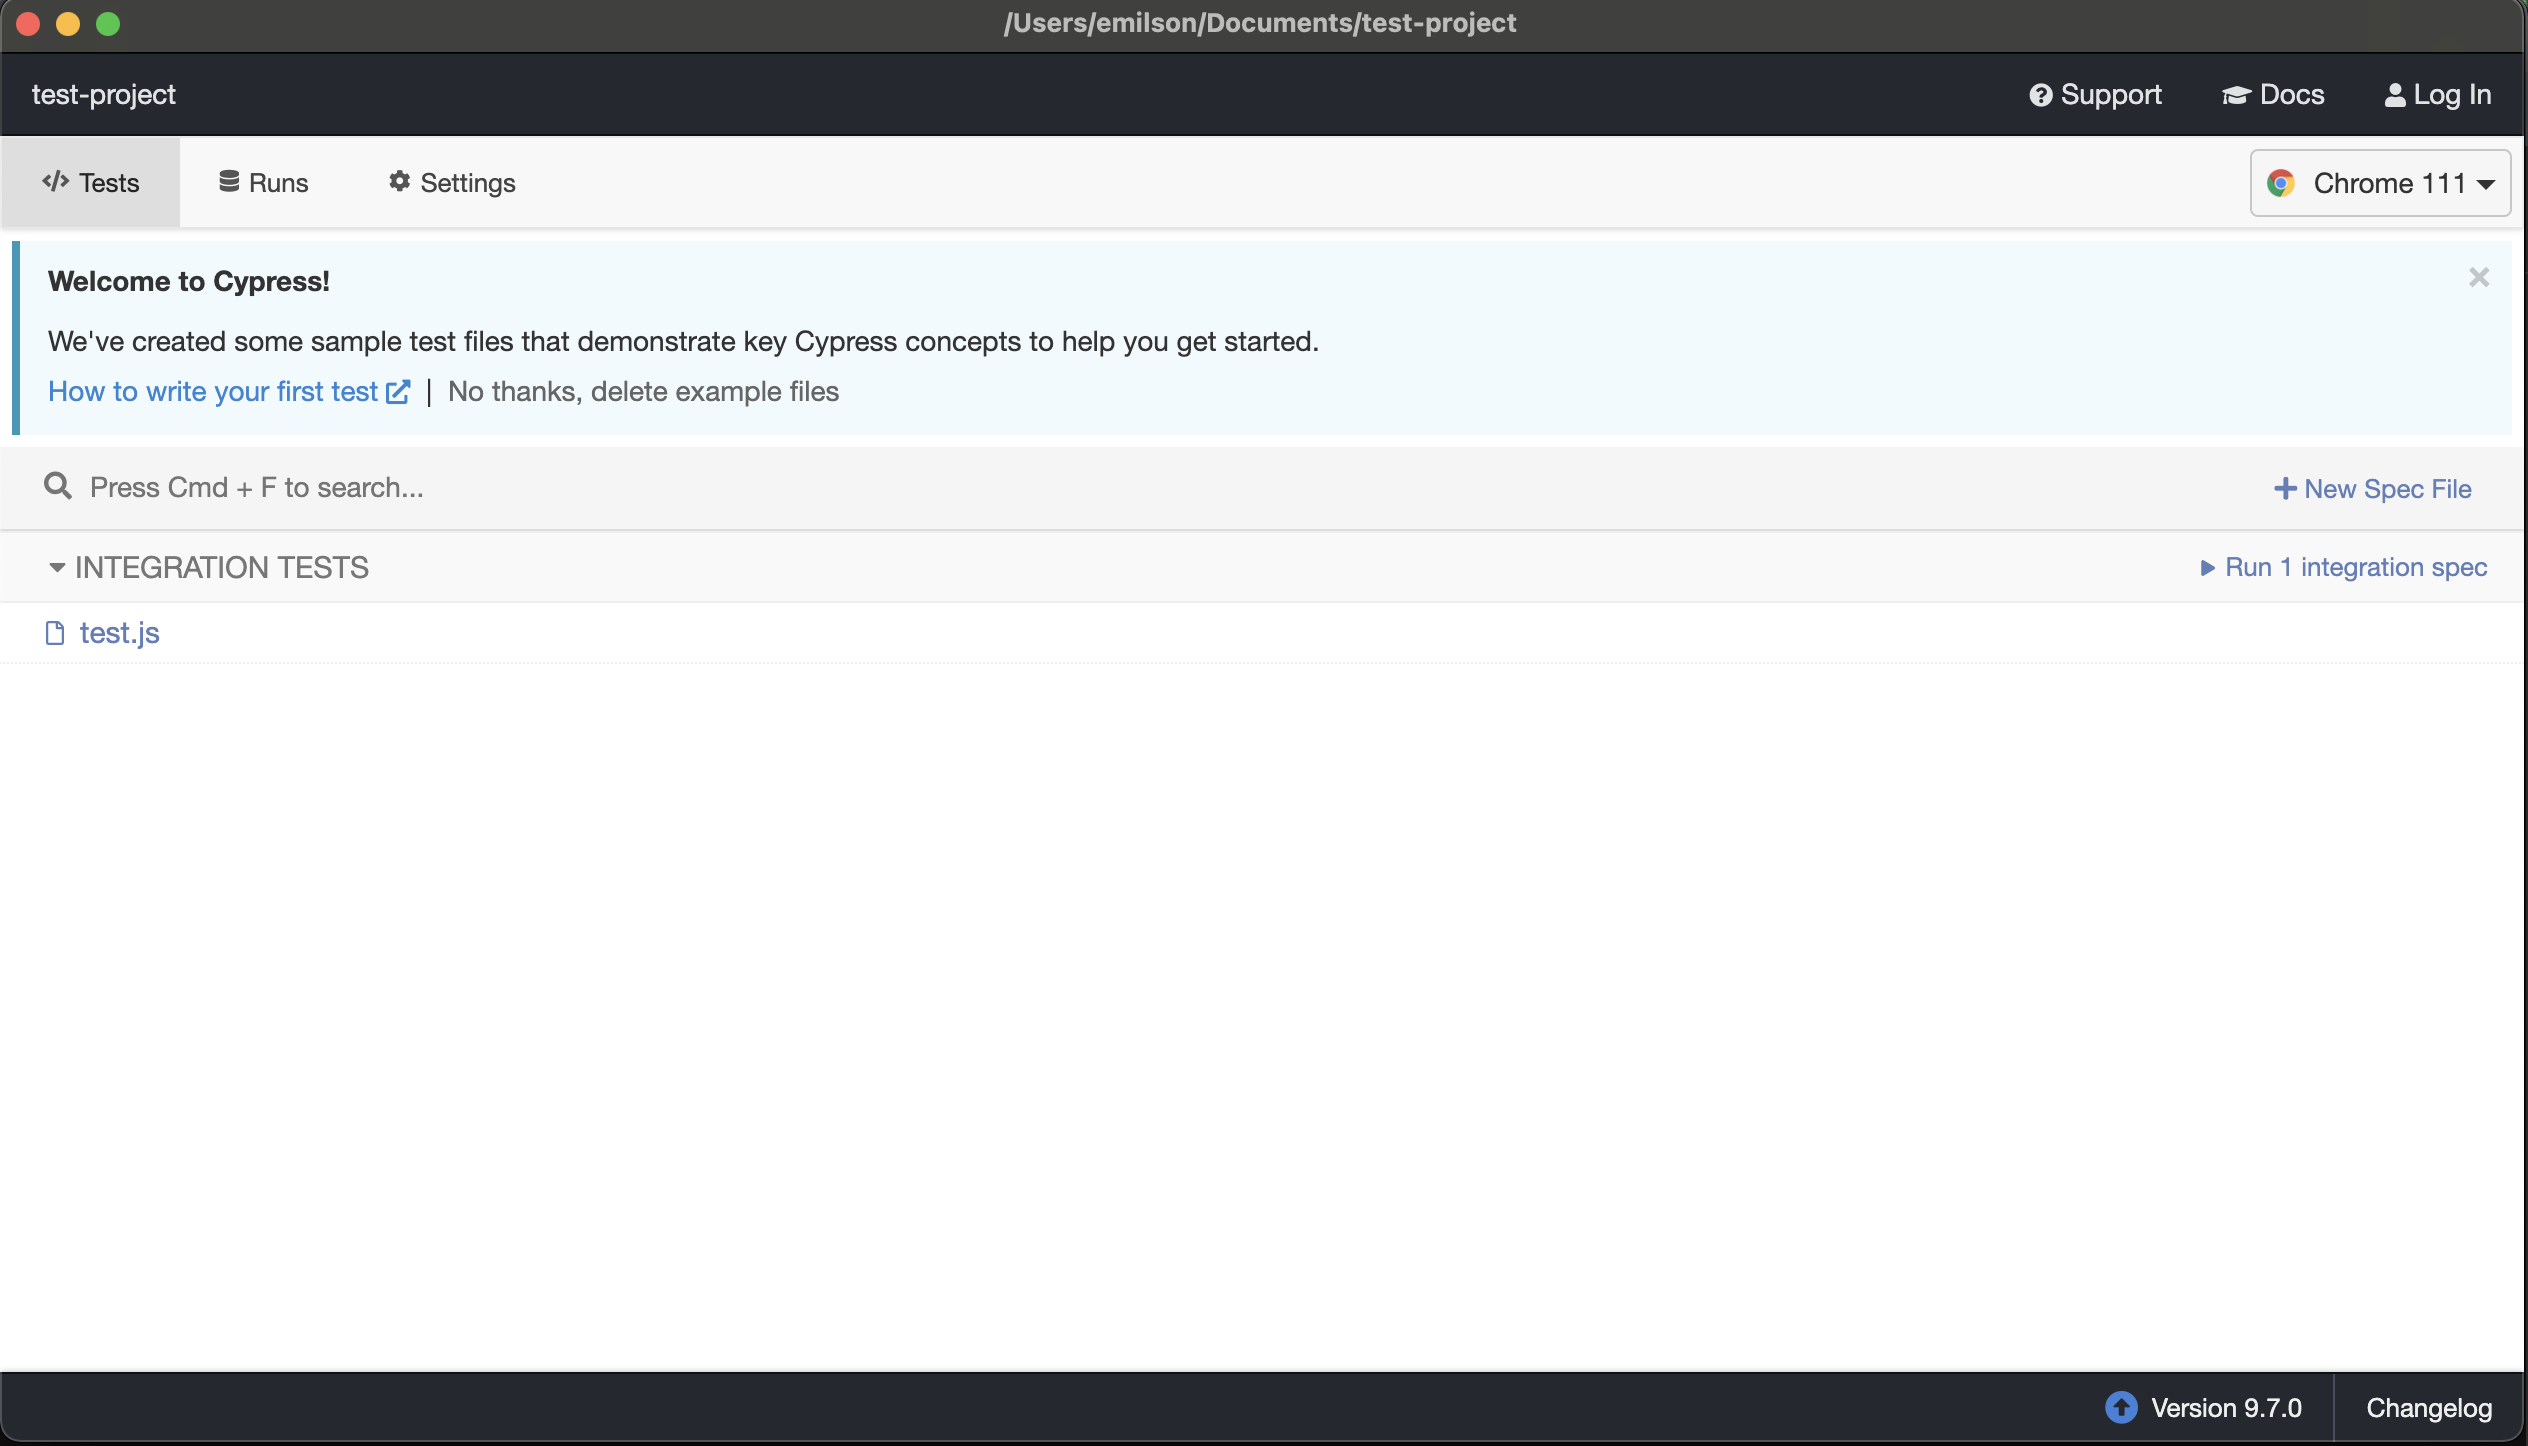
cypress test runner running Jscrambler application through a web browser

To assist us in getting started, Cypress’ default settings build an example test file. If the sample test is something we do not want, we can delete it and create our own test file.

Now that we have installed and set up Cypress, let’s move on to the next stage: creating our first simple test.

Write our first Cypress Test

First, we are going to run an external test on the Vue documentation. We are going to check if the document contains the specific information we are looking for. To do that, copy the code below and paste it into the default test file Cypress created for us:

describe('Testing Vue Documentation', () => {
  it('Contains required contents in the document, () => {
    cy.visit('https://vuejs.org/guide/introduction.html');
    cy.contains('Introduction');
    cy.get('.demo').click();
    cy.contains('<button @click="count++">Count is: {{ count }}</button>');
    cy.contains('Try it in the Playground');
  });
});

In the preceding code example, the test will pass if all of the information we verified in the documentation is there, but it will fail if only one of those pieces of information is present. This is an example of a test that was successful.
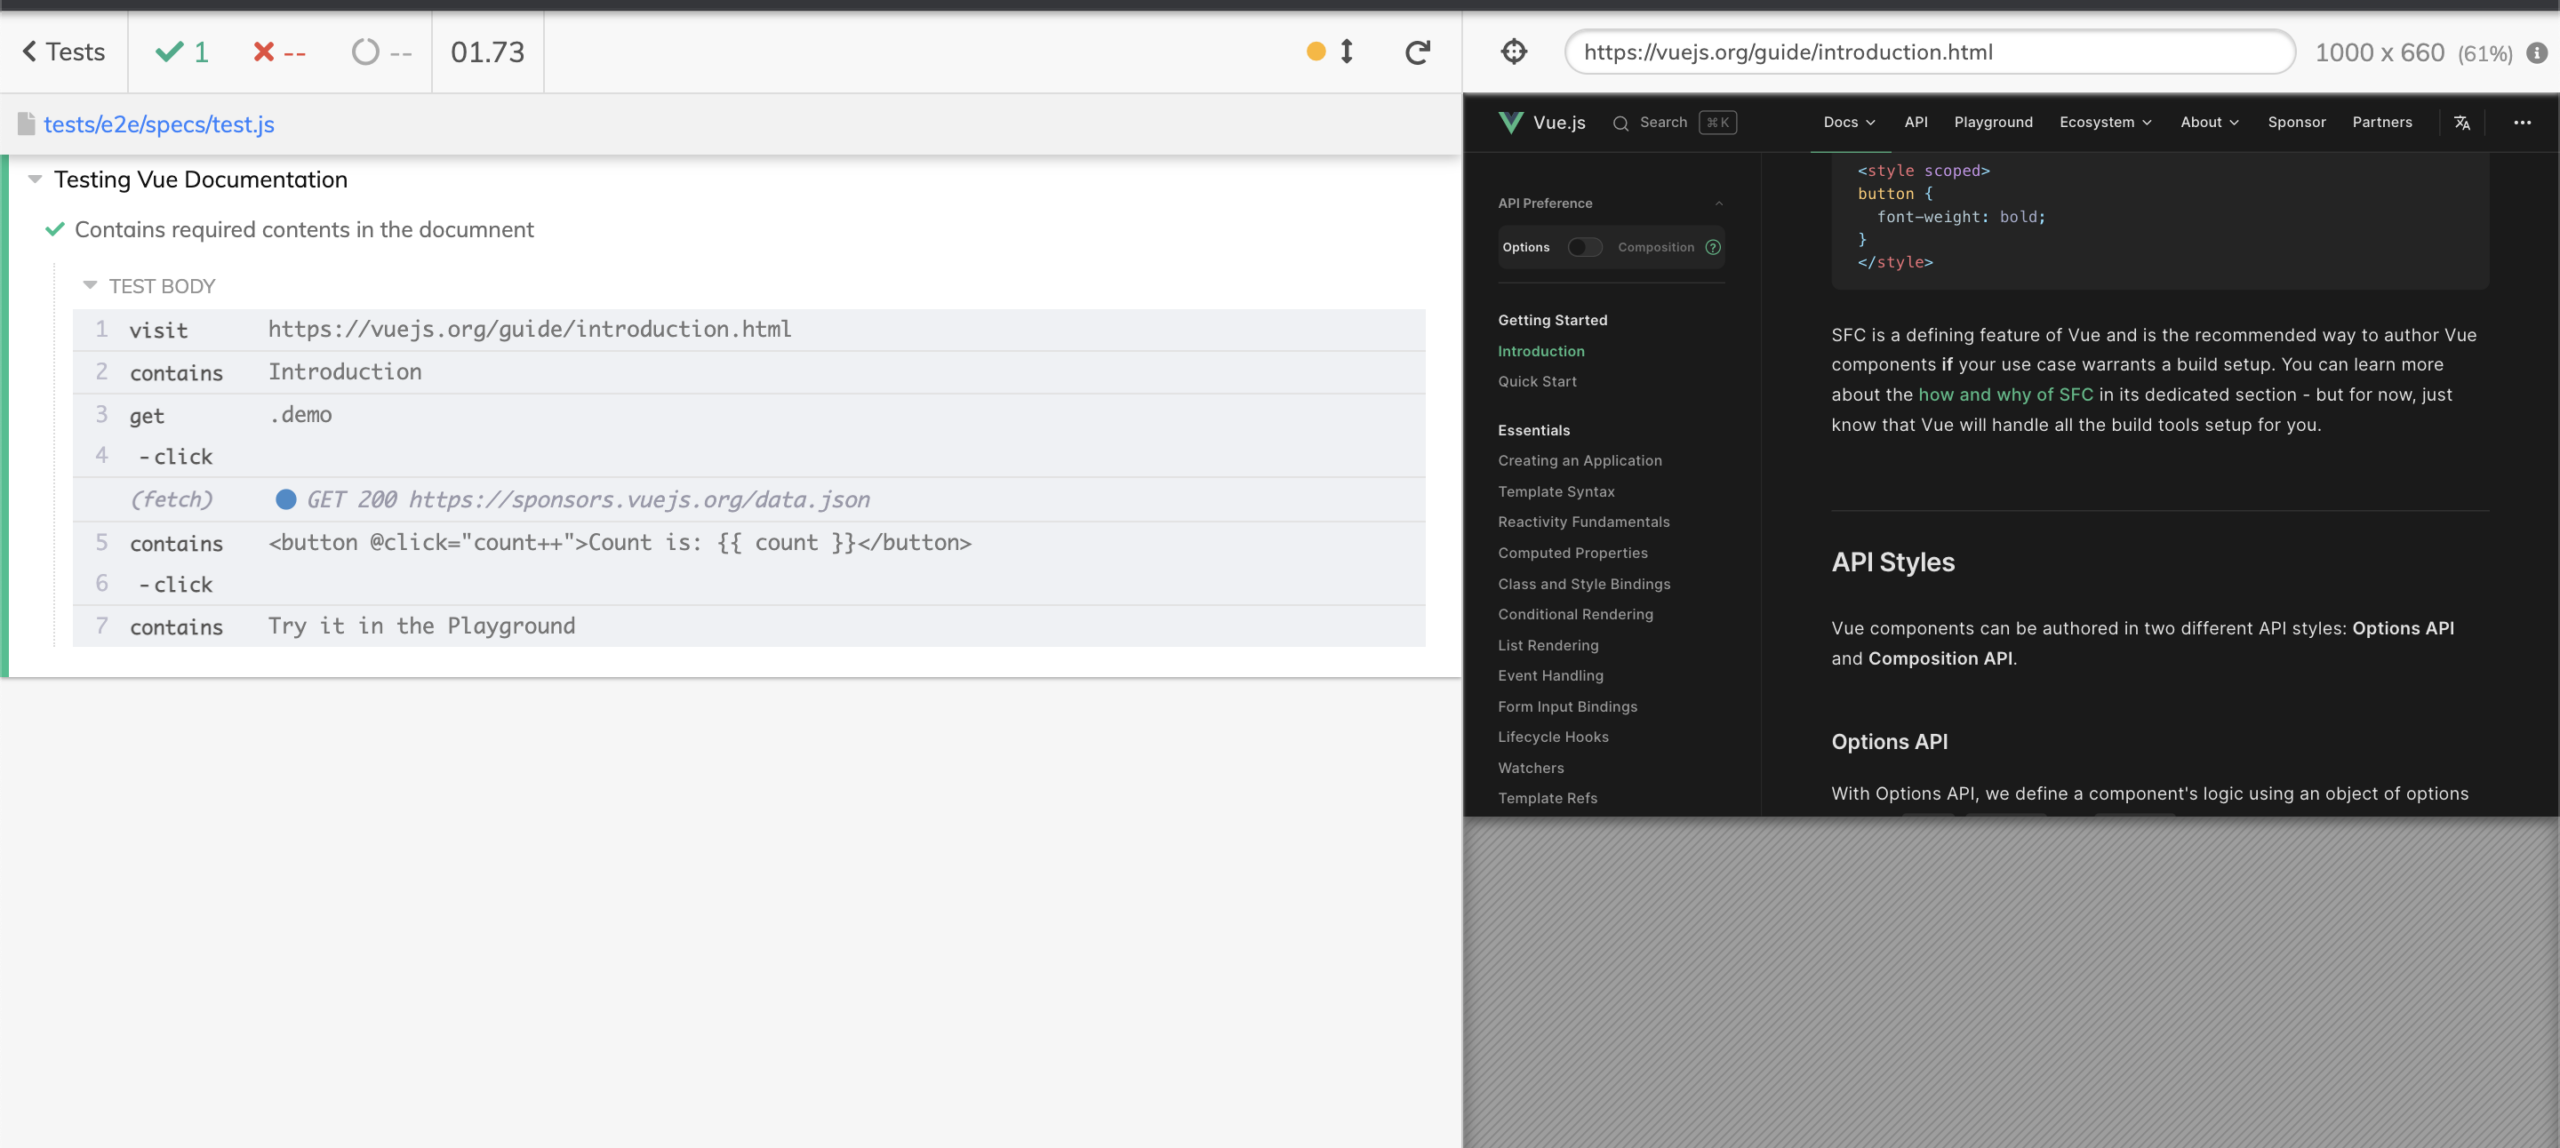
code example of a successful test using Cypress

When using Cypress to run tests, if the first test fails, Cypress won’t execute subsequent tests that pass the criteria until the problem has been resolved. Example of a test that failed.
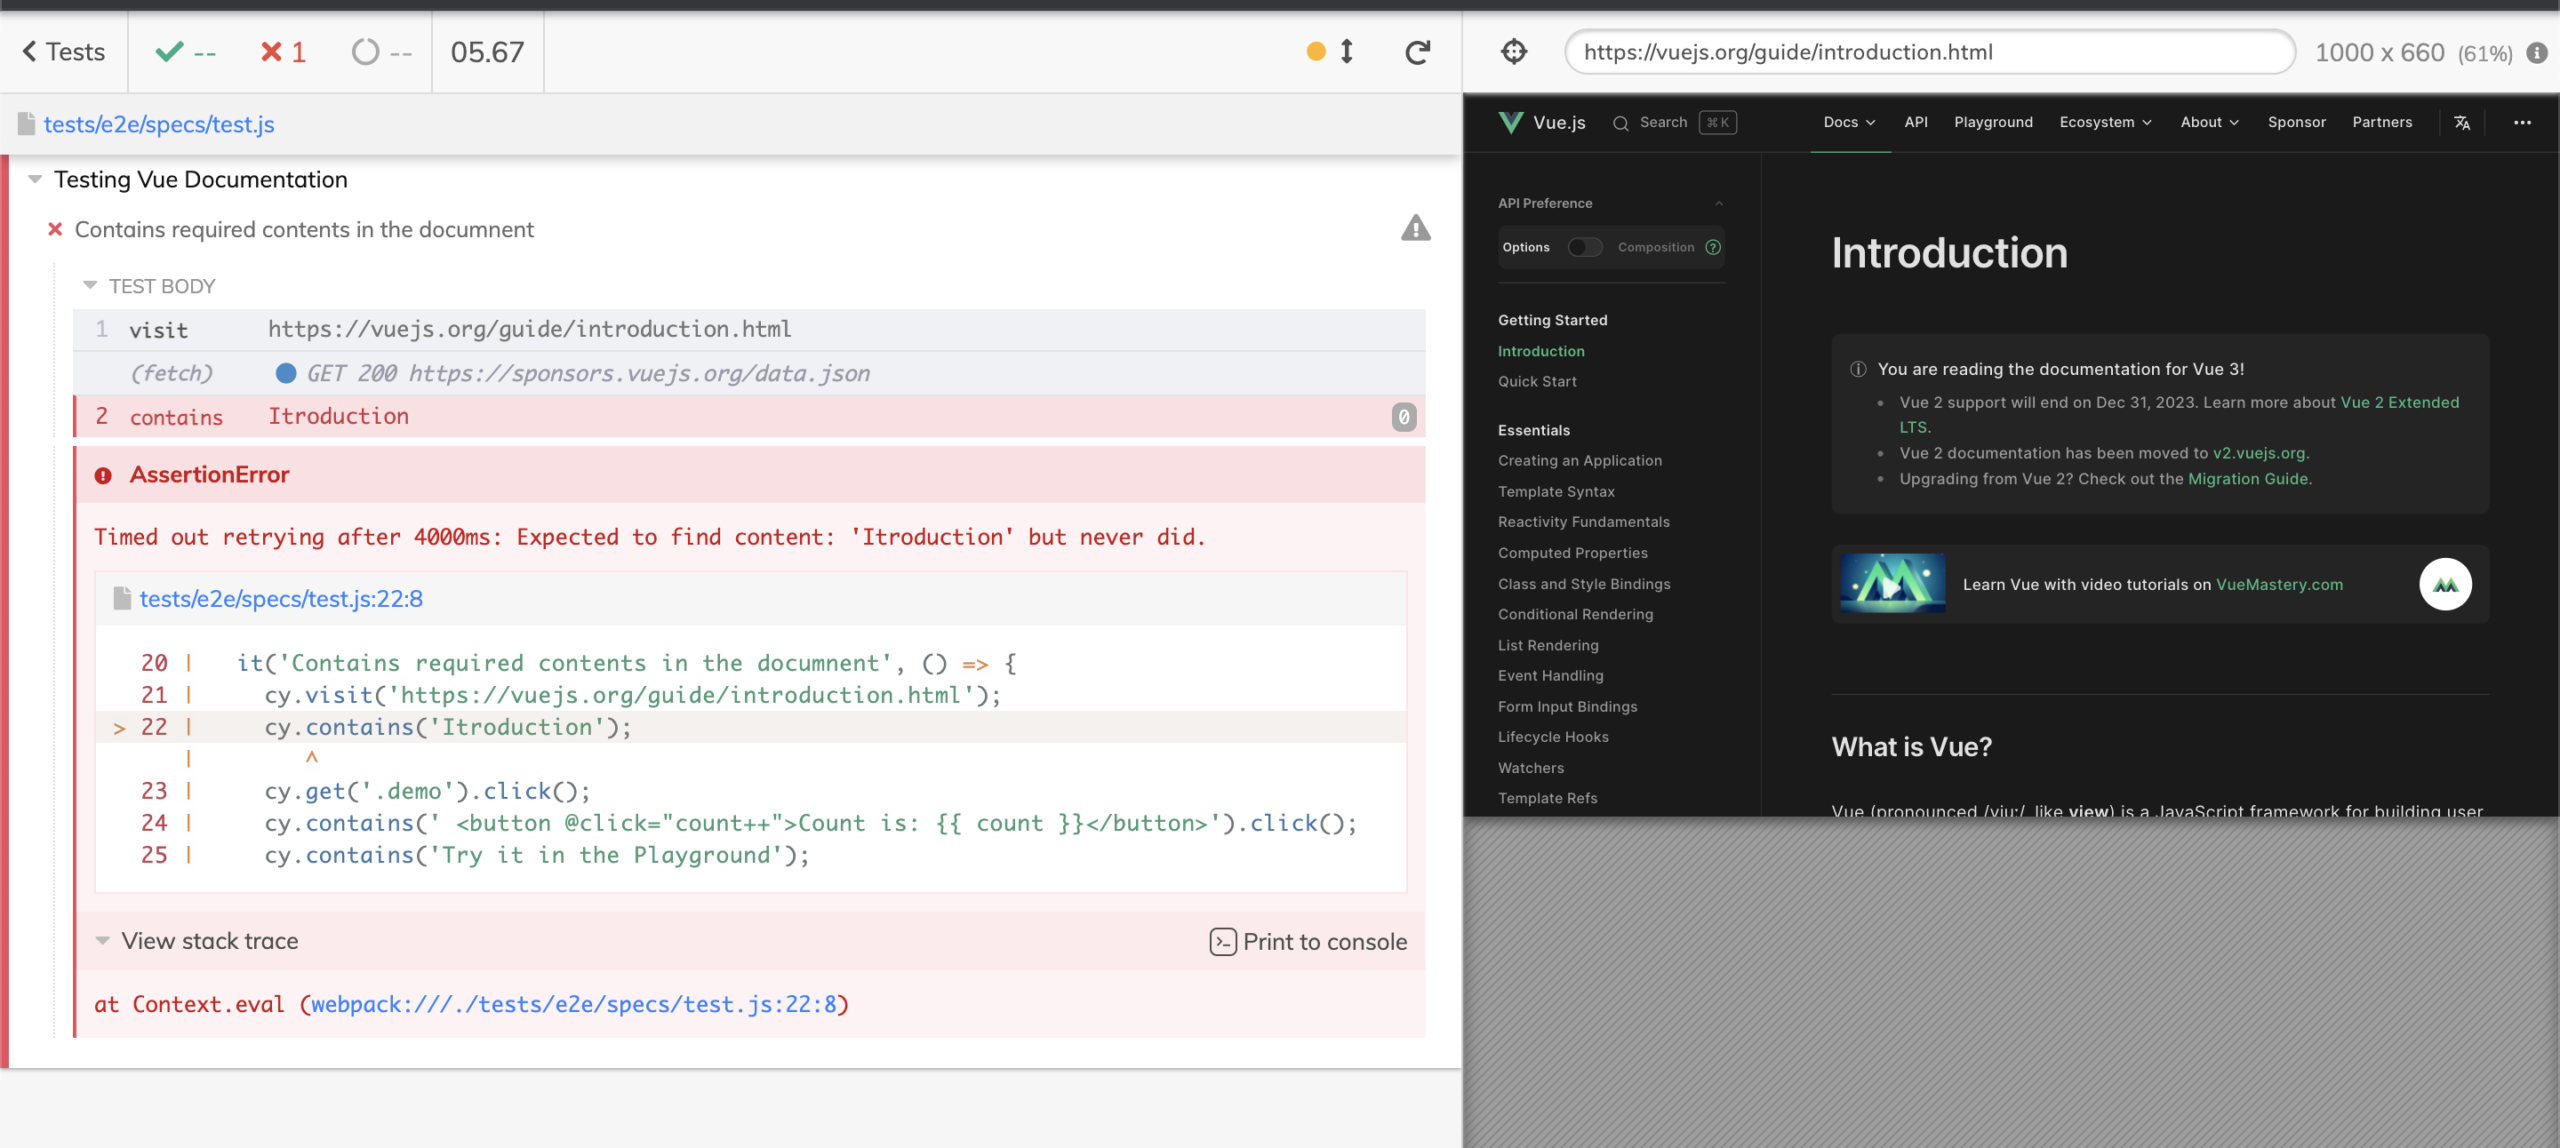
example of a failed test using Cypress

One distinctive feature of Cypress is that it shows the stack trace, the code frame, and a link to the IDE where the test failed. As shown in the above graphic, Cypress, for instance, included a link to tests/e2e/specs/test.js:22:8 in the IDE, indicating the location of the problem that caused the test to fail.

We’ve now seen how to use Cypress to generate successful and unsuccessful tests. The following phase will involve testing the entire application to make sure all the specifications are met.

We will create a new test file contact-form-test.js after creating our test file, we will create a component ContactForm.vue Copy the code below, and paste it into the AuthForm.vue component.

<template>
    <section class="text-gray-600 body-font relative section">
        <div class="container px-5 py-24 mx-auto">
            <div class="flex flex-col text-center w-full mb-12">
                <h1 class="sm:text-3xl text-2xl font-medium title-font mb-4 text-gray-900">Contact Us</h1>
                <p class="lg:w-2/3 mx-auto leading-relaxed text-base">Do you have any idea you or question, please kindly
                    fill the form below</p>
            </div>
            <div class="lg:w-1/2 md:w-2/3 mx-auto">
                <form @submit.prevent="submitForm" class="flex flex-wrap -m-2">
                    <div class="p-2 w-1/2">
                        <div class="relative">
                            <label for="name" class="leading-7 text-sm text-gray-600">Name</label>
                            <input type="text" id="name" placeholder="name"
                                class="w-full bg-gray-100 bg-opacity-50 rounded border border-gray-300 focus:border-red-500 focus:bg-white focus:ring-2 text-base outline-none text-gray-700 py-1 px-3 leading-8 transition-colors duration-200 ease-in-out"
                                v-model="user.name">
                        </div>
                    </div>
                    <div class="p-2 w-1/2">
                        <div class="relative">
                            <label for="email" class="leading-7 text-sm text-gray-600 action-email">Email</label>
                            <input type="email" id="email" placeholder="email"
                                class="w-full bg-gray-100 bg-opacity-50 rounded border border-gray-300 focus:border-red-500 focus:bg-white focus:ring-2 text-base outline-none text-gray-700 py-1 px-3 leading-8 transition-colors duration-200 ease-in-out"
                                v-model="user.email">
                        </div>
                    </div>
                    <div class="p-2 w-full">
                        <div class="relative">
                            <label for="message" class="leading-7 text-sm text-gray-600">Message</label>
                            <textarea id="message" placeholder="message"
                                class="w-full bg-gray-100 bg-opacity-50 rounded border border-gray-300 focus:border-red-500 focus:bg-white focus:ring-2 h-32 text-base outline-none text-gray-700 py-1 px-3 resize-none leading-6 transition-colors duration-200 ease-in-out"
                                v-model="user.message"></textarea>
                        </div>
                    </div>
                    <div class="p-2 w-full">
                        <button
                            class="flex mx-auto text-white bg-red-500 border-0 py-3 px-12  hover:bg-white rounded text-lg  submit-button">Submit</button>
                    </div>
                </form>
            </div>
        </div>
    </section>
</template>


<script>
export default {
    data() {
        return {
            user: {
                name: '',
                email: '',
                message: ''
            }
        }
    },
    methods: {
        submitForm() {
            console.log('Success:form has succesfully been submitted:', this.user);
            // You can also send the form data to an API endpoint here
        }
    }
}
</script>


The code above shows how our form application’s layout appears after we send the form’s data to our console.

Please keep in mind that we are sending the form to our console because this is a sample example; however, you can also apply the same strategies described in this article to a fully functional application. View a sample diagram of our form that was submitted to the console below.
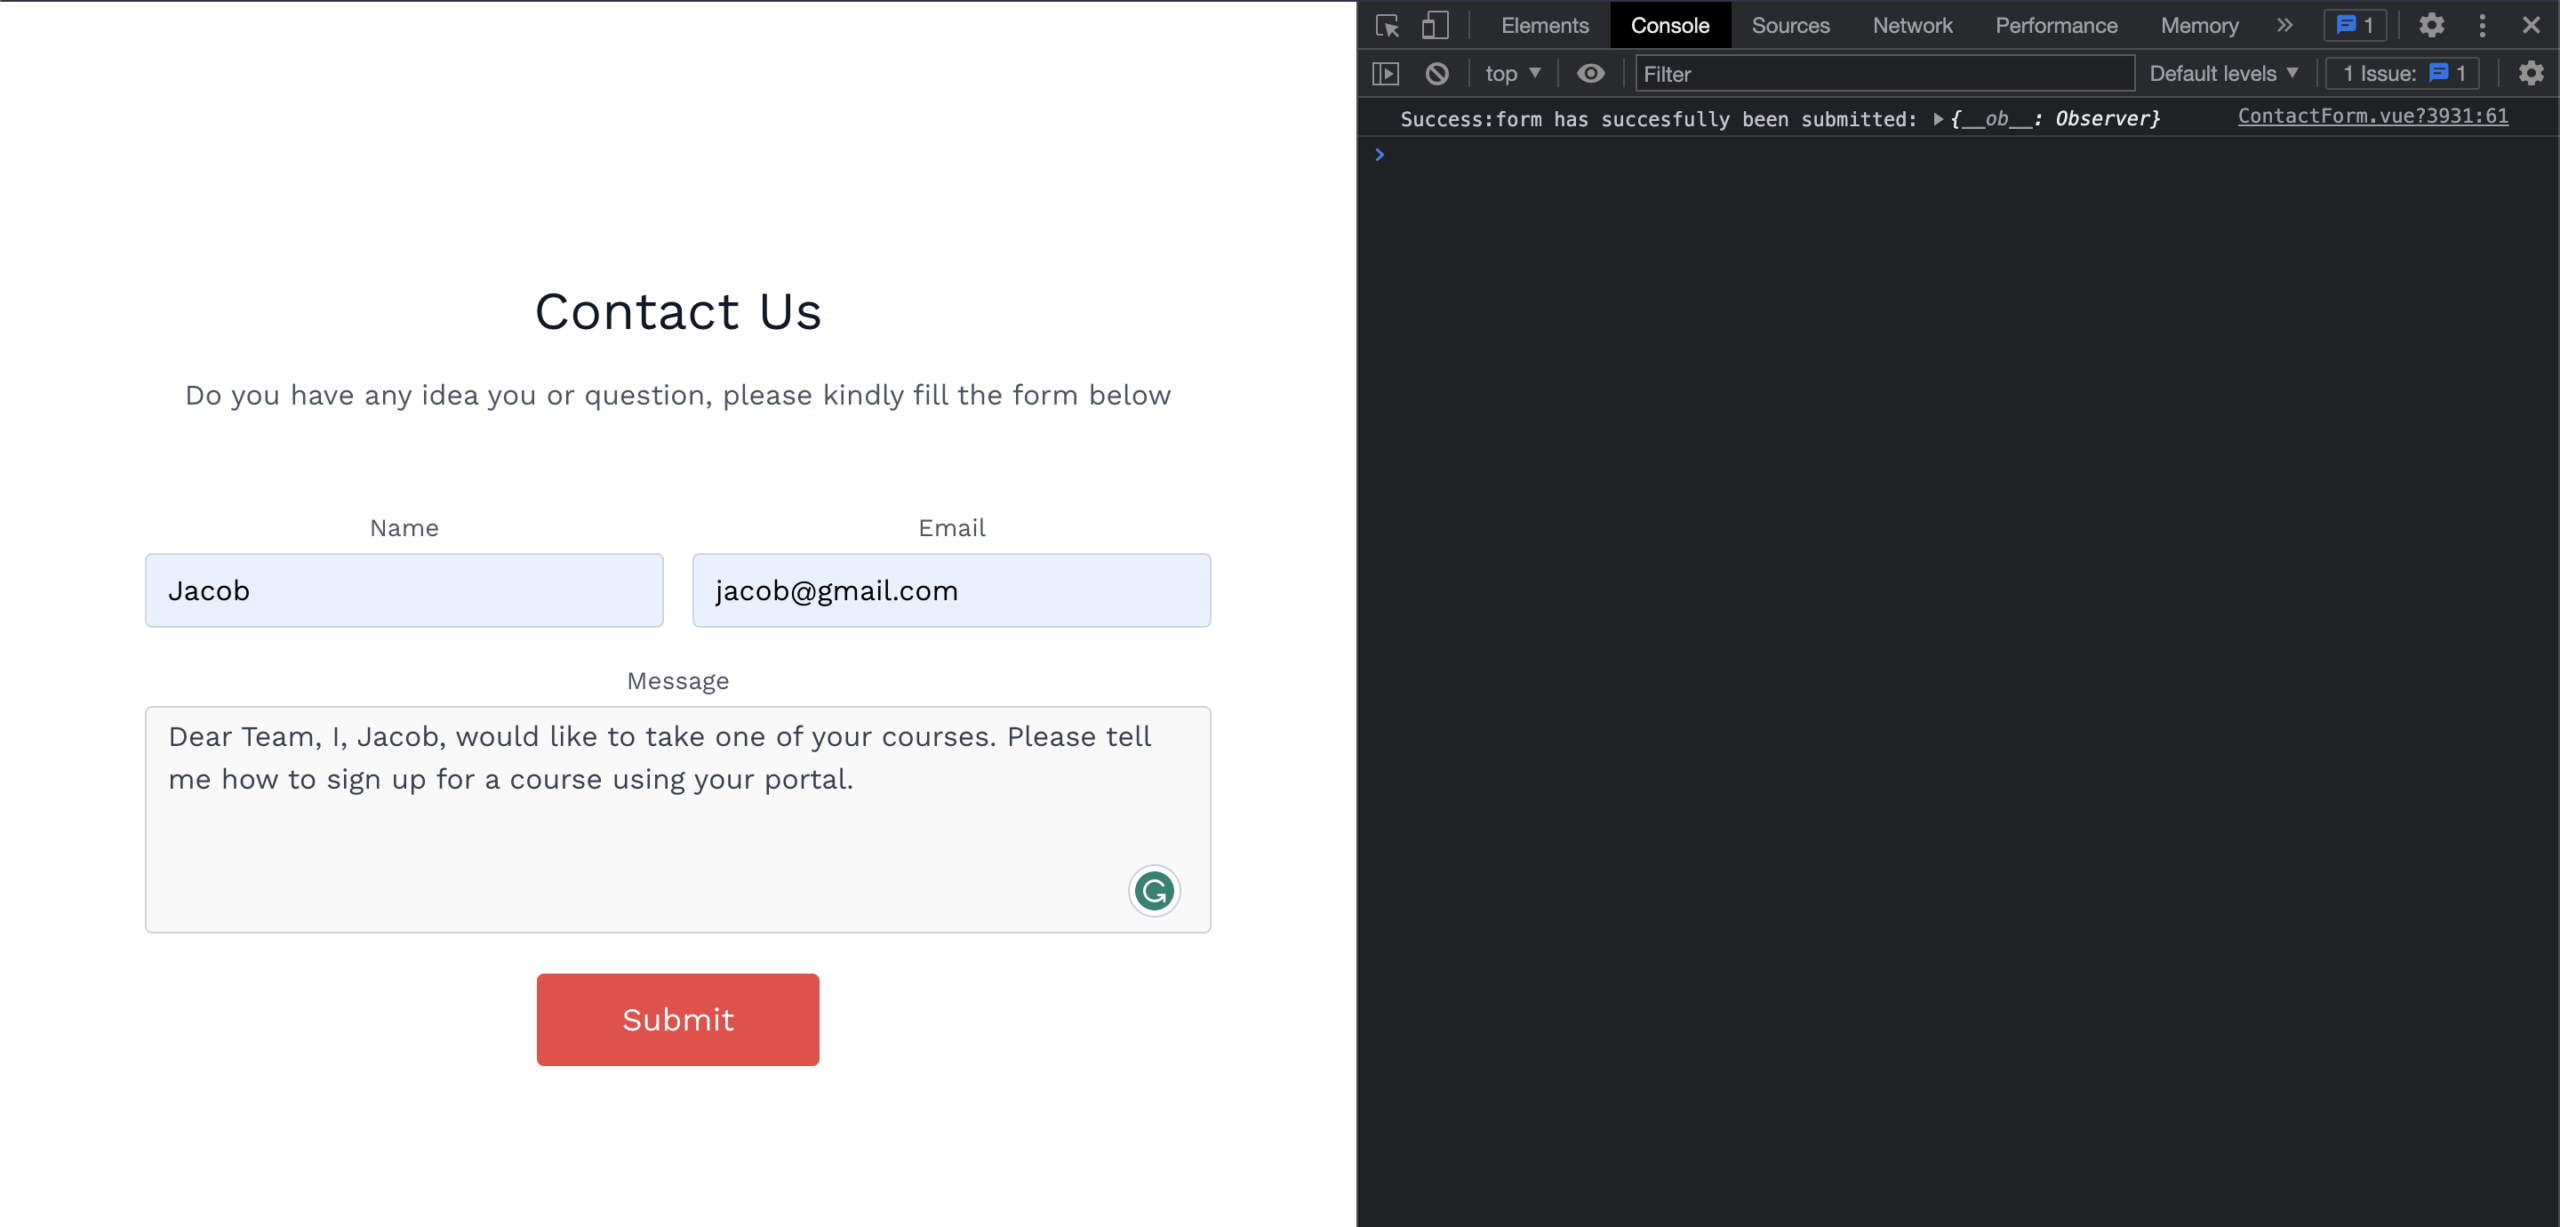
sample diagram of our form that was submitted to the console


Testing our Form Application

We will create a test for our form application in order to see if users can enter their information into the form. For instance, we’ll see if the user can enter a name, email, and message. We’ll also see if the submit button functions as intended and actually sends the data when the user clicks on it. See the code example below:

describe('Testing contact form', () => {
    it('allows users to input the right information', () => {
      cy.visit('http://localhost:8080/');
    //   cy.get('form')
      cy.get('input[placeholder="name"]')
      .type("Jacob")
      .should("have.value", "Jacob");
    cy.get('input[placeholder="email"]')
      .type("[email protected]")
      .should("have.value", "[email protected]");
    cy.get("textarea")
      .type("Dear Team, I, Jacob, would like to take one of your courses. Please tell me how to sign up for a course using your portal.")
      .should("have.value", "Dear Team, I, Jacob, would like to take one of your courses. Please tell me how to sign up for a course using your portal.");
      cy.get("form").click();
    });
  });


In the above code sample, Cypress assertions were used to determine whether users could enter their information. For instance, while testing the user name, we also add the value that must be provided by the user in order for the test to pass. In this case, if we test the name input with a different value than what Cypress was expecting in our code, the test will fail since the expected value was not provided.

See the example of the successful test.
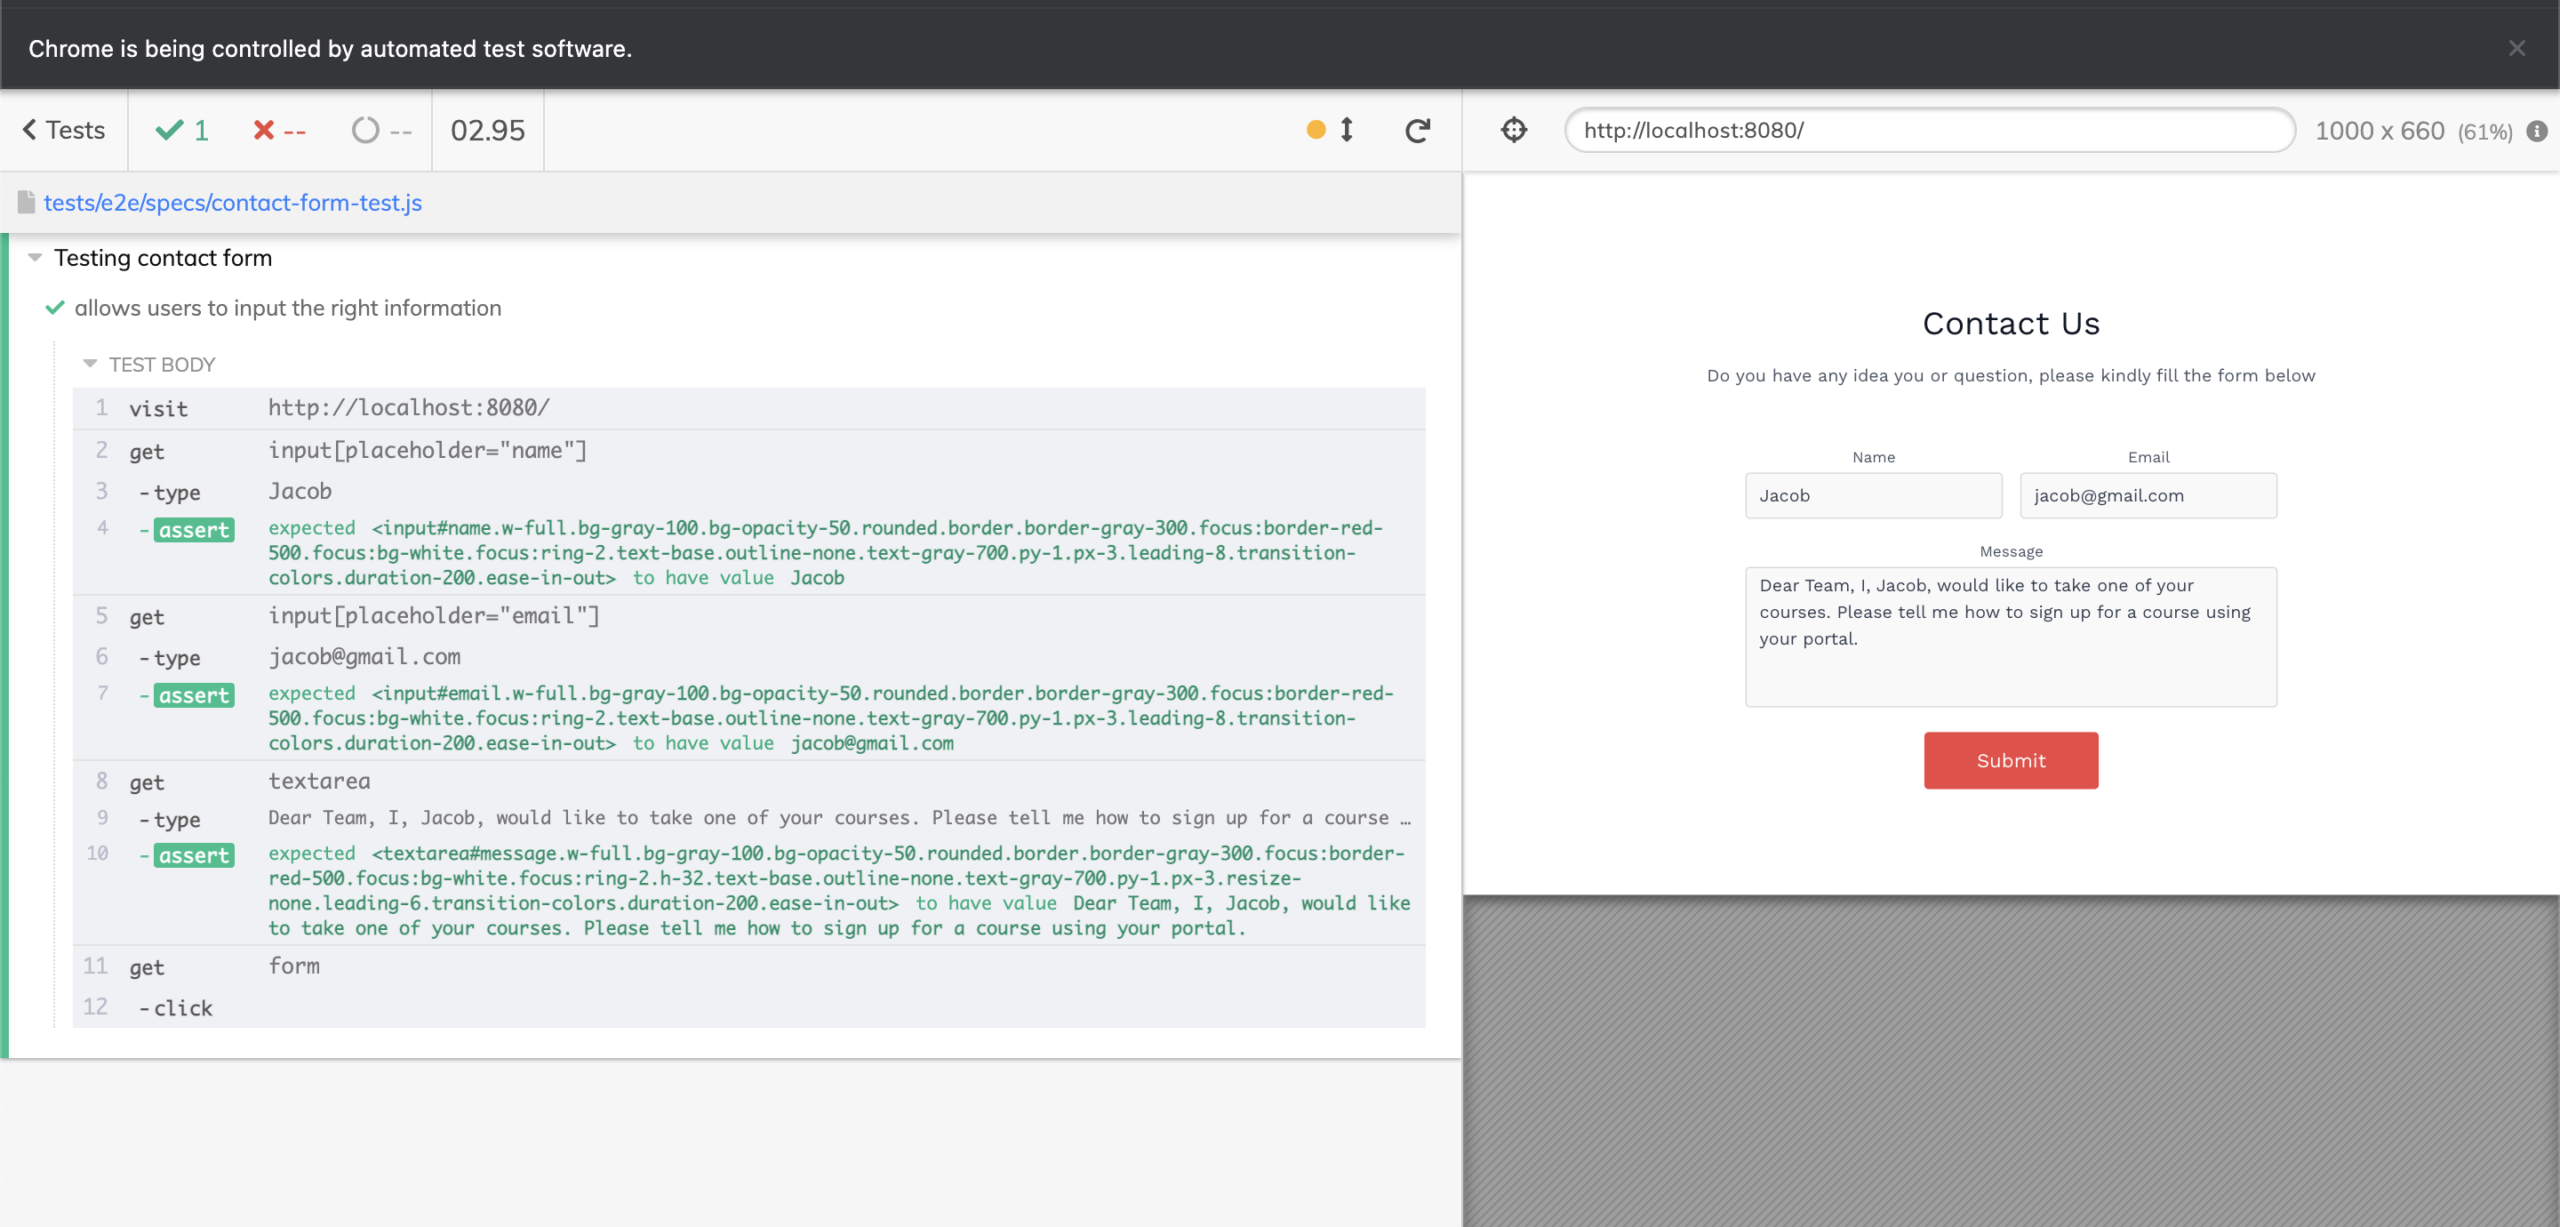
example of the successful test with the name input


See another example of a failed test. The correct value was not inputted.
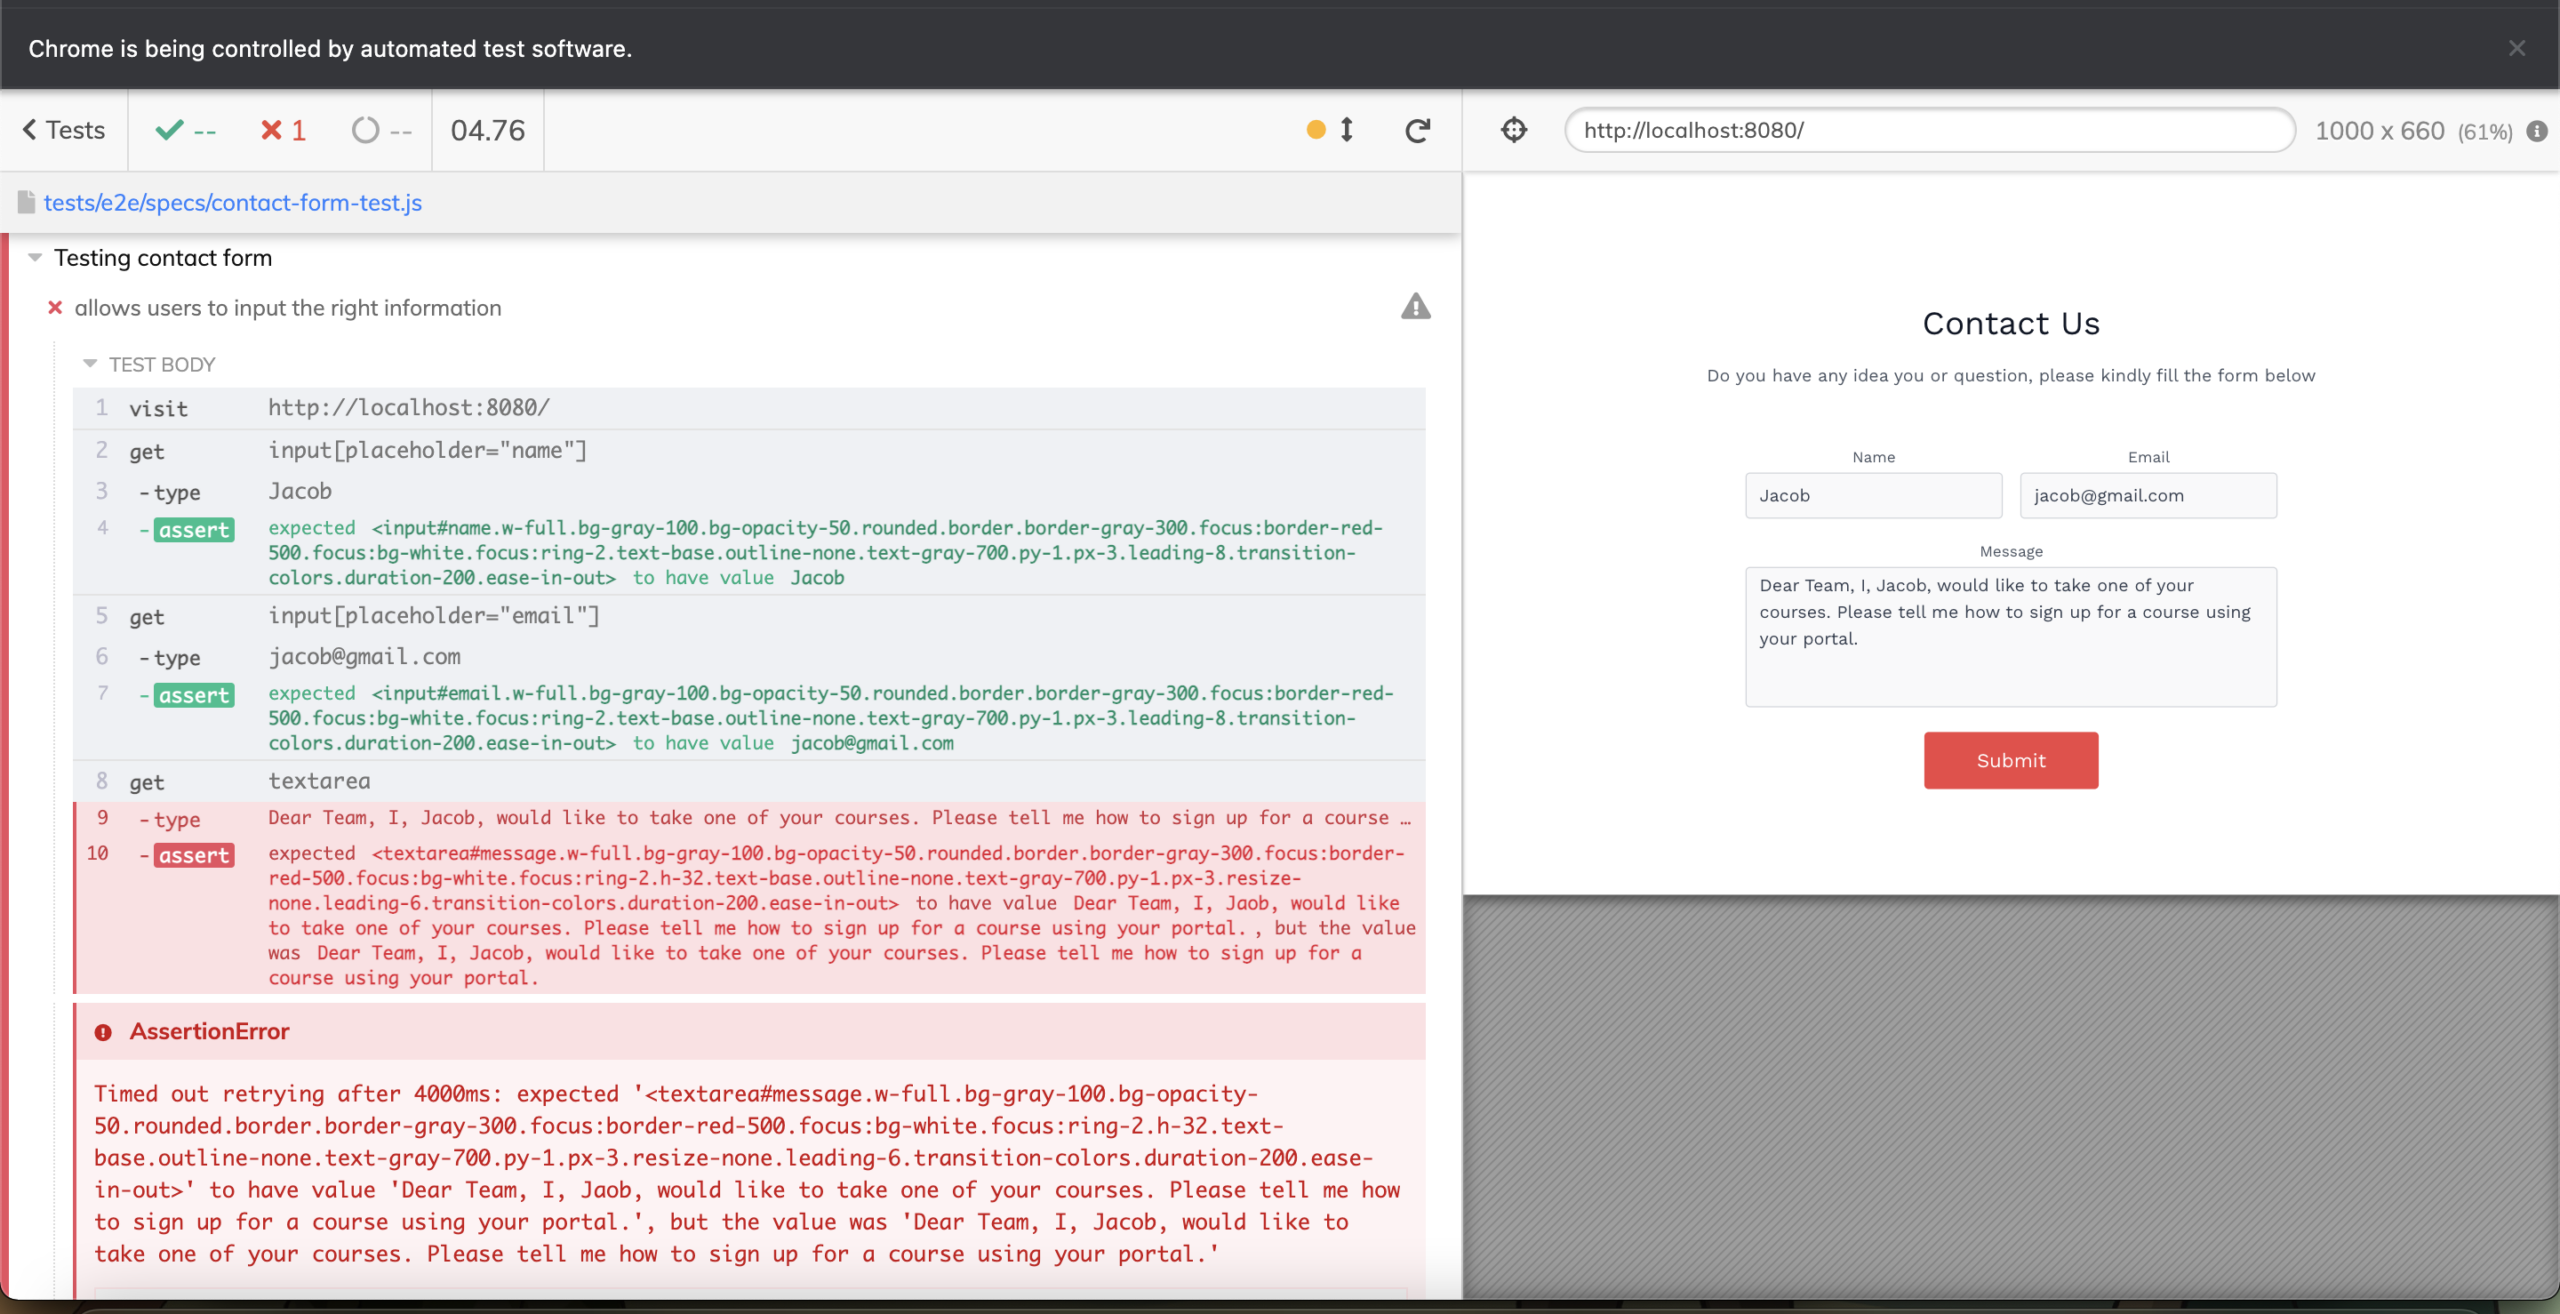
example of a failed test where the correct value was not input


Conclusion: End-to-end testing with Vue and Cypress Guide

End-to-end testing guarantees that our application is functional and meets user needs.

Cypress is a strong tool with an easy-to-use interface and helpful starting instructions that make end-to-end testing simpler. If this is your first time working with Cypress, don’t be afraid because plenty of resources are available to assist you.


Jscrambler & GitHub integration is now available

Jscrambler and GitHub integration will make it easier for users to include Jscrambler’s Code Integrity protection in their build pipeline.

The users have the action ready on the GitHub Marketplace, only needing to adjust a few parameters. By integrating Jscrambler with GitHub, the user avoids having to customize GitHub actions from scratch or include calls to the Jscrambler CLI when setting up the pipeline.

If you haven’t yet experienced Jscrambler’s dashboard, we suggest you follow our Getting Started guide, which will walk you through all the functionalities that we make available for our users.

If you are familiar with Jscrambler, you just need to download “No Secrets” Jscrambler’s configuration file for the application you want to protect. If you don’t know how to do this, please contact us.

Jscrambler and GitHub

A Jscrambler configuration file should look like this:


{
  "parameters": [
    {
        "status": 1,
        "name": "objectPropertiesSparsing"
    },
    {
        "status": 1,
        "name": "whitespaceRemoval"
    },
    {
        "status": 1,
        "name": "regexObfuscation"
    },
    {
        "status": 1,
        "options": {
            "features": [
                "opaqueSteps"
            ]
        },
        "name": "controlFlowFlattening"
    },
    {
        "status": 1,
        "name": "booleanToAnything"
    },
    {
      "status": 1,
      "name": "identifiersRenaming"
    }
  ],
  "areSubscribersOrdered": false,
  "languageSpecifications": {
    "es8": true,
    "es7": false,
    "es6": true,
    "es5": true
  },
  "applicationTypes": {
      "html5GameApp": false,
      "javascriptNativeApp": false,
      "hybridMobileApp": true,
      "serverApp": false,
      "desktopApp": false,
      "webBrowserApp": true
  },
  "useRecommendedOrder": true,
  "tolerateMinification": true,
  "useProfilingData": false
}


After downloading Jscrambler’s configuration file for the application you want to protect, you should:

  • Store your account keys and application ID as GitHub secrets.

  • Place the jscrambler.json file in your application’s root folder.

To configure a Jscrambler job with GitHub CI:

Consider the case of a workflow that, on a certain event, compiles or bundles a project and generates a set of JavaScript files in a dist folder.

To integrate with Jscrambler, you could add the following jobs:

jobs:
  build:
    runs-on: ubuntu-latest
    name: Test Protection
    environment: production
    steps:
      - uses: actions/checkout@v3
      # < your build process here >
      - name: Protect with Jscrambler
        id: jscrambler
        uses: jscrambler/code-integrity-actions/protect@v6
        with:
          application-id: ${{ secrets.JSCRAMBLER_APPLICATION_ID }}
          secret-key: ${{ secrets.JSCRAMBLER_SECRET_KEY }}
          access-key: ${{ secrets.JSCRAMBLER_ACCESS_KEY }}
          jscrambler-config-path: jscrambler.json
          files-src: |
            dist/*
            dist/**/*
          files-dest: dist-obfuscated/
      - name: Upload protected code as a GitHub artifact
        uses: actions/upload-artifact@v3
        with:
          name: protected-source-code
          path: dist-obfuscated/
          retention-days: 1

Integrate Jscrambler Code Integrity with GitHub workflow documents


Jscrambler is the leader in client-side web security and is trusted by the Fortune 500 and major companies in sectors such as finance, e-commerce, media, and software development.

Jscrambler has protected more than 1 million application builds and 2 billion user sessions.

Understanding Data Fetching in Next.js

Server-side rendering (SSR) is the technique of generating the page on the server side and then once it’s ready, sending it over to the client side to hydrate. SSR is also good from a search engine optimization point of view since the page content is already available on the client side.

Depending on how you are planning to render your content, Next.js provides different ways to fetch the data. And in this tutorial, you’ll learn how to fetch data in your Next.js application during SSR and client-side rendering.

Let’s get started by creating your Next.js app.

Creating the Next.js App

To get started you’ll be requiring Node.js >= 10.13. Type in the following command to check the Node version installed.

node -v

The above command should output the following:

C:UsersJay>node -v
v18.12.1

If your Node version is above 10.13 use the following command to create your Next.js app.

npx create-next-app next-fetch-data

It would prompt a couple of questions. Select the answers as shown:

  • Would you like to use TypeScript with this project? Yes

  • Would you like to use ESLint with this project? Yes

  • Would you like to use `src/` directory with this project? Yes

  • Would you like to use experimental `app/` directory with this project? No

  • What import alias would you like configured? Press Enter

Once done you will have your Next.js app created. Navigate to the project directory and start the app.

cd next-fetch-data
npm run dev

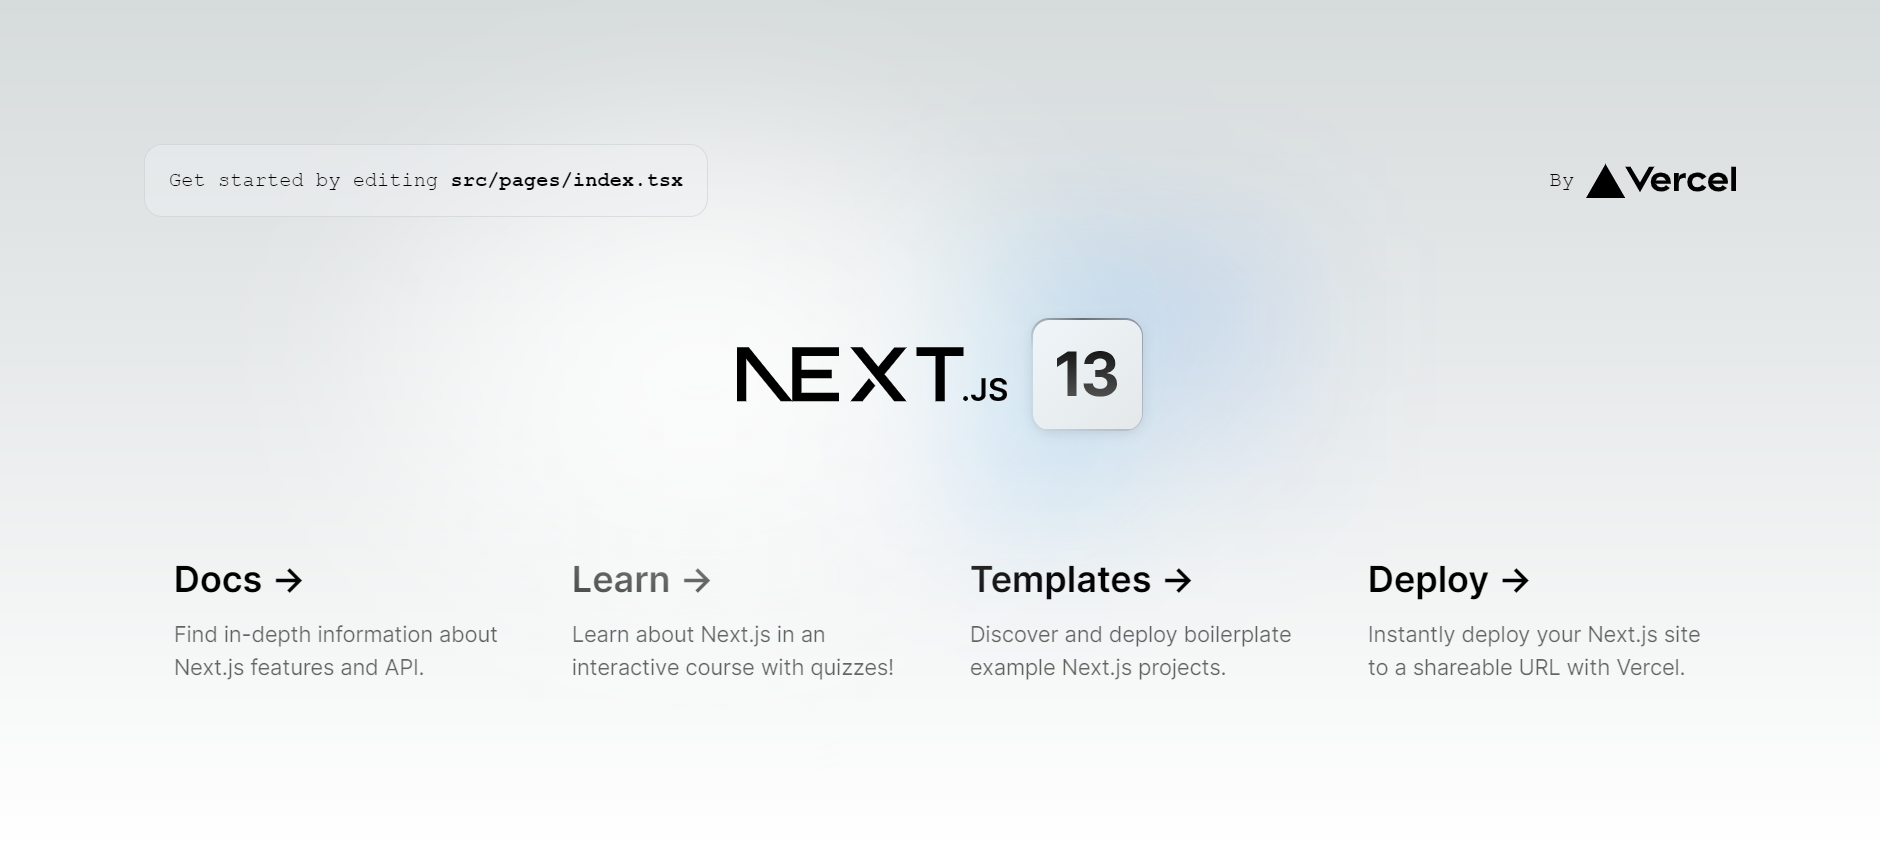
The above command will start the project in development mode and you will have the app running at http://localhost:3000.

next.j application running at http://localhost:3000

Understanding Data Fetching


Whenever a client sends a request to the server, it generates the HTML and sends it to the client side. The client-side then renders the HTML document in the browser.

Now the page rendered can be a complete HTML page document or the basic structure of a page document. If it’s a complete HTML file, like in the case of static pages, then it will be rendered in the browser.

If it’s a complete HTML page, it will be simply rendered. If it’s a basic page structure, then there will be some script being run on the client side to generate the dynamic page content.

For example:

<html>
<head></head>
<body>
    <div id="content-container">
        <!-- 
                Dynamic content
will be here !!
             -->
    </div>
</body>
</html>

In the case of client-side rendering, the data will be fetched from the client once the app has loaded. For fetching the data during server-side rendering, Next.js provides a couple of methods based on the particular use case.

Let’s dive a bit deeper into each use case to understand how we can fetch data.

getStaticProps

Let’s say while loading your page, you are showing a list of countries in a drop-down. No matter to whom or from where the page is being requested, the country list remains the same.

In such cases, you can make use of `getStaticProps`. Now, what `getStaticProps` does is fetch the data from the API during build time and keep it aside as a JSON file. Whenever the page is requested, it is rendered with the data in the JSON file. So basically, `getStaticProps` is executed only once during build time, and the data is cached and rendered each time the page is requested. Now let’s see it in action.

By default, we have an `index` page inside the `pages` folder. Remove the existing code and replace it with the following code:

export default function Home({users}:any) {
  return (
    // ## Iterating over the users list
    // ## and displaying the name
    <ul>
      {users.map((user:any) => (
        <li key={user.id}>{user.name}</li>
      ))}
    </ul>
  )
}
export async function getStaticProps(context:any) {
  // ## making an API call
  const res = await fetch('/users')
  // ## parsing out the JSON data
  const users = await res.json()
  // ## returning the users as props to the page
  return {
    props: {
      users,
    },
  }
}

For Next.js to pre-render the page, you need to export the function `getStaticProps`. Inside the method, we are making an API call and pass the information as props to the page where it’s rendered. Now let’s try building the project:

npm run build

Inside the project directory, if you go to the page `.next/server/pages/` you will find a file called `index.json` which is the JSON data being passed as props to the page generated during build time. Now every time the page is requested, this file is reused instead of fetching data on every request.

Now, what if the data has changed since you last built your project?

One option would be to rebuild your project once again. But you can’t be doing it every time the data changes. That takes us to Incremental Static Regeneration (ISR).

Incremental Static Regeneration


ISR is required when you need to update your static pages once you have built and deployed your project. To make use of ISR, you need to add a property called `revalidate` along with the `props` as shown:

export async function getStaticProps(context:any) {
  // ## making an API call
  const res = await fetch('/users')
  // ## parsing out the JSON data  
const users = await res.json()
  // ## returning the users as props to the page
  return {
    props: {
      users,
    },
    revalidate: 20
  }
}

So whenever you request a page for 20 seconds, you’ll be shown the page with the cached data. Once you request the page after 20 seconds, it will trigger a revalidation, and the page will be regenerated with the new data.

Now, what do I do if I require fresh data on each request? You can use `getServerSideProps`.

getServerSideProps

Once you have exported a function called `getServerSideProps` in your Next.js page it will be executed on each request. The page will get pre-rendered on the server side with the data being passed from the `getServerSideProps` method. Here is an example of it in action,

export default function Home({users}:any) {  
return (
    // ## Iterating over the users list
    // ## and displaying the name
    <ul>
      {users.map((user:any) => (
        <li key={user.id}>{user.name}</li>
      ))}
    </ul>
  )
}
export async function getServerSideProps(context:any) {
  // ## making an API call
  const res = await fetch('/users')
  // ## parsing out the JSON data
  const users = await res.json()
  // ## returning the users as props to the page
  return {
    props: {
      users
    }
  }
}

Unlike the `getStaticProps` the code inside `getServerSideProps` will get called each time the page is requested and pre-rendered on the server.

getStaticPaths

This method applies to dynamic routes, and if you are not familiar with dynamic routes, I would recommend reading about them in our previous blog article about understanding routing in Next.js.

Let’s try to understand this with the help of an example. Let’s assume we are showing a list of users on the page `/users`. Each user will have a detailed info page that is shown when clicking on `/users/1`, `/users/2` etc. where `1`,`2` indicate the respective user ids.

Using the `getStaticPaths` method, we’ll create a list of dynamic paths, which will be pre-rendered to create the paths.

On the `index.tsx` page you’ll be shown the list of users with a link to click to view the user details. We’ll be using `getServerSideProps` method to fetch data in this case,

export default function Home({users}:any) {
  return (
    // ## Iterating over the users list
    // ## and displaying the name
    <ul>
      {users.map((user:any) => (
        <li key={user.id}>
          <a href={`/users/${user.id}`}>
          {user.name}
          </a>
        </li>
        
      ))}
    </ul>
  )
}
export async function getServerSideProps(context:any) {
  // ## making an API call
  const res = await fetch('/users')
  // ## parsing out the JSON data
  const users = await res.json()
  // ## returning the users as props to the page
  return {
    props: {
      users
    }
  }
}

Next, we’ll create a dynamic page `/pages/users/[id].tsx` and add the following code:

export default function Home({userInfo}:any) {
    return (
      <table>
        <tbody>
        <tr>
            <td>
                Name
            </td>
            <td>
                {userInfo.name}
            </td>
        </tr>        <tr>
            <td>
                Email
            </td>
            <td>
                {userInfo.email}
            </td>
        </tr>
        <tr>
            <td>
                Phone Number
            </td>
            <td>
                {userInfo.phone}
            </td>
        </tr>
        </tbody>        
      </table>
    )
  }
  export async function getStaticProps({ params }:any) {

    // ## making an API call
    const res = await fetch(`/users/${params.id}`)

    // ## parsing out the JSON data
    const userInfo = await res.json()

    // ## returning the users as props to the page
    return {
      props: {
        userInfo
      }
    }
  }
  export async function getStaticPaths() {

    // ## making an API call
    const res = await fetch('/users')

    // ## parsing out the JSON data
    const users = await res.json()
    let params = users.map((user:any) => {
      return {
        params: {id : user.id.toString()}
      }
    })
    return {
      paths: params,
      fallback: false, // can also be true or 'blocking'
    }
  }

As seen in the above code, dynamic paths are created based on `params` generated inside the `getStaticPaths` method. And then during build time for each of the dynamic routes like `/users/1` the page is pre-rendered as in `getStaticProps`.

Save the above changes and build the project.

npm run build

And run the project based on the build,

npm start

Point your browser to http://localhost:3000 and you will get a list of users. On clicking each name, you’ll be redirected to the specific dynamic route.


Client-side fetching


Last but not least is the client-side fetching. Here, data is fetched once the basic page structure has loaded. You can use `useEffect` hook to make client-side calls once the component has loaded, as shown:

useEffect(()=>{
const makeAPICall = async () =>{
const res = await fetch('/users');
const users = await res.json();
};
makeAPICall();
},[]);


Wrapping It Up

In this tutorial, we learned about different ways to fetch data during server-side rendering and client-side rendering. The method used differs based on your use case.

Creating a Kanban Board with Vue Draggable

A Kanban board is a management tool that tracks and manages the team’s activity in an organization or personal projects. It has a sequence of columns with different tracking categories or activities.

An example of a Kanban board is the Trello board. Having a management board like Trello helps keep us on track with our goals and tasks and improves our productivity.

This article will focus on how to create a personal or team management board to track daily work activities using Vue, the Vue draggable API, and Tailwind CSS.

Prerequisites


This article assumes you have the listed prerequisites below:

  • Knowledge of how to create a new Vue project.

  • Node JS installed on our Computer.

  • Tailwindcss installed and setup in our new Vue Project.


The pictorial example of the Trello board below manages the content writing process; it splits the task into different categories such as New Pitch, Content in Progress, Draft Received, In Review, and Published Article. This is an example of what we want to build in this article.

What is Vue Draggable?


Vue Draggable API is a library that provides a straightforward API to incorporate drag-and-drop capabilities into our components and applications. With the help of this library, we can develop interactive elements and programs, such as Jira Software, a Kanban board, and a Trello board.

The Vue Draggable can be used for any project, including a grid of photographs, a to-do list, a shopping cart, etc. In addition, it includes several characteristics that make it simple for us to utilize. For instance, it works well on mobile devices since it allows touch events. Also, there are other options for modifying the behavior of draggable items, including the ability to select a handle for dragging and the sorting orientation.

Installing and Setting the Vue Draggable

First, we will begin with the installation. To do that, we will cd into our Vue project directory and use the command below:

npm install -- save  vuedraggable


We have successfully added Vue draggable library to our project; next is to import it into the script tag and add it as a component:

<script>     
import draggable from "vuedraggable";
 export default {
 name: 'HelloWorld',      components: { 
draggable,
},
} 
</script>


Designing the Kanban board layout


First, we will create a component called KanbanBoard.vue Now, we can start designing our Kanban board layout. We will use a 4-column layout to represent the different stages of our task workflow.

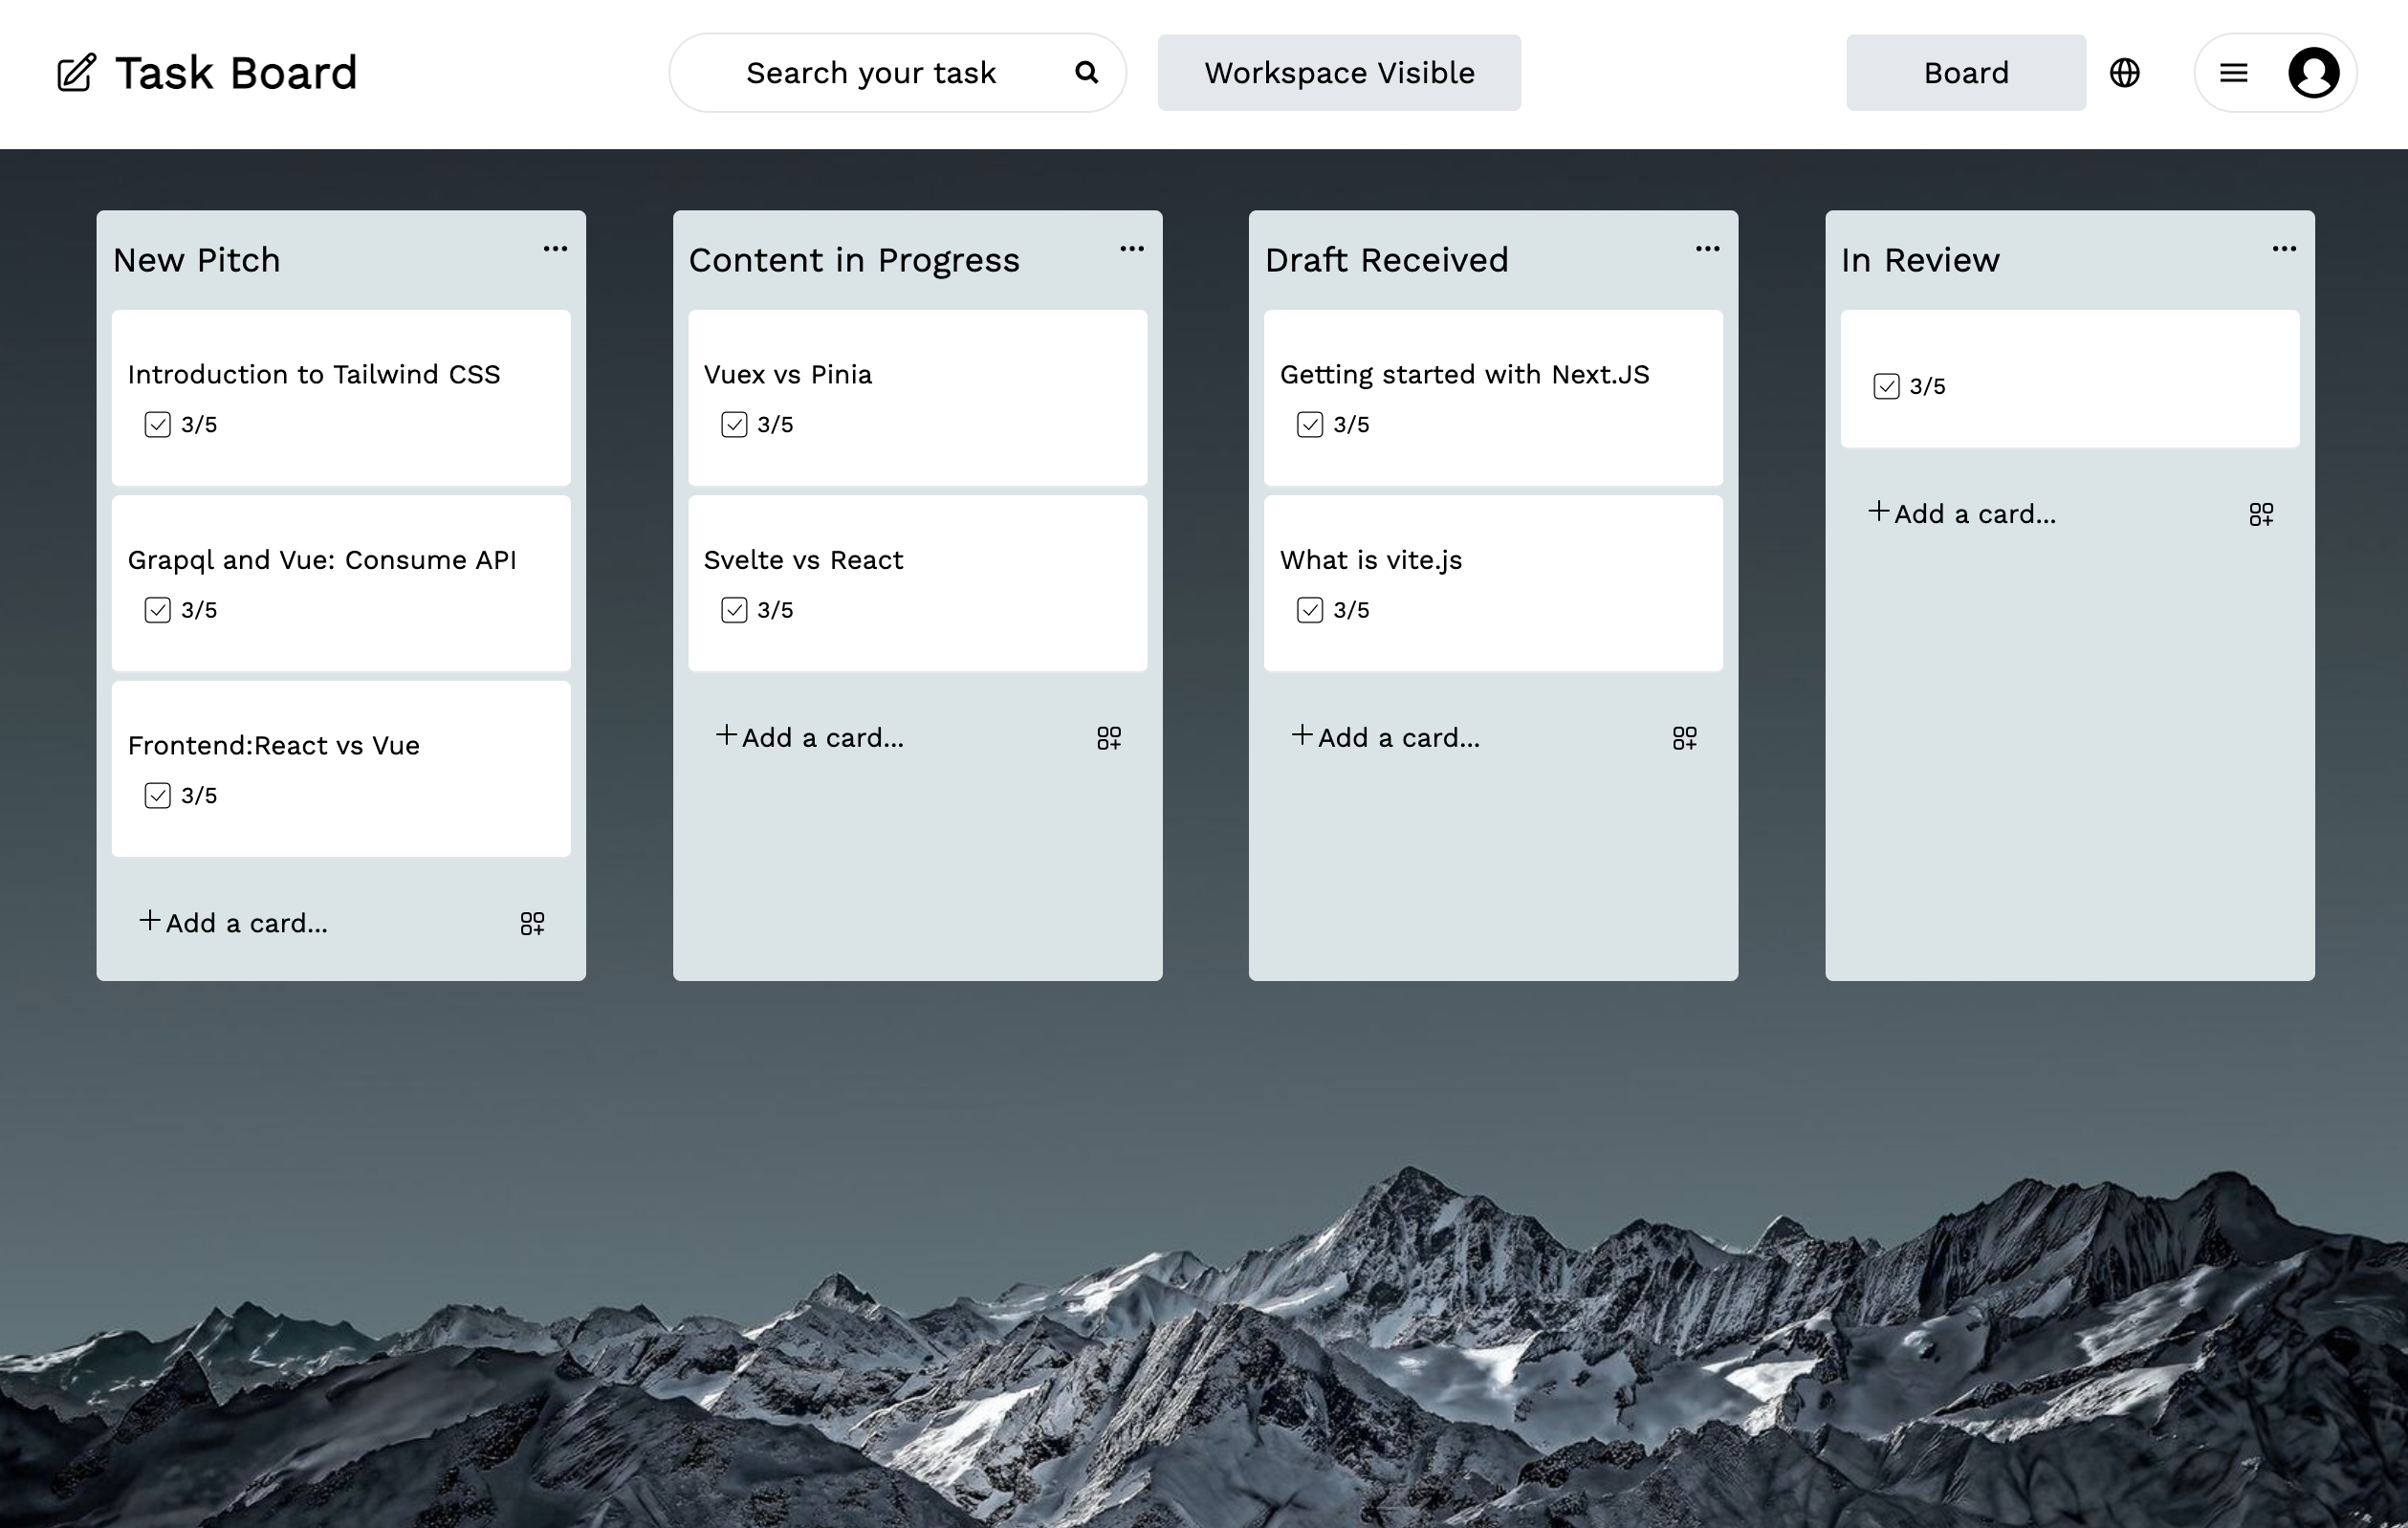
The first column will represent the New Pitch stage, the second column will represent the Content in Progress stage, the third column will represent the Draft Received stage, and the fourth one will receive the In Review stage with the code.

Here is what our application would look like:

the Kanban board layout

Adding the Drag-and-Drop Functionality


The next stage is to add drag-and-drop functionality to our Kanban board structure so that users can quickly move cards between columns to reflect changes in the status of their tasks.

We will take advantage of the VueDragable library to accomplish this. Drag-and-drop functionality can be easily implemented into our project. After integrating the library, we will use a for loop to repeatedly run through a list of our tasks:

<div class="text-sm mt-2">
  <div class="">   
    <draggable class="draggable-list" :list="articles.draftReceived" group="articles">
      <div v-for="(article, i) in articles.draftReceived" :key="i"> 
       <div class="bg-white p-2  py-6 rounded mt-1 border-b border-grey cursor-pointer hover:bg-grey-lighter">
       <p> {{ article }} </p>
      <div class="text-grey-darker mt-2 ml-2 flex justify-between items-start">    
       </div>              
    </div>
    </div>
  </draggable>             
  </div>
</div>
<script>
import draggable from "vuedraggable";
export default {
  name: 'HelloWorld',
  components: {
    draggable,
  },
  data() {
    return {
      articles: {
        newPitch: ["Introduction to Tailwind CSS", "GrapQL and Vue: Consume API", "Frontend:React vs Vue"],
        contentInProgress: ["Vuex vs Pinia", "Svelte vs React"],
        draftReceived: ["Getting started with Next.JS", "What is vite.js"],
        inReview: [],
      },
    };
  },
}
</script>


In the above code, we wrapped our card component with the <Draggable> element and used the <:list> attribute to bind our articles to the <Draggable> element; this will help to reflect the changes we make to any card. Inside the draggable component, we created a v-for directive to iterate over the list of our columns (New pitch, Content in progress, Draft received, and In review) and tasks.

See the complete code.

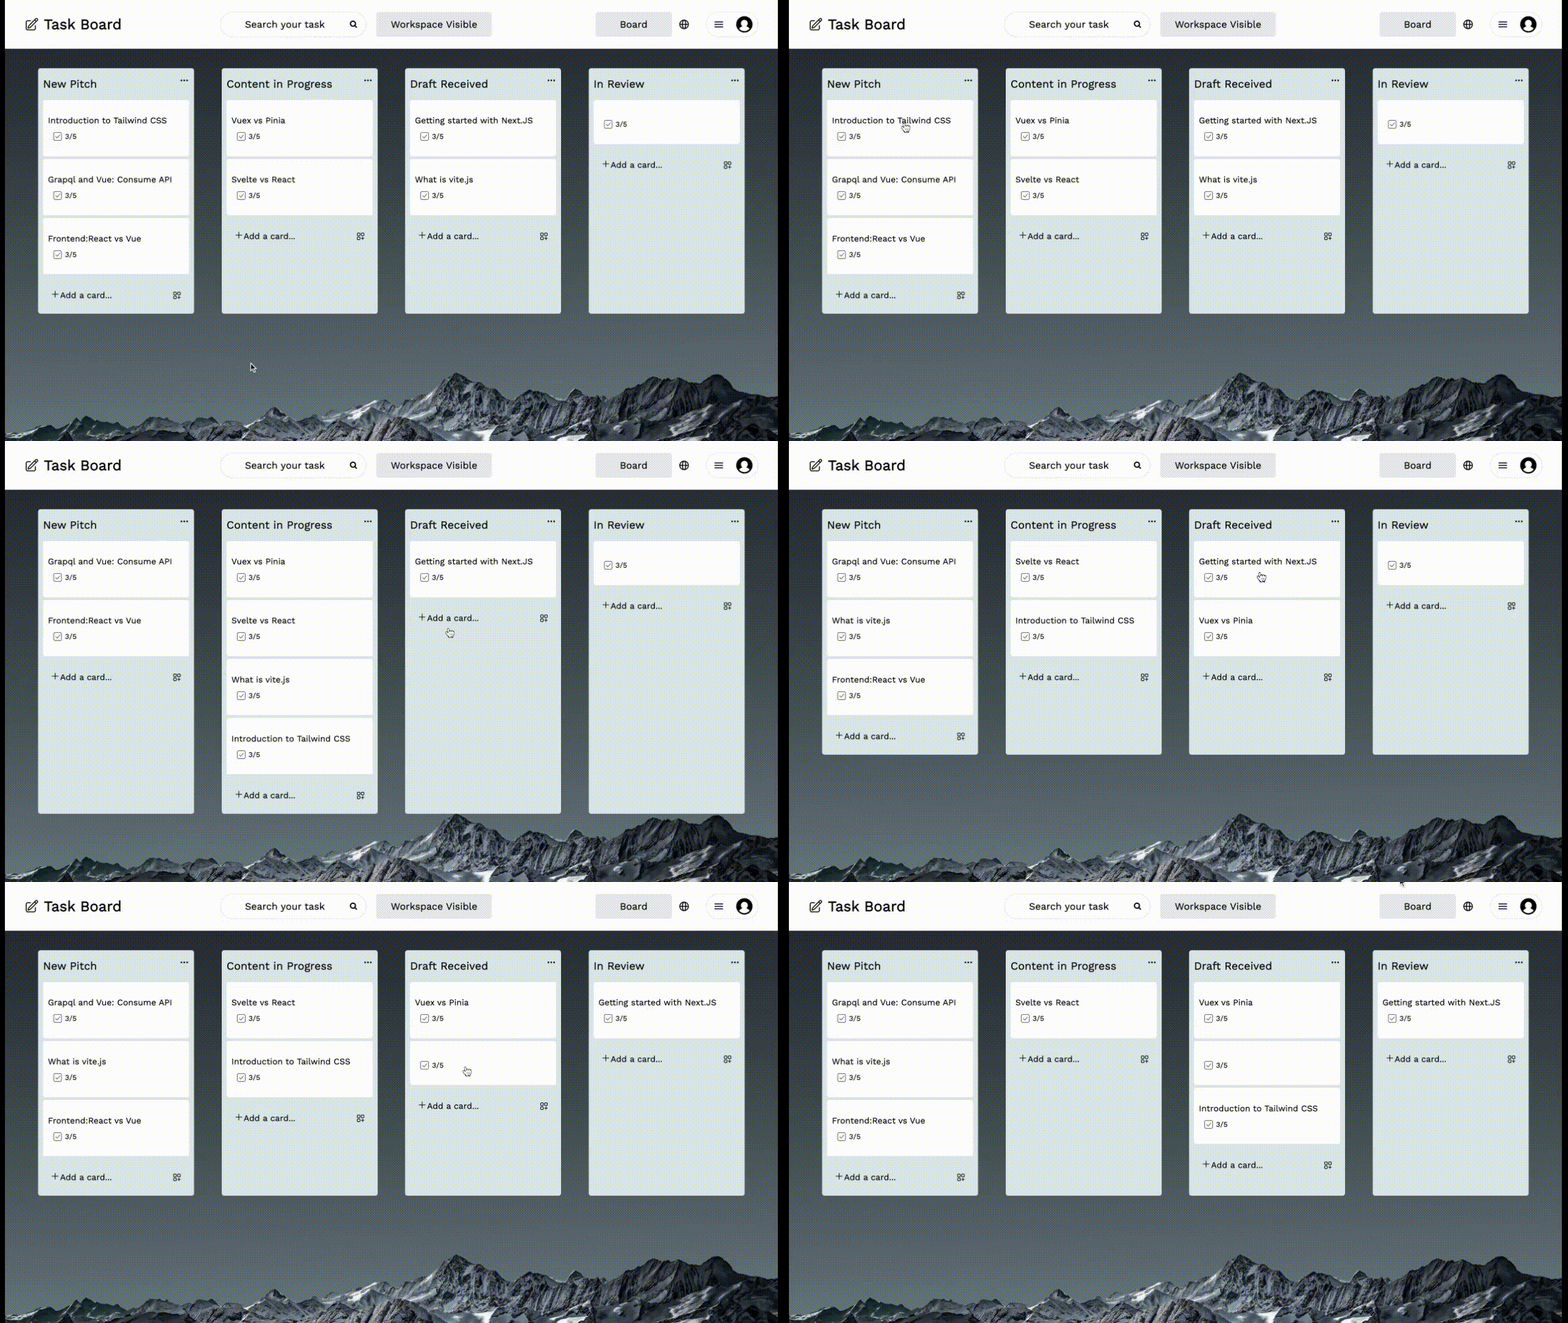
This is an illustration of how our program will appear once the drag-and-drop feature has been added.

gif kanban board

There are further features we can include in our Kanban board, and I’ll include the GitHub link to this article so we can customize the board to meet our unique needs.

Look at the entire code on GitHub. See the documentation to see other ways we can use the Vuedraggable Library.

Conclusion

Using Vue Draggable to create a Kanban board is an easy and effective way to manage chores and projects.

Using the Vue draggable framework, we can quickly develop a specialized and dynamic Kanban board that satisfies our project management requirements.

Jscrambler to partner with PCI Security Standards Council to help secure payment data worldwide

Jscrambler has joined the PCI Security Standards Council (PCI SSC) as a new Principal Participating Organization. Jscrambler will help drive the future of global payment security with a strategic level of leadership, participation, and influence with the Council.

Jscrambler joined the PCI Security Standards Council


PCI SSC leads the global effort to increase payment security by providing flexible, industry-driven, and effective data security standards and programs. Global industry collaboration is critical to this mission.

The Council’s Participating Organizations program brings together industry leaders to strategize about how to protect payment data from the latest threats and anticipate the needs of an ever-changing payment ecosystem.

As a Principal Participating Organization, Jscrambler will provide strategic direction to help shape the future of the Council. Jscrambler will impact the direction of PCI SSC standards, drive technical discussions, and have input into Council initiatives.

“Every day, companies and organizations across the globe face an ever-changing payment landscape with new and evolved threats attacking their systems and data”, said Lance Johnson, Executive Director of the PCI Security Standards Council.

By joining as a Principal Participating Organization, Jscrambler will have a significant impact on how the PCI SSC helps them address these challenges, especially the direction and development of PCI Security Standards and resources that help organizations prevent, detect, and mitigate attacks on global payment data.

We are delighted to partner with an organization that is focused on the global struggle for secure payments,” said Rui Ribeiro, CEO and Co-founder of Jscrambler. “As the industry prepares for two new requirements under PCI DSS v4, we know that more attention than ever will be placed on securing third-party JavaScript on payment pages. We’re excited to work with the community to protect end-users from the risk of web skimming and other cyber-attacks that stem from a lack of payment security.”

About the PCI Security Standards Council

The PCI Security Standards Council (PCI SSC) leads a global, cross-industry effort to increase payment security by providing industry-driven, flexible, and effective data security standards and programs that help businesses detect, mitigate, and prevent cyberattacks and breaches.

Connect with the PCI SSC on LinkedIn. Join the conversation on Twitter @PCISSC. Subscribe to the PCI Perspectives Blog.

Jscrambler is helping companies comply with PCI DSS v4.0


Jscrambler’s free tool helps Merchants achieve compliance with requirements 6.4.3 and 11.6.1 of PCD DSS v4.0 and QSAs to validate compliance.

The only solution developed by

  • A PCI SSC Principal Participating Organization.

  • A member of the PCI SSC Board of Advisors.

  • A company with more than a decade of experience protecting JavaScript.

Try the Free PCI DSS Payment Page Analysis!

Three things you need to know about PCI DSS v4.0

PCI DSS v4 is the latest version of the PCI DSS standard, released in March 2022. It contains 64 new requirements that organizations seeking compliance must fulfill. Two of these new requirements are focused on the integrity of pages where payment is taken on an e-commerce website and aim to stop e-commerce skimming (Magecart) attacks.

The PCI DSS (Payment Card Industry Data Security Standard) is a well-known general data security standard for all organizations that store, process, or transmit payment card data.

The Payment Card Industry (PCI) Security Standards Council (SSC) released it in 2006. This joint initiative of the card brands includes brands such as Visa, Mastercard, American Express, Discover, and JCB.

3 Things You Must Know About PCI DSS v4

  1. What are the two new requirements to prevent and detect e-commerce skimming attacks?

  2. How can E-commerce websites meet the new requirements?

  3. The business impact of version 4.0: Why should companies worry now?

Below, we detail the three things we consider mandatory to know about PCI DSS V4 to facilitate your PCI DSS compliance.

What are the two new requirements to prevent and detect e-commerce skimming attacks?


1: Requirement 6.4.3  (Preventative)

The first new requirement is designed to minimize the attack surface and manage all JavaScript present on the payment page by requiring an approval process and justification for each script added to the payment page.

It is designed to ensure that all JavaScript included in the payment page is actively managed. Additionally, the requirement wants a way of validating the integrity of a script to be defined to ensure that malicious scripts are not placed on the payment page.

2: Requirement 11.6.1 (Detective)

The second new requirement aims to detect tampering or unauthorized changes to the payment page, which can indicate a skimming-type attack.

In addition to detecting changes, the requirement demands that an alert be generated when such changes are detected. There is no requirement to block changes or malicious activity, just to send an alert.

How can E-commerce websites meet the new requirements?


To meet these two new requirements, e-commerce companies must focus on:

  • Gaining visibility of the JavaScript that’s loaded into their web pages

  • Managing the risk associated with each script: Where does it come from? What does it do?

  • Having control of JavaScript so that malicious scripts can be blocked or deactivated

The business impact of version 4.0: Why should companies worry now?


Any organization that wants to accept a transaction with a payment card issued by a PCI SSC participating card brand is required to sign a contract that will contain references to the card brand’s rules, which will specify that:

  • The organization has to comply with PCI DSS.

  • The organization has to make sure that all of their third-party service providers that can affect the security of cardholder data comply with PCI DSS.


The latest version of PCI DSS was released in March 2022 and will replace version 3.2.1. These two new requirements are labeled “best practice until March 31, 2025”. This means that they will not be evaluated in a formal PCI DSS assessment until “after March 31, 2025”.

Although it seems there is still a long way to go until then, it’s highly recommended that companies do not delay the implementation of the new security requirements as these E-commerce skimming attacks continue to be increasingly popular today and all e-commerce websites are at risk.

It is imperative that merchants gain visibility, risk management, and control over JavaScript before the standard requires it in order to protect payment card data and guarantee compliance with the new PCI DSS requirements.

Jscrambler’s Solution to Help Achieve PCI DSS v4 Compliance


Jscrambler’s Solution allows companies to achieve compliance with the new requirements of PCI DSS v4, developed to prevent and detect e-commerce (e.g., Magecart) skimming attacks.

More specifically, we are helping Merchants achieve compliance with requirements 6.4.3 and 11.6.1 of PCI DSS v4 and QSAs to validate compliance. Our solution provides merchants with visibility, risk management, and control of all JavaScript running on their websites.  

The new requirements mandate that e-commerce businesses maintain a full inventory of every script on their payment page. Businesses are also expected to validate the integrity of every script to ensure that those loaded into the consumer’s browser haven’t been tampered with.

Jscrambler goes one step further than the new requirements and can be configured to automatically block all attempts to skim cardholder data from e-commerce transactions.

Understanding Routing in Next.js

In this comprehensive guide, you’ll learn the basics of how to route pages in your Next.js application. In other words, you will understand routing in Next.js.

I will explain the different types of routing available in Next.js and how to use them with the help of an example. So, let’s get started by creating your Next.js app.

Creating the Next.js App


In order to properly integrate Jscrambler into your Next.js build process, there are two things we need to do first:

  1. Creating a Next.js app.

  2. Configuring Jscrambler. Let’s go through those steps.

Creating Your Next.js Application


If you are not very experienced with Next.js yet, feel free to check out Jscrambler’s blog articles regarding the Next.js topic, including “Working with Redux in Next.js” and “Understanding Data Fetching in Next.js“.

We will actually be using this example app in our integration tutorial, so let’s install it.

Teste

To get started with creating your Next.js app you’ll be requiring Node.js >= 10.13. Type in the following command to check the Node version installed,

import { useRouter } from 'next/router' 

   const Brand = () => { 
   const router = useRouter() 
   const { brandId } = router.query 
   return <h3>Brand: {brandId}</h3> 
   }
 
export default Brand

The above command should output something as shown.

To get started with creating your Next.js app, you’ll need Node.js >= 10.13. Type in the following command to check the Node version installed,

node -v


The above command should output something as shown:

C:UsersJay>node -v
v18.12.1


If your Node version is above 10.13 you can use the following command to create your Next.js app.

npx create-next-app next-route-app


The above command would ask a couple of questions as shown. For the following, you can select the respective answers:

  • Would you like to use TypeScript with this project? Yes

  • Would you like to use ESLint with this project? Yes

  • Would you like to use src/ directory with this project? Yes

  • Would you like to use the experimental app/ directory with this project? No

  • What import alias would you like configured? Press Enter


Once this is done you will have your Next.js app created. Navigate to the project directory and start the app.

cd next-route-app
npm run dev


The above command will start the project in development mode and you will have the app running at http://localhost:3000.

Third-party scripts in e-commerce websites: is payment data at risk?

Digital skimming attacks targeting eCommerce websites and third-party scripts are common. Is payment data at risk? No, if your JavaScript is protected.

These high numbers of fraud, data leakages, and other data skimming attacks occurred because of unprotected JavaScript running on the payment page. More than 99% of all websites use JavaScript in some form, as it serves many purposes. Some directly and others via a third-party vendor.

JavaScript powers the web because of its versatility. It provides a form to collect data, enables functionality like tag managers or content management systems, or can be used to build the entire website. Because it is pervasive, the Jscrambler security team wanted to explore the impact of this third-party code (in scripts) present on e-commerce websites.

Most organizations don’t have visibility into the third-party JavaScript that loads at runtime on their website. This massive blind spot can lead to stolen data, loss of revenue and reputation, and heavy fines.

Why is the research about Third-Party risk on E-commerce websites important?


The main goal of the research is to highlight the importance of having visibility and control over the scripts that are present on the payment pages, especially on e-commerce websites.

Popular e-commerce sites in North America and Europe were selected for analysis to understand the scope of the problem and potential points of failure. We looked at the number of scripts on the payment pages controlled by third parties.

Examples of third-party applications targeted by attackers

  • Live chatbots;

  • Advertising scripts;

  • Marketing tags;

  • Marketing forms;

  • Open source code libraries;

  • Other elements loaded by the user’s browser.

Research results, developed by Jscrambler

Our findings indicate that the possible attack surface is huge unless these sites find a way to identify, monitor, and control the behavior of third-party Scripts.

For these reports, 20 highly trafficked e-commerce websites with more than $50 million in revenue were selected. They are from diverse industries, including health, personal care, retail, groceries, home goods, consumer electronics, and airlines.

The data collected focused on the payment pages. All data was collected using Jscrambler’s Webpage Integrity, a holistic solution to detect and block, in real-time, malicious behavior on the client side of web applications.

Highlights

Consider the potential damage if even one script is compromised; now multiply that by 100. Some of these e-commerce companies register hundreds of third-party scripts on their payment pages. We are witnessing a level of risk that demands action.

Third-Party Risk in Top 20 US E-Commerce Websites

  • 60% of the analyzed websites have more than 10 different vendors on their payment pages.

  • On average, 148 scripts are being loaded on the payment page; of these, 58% are third-party.

  • One of the analyzed websites did not allow the retrieval of data.


Third-Party Risk in Top 20 EU E-Commerce Websites

  • 80% of the analyzed websites have more than 10 different vendors on their payment pages.

  • On average, 132 scripts are loaded on the payment page, and of these, 97% are third-party.

  • All websites allowed the retrieval of data.


In general, it’s important for website owners to carefully consider the use of third-party scripts and to only include those that are necessary for the website to function properly.

Implementing an automated client-side security solution will help in the process of continuously monitoring these “foreign” scripts. Such a solution can also help the website comply with mandatory or recommended regulations.

Preventing Digital Skimming Attacks: What Should Be Done?


Companies need to adopt a proactive approach to client-side security, restricting the behaviors of website scripts to prevent them from tampering with forms and/or leaking sensitive data.

The dynamic nature of the web and JavaScript itself, and because there’s so much sensitive data being handled on the client side, demands that security can’t be treated as an afterthought.

Jscrambler’s Approach to Client-Side Security


Jscrambler’s Webpage Integrity (WPI) is a holistic solution to detect and block, in real-time, unauthorized behavior on the client side of web applications.

It prevents the leaking or scraping of sensitive data and protects against web supply chain attacks. WPI also addresses both of the new requirements in PCI DSS version 4.

The PCI DSS v4 New Requirements and Client-Side Security

Regulations and standards that aim to protect Personally Identifiable Information (PII) are becoming increasingly prominent, especially regarding the protection of payment pages.

The Payment Card Industry (PCI) Data Security Standard (DSS) emerges as a highlight standard for all organizations that store, process, or transmit payment card data, and its latest version, 4.0, was released in March 2022. It has 64 new requirements that organizations seeking compliance must fulfill.

To curtail skimming (Magecart) attacks, two of these requirements focus on the integrity of pages where payment is taken. These are:

  • Requirement 6.4.3 demands that entities manage the JavaScript on payment pages. All JavaScript must be detailed in an inventory, be necessary for the payment page, be approved, and have its integrity assured.

  • Requirement 11.6.1 requires changes to scripts and page headers to be detected on payment pages, and the appropriate alerts generated.


E-commerce companies need to focus on gaining visibility into the JavaScript that’s loaded into their web pages because the risk of each third-party script shouldn’t go unnoticed. Each malicious script should be blocked and deactivated.

Try a free trial to gain visibility over your E-commerce website scripts with Jscrambler’s Webpage Integrity solution.

Learn more about how Jscrambler can help you effectively manage third-party risk, mitigate payment data risks to your organization, and defend your business from client-side attacks.

How to manipulate DOM using a service worker

Service workers are JavaScript workers that run in the background of a web page, act as a proxy between the web browser and the server, and can be used to manipulate the DOM (Document Object Model). They can be used to do things like cache resources, receive push notifications, and handle offline scenarios.

This article will teach us how to manipulate the DOM using a Service Worker in JavaScript and give tips and best practices for using a service worker to manipulate the DOM.

Prerequisites

We assume you have prior experience working with Service workers and DOM, as we won’t give details of how to work with them in this blog post.


That said, we will explore the following topics:

  1. Introduction to a Service Worker

  2. Registering a Service worker

  3. Using Service Workers to Manipulate DOM

  4. Tips and best practices for using service workers to manipulate the DOM

Introduction to a Service Worker

A service worker is a specialized type of JavaScript web worker that runs a script in the background of a web browser and manages caching and other offline-related tasks.

It can intercept network requests, access the browser’s cache, and serve responses directly from the cache or make network requests as needed.

Service workers are typically used in Progressive Web Apps (PWAs) to provide a native-like experience on the web.

Registering a service worker

A service worker is a powerful script that allows us to create offline-first websites and enhance the functionality of our web applications.

Registering our service worker will give us control over the caching of resources, handle push notifications, and even intercept network requests.

To register our service worker, we will create a javascript file named “sw.js” in our root folder; this file can contain all the logic for handling caching, push notifications, and network requests in our application.

Next, we will copy the following code into our main JavaScript file:

if ('serviceWorker' in navigator) {
    navigator.serviceWorker.register('/sw.js')
      .then(function(registration) {
        console.log('You have successfully registered your service worker : ', registration);
      })
      .catch(function(error) {
        console.log('Your service worker registration failed: ', error);
      });
  }


The first line of code will check if a service worker is supported on the browser; using the if statement, it will check if the service worker exists in the browser navigator object (A navigator is an object in javascript that represents the browser and information about it).

If it exists, it will register the service worker using a method called “Register”. In that method, we will pass an argument, “sw.js” which is the Javascript file we created.

Next, we will create a method and pass a call-back function, which will execute when the promise is resolved and reject it with an error if it fails.

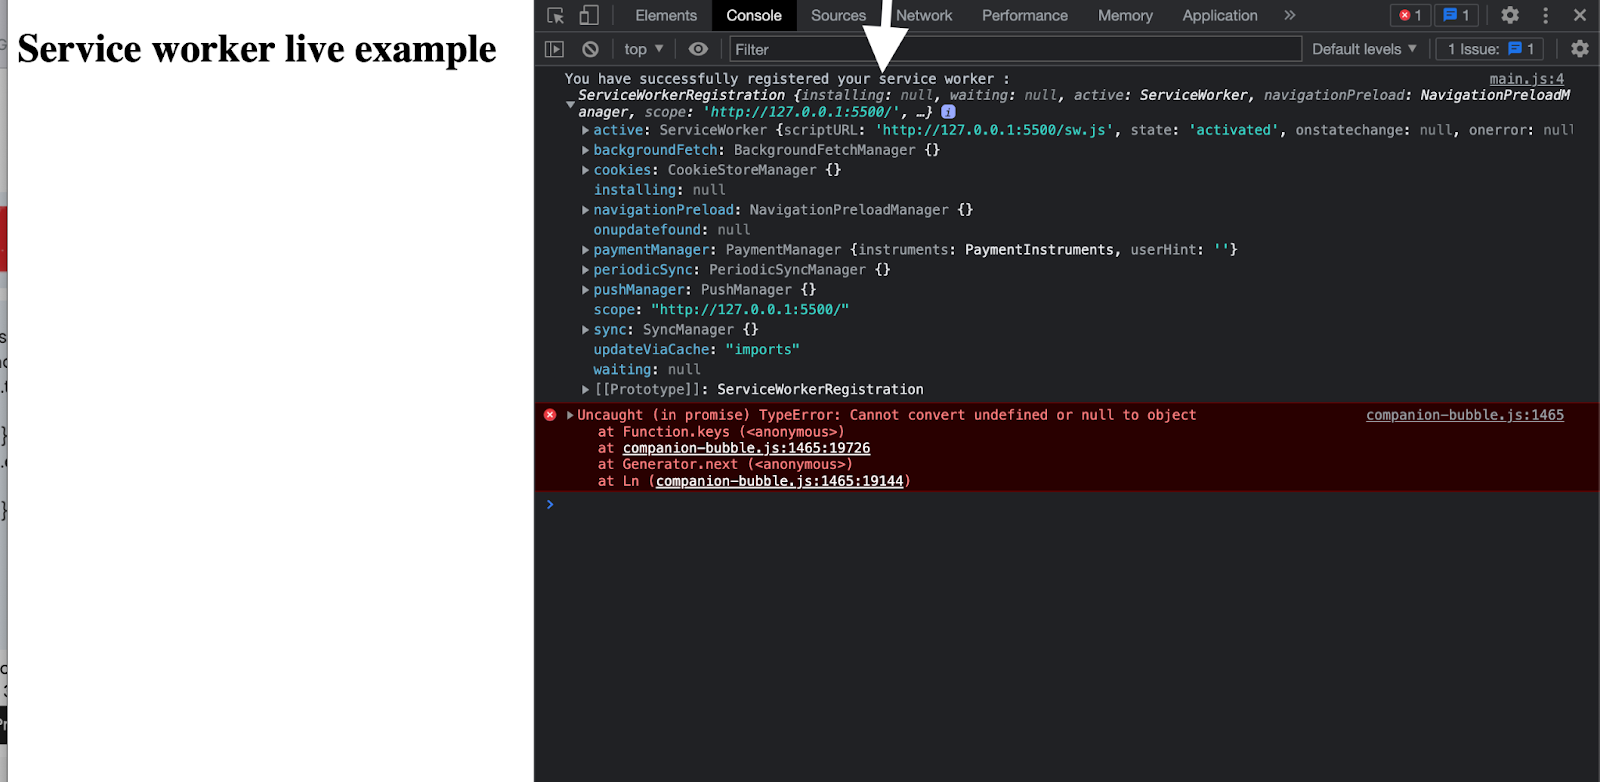
Let’s go to our browser to see the result.

service worker live example
Note: For us to test our service worker locally, we will need to use a secure connection (HTTPS), because service workers only work over HTTPS.

Using Service Workers to Manipulate DOM

Service workers are a powerful tool for modifying a web page’s DOM. One of the most powerful features of service workers is their ability to manipulate the DOM even when the user is not present.

This enables the development of offline-capable web apps that can continue functioning and provide a seamless user experience even when there is no internet connection.

Let’s look at a code example of manipulating the DOM using a service worker.

function updateElement() {
  if ("serviceWorker" in navigator) {
     navigator.serviceWorker
     .register("/sw.js")
     .then(function (registration) {
        var Element = document.getElementById("heading-text");
        console.log("You have successfully registered your service worker");
        Element.style.color = "Black";
        Element.style.fontFamily = "Helvetica";
        Element.innerHTML = "Test has been changed";

     })
     .catch(function (error) {
        console.log("Your service worker registration failed");
     });
  }
}


The previous text on our “h1” element was “service worker live example”, and we changed the content to “You have manipulated the DOM with a service worker” using a service worker. That’s a simple example of manipulating the DOM using a service worker.

Check out the full code example on Github about how to manipulate the DOM with a service worker.

Tips and best practices for using service workers to manipulate the DOM

While manipulating the DOM with service workers is simple, there are some best practices and tips to follow in order to develop capable applications and improve performance.

  • Use the developer tools in your browser to debug service workers and look for errors or unusual behavior in your application.

  • Always run your code on HTTPS when working with a service worker because the service worker only works on HTTPS.

  • Maintain as little complexity as possible in the service worker script. When performing simple tasks, avoid using large libraries or frameworks.

  • Use tools like a workbox to set up and manage service workers, as this tool will make it easier to catch strategies.

Conclusion


Manipulating the DOM with a service worker can be a powerful tool for developing offline-capable web applications and improving website performance.

A service worker can provide users with a seamless experience even when offline by intercepting network requests and serving cached resources.

In this article, we learned how to register a service worker and how to manipulate the DOM with it.

Unit Testing in Angular

Unit testing in Angular apps is one of the phases of software development. It helps in adding new enhancements without breaking existing application features.

There are several tools and frameworks for writing and running unit test cases. In this Angular project, we’ll see how to write and run test cases using Jasmine and Karma.

How to do unit testing in Angular?


The behavior-driven JavaScript framework Jasmine is the one we will use for writing unit test cases in Angular. It helps in writing unit tests in a readable format that anyone can understand.

We’ll be writing unit tests by creating instances of our components and services and by mocking and spying on the methods.

From the official documentation:
Jasmine is a behavior-driven development framework for testing JavaScript code. It does not depend on any other JavaScript frameworks. It does not require a DOM. And it has a clean, obvious syntax so that you can easily write tests.


Karma is more of a tool that helps in running the test case written using the Jasmine framework and displaying the output in the terminal.

From the official documentation:
A simple tool that allows you to execute JavaScript code in multiple real browsers.


How to get started with Unit Testing in Angular


Let’s start by creating an Angular project from scratch. From your terminal, install the Angular CLI.

npm install -g @angular/cli


Once you have the CLI installed, create an Angular project using the following command:

ng new unit-testing-angular


Select Angular routing when asked and select the rest of the configurations. That will create an Angular project with some boilerplate code. Navigate to the project directory and run the application:

cd unit-testing-angular
npm run start


Now let’s add some Angular code so that we can write some unit tests. Open your app.component.ts file and add the following code:

import { HttpClient } from '@angular/common/http';
import { Component } from '@angular/core';
@Component({
  selector: 'app-root',
  templateUrl: './app.component.html',
  styleUrls: ['./app.component.css']
})
export class AppComponent {
  title = 'unit-testing-angular';

  public users : User[];

  constructor(private http: HttpClient) {
    this.users = [];
  }

  ngOnInit(): void {
    //Called after the constructor, initializing input properties, and the first call to ngOnChanges.
    //Add 'implements OnInit' to the class.
    this.getData();
  }

  getData(){
    this.http.get('https://jsonplaceholder.typicode.com/users').subscribe({
      next : (response:any) => {
        this.users = response;
      },
      error : (error) =>{
        this.users = [];
      }
    })
  }
}

interface User{
  name: string,
  email: string
}


The above makes use of the HttpClientModule so go to your app.module.ts file and replace it with the following code:

import { NgModule } from '@angular/core';
import { BrowserModule } from '@angular/platform-browser';

import { AppRoutingModule } from './app-routing.module';
import { AppComponent } from './app.component';
import { HttpClientModule } from '@angular/common/http'

@NgModule({
  declarations: [
    AppComponent
  ],
  imports: [
    BrowserModule,
    AppRoutingModule,
    HttpClientModule
  ],
  providers: [],
  bootstrap: [AppComponent]
})
export class AppModule { }


For rendering the application, you need to add the following HTML code to app.component.html:

<div>
  <table>
    <tr>
      <th>
        Name
      </th>
      <th>
        Email
      </th>
    </tr>
    <tr *ngFor="let user of users">
      <td>
        {{user.name}}
      </td>
      <td>
        {{user.email}}
      </td>
    </tr>
  </table>
</div>


Save your changes, and you will have a list of names and emails listed on your application page. Now let’s write our first Angular unit test case.

Writing Your First Unit Test Case

For your first test, you don’t need to install anything. Jasmine and Karma have already been installed, along with some boilerplate code to get started.

Inside your src/app folder where you have the app.component.html file, you will also have the app.component.spec.ts file. That is the unit testing file for your AppComponent.

import { TestBed } from '@angular/core/testing';
import { RouterTestingModule } from '@angular/router/testing';
import { AppComponent } from './app.component';

describe('AppComponent', () => {
  beforeEach(async () => {
    await TestBed.configureTestingModule({
      imports: [
        RouterTestingModule
      ],
      declarations: [
        AppComponent
      ],
    }).compileComponents();
  });

  it('should create the app', () => {
    const fixture = TestBed.createComponent(AppComponent);
    const app = fixture.componentInstance;
    expect(app).toBeTruthy();
  });

  it(`should have as title 'unit-testing-angular'`, () => {
    const fixture = TestBed.createComponent(AppComponent);
    const app = fixture.componentInstance;
    expect(app.title).toEqual('unit-testing-angular');
  });

  it('should render title', () => {
    const fixture = TestBed.createComponent(AppComponent);
    fixture.detectChanges();
    const compiled = fixture.nativeElement as HTMLElement;
    expect(compiled.querySelector('.content span')?.textContent).toContain('unit-testing-angular app is running!');
  });
});


Let’s try to understand the above code.

The first thing that you’ll notice is that you have a couple of imports like TestBed, RouterTestingModule in the spec file.

While running a unit test case for a component, you first need to configure it using whatever imports and providers the component requires. For that, you make use of the TestBed module. As seen from the code, you are making use of TestBed.configureTestingModule to configure the test bed.

RouterTestingModule is used for testing the app routing and other related use cases, which we can omit for the time being.

You will also notice it and describe keywords in the spec file. A unit test case or a specification is written by using the keyword it. The describe keyword is used to group a number of specs.

Our app code makes use of the HttpClientModule to make API calls. So you need to import it into the spec file.

import { HttpClientTestingModule } from  '@angular/common/http/testing';


Add it to the imports inside the testbed configuration. Also, remove the last two test cases, and let’s just work out the first test case. Here is how the modified spec file looks:

import { TestBed } from '@angular/core/testing';
import { HttpClientTestingModule } from '@angular/common/http/testing';
import { AppComponent } from './app.component';

describe('AppComponent', () => {
  beforeEach(async () => {
    await TestBed.configureTestingModule({
      imports: [
        HttpClientTestingModule
      ],
      declarations: [
        AppComponent
      ],
    }).compileComponents();
  });

  it('should create the app', () => {
    const fixture = TestBed.createComponent(AppComponent);
    const app = fixture.componentInstance;
    expect(app).toBeTruthy();
  });

});


Before running the unit test case, let’s just look at our first test case. In the above test case, we expect the app to be initialized properly. For that, we are creating an instance of our AppComponent. If that app instance is created fine, it means it’s getting initialized fine.

For getting an instance of the component, we are making use of the TestBed.createComponent method, where we are passing in the component to create.

From the returned response, we are getting the component instance, which we are checking to be truthful.

Save the above changes and run the unit test case.

npm run test


Once the test case has executed fine, you will get the following response in your terminal:

Chrome 108.0.0.0 (Windows 10): Executed 1 of 1 SUCCESS (0.072 secs / 0.054 secs)    
TOTAL: 1 SUCCESS


So you succeeded in writing your first unit test, or, to be precise, understanding a simple pre-written test case. Now let’s move forward and write some unit tests for the existing Angular component.

Testing Angular component

Let’s first write some code for us to unit test. I have added some code to get data from an API endpoint and process the data to show the Name, email, and City in the UI. Add the following code to the app.component.ts file:

import { HttpClient } from '@angular/common/http';
import { Component } from '@angular/core';
@Component({
  selector: 'app-root',
  templateUrl: './app.component.html',
  styleUrls: ['./app.component.css']
})
export class AppComponent {

  public users : User[];

  constructor(private http: HttpClient) {
    this.users = [];
  }

  ngOnInit(): void {
    //Called after the constructor, initializing input properties, and the first call to ngOnChanges.
    //Add 'implements OnInit' to the class.
    this.getData();
  }

  getData(){
    this.http.get('https://jsonplaceholder.typicode.com/users').subscribe({
      next : (response:any) => {
        if(response && response.length){
          this.users = response.map((u:any) => {
            u['city'] = this.getCity(u['address']);
            return u;
          });
        } else {
          this.users = [];
        }
      },
      error : (error) =>{
        this.users = [];
      }
    })
  }

  getCity(address:any){
    if(address.city){
      return `Residing at ${address.city}`
    }
    return "No city specified";
  }
}
interface User{
  name: string,
  email: string,
  city: string
}


In the ngOnInit, we are calling the getData method, which makes the API call, and after parsing the city using the getCity method, we are filling the user’s array.

As you noticed, we have two methods in our components: getData and getCity. Let’s write a unit test for testing the method getCity.

Now, this method GetCity has two scenarios that need to be covered. One when the address has a city, and one when it does have a city.

We’ll create a component, and using its instance, we’ll invoke the getCity method and validate its response.

it(`should return the city'`, () => {
    const fixture = TestBed.createComponent(AppComponent);
    const app = fixture.componentInstance;
    expect(app.getCity({city : "Delhi"})).toEqual(`Residing at Delhi`);
  });

  it(`should return the city not found'`, () => {
    const fixture = TestBed.createComponent(AppComponent);
    const app = fixture.componentInstance;
    expect(app.getCity({})).toEqual(`No city specified`);
  });


We wrote two test cases, one for an address with a city and one without a city. In both test cases, we are comparing the responses if appropriate to validate the test case. Save the above changes and run the test case.

npm run test


You will be able to see a message that the test cases ran successfully.

Chrome 108.0.0.0 (Windows 10): Executed 3 of 3 SUCCESS (0.126 secs / 0.055 secs)
TOTAL: 3 SUCCESS


Now let’s move forward and write another test case to cover the getData method.

The getData method uses observables or subscriptions while making API calls. Let’s learn how to write unit tests for testing methods with a subscription.

Testing Subscriptions

In the existing code, it’s a bit difficult to mock the API call since the subscription code and the logic are coupled. So while writing code, make sure to divide your code into small logical units which makes it easier to unit test.

I’ll break down the existing code getData into two separate methods. For that create an Angular service using the following code:

ng g service data


The above command will create a .spec file for DataService. You can delete it since we’ll be focusing only on the app.component.spec file.

Add the following code to the data.service.ts file:

import { HttpClient } from '@angular/common/http';
import { Injectable } from '@angular/core';

@Injectable({
  providedIn: 'root'
})
export class DataService {

  constructor(private http: HttpClient) { }

  fetchUsersData(){
    return this.http.get('https://jsonplaceholder.typicode.com/users')
  }
}


Here is the modified app.component.ts file:

import { Component } from '@angular/core';
import { DataService } from './data.service';
@Component({
  selector: 'app-root',
  templateUrl: './app.component.html',
  styleUrls: ['./app.component.css']
})
export class AppComponent {

  public users : User[];

  constructor(private dataService: DataService) {
    this.users = [];
  }

  ngOnInit(): void {
    //Called after the constructor, initializing input properties, and the first call to ngOnChanges.
    //Add 'implements OnInit' to the class.
    this.getData();
  }

  getData(){
    this.dataService.fetchUsersData().subscribe({
      next : (response:any) => {
        if(response && response.length){
          this.users = response.map((u:any) => {
            u['city'] = this.getCity(u['address']);
            return u;
          });
        } else {
          this.users = [];
        }
      },
      error : (error) =>{
        this.users = [];
      }
    })
  }

  getCity(address:any){
    if(address.city){
      return `Residing at ${address.city}`
    }
    return "No city specified";
  }
}
interface User{
  name: string,
  email: string,
  city: string
}


Let’s write a test case to unit test getData. getData makes a call to fetchUsersData which returns an observable. So instead of making an actual API call via fetchUsersData, we’ll mock the call to fetchUsersData.

Let’s start by defining the test case and creating a reference to the AppComponent.

  it(`should return empty list of users'`, () => {
    const fixture = TestBed.createComponent(AppComponent);
    const app = fixture.componentInstance;
  });


For mocking you can make use of spyOn. Start by importing the DataService.

import { DataService } from './data.service';


For using DataService you first need to create a reference to the service DataService

  it(`should return empty list of users'`, () => {
    const fixture = TestBed.createComponent(AppComponent);
    const app = fixture.componentInstance;
    let service = fixture.debugElement.injector.get(DataService);
  });


Using the service reference you can set up a mock call using the callFake method as shown in the below code.

    it(`should return empty list of users'`, () => {
    const fixture = TestBed.createComponent(AppComponent);
    const app = fixture.componentInstance;
    let service = fixture.debugElement.injector.get(DataService);
    spyOn(service,"fetchUsersData").and.callFake(() => {
      return of([]);
    });
    app.getData();
    expect(app.users).toEqual([]);
  });


In the above code, we are mocking the fetchUsersData method to return an empty list. Once the mock has been set we are calling the getData method and validate the output.

Save the above changes and start the unit tests.

npm run test


Similarly, let us add one more test case with some data instead of an empty array.

    it(`should return list of users'`, () => {
    const fixture = TestBed.createComponent(AppComponent);
    const app = fixture.componentInstance;
    let service = fixture.debugElement.injector.get(DataService);
    spyOn(service,"fetchUsersData").and.callFake(() => {
      return of([{city:"Delhi",address:"New Delhi"}]);
    });
    app.getData();
    expect(app.users.length).toEqual(1);
  });


In the above test case, I’m passing in some data and expecting the user length to be one. That’s how you can unit-test observables.

Wrapping It up

In this tutorial, you learned how to get started with writing unit test cases for your Angular application.

You learned how to make use of spyOn and callFake while testing subscriptions and observables.

You can further explore different aspects of Angular unit testing by visiting the official documentation.

The source code from this tutorial is available on GitHub.