Validations in Angular Reactive Forms
June 2nd, 2021 | By Jay Raj | 8 min read

Implementing validations in Angular Reactive Forms is easy. First, you must import the Validators class in the Angular app.
Before submitting data to the server, it's important to validate if it's in the expected format. In this Angular tutorial, you'll learn how to add validations to Angular Reactive forms.
Setting up the app
In one of our previous tutorials, you learned how to create a user registration form using reactive forms. Let's clone the source code we used there and use it for this tutorial.
git clone https://github.com/jay3dec/reactive-form-demo
Navigate to the project directory. You have two different options inside it, namely: form-app and form-server.
Form-app is the Angular project directory. Navigate to the form-app directory and install the project dependencies using npm.
cd reactive-form-demo
cd form-app
npm install
Once you have the dependencies installed, you can run the app.
npm start
You will have the app running at localhost:4200.
Using Built-In Validators
Let's first try some built-in validators like required, min length, and max length.
this.userForm = this.formBuilder.group({
      firstName: ['', [Validators.required, Validators.pattern('^[a-zA-Z]+$')]],
      lastName: ['',[Validators.required, Validators.pattern('^[a-zA-Z]+$')]],
      email: ['', [Validators.required, Validators.email]]
    });
The form already uses required and pattern field validators. As the name implies, the field is required, and the text entered must satisfy the pattern.
Let's add a couple of more built-in validators to the first and last name fields.
this.userForm = this.formBuilder.group({
      firstName: ['', [Validators.required, Validators.pattern('^[a-zA-Z]+$'), Validators.maxLength(10)]],
      lastName: ['',[Validators.required, Validators.pattern('^[a-zA-Z]+$'), Validators.maxLength(10)]],
      email: ['', [Validators.required, Validators.email]]
    });
As you can see, we just added the maxlength validator to the firstName and lastName.
Now let's display a message under the fields based on the validations to make it more meaningful.
Add the following CSS code to root.component.css:
.custom-col{
    display: flex;
    flex-direction: column;
    align-items: flex-start;
}

.custom-col span{
    color: red;
    font-size: small;
    margin-top: 0.25rem;
 }
Modify the root.component.html file to include a span inside the first name divand change the class name of the div.
<div class="col custom-col">
            <input type="text" formControlName="firstName" id="defaultRegisterFormFirstName" class="form-control"
                placeholder="First name">
            <span>* First Name is required</span>
        </div>
Now you need to make the validation message conditional based on the validation. You must show it when the user clicks the sign-in button but has not entered the first name.
Let's define a variable to check when the form is submitted inside the root.component.ts file. You can add it before the constructor method.
formSubmitted : boolean = false;
Currently, a message is shown when the form is not valid. Let's remove the alert message and set the formSubmitted variable to true.
onSubmit(){
    if(this.userForm.valid){
      alert('good')
      this.http.post('/api/userCreate', this.userForm.value)
      .subscribe((response)=>{
        console.log('repsonsei ',response);
      })
    } else {
      this.formSubmitted = true;
    }
  }
Inside the root.component.htmlfile, add the ngIf directive to show the message when the form is submitted. For this, the required validator must be "true.".
<span *ngIf="formSubmitted && userForm.get('firstName').hasError('required')">
   * First Name is required
</span>
Save the changes and run the app. Click the sign-in button without entering the first name. You will see the required validation message.
Similarly, you can add validation messages for other validations like pattern and max length.
Writing Custom Validations
You saw how to use built-in validators in Angular reactive forms. You can also create your own custom validations and use them in reactive forms. Try to create one.
You have an email ID field in the sign-up form. Create a custom validation to check for duplicate or existing email IDs and display a message.
Assuming you already have a list of email addresses already signed up, add the following array list to the root.component.ts file.
emailIds = ["[email protected]","[email protected]","[email protected]"];
Import FormControl into the root.component.ts file.
import { FormControl } from '@angular/forms';
Create a method called duplicateEmailValidator inside the root.component.ts file.
  duplicateEmailValidator(control: FormControl){
    let email = control.value;
    if (email && this.emailIds.includes(email)) {
      return {
        duplicateEmailId: {
          email: email
        }
      }
    }
    return null;
  }
The above method takes a FormControl type as a parameter. It considers whether the email entered exists in the email ID list. If it exists, it returns an object, which indicates an error. If all is well, it returns null.
You need to add the validator to the validation array of the email control.
  ngOnInit() {
    this.userForm = this.formBuilder.group({
      firstName: ['', [Validators.required, Validators.pattern('^[a-zA-Z]+$'), Validators.maxLength(10)]],
      lastName: ['',[Validators.required, Validators.pattern('^[a-zA-Z]+$'), Validators.maxLength(10)]],
      email: ['', [Validators.required, Validators.email, this.duplicateEmailValidator.bind(this)]]
    });
  }
You have used bind to bind the current scope to give access to the email array inside the duplicateEmailValidator method.
Add an error message to the HTML in the root.component.html file. Add a div container to the email input and add a span as shown:
 <div class="custom-col">
        <input type="email" formControlName="email" id="defaultRegisterFormEmail" class="form-control mb-4"
        placeholder="E-mail">
        <span *ngIf="formSubmitted && userForm.get('email').hasError('duplicateEmailId')">
            * Email Id already exists !!
        </span>
    </div>
Save the above changes. From the application, try entering an existing email ID. The email field will be validated for duplicate emails, and an error will be shown.
Dynamically Adding Validations
Sometimes it's required to add validations dynamically. Add a new field called employed. It will be a check box.
Add another one called Company Name. This will be required only if the Employed checkbox is checked.
   <div class="custom-col emp-check">
        <input class="form-check-input" formControlName="employed" type="checkbox" value="" id="flexCheckDefault">
        <label class="form-check-label" for="flexCheckDefault">
          Employed
        </label>
    </div>

    <div class="custom-col">
        <input type="text" formControlName="companyName" class="form-control mb-4"
        placeholder="Company Name">
    </div>
Let's add the form control names for employed and companyName in the root.component.ts.
  ngOnInit() {
    this.userForm = this.formBuilder.group({
      firstName: ['', [Validators.required, Validators.pattern('^[a-zA-Z]+$'), Validators.maxLength(10)]],
      lastName: ['',[Validators.required, Validators.pattern('^[a-zA-Z]+$'), Validators.maxLength(10)]],
      email: ['', [Validators.required, Validators.email, this.duplicateEmailValidator.bind(this)]],
      employed : [''],
      companyName: ['']
    });
  }
When the employed checkbox is checked, make the company name required. Create a value change event handler for employed.
  handleValueChange(){
    this.userForm.get('employed').valueChanges.subscribe(response => {
      console.log('check response is ', response);
    })
  }
You need to call the handleValueChange method in the ngOnInit method after you have defined the userForm.
ngOnInit() {
    this.userForm = this.formBuilder.group({
      firstName: ['', [Validators.required, Validators.pattern('^[a-zA-Z]+$'), Validators.maxLength(10)]],
      lastName: ['',[Validators.required, Validators.pattern('^[a-zA-Z]+$'), Validators.maxLength(10)]],
      email: ['', [Validators.required, Validators.email, this.duplicateEmailValidator.bind(this)]],
      employed : [''],
      companyName: ['']
    });
    this.handleValueChange();
  }
If the checkbox is checked, add the required field validator to the companyName field. If the checkbox is unchecked, remove the validators from companyName.
  handleValueChange(){
    this.userForm.get('employed').valueChanges.subscribe(response => {
      console.log('check response is ', response);
      if(response == true){
        this.userForm.get('companyName').setValidators(Validators.required);
      } else {
        this.userForm.get('companyName').clearValidators();
      }
      this.userForm.get('companyName').updateValueAndValidity();
    })
  }
As seen in the above code, setValidators and clearValidators have been used to set and clear the control validations. In the end, the updateValueAndValidity method is used to reset the validation status of the control.
Add the HTML code to show a validation status message for the company name field.
   <div class="custom-col">
        <input type="text" formControlName="companyName" class="form-control mb-4"
        placeholder="Company Name">
        <span *ngIf="formSubmitted && userForm.get('companyName').hasError('required')">
            * Company Name is required
        </span>
    </div>
Save the above changes and restart the app. While filling out the form, click the employed checkbox to see if the company name has required field validation. Uncheck the checkbox, and the validation is removed.
Next, look at what cross-validation is and how to use it.
Cross-Validations
Cross-validation means validating two fields across a form group. For example, your email address should be your company's email address.
If your email is [email protected], then your company name should be Gmail. Let's try adding this cross-validation to our user form.
We will place the validation not on any particular form group control but on the whole form group.
Add the form group validation as shown:
this.userForm = this.formBuilder.group({
      firstName: ['', [Validators.required, Validators.pattern('^[a-zA-Z]+$'), Validators.maxLength(10)]],
      lastName: ['',[Validators.required, Validators.pattern('^[a-zA-Z]+$'), Validators.maxLength(10)]],
      email: ['', [Validators.required, Validators.email, this.duplicateEmailValidator.bind(this)]],
      employed : [''],
      companyName: ['']
    }, {validator : this.companyEmailValidation});
Now let's define the companyEmailValidation validation in our root.component.ts.
The validation method will take formGroup as a parameter. Let's first parse the required form control from the form group.
Once you have the form controls, you'll split the email string to get the @ name and compare it with the company name. Here is how the method looks:
  companyEmailValidation(formGroup : FormGroup){
    const email = formGroup.get('email').value;
    const company = formGroup.get('companyName').value;
    if(email && email.length > 0){
      let comName = email.split("@")[1].split(".")[0];
      if(company == comName) return null;
    }
    return {
      companyEmailError : true
    }
  }
If the validation fails, it will return an error object, as shown in the above code. If all is well, null will be returned.
Now let's add some HTML to check for the error and show the error message.
Before the sign-in button HTML, add the following code to show the validation message:
    <div class="custom-col">
        <span *ngIf="formSubmitted && userForm.errors && userForm.errors.companyEmailError">
            * Enter your company email address
        </span>
    </div>
Save the changes and refresh the app. Enter the email address and another company name other than the one in the email.
For example, enter the email address as [email protected] and the company name as Google.
You'll be able to see the validation message.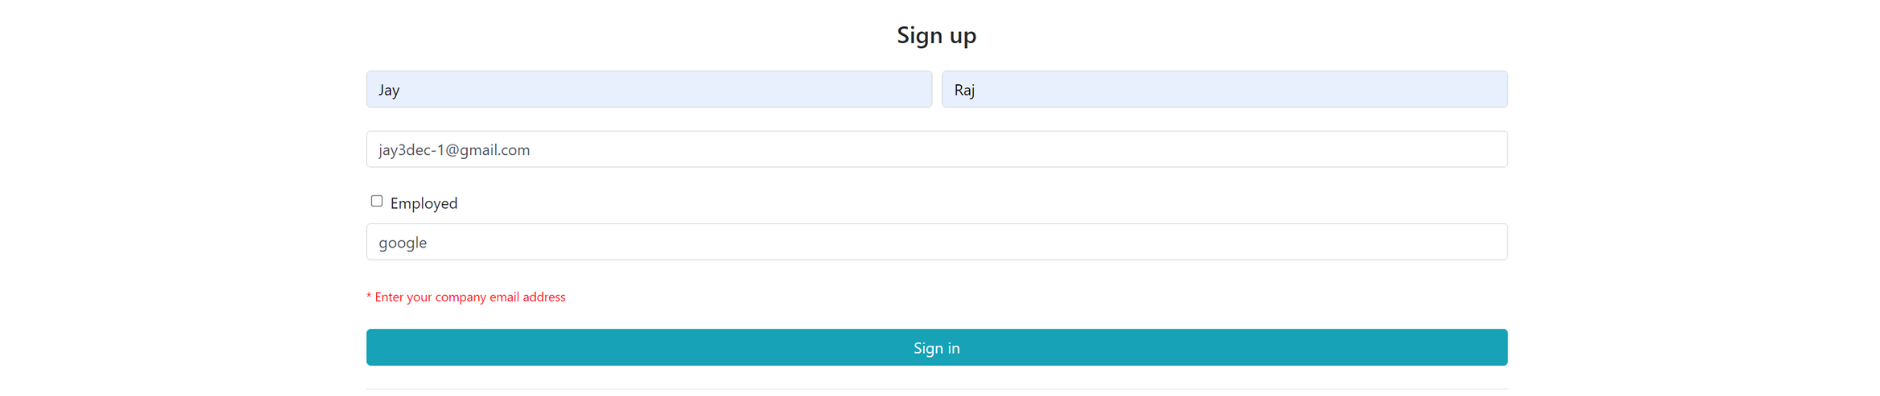
Summary
You've learned how to validate Angular reactive forms. You also learned about built-in validators, dynamic validation, custom validation, and cross-validation across form groups.
We hope you find it helpful. Lastly, learn how to secure your Angular source code against theft and reverse engineering.
The source code for this tutorial is available on GitHub.
Jscrambler
The leader in client-side Web security. With Jscrambler, JavaScript applications become self-defensive and capable of detecting and blocking client-side attacks like Magecart.
View All ArticlesMust read next
Creating and Validating React Native Forms with Formik
Formik is a useful library for React and React Native that allows keeping track of a form's state, handling submissions, and handling validation.
October 16, 2020 | By Aman Mittal | 11 min read
Building User Registration Form With Reactive Forms in Angular 7
Learn how you can handle forms in Angular 7 web apps by leveraging Reactive Forms and post the reactive form to a REST API endpoint.
January 15, 2019 | By Jay Raj | 7 min read
