Sharing Data Across React Components Using Context
July 22nd, 2024 | By Jay Raj | 13 min read

In this tutorial, you'll learn how to share data across React components using Context API.
Sharing Data Across React Components: Setting up the App
We'll be using the Next.js framework to create our web application. Make sure you have Node.js 18 or later installed in your system, if not you can download and install it.
Let's use `create-next-app` to create a new Next.js project.
npx create-next-app@latest share-data
The above command will prompt you for some additional info which you can fill as shown:
√ Would you like to use TypeScript? ... Yes
√ Would you like to use ESLint? ... No
√ Would you like to use Tailwind CSS? ... No
√ Would you like to use `src/` directory? ... Yes
√ Would you like to use App Router? (recommended) ... No
√ Would you like to customize the default import alias (@/*)? ... No
Once done it should create your project. Navigate to your project directory and start the application,
cd share-data
npm run dev
You will have the project running at http://localhost:3000.
We'll be using Material UI for styling up our sample app. Install material UI using Node Package Manager(npm).
npm install @mui/material @emotion/react @emotion/styled
Once done you will be able to import Material UI components and use in your application.
You want to learn how to share data between two React components, so let's first create two React components. We'll be creating a Cart listing component and a Cart checkout component. Selected data from the Cart listing component will be shared with the cart checkout component using Context API.
Creating Cart Listing Component
Inside the `src` folder create a `components` folder. Inside the `components` folder create a file called `cartList.tsx` and the following code:
jsx

import List from '@mui/material/List';
import ListItem from '@mui/material/ListItem';
import Divider from '@mui/material/Divider';
import ListItemText from '@mui/material/ListItemText';
import ListItemAvatar from '@mui/material/ListItemAvatar';
import Avatar from '@mui/material/Avatar';
import React from 'react';
import { FormControl } from '@mui/material';
import Checkbox from '@mui/material/Checkbox';

export const CartList = () => {
    const  ITEMS  = [{id :  1, name :  'Frozen yoghurt'},{id :  2, name :  'Ice cream sandwich'},{ id :  3, name :'Eclair'},{id :  4, name :  'Cupcake'},{id:  5, name:'Gingerbread'}]

    const handleSelect = (id: any) => {

        // logic to handle checkbox selection
    }

    return (
        <>
            <List sx={{ width: '100%', maxWidth: 600, bgcolor: 'background.paper' }}>
                {
                    ITEMS.map((item:any, index: any)=>{
                        return (
                            <div key={index}>
                                <ListItem alignItems="flex-start" sx={{width: 500}}>
                                    <ListItemAvatar>
                                        <Avatar alt="Remy Sharp" src="/static/images/avatar/1.jpg" />
                                    </ListItemAvatar>
                                    <ListItemText
                                        primary={item.name}
                                        sx={{width: '80%'}}
                                        className='item-name'
                                    />
                                    <FormControl fullWidth>
                                        <Checkbox onClick={() => handleSelect(item.id)} />
                                    </FormControl>
                                </ListItem>
                                <Divider variant="inset" component="li" />
                            </div>
                        )
                    })
                }


            </List>
        </>
    )
}
In the above code, we are iterating over the `ITEMS` array and listing each items. As you can see we are using Material UI components in the above code.
Creating Cart Items
Inside the `src/components` folder create another file called `cartItems.tsx` and add the following code:
jsx

import * as React from 'react';
import Table from '@mui/material/Table';
import TableBody from '@mui/material/TableBody';
import TableCell from '@mui/material/TableCell';
import TableContainer from '@mui/material/TableContainer';
import TableHead from '@mui/material/TableHead';
import TableRow from '@mui/material/TableRow';
import Paper from '@mui/material/Paper';
function createData(
  name: string,
  calories: number,
  fat: number,
  carbs: number,
  protein: number,
) {
  return { name, calories, fat, carbs, protein };
}

const rows = [
  createData('Frozen yoghurt', 159, 6.0, 24, 4.0),
  createData('Ice cream sandwich', 237, 9.0, 37, 4.3),
  createData('Eclair', 262, 16.0, 24, 6.0),
  createData('Cupcake', 305, 3.7, 67, 4.3),
  createData('Gingerbread', 356, 16.0, 49, 3.9),
];

export const CartItems = () => {
  return (
    <TableContainer component={Paper}>
      <Table sx={{ minWidth: 200 }} aria-label="simple table">
        <TableHead>
          <TableRow>
            <TableCell>Dessert (100g serving)</TableCell>
            <TableCell align="right">Calories</TableCell>

          </TableRow>
        </TableHead>
        <TableBody>
          {rows.map((row) => (
            <TableRow
              key={row.name}
              sx={{ '&:last-child td, &:last-child th': { border: 0 } }}
            >
              <TableCell component="th" scope="row">
                {row.name}
              </TableCell>
              <TableCell align="right">{row.calories}</TableCell>

            </TableRow>
          ))}
        </TableBody>
      </Table>
    </TableContainer>
  );
}
The above component will show the selected items from the Cart List component and checkout info.
Next, we'll create the cart checkout component which will show the cart checkout information.
Creating Cart Checkout Component
Inside the `src/components` folder create another file called `cartCheckout.tsx` and add the following code:
jsx
import { CartItems } from "./cartItems"

export const CartCheckout = () => {
    return (
        <>
            <CartItems />
        </>
    )
}
`CartCheckout` component will show the `CartItems` component along with the price information we'll add as the tutorial progresses.
All Components in Page
Let's use the components that we created in the `pages/index.tsx` file.
jsx

import styles from '@/styles/Home.module.css'
import { CartList } from '@/components/cartList'
import { CartCheckout } from '@/components/cartCheckout'
import { Container, Grid } from '@mui/material'

export default function Home() {
  return (
    <>
      <Container maxWidth="lg">
        <Grid container spacing={2}>
          <Grid item xs={8}>
            <div>
              <CartList />
            </div>
          </Grid>
          <Grid item xs={4}>
            <div>
              <CartCheckout />
            </div>
          </Grid>
        </Grid>
      </Container>
    </>
  )
}
Save the above changes and start the application server.
npm run dev
Point your browser to http://localhost:3000 and you'll be able to see the following UI.
.png)
Creating App Context
Let's create an App Context that we can share across the application and utilize to share data between components.
Inside the `src` folder create a file called `app.context.tsx`. In the file, start by creating a React context.
const AppContext = React.createContext({});
Next, create an app context provider method that returns and exports the App Context.
const ITEMS = [{id : 1, name : 'Frozen yoghurt'},{id : 2, name : 'Ice cream sandwich'},{ id : 3, name :'Eclair'},{id : 4, name : 'Cupcake'},{id: 5, name:'Gingerbread'}]

const AppContextProvider : any = ({children}:any) => {
    const [selectedItems, setSelectedItems] = useState([]);
    const value = {
        displayName : "App Context",
        ITEMS,
        selectedItems,
        utils : {
            setSelectedItems
        }
    };
    return(
        <AppContext.Provider value={value}>
            {children}
        </AppContext.Provider>
    )
}
export {AppContextProvider, ITEMS};
As you can see in `AppContextProvider` we are returning the `AppContext.Provider` along with some values and util functions.
Create a custom hook function called `useAppContext` which will return the App Context.
jsx
const useAppContext = () => {
    const context = useContext(AppContext);
    return context;
}
Here is how the entire `app.context.tsx` file looks:
jsx

import React, { useContext, useState } from "react";

const AppContext = React.createContext({});

const ITEMS = [{id : 1, name : 'Frozen yoghurt'},{id : 2, name : 'Ice cream sandwich'},{ id : 3, name :'Eclair'},{id : 4, name : 'Cupcake'},{id: 5, name:'Gingerbread'}]

const AppContextProvider : any = ({children}:any) => {
    const [selectedItems, setSelectedItems] = useState([]);
    const value = {
        displayName : "App Context",
        ITEMS,
        selectedItems,
        utils : {
            setSelectedItems
        }
    };
    return(
        <AppContext.Provider value={value}>
            {children}
        </AppContext.Provider>
    )
}

const useAppContext = () => {
    const context = useContext(AppContext);
    return context;
}

export {AppContextProvider, ITEMS};

export default useAppContext;
You can wrap the `App` using the `AppContextProvider` in `_app.tsx`.
jsx

import {AppContextProvider} from '@/app.context'
import '@/styles/globals.css'
import type { AppProps } from 'next/app'

export default function App({ Component, pageProps }: AppProps) {
  return (
    <AppContextProvider>
        <Component {...pageProps} />
    </AppContextProvider>
  )
}
Using the Context to Share Data
Inside the `CartList` component, we can use the app context hook to load the `ITEMS` currently hardcoded inside the component.
const {ITEMS, selectedItems ,utils:{setSelectedItems}}:any = useAppContext();
Whenever the user selects or unselects the items, using the `setSelectedItems` method, we can keep track of the selected items from the ITEMS in our Context.
jsx
    const handleSelect = (e:any,id: any) => {
        // logic to handle checkbox selection
        const item = ITEMS.filter((i:any)=>i.id == id);

        if(e.target.checked){
            setSelectedItems([...item, ...selectedItems]);
        } else {
            const newArr = selectedItems.filter((i:any)=>i.id !=id);
            setSelectedItems(newArr);
        }

    }
Here is how the entire `cartList.tsx` file looks:
jsx
import List from '@mui/material/List';
import ListItem from '@mui/material/ListItem';
import Divider from '@mui/material/Divider';
import ListItemText from '@mui/material/ListItemText';
import ListItemAvatar from '@mui/material/ListItemAvatar';
import Avatar from '@mui/material/Avatar';
import React from 'react';
import { FormControl } from '@mui/material';
import Checkbox from '@mui/material/Checkbox';
import useAppContext from '@/app.context';

export const CartList = () => {

    const {ITEMS, selectedItems ,utils:{setSelectedItems}}:any = useAppContext();

    const handleSelect = (e:any,id: any) => {
        // logic to handle checkbox selection
        const item = ITEMS.filter((i:any)=>i.id == id);
        if(e.target.checked){
            setSelectedItems([...item, ...selectedItems]);
        } else {
            const newArr = selectedItems.filter((i:any)=>i.id !=id);
            setSelectedItems(newArr);
        }
    }

    return (
        <>
            <List sx={{ width: '100%', maxWidth: 600, bgcolor: 'background.paper' }}>
                {
                    ITEMS.map((item:any)=>{
                        return (
                            <>
                                <ListItem alignItems="flex-start" sx={{width: 500}}>
                                    <ListItemAvatar>
                                        <Avatar alt="Remy Sharp" src="/static/images/avatar/1.jpg" />
                                    </ListItemAvatar>
                                    <ListItemText
                                        primary={item.name}
                                        sx={{width: '80%', color: ‘black’}}
                                        className='item-name'
                                    />
                                    <FormControl fullWidth>
                                        <Checkbox onClick={(e) => handleSelect(e,item.id)} />
                                    </FormControl>
                                </ListItem>
                                <Divider variant="inset" component="li" />
                            </>
                        )
                    })
                }
            </List>
        </>
    )
}
Now since we have the selected items list in the context, we can use the same list to update the `CartItems` data.
Go to `cartItems.tsx` file and import `selectedItems` from the `useAppContext` hook and then we can iterate over the selected items to show the data.
jsx
import * as React from 'react';
import Table from '@mui/material/Table';
import TableBody from '@mui/material/TableBody';
import TableCell from '@mui/material/TableCell';
import TableContainer from '@mui/material/TableContainer';
import TableHead from '@mui/material/TableHead';
import TableRow from '@mui/material/TableRow';
import Paper from '@mui/material/Paper';
import useAppContext from '@/app.context';

export const CartItems = () => {

  const { selectedItems: rows }: any = useAppContext();

return (

   <TableContainer component={Paper}>

     <Table sx={{ minWidth: 200 }} aria-label="simple table">

        <TableHead>
          <TableRow>
           <TableCell>Dessert (100g serving)</TableCell>
          </TableRow>
        </TableHead>
        <TableBody>
          {rows.map((row: any) => (
            <TableRow
              key={row.id}
              sx={{ '&:last-child td, &:last-child th': { border: 0 } }}
           >
              <TableCell component="th" scope="row">
                {row['name']}
              </TableCell>
            </TableRow>
          ))}

        </TableBody>
      </Table>
    </TableContainer>
  );
}
Save the changes and run the app. Try checking and unchecking data from the list. It should show up on the right side list.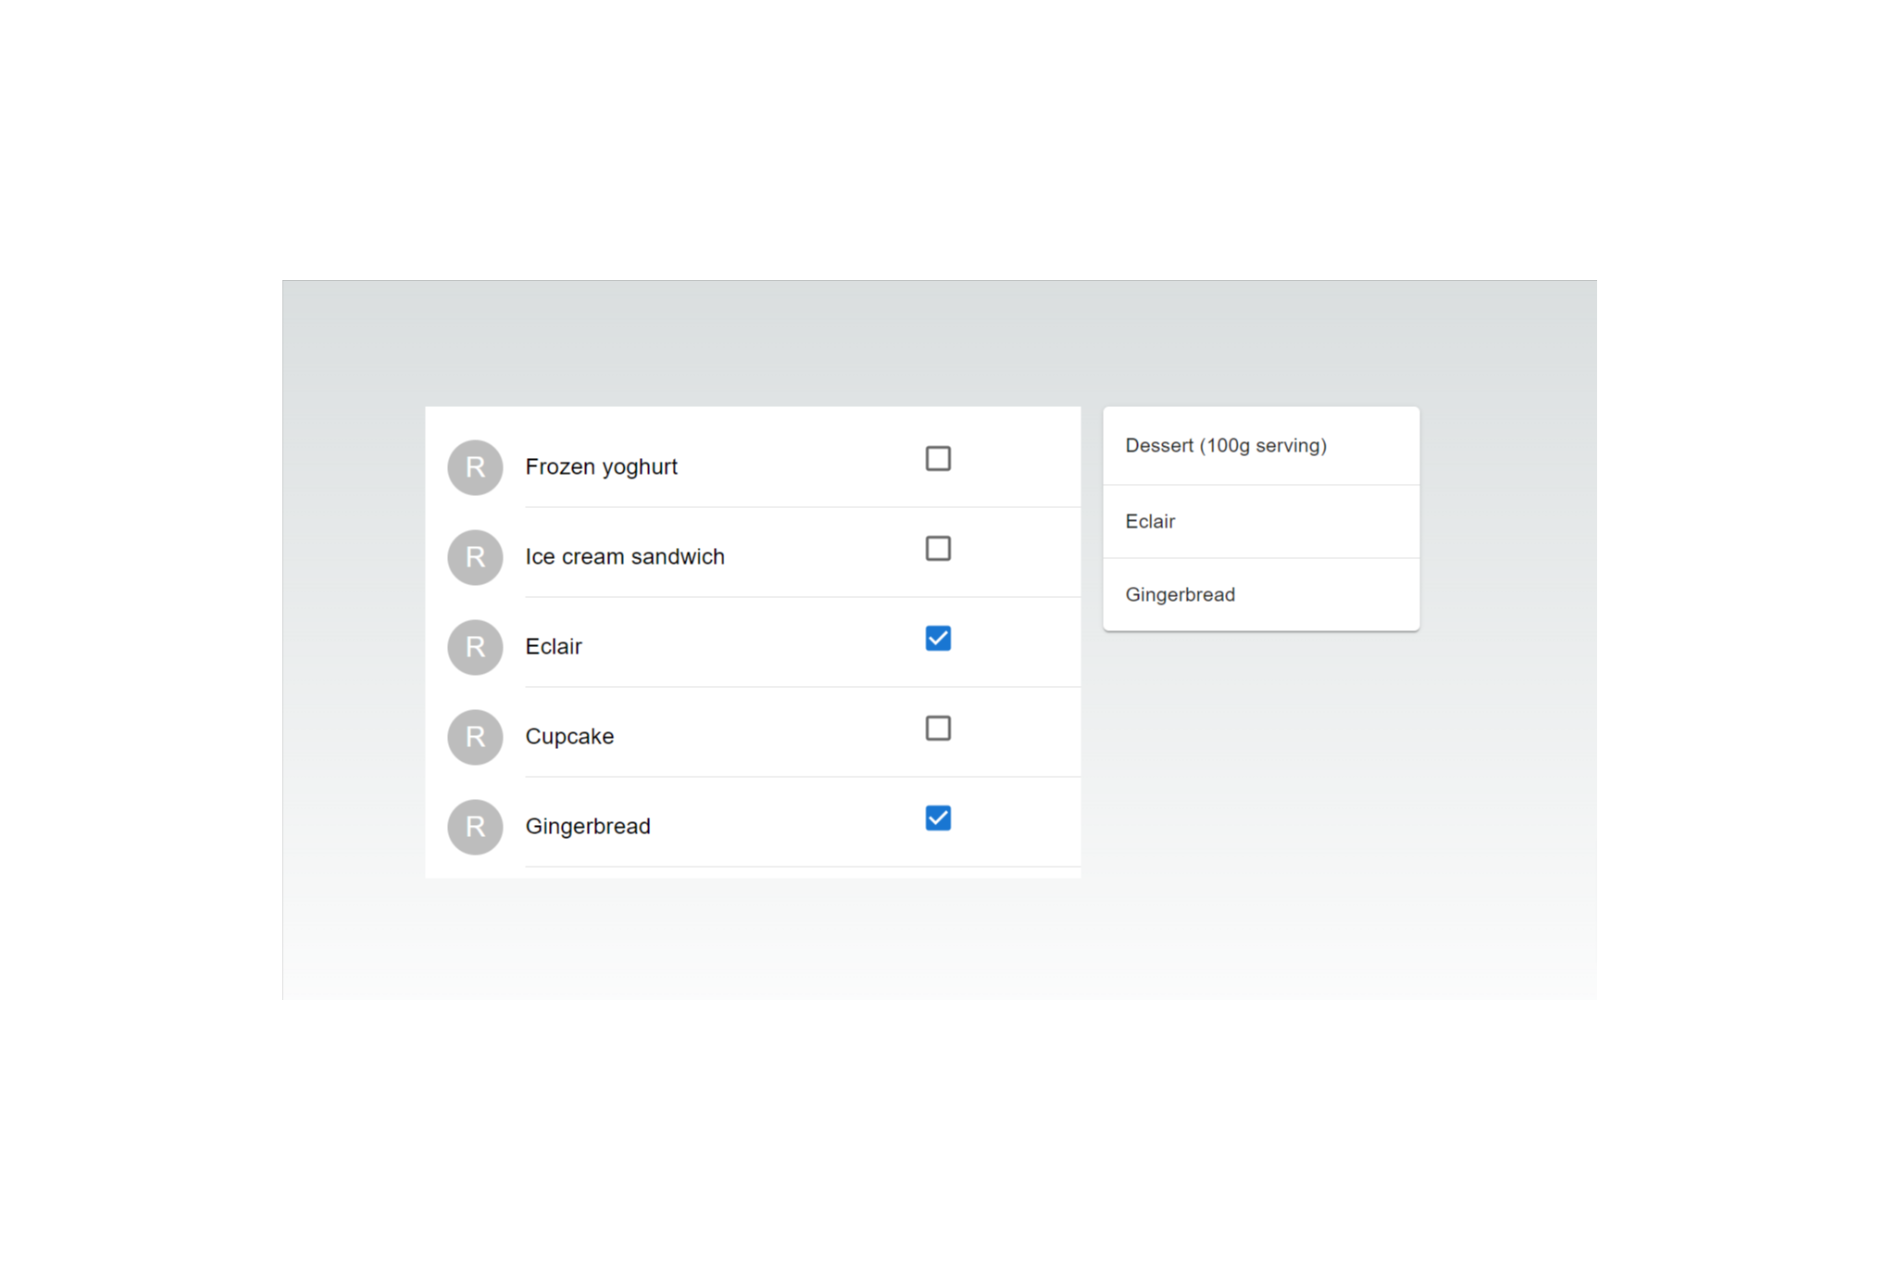 We created a context for the whole application, but it's possible to create a context for a set of components too.
Jscrambler
The leader in client-side Web security. With Jscrambler, JavaScript applications become self-defensive and capable of detecting and blocking client-side attacks like Magecart.
View All ArticlesMust read next
From React to React Native in 30 Minutes
Learn how to make a iOS app, using React Native, in 30 minutes
September 2, 2015 | By José Magalhães | 5 min read
Understanding Context API In React.js
In this tutorial, you'll learn about the Context API which is used for passing or sharing data across components in React.js.
September 9, 2022 | By Jay Raj | 9 min read
How to Update Child and Parent Components in React.js
In this tutorial, we’ll explore how to update component states in a React application, focusing on two specific scenarios: updating a parent component's state from a child component and updating a...
February 4, 2025 | By Jay Raj | 12 min read
