Category: Client-Side Security

Online Banking Growth: New Security Challenges

Over the course of a few weeks, online banking growth became key in every economy.

Not only are we seeing large-scale branch closures, but fears of “infected” cash are prompting a change in how consumers are paying for goods and services.

Electronic payments look more appealing now as a safer alternative to cash. Against this backdrop and with the general upsurge in consumer digital banking, what are the key security concerns for banks?

Security in Digital Banking

Consumers are turning to digital and mobile banking in a big way. In some countries, their Central Banks are even advocating that consumers do so.

For example, in the UAE, the Central Bank has called on bank customers to take advantage of digital and online banking services as a measure to ensure the health and safety of residents amid the coronavirus pandemic.

This digital banking trend is even extending to payments. In Italy, one of the first countries to order residents to stay home in a bid to prevent the virus from spreading, e-commerce transactions have soared 81% since the end of February, according to estimates by McKinsey & Co.

Amidst all the fear and worry that COVID-19 has generated, industry analysts have pointed out the significant opportunity for incumbents to make a move to digital; they feel that the winds of change in consumer behavior might turn out to be permanent.

The Consumer Banking Side

On the consumer banking side, there will undoubtedly be more adoption of online options from traditional banks, and as people self-quarantine, they will probably avoid bank branches too.

The crisis has definitely provided all the ingredients for a move to digital, where we will witness people moving to utilize all forms of digital financial services. In fact, one recent survey found that 84% of consumers expect banks to find ways to maximize digital interaction to keep them safe.

Major neobanks (direct banks that operate exclusively online without traditional physical branch networks) are expanding rapidly.

Neobanks Growth

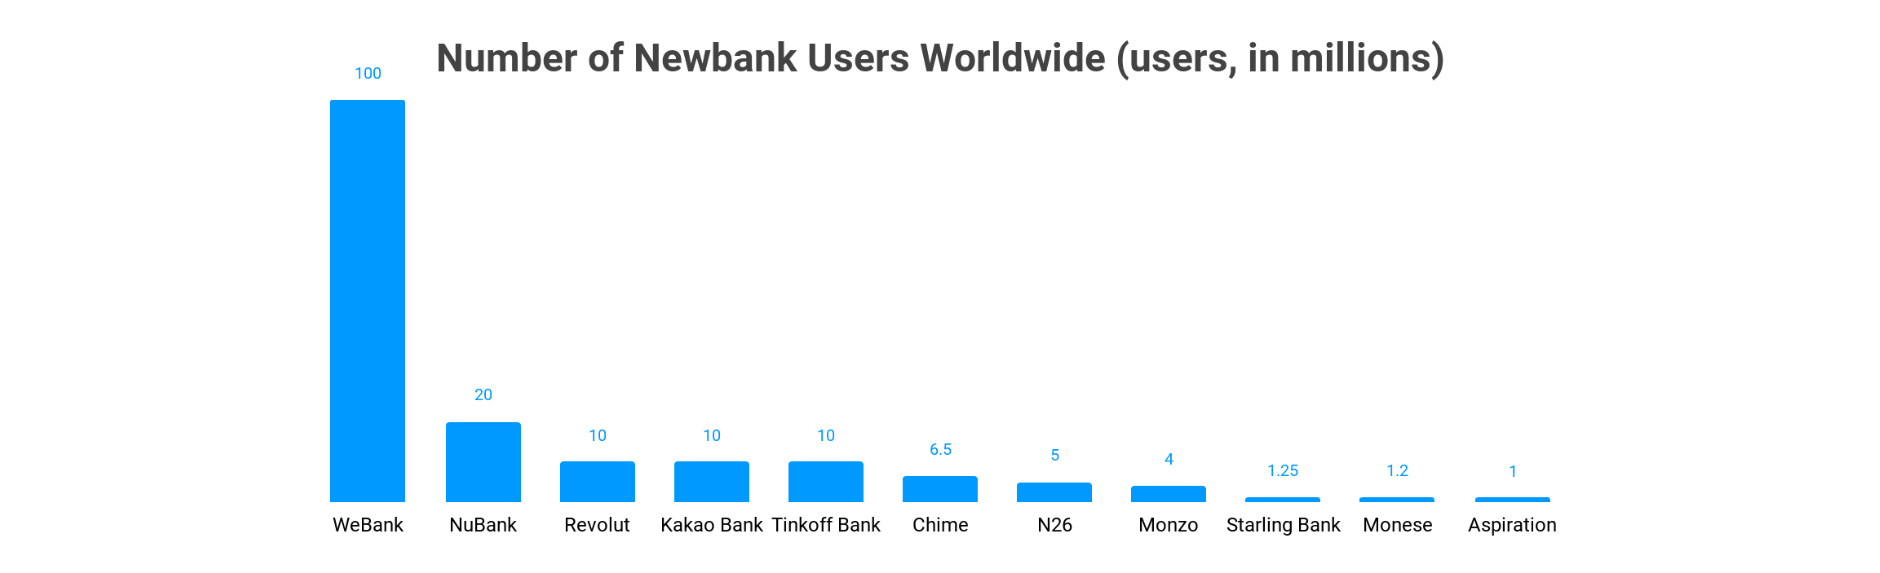
This is the case with Revolut, which recently launched in the U.S. market; N26, which is seeking to reach more European customers; and Nubank, which is taking Latin America by storm after quickly surpassing 20 million clients.

And we are already seeing signs across the globe of incumbents accelerating their digital presence and the release of new banking applications. For example, South Africa’s Nedbank is accelerating the rollout of its digital strategy across Africa as customers turn away from face-to-face banking.

jscrambler-blog-online-banking-security-statsHowever, financial institutions are still faced with new challenges as they prioritize the move to digital. This is certainly the case when implementing infrastructure and procedures to allow for online account opening; many financial institutions are challenged to open new accounts completely online, which is certainly a differentiating feature of fintech, challenger, and neo-banks. But perhaps a much more important challenge comes from keeping customers and their data safe.

Insofar as most digital banking providers rely on fast, agile product development to keep up with consumer demand, they often sacrifice security in lieu of a quicker go-to-market.

We’ve seen an increasing trend of banking applications built with JavaScript, a programming language that has a large ecosystem and the practice of reusing code.

The shift to this new application development strategy requires banks to consider a whole host of new security threats.

Web and Mobile Banking Apps Attack Surface

Web and mobile banking apps have a considerable attack surface, even if we discount code vulnerabilities and security testing tools like SAST and DAST.

In that scenario, where the teams that develop banking apps find and fix every single vulnerability in their JavaScript code, it will still be plain, easy-to-understand code.

In much the same way that we can look at this code and understand how the banking application works, so can any attacker. And because these development teams are relying extensively on third-party code, they also need to be prepared to face web supply chain attacks.

And this is where banks must consider this additional threat and ask themselves, “What would it cost us if someone were to tamper with our code to find ways to exfiltrate our user’s data?”.

At a time when so much is on the line, it is by asking more questions and instigating a holistic approach to security that banks will be able to keep their customers safe amidst this unforeseen acceleration in banking digitalization.

To protect the code of your banking platform with Jscrambler, start your free trial today.

Jscrambler 7.0: Web + Mobile App Protection

Pick up your smartphone because Jscrambler 7.0 is officially live! To discover what is new, explore the page about our latest features.

Web and Mobile App Protection

With this update, Jscrambler becomes a one-stop shop for protecting web and mobile apps.

By extending our leading JavaScript protection technology to cross-platform frameworks like React Native, Ionic/Cordova, NativeScript, and PWAs, you can seamlessly protect all JavaScript components and native ones.

These integrations are thoroughly documented and extensively tested to ensure a seamless protection process and minimal need for troubleshooting.

App Classification

Another key feature of this major release is App Classification.

Now, when you upload your code to the Jscrambler Web App, you will see an analysis of your app, including its compatibility and frameworks.

Jscrambler uses this metadata with two goals:

  1. First, to seamlessly fine-tune Jscrambler’s protection to your specific app.

  2. Second, to provide a new Browser Compatibility feature that will give you complete visibility and control over the compatibility of your protected code. You can set specific browser versions for which you want to ensure compatibility, and Jscrambler will assist you in making sure that the selected transformations match these requirements.

Improved Application Profiling

Jscrambler Profiling allows you to effortlessly improve the performance of your protected code in performance-sensitive apps.

In this 7.0 release, we introduce new Profiling modes to help you persist with the profiling recommendations and integrate Profiling into your CI/CD. You can now also manage the Jscrambler Profiling process through our CLI.

Always Ahead

This release is another milestone in our journey to provide cutting-edge JavaScript Protection.

Not only did we improve the overall usability of our solution, but we now cover all mobile apps, ensuring that organizations will not expose code.

If you haven’t already, try Jscrambler for free and see it in action with the support of our security engineers!

Beyond Obfuscation: JavaScript Protection and In-Depth Security

When we throw in the concept of JavaScript Obfuscation, many dismiss it on the basis that “obscurity isn’t security”. And “security through obscurity is a bad idea”, says every CISO, and with good reason.

But obfuscation is just a small piece of a much bigger picture: source code protection. The ISO 27001 information security standard states:

Program source code can be vulnerable to attack if not adequately protected and can provide an attacker with a good means to compromise systems in an often covert manner. If the source code is central to the business success it’s loss can also destroy the business value quickly too.

This last sentence says it all. The more value your applications bring to your business, the more it has to lose from attacks on source code. This is why it’s crucial to understand JavaScript Obfuscation, JavaScript protection, and in-depth security.

Having a security system rely on secrecy is by no means a good practice. In the NIST Guide to General Server Security, it’s clear:

“System security should not depend on the secrecy of the implementation or its components.”

Nowadays, security engineers generally accept and adopt this principle. And this could be the end of our story, but it isn’t.

JavaScript Obfuscation

JavaScript obfuscation is a series of code transformations that turn exposed JS code into a modified version that is extremely hard to understand and reverse-engineer.

Look at a sample of obfuscated JavaScript (and yes, it is valid JavaScript):

[][(![]+[])[+[]]+([![]]+[][[]])[+!+[]+[+[]]]+(![]+[])[!+[]+!+[]]+(!![]+
[])[+[]]+(!![]+[])[!+[]+!+[]+!+[]]+(!![]+[])[+!+[]]][([][(![]+[])[+[]]+
([![]]+[][[]])[+!+[]+[+[]]]+(![]+[])[!+[]+!+[]]+(!![]+[])[+[]]+(!![]+
[])[!+[]+!+[]+!+[]]+(!![]+[])[+!+[]]]+[])[!+[]+!+[]+!+[]]+(!![]+[][(![]+
[])[+[]]+([![]]+[][[]])[+!+[]+[+[]]]+(![]+[])[!+[]+!+[]]+(!![]+[])[+[]]+
(!![]+[])[!+[]+!+[]+!+[]]+(!![]+[])[+!+[]]])[+!+[]+[+[]]]+([][[]]+[])[+
!+[]]+(![]+[])[!+[]+!+[]+!+[]]+(!![]+[])[+[]]+(!![]+[])[+!+[]]+([][[]]+
[])[+[]]+([][(![]+[])[+[]]+([![]]+[][[]])[+!+[]+[+[]]]+(![]+[])[!+[]+!+
[]]+(!![]+[])[+[]]+(!![]+[])[!+[]+!+[]+!+[]]+(!![]+[])[+!+[]]]+[])[!+
[]+!+[]+!+[]]+(!![]+[])[+[]]+(!![]+[][(![]+[])[+[]]+([![]]+[][[]])[+!+
[]+[+[]]]+(![]+[])[!+[]+!+[]]+(!![]+[])[+[]]+(!![]+[])[!+[]+!+[]+!+[]]+
(!![]+[])[+!+[]]])[+!+[]+[+[]]]+(!![]+[])[+!+[]]]((![]+[])[+!+[]]+(![]+
[])[!+[]+!+[]]+(!![]+[])[!+[]+!+[]+!+[]]+(!![]+[])[+!+[]]+(!![]+[])[+
[]]+(![]+[][(![]+[])[+[]]+([![]]+[][[]])[+!+[]+[+[]]]+(![]+[])[!+[]+!+
[]]+(!![]+[])[+[]]+(!![]+[])[!+[]+!+[]+!+[]]+(!![]+[])[+!+[]]])[!+[]+
!+[]+[+[]]]+[+!+[]]+(!![]+[][(![]+[])[+[]]+([![]]+[][[]])[+!+[]+[+[]]]+
(![]+[])[!+[]+!+[]]+(!![]+[])[+[]]+(!![]+[])[!+[]+!+[]+!+[]]+(!![]+
[])[+!+[]]])[!+[]+!+[]+[+[]]])()


To the human eye, this seems impossible to reverse-engineer. But while this code has been obfuscated with high potency, the obfuscation is very weak.

Using an automated reverse-engineering tool, we would get the original code immediately. This means that this obfuscation has low resilience.

Knowing these two concepts will go a long way toward being able to compare different obfuscation tools. As you do this analysis, you’ll see how free obfuscators offer basic transformations with very little resilience, meaning that they would be easily reversed. There are also known cases of these free tools inserting malware during obfuscation.

On the contrary, the obfuscation layer that Jscrambler provides includes a meticulous combination of the most potent and resilient transformations to make it extremely hard for humans and machines alike to reverse the code. Like one of our clients in Healthcare stated:

Jscrambler was the only product we found that could not be cracked.

Now that we’ve covered obfuscation, let’s look at the remaining pieces of JavaScript protection.

JavaScript Protection

Just like you put in place strict measures for server-side and network security, specific client-side security practices are crucial to preventing serious attacks.

To understand why, let’s see what OWASP says about this in their Mobile Top 10 Security Risks guide:

M8 Code Tampering

M9 Reverse Engineering

“The mobile app must be able to detect at runtime that code has been added or changed (…) The app must be able to react appropriately at runtime to a code integrity violation.”

“To prevent effective reverse engineering, you must use an obfuscation tool.”


While obfuscation should provide a good way of preventing reverse-engineering, more advanced threats like code tampering require protection at runtime.

Jscrambler provides advanced runtime protection with techniques such as Self-Defending, which breaks the protected app when an attacker tries to debug it or when there’s any change to the source code.

By providing these techniques on top of our cutting-edge obfuscation, we have helped thousands of businesses tackle different attack scenarios. Let’s look at some of the most prevalent ones.

Attack Scenario 1: Automated Abuse

On the Web, abuse refers to exploiting the web application’s functionalities to gain access or privileges through the use of bots, for example, to automate new account creation with a cloud provider and get unlimited free benefits to mine cryptocurrencies.

Often, these attacks require some sort of source code manipulation, which is possible when JavaScript is unprotected.

Jscrambler’s unique polymorphic JavaScript obfuscation directly tackles this by making each new code build completely different. When coupled with frequent deployments, this means that the attack window is short and neither automated nor manual reverse-engineering is possible.

Attack Scenario 2: Piracy and Cheating

Piracy is a key business threat to digital products and services, especially in the fast-growing OTT industry.
1-in-5US-households-use-piracy-websites-or-jailbroken-devices

The forensic watermarking solutions that providers employ to track down the source of leaks are typically deployed with a client-side JavaScript agent. Because the source code of this agent is exposed, attackers can tamper with its logic to bypass it and make it much harder for providers to block their accounts.

Using a similar tactic, attackers can abuse games by tampering with the code to illegitimately gain advantages. This negatively affects legitimate users and severely hurts the business.

Jscrambler addresses both of these threats. When an attacker tries to debug or tamper with a client-side watermarking agent protected by Jscrambler, the code is highly obfuscated, and Self-Defending will break the app and keep the attacker locked out.

The same happens when attackers are trying to tamper with a game’s logic to bypass its restrictions.

Attack Scenario 3: Data Exfiltration

On the Web, users commonly submit data like their email, name, address, credit card number, or even medical information on a website using a form.

The safety of this data might be at risk. These risks are based on the JavaScript logic behind these forms: all this sensitive data passes through the client-side.

By leaving their JavaScript exposed, organizations make it easier for attackers to understand how their web applications work and facilitate the planning or automation of data exfiltration or scraping attacks.

On the contrary, by protecting their source code with Jscrambler, companies make it much harder for attackers to go through the source code.

This protection helps frustrate attackers and raise the cost of the attack to a point where they’re likely to move on to another target.

Plus, by protecting their JavaScript source code, these companies increase their compliance with standards such as ISO 27001 and data protection regulations like CCPA and GDPR.

Attack Scenario 4: In-Depth Security

The different attack scenarios we just covered are the reason why we emphasize that JavaScript Protection is much more than obfuscation. This protection should be seen as a valuable component of an application security strategy.

Because attackers keep evolving their tactics against web applications and the JavaScript ecosystem doesn’t stop growing, we keep improving our JavaScript protection solution, even after 10 years of R&D and over 500,000 protected builds.

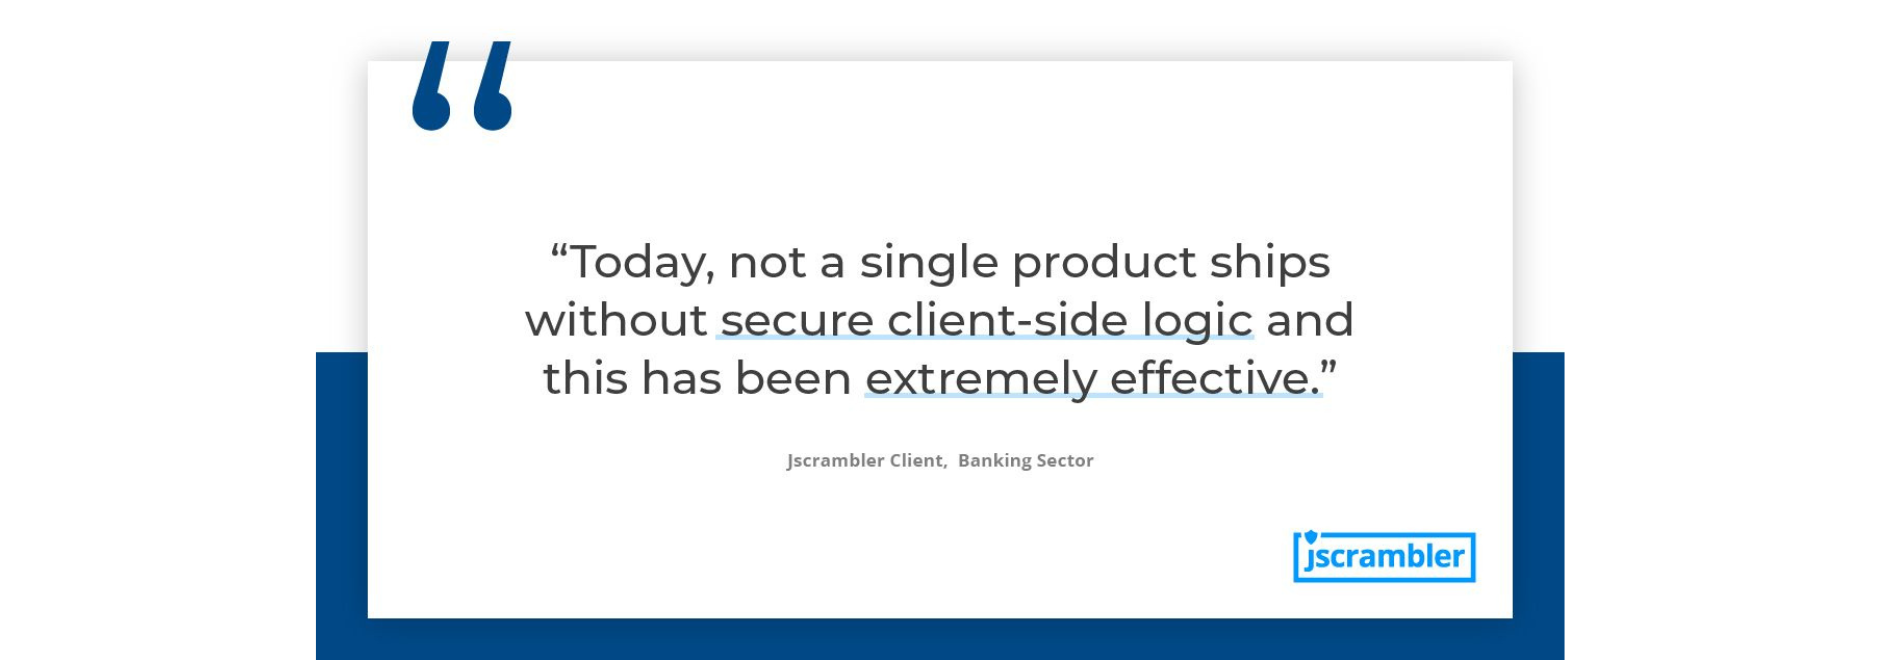
And as we bring JavaScript protection to major enterprises, this is what we’re hearing back from our clients:
banking-sector-secure-client-side-logic-testimonial
So the “security isn’t obscurity” argument has naturally evolved to today’s context with the new constructive argument of “what we need is in-depth security”.

Feel free to try all Jscrambler features with a free trial to learn more.

SSL Pinning

Introduction to TLS and SSL Pinning

Transport Layer Security (TLS) is a cryptographic protocol to secure communications over the network. Secure Sockets Layer (SSL) preceded TLS.

Websites use TLS to secure communications between servers and web browsers. The flow in a TLS connection is as follows:

  • A client initiates a connection to the server.

  • The server responds with a certificate containing its public key.

  • The client verifies the certificate with preinstalled Certified Authority (CA) certificates on the computer.

  • On success, the client creates a new secret key, encrypted using the Server’s Public key.

  • The server decrypts the new key with its private key.

  • All further communications are carried out using this secret key.


CAs play a role in securing connections. They issue digital certificates that certify ownership of public keys, usually X.509.

Digital Certificates

Asymmetric Cryptography is a system that uses a pair of public and private keys to secure a system. A user can distribute his public key, which in turn can be used by others to sign a message. A user can verify the authenticity of the message using his private key.

A digital certificate is an electronic document that certifies ownership of a public key. If the signature is valid and the issuer is trusted, then that key can be used to communicate securely.

In our context, the Certificate Authority is the issuer. Let’s take a look at the different types of certificates:

  • Root Certificates: This is a certificate that identifies a Certificate Authority.

    These certificates are self-signed. Usually, CAs issue certificates in tree format. Root certificates are used to sign an intermediate certificate and establish a root chain. Intermediate certificates inherit the trustworthiness of the root chain.

    Major software companies like Microsoft, Apple, Mozilla, Google, and Oracle have their own root programs to store root certificates. Root stores are certificates installed in operating systems.

  • Intermediate certificates: CAs don’t issue server certificates directly from a root certificate.

    They usually sign an intermediate certificate with its private key. As mentioned earlier, the certificate inherits the trustworthiness of a parent. This process can be repeated multiple times to form a certificate chain.

    The end-user certificate, or Leaf certificate, is usually signed by an intermediate certificate. There is a huge risk involved in signing with Root; it’s easier to revoke an intermediate certificate.

  • Leaf Certificate: This refers to certificates that cannot be used to sign other certificates. SSL/TLS server certificates are usually leaf certificates.

  • Self-Signed Certificates: If a certificate is not signed by a CA, then it’s a self-signed certificate.

    Self-signed certificates can be created using tools like Apple’s Keychain, OpenSSL, and Java’s Keytool. Self-signed certificates are useful for testing. However, they are susceptible to Man-in-the-Middle (MITM) attacks. It’s advised to avoid self-signed certificates in production.

Certificate Chain

As mentioned earlier, a CA doesn’t sign a leaf certificate with its root. A complex chain of intermediate certificates is established, with each intermediate certificate inheriting the trustworthiness of its parent.

Usually, while connecting to a secure server, the client downloads the server certificate. Unless the certificate is self-signed, the certificate used to sign a leaf certificate is downloaded.

If the intermediate certificate is not root, then the process is repeated. If the final certificate is a root certificate and it is verified, the entire chain of certificates is trusted, and hence the connection is trusted. If the root is not verified or if the last certificate is not a root certificate, then the chain is untrusted.

Pinning

HTTPS traffic can potentially be intercepted by installing malicious CA certificates on a device. Tools like OWASP ZAP, Burp, and Mitmproxy auto-generate CAs to intercept traffic from the browser.

Usually, malicious actors use social engineering to install rogue CAs on devices. Unlike home computers, it’s relatively easier to install certificates on mobile devices. Commonly, WiFi hotspots can be used to install such rogue CAs.

We can use certificate pinning to add an extra layer of defense.

Certificate pinning is a technique with which we can directly associate the host or app with a certificate or its public key instead of accepting any certificate signed by a trusted CA. By revoking trust from CA, we are reducing the attack surface.

Even if an attacker manages to install a rogue CA on a device, he won’t be able to intercept traffic easily. The best practice is to pin the server’s leaf certificate. However, a developer can choose to pin an intermediate certificate to increase compatibility. This will allow us to change the server’s leaf certificate periodically, but it also increases the attack surface.

We can implement pinning in two ways.

1. We can directly pin the certificate by bundling the certificate in our apps. However, once the certificate expires, a transition plan will have to be implemented beforehand. Once the certificate expires, older apps will throw errors.

2. We can pin the Public Key to the certificate. By pinning a public key, we won’t have to worry about the certificate expiring as long as the public key remains the same. We can pin multiple certificates; such an arrangement is known as a pinset.

Let’s take a look at commonly used plugins in React Native and Ionic.

Pinning in React Native

In a previous article, we mentioned plugins that can be used for certificate pinning. We will list them here again.

  • react-native-ssl-pinning: This plugin uses OkHttp3 on Android and AFNetworking on iOS to provide SSL pinning and cookie handling. It supports both Certificate and Public Key Pinning. We will be using fetch from the library to consume APIs. This library uses promises and supports multi-part form data. It has support for React Native 0.60 and above.

  • react-native-pinch: React Native Pinch is used to pin certificates. Both callbacks and promises are supported.

  • react-native-cert-pinner: This plugin allows us to pin the public key. Unlike the plugins above, we can use fetch and other utilities directly. The pinning occurs before native JS is run. Also, there is no requirement to define hashes in the request itself.

  • react-native-trustkit: this is a wrapper plugin for the iOS Trustkit library. This library is available for iOS only.

Pinning in Ionic Apps

Currently, certificate pinning is only available via cordova-plugin-advanced-http.

Advanced HTTP is a versatile plugin that can be used to perform complex HTTP operations like SSL pinning, certificate-based authentication, and complex file operations.

Pinning Caveats

Theoretically, pinning secures the connection between the client (app) and the server. Practically, rogue pinsets can be inserted via tampered apps. Therefore, it’s advisable to use Pinning with Attestation Checks like SafetyNet.

If the pinned certificate changes regularly, the application has to be updated too. App Store updates can take multiple days and have a certain level of uncertainty involved. This may cause unintended service outages for end-users.

While this article was more focused on network security, you should protect your JavaScript source code as well.

Jscrambler Recognized in Gartner’s 2020 Market Guide for Online Fraud Detection

Gartner has recognized Jscambler’s client-side security technologies in its 2020 Market Guide for Online Fraud Detection.

In a few months, we have seen digital services experience unprecedented growth, especially in sectors such as E-Commerce, Digital Banking, and OTT.

This growth has been accompanied by an increase in online fraud as attackers seek to leverage this uptick in volume. While online fraud is increasing across the board, it’s worth paying attention to web supply chain attacks like Magecart.

Online Frauds and Client-side Attacks

These web credit card skimming attacks have breached thousands of companies, including major retailers. The resulting business losses impact businesses, namely in the form of fines that can top $230 million.

Gartner, the world’s leading research and advisory company, has recognized Code Integrity and Webpage Integrity, two cutting-edge technologies from Jscrambler, in its Market Guide for Online Fraud Detection for the second consecutive year.

This market guide covers the leading solutions to tackle online fraud and helps businesses select vendors based on desired business outcomes.

“We are very pleased to once again be recognized as a Representative Vendor in Gartner’s Market Guide for Online Fraud Detection. We have grown our commitment to battling online fraud and helping businesses successfully stay several steps ahead of attackers,” said Rui Ribeiro, co-founder and CEO of Jscrambler. “To receive this recognition from Gartner for the second year in a row is a proud moment for our company.”

Jscrambler is also recognized in the Gartner Market Guide for In-App Protection for its approach to protecting JavaScript-based applications.

Jscrambler Client-side Security Technologies

Jscrambler Code Integrity enables enterprises to secure crucial business logic (such as algorithms), enforce licensing agreements, and prevent attackers from debugging or tampering with JavaScript code.

Jscrambler Webpage Integrity presents a holistic solution to detect and block, in real-time, malicious behavior on the client-side of web applications. It allows businesses to stop more advanced client-side threats such as Magecart and data exfiltration.

Read the full press release.

Jscrambler is trusted by Fortune 500 and companies in sectors such as Finance, Broadcasting, Software Development, E-Commerce, and Gaming.

Gartner Disclaimer

Gartner does not endorse any vendor, product, or service depicted in its research publications and does not advise technology users to select only those vendors with the highest ratings or other designations. Gartner’s research publications consist of the opinions of Gartner’s research organization and should not be construed as statements of fact. Gartner disclaims all warranties, expressed or implied, concerning this research, including any warranties of merchantability or fitness for a particular purpose.

Regulations in Digital Banking: White Paper for Banks Compliance

Digital banking results from the processes that banking and financial services are still undergoing for massive digitalization. This process finds some of its roots in the 2008 financial crisis.

With consumers’ trust in banks at a low point and banks freezing their innovation front, an opening was left for digital consumer banking services.

Enter neobanks, a new wave of fintech companies that develop web and mobile banking applications.

These facilitate the traditional banks’ overly complicated procedures and enhance the user experience by providing user-specific advice and spending analytics.

Neobanks are quickly gaining momentum in the market for consumer banking, amassing millions of clients globally.
digital-banking-regulations-neobanks-number-of-newbank-users-worldwide

Despite the many benefits that this shift has brought to consumers and the overall market, digitalization in banking services has highlighted the big question of data privacy and security.

Gigantic data breaches (notably Magecart attacks) are becoming more common. Consumers have grown more concerned about how their data is stored and used, especially their financial information.

From the standpoint of financial organizations (including Neobanks and fintech), the answer to this concern begins in the development stage of these digital banking applications, where secure development practices must be adopted.

Developing banking applications that deal with user data requires strict security practices.

And thanks to the emergence of several regulations and standards, this need for improved security of customer data is often not only recommended but an actual requirement.

Specifically, we find regulations directly related to the financial industry: PSD2, 23 NYCRR 500, and GLBA, as well as three regulations that are aimed at consumer privacy in general (which the financial sector is also subject to): GDPR, CCPA, and LGPD.

In this white paper, we explore the procedures to increase compliance by securing your banking apps, present the general goals of each regulation, and provide a summary of how organizations can accelerate compliance. We also cover standards such as ISO/IEC 27001, ISO 12812:2017, and the NIST Cybersecurity Framework.

We end the white paper by putting forward practical recommendations to increase compliance, reaching topics such as server-side security, network security, and client-side security.

Creating “Quarantine Pro” — A Fun Learning Experiment in React Native

Creating Quarantine Pro is a fun experience for those feeling bored.

Learning Experiments in React Native COVID-19 has changed our way of life since the start of 2020. Self-isolating seems to be the best thing you can do right now. Thus, in isolation, we had a fun, simple React Native app idea.

The app is all about how long you have been quarantining. Input the date of the first day you started isolating, and the app displays a fun message to tell you how far you have come in the quarantine game.

Apart from being fun, this tutorial uses the latest SDK version 37.x.x. of Expo to build a demo app. You will learn the following three points:


Here is a sneak peek of what we intend to build in this tutorial:
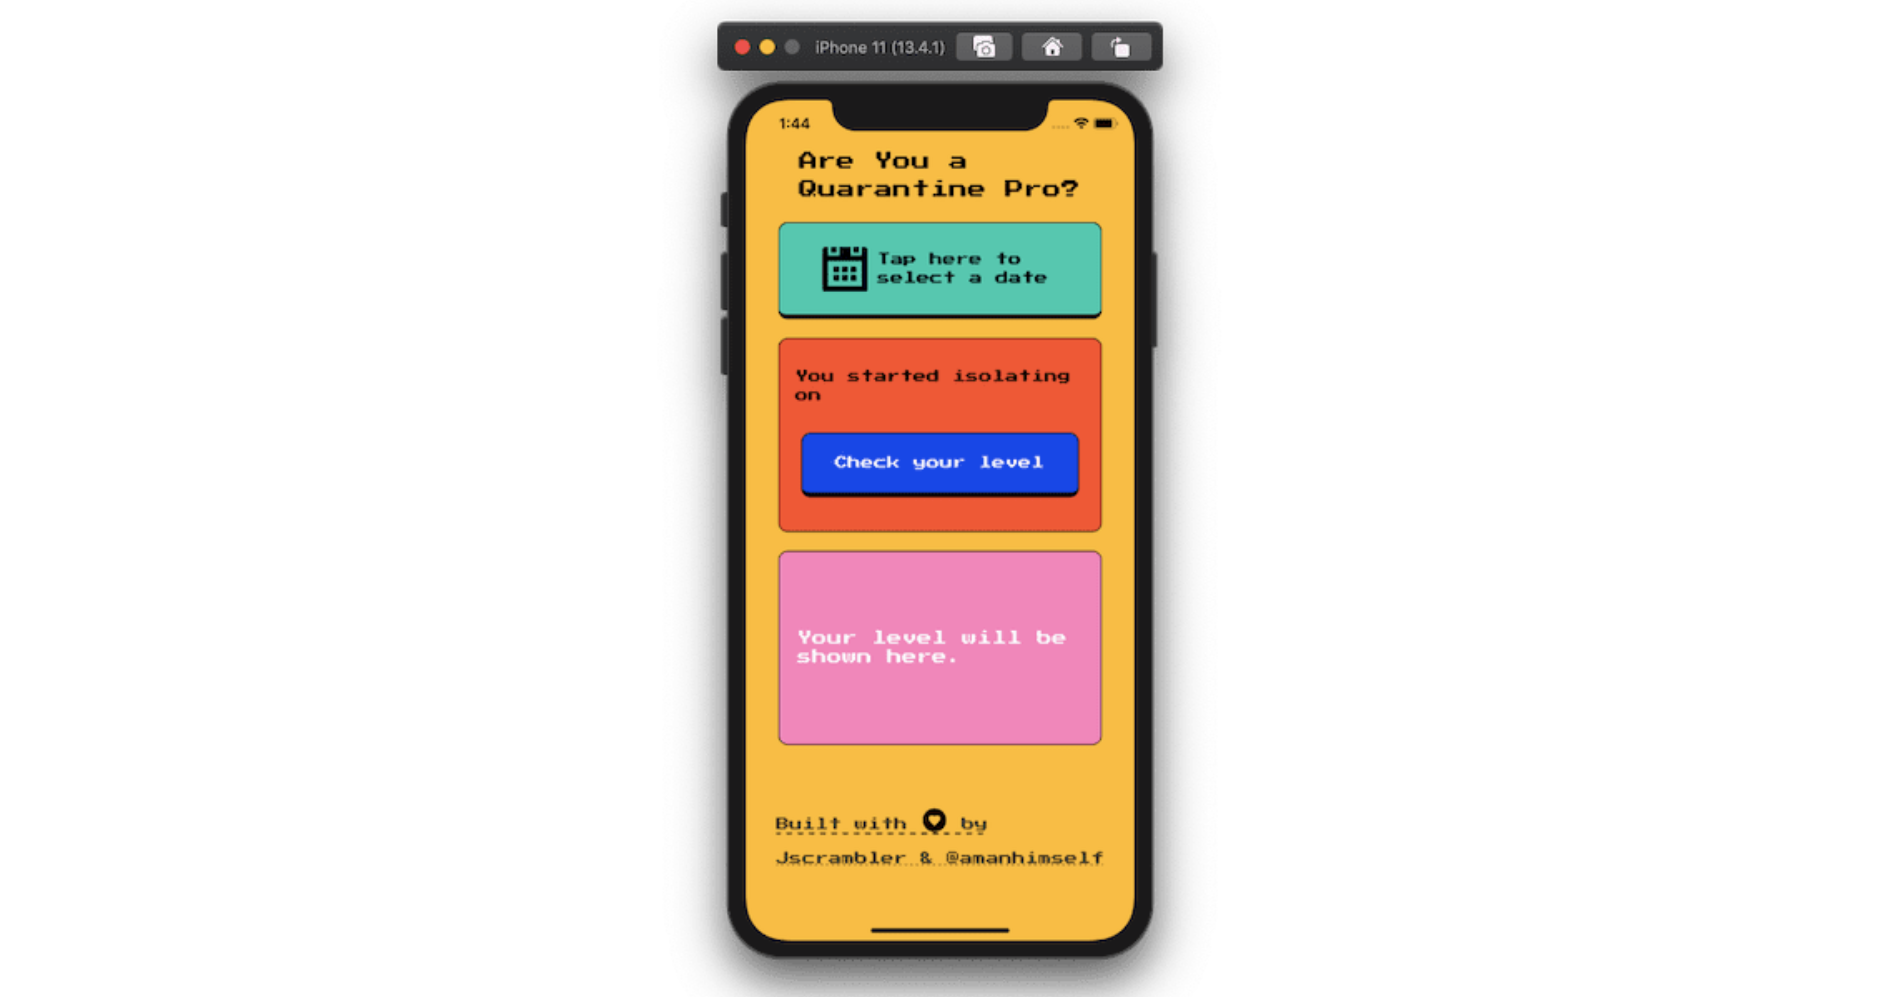
Quarantine-Pro-React-Native-app-example

You can find the complete code for this tutorial in this GitHub repo.

Create a New Expo App

Start by creating a new Expo app at your favorite side-project location in your local development environment. Run the following command from a new terminal window to generate a React Native app using Expo-cli.

npx expo-cli init DaVinciOfIsolation


When asked to select a template, choose blank from a Managed workflow.
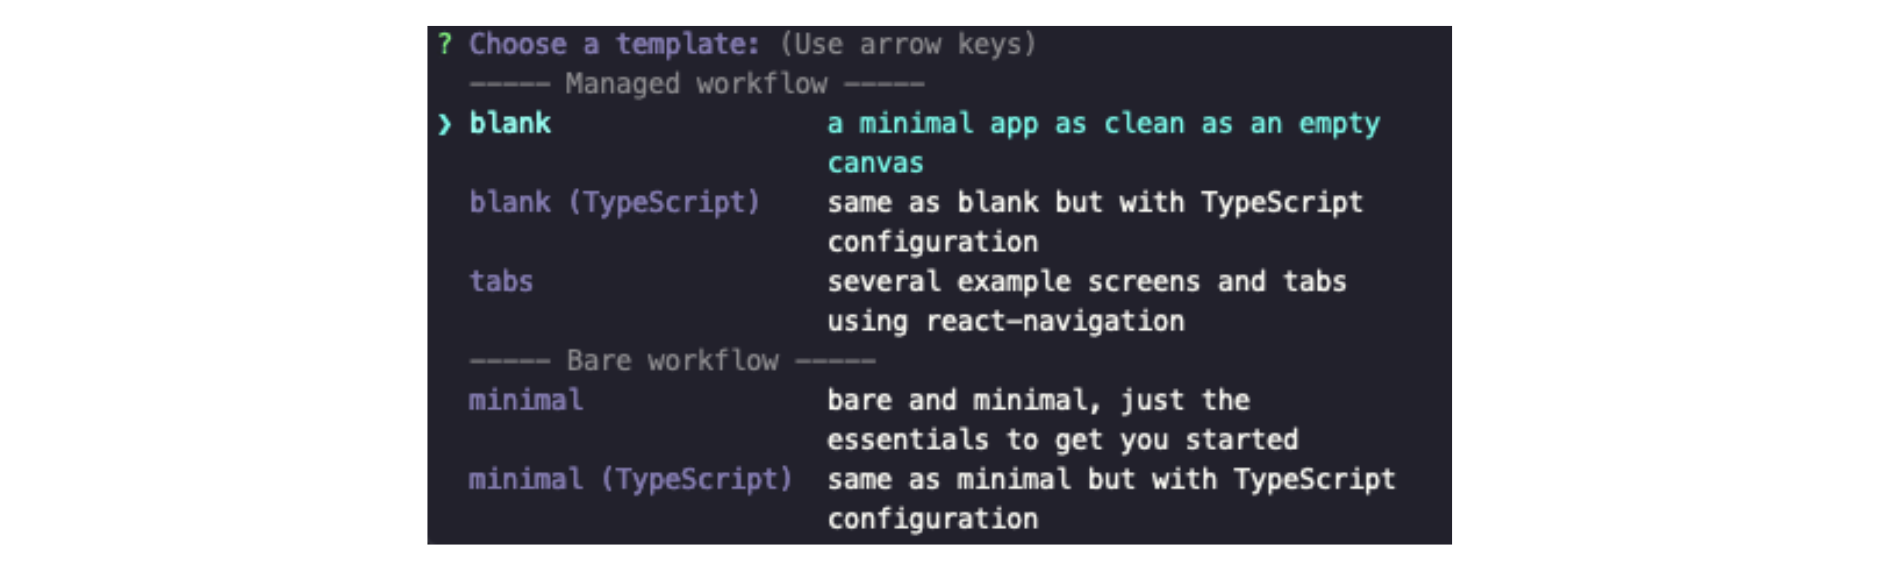
choose-blank-template-from-the-Managed-workflow

After that, press enter and let Expo-cli install the dependencies required to start this project.

Once the project has initialized generation, go to the project directory from the terminal window and start the Expo bundler service.

expo start


This will start the Expo app on a simulator or device where the Expo client is installed. For more information on installing an Expo client, visit the official documentation.

Once the app is running in the Expo client, the following default screen welcomes you:
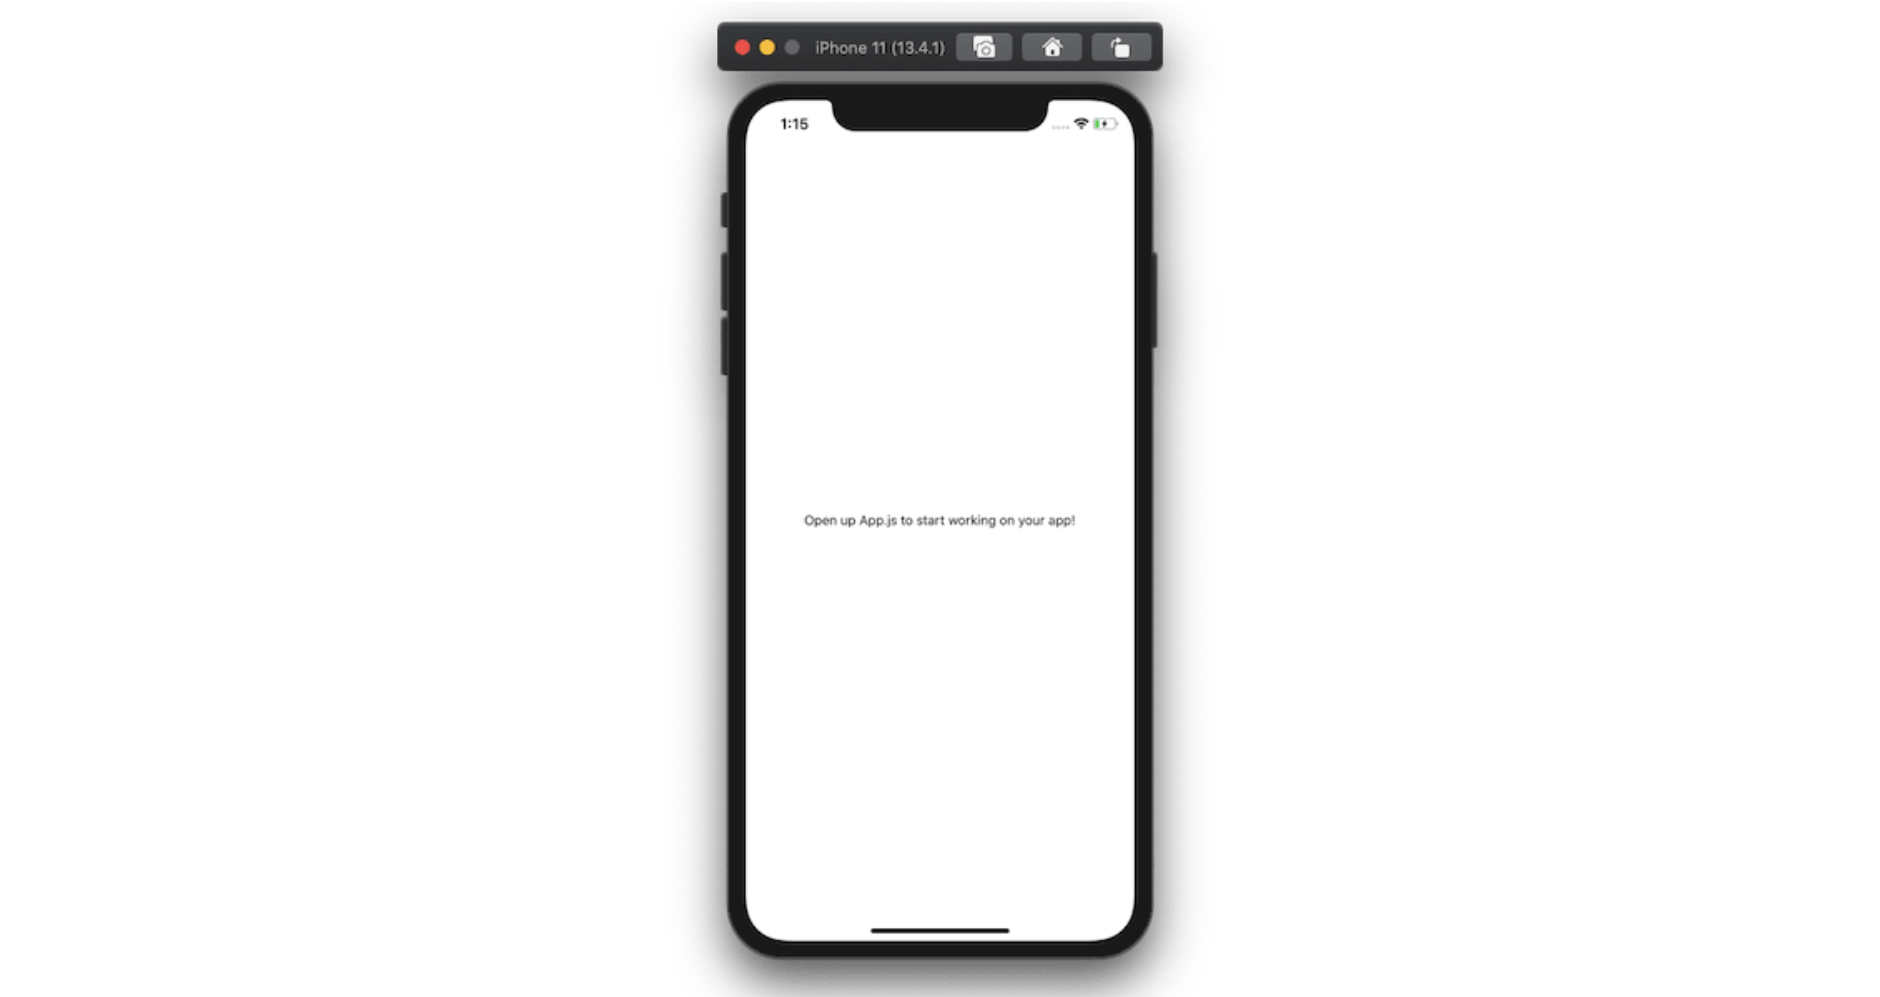
welcoming-default-screen-to-start-working-on-your-app

Let us install the npm dependencies we are going to need to build this project by executing the following command:

expo install expo-font @use-expo/font @react-native-community/datetimepicker


The Expo install adds dependencies using a specific version compatible with the Expo SDK.

Also, install the following npm packages either using npm install or using yarn:

yarn add react-native-modal-datetime-picker moment


With that, we have installed the required set of npm dependencies. Let us move further and start building the app.

How To Use Custom Fonts In An Expo App

Install a New Font

In this app, we are going to use a specific custom font that is free to download from Google Fonts (Press Start 2P).

To use this font or any other custom font, create a new directory called fonts inside the assets or folder. Then place the font file(s) you have just downloaded. The path to the fonts directory ./assets/fonts is a convention that Expo developers recommend using when placing custom fonts in your app.

After placing the file inside the newly created directory, the file structure will look like below:
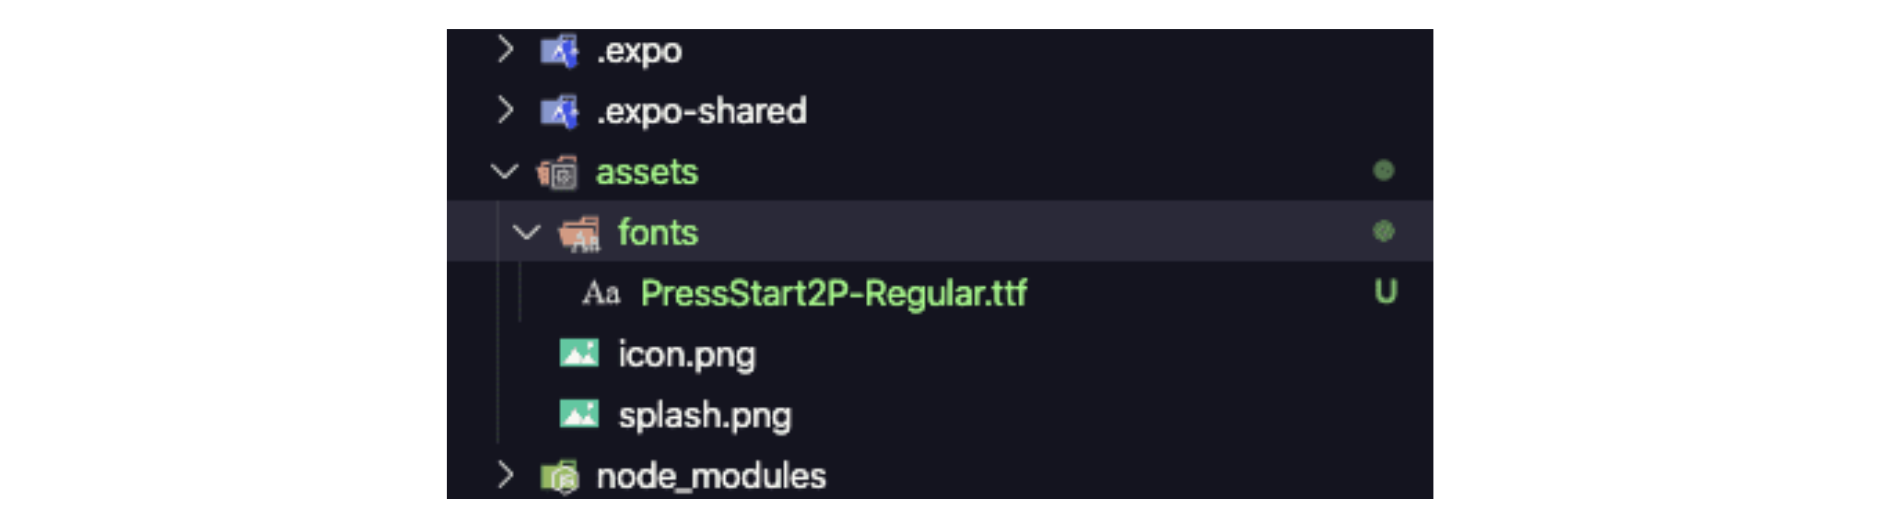
file-structure-example-after-placing-the-file-inside-the-newly-created-directory

When you are downloading a font to use in an Expo React Native app, make sure you download either a font either.otf .otf or .ttf format. Those are the two formats that work across all Expo platforms, such as the web, iOS, and Android.

Use The useFonts Hook

To use any hook in a React or React Native app, you have to use functional components. To set up a new font, start by importing the following statements:

import React from 'react';
import { View, Text } from 'react-native';
import { useFonts } from '@use-expo/font';
import { AppLoading } from 'expo';


The useFonts hook takes one argument as a JavaScript object and returns a single item list containing a value telling you whether the font is loaded or not. This eliminates the need for a lot of boilerplate code to make this check.

After you have imported the statements, create a new object called customFont. It will have a key ⁠— the name of the font itself, and the value of this key, the path to the font file in assets/fonts/ directory.

const customFont = {
  'Press-Start2p': require('./assets/fonts/PressStart2P-Regular.ttf')
};


Next, inside the function component, define the isLoaded variable from the useFonts hook and pass the customFont object as its argument.

Also, when the font is in the loading state or has not loaded yet, it is a good practice to make use of the AppLoading component from Expo and render nothing on the screen.

Once the font has loaded, the screen will display the content of the functional component.

Here is the complete code for the App component. Right now, we are displaying the title of the app using the new font we have just installed.

export default function App() {
  const [isLoaded] = useFonts(customFont);

  if (!isLoaded) {
    return <AppLoading />;
  }

  return (
    <View
      style={{
        flex: 1,
        alignItems: 'center',
        backgroundColor: '#ffbd12'
      }}
    >
      <Text
        style={{
          fontFamily: 'Press-Start2p',
          fontSize: 24,
          marginTop: 80,
          paddingHorizontal: 20
        }}
      >
        {`Are You a Quarantine Pro?`}
      </Text>
    </View>
  );
}


From the above snippet, make sure you describe the fontFamily property on the Text component. This is the only way the font is going to be used for a specific text component.

Go back to the Expo client, and you are going to see the following result:

That’s it! You have completed the first step of loading fonts and using them in a React Native app.

For more information, check out Cedric van Putten’s collection of hooks that you can use in an Expo app.
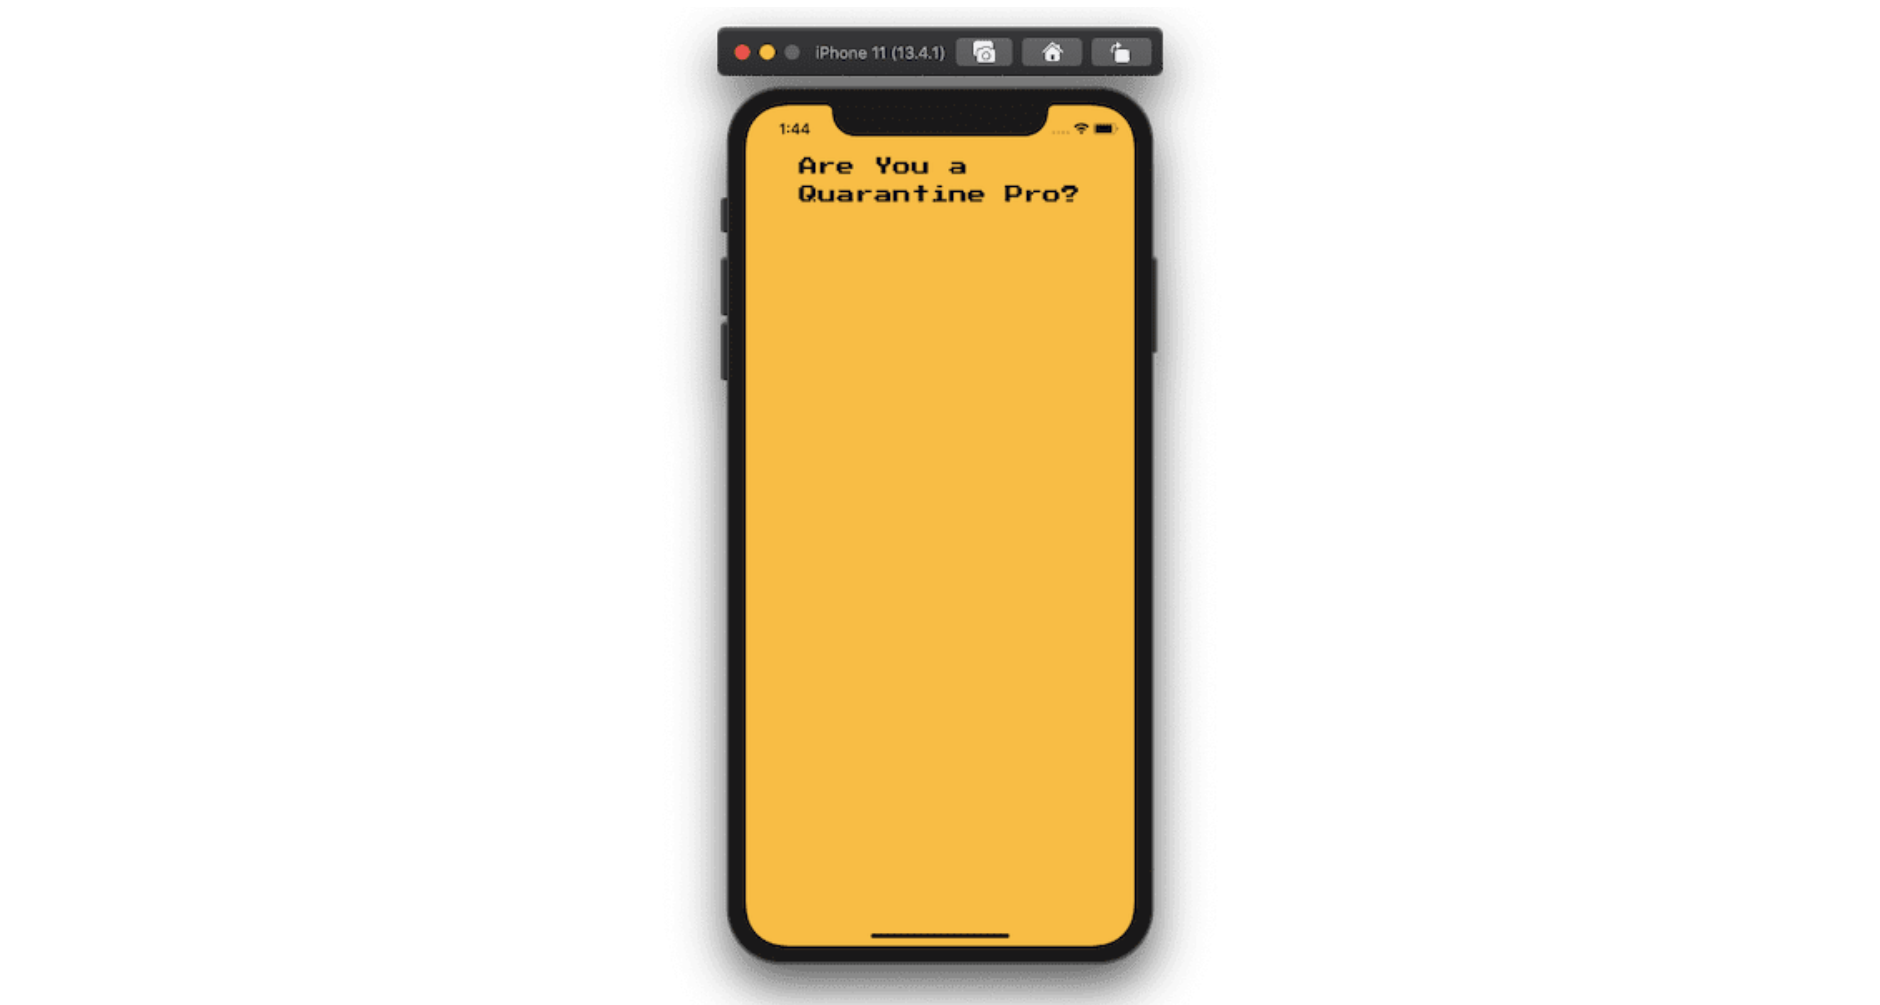
are-you-a-quarantine-pro

Create a Button To Use The Datetime Picker Modal

Since we have already installed the required npm dependencies to show a date picker modal (that uses the native date picker module), let us add a button to the current App.js file in order to display this modal.

Start by modifying the import statements as stated below and adding new ones.

import React, { useState } from 'react';
import {
  View,
  Text,
  StyleSheet,
  Dimensions,
  TouchableWithoutFeedback
} from 'react-native';
import {
  Fontisto,
  MaterialCommunityIcons,
  FontAwesome
} from '@expo/vector-icons';
import DateTimePickerModal from 'react-native-modal-datetime-picker';


To set the width and height of the button, we are going to use the Dimensions API from the react-native core. The width and height of the button are going to be calculated based on the width of the current window.

Define a variable W that is going to represent the width of the window before the App functional component.

const W = Dimensions.get('window').width;


Next, after the app’s title text, define another container View component for the button. We are going to wrap the contents of the TouchableWithoutFeedback button inside a separate View component since this touchable component from React Native is only allowed to have a child component.

However, we are going to have two child components: the icon of the button and the text. Modify the return statement of the App component as per the code snippet below.

return (
  <View style={styles.container}>
    <Text style={styles.title}>{`Are You a Quarantine Pro?`}</Text>
    <TouchableWithoutFeedback>
      <View style={styles.pickerContainer}>
        <Fontisto style={styles.icon} name="calendar" size={48} />
        <Text style={styles.pickerText}>{`Tap here tonselect a date`}</Text>
      </View>
    </TouchableWithoutFeedback>
  </View>
);


Add the following styles to the above code snippet: let’s make use of the StyleSheet object to manage styles in the current component file.

const styles = StyleSheet.create({
  container: {
    flex: 1,
    alignItems: 'center',
    backgroundColor: '#ffbd12'
  },
  title: {
    fontFamily: 'Press-Start2p',
    fontSize: 24,
    marginTop: 80,
    paddingHorizontal: 20,
    lineHeight: 30
  },
  pickerContainer: {
    marginTop: 20,
    backgroundColor: '#00c6ae',
    width: W / 1.2,
    height: W / 4,
    borderRadius: 10,
    borderWidth: 1,
    borderColor: '#000',
    borderBottomWidth: 5,
    borderBottomColor: '#000',
    justifyContent: 'center',
    alignItems: 'center',
    flexDirection: 'row'
  },
  pickerText: {
    fontFamily: 'Press-Start2p',
    fontSize: 14,
    paddingHorizontal: 10,
    lineHeight: 20
  },
  icon: {
    color: '#000'
  }
});


Refresh the Expo client to get the following result:
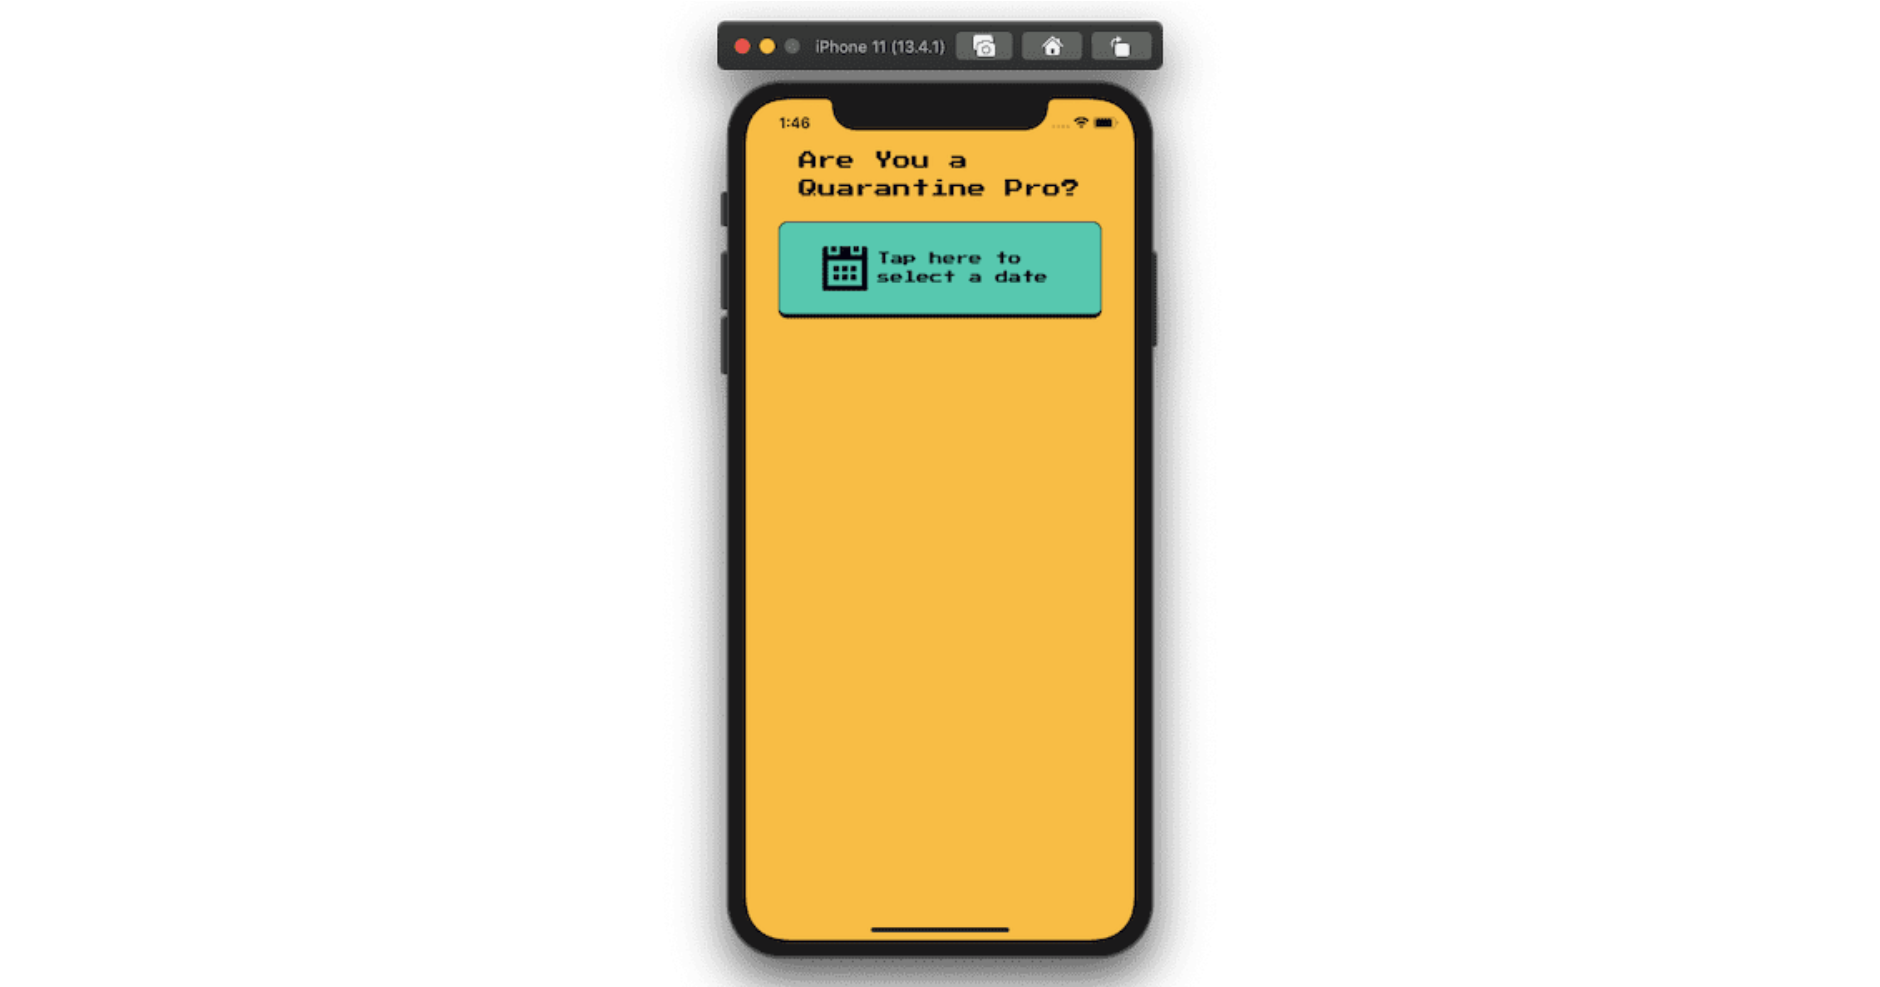
result-from-refreshing-the-expo-client

Now, let us bind the date picker modal to this button. We already imported the npm package react-native-modal-datetime-picker we need for this step.

We are using this library over the default @react-community/react-native-datetimepicker because this special library exposes a cross-platform interface for showing the native date-picker and time-picker inside a modal.

For our app, we are also going to evaluate the number of days the user has already spent in quarantine based on the date they choose as the input.

Let us define a few state variables using the useState hook from React for the following reasons:

  • pickedDate to store the date picked by the user;

  • isDatePickerVisible to show or hide the date picker modal.


We have to define three helper functions along with these state variables. The first two will handle the visibility of the date picker modal.

The third one will handle the confirm button from the date picker modal and decide what action to take when the user has to choose a date.

The action we have to take here is to hide the date picker modal as well as store the value of the date in the state variable pickedDate.

export default function App() {
  // ... rest of the component remains same

  const [pickedDate, setPickedDate] = useState(null);
  const [isDatePickerVisible, setDatePickerVisibility] = useState(false);

  function showDatePicker() {
    setDatePickerVisibility(true);
  }

  function hideDatePicker() {
    setDatePickerVisibility(false);
  }

  function handleConfirm(date) {
    console.log('A date has been picked: ', date);
    hideDatePicker();
    setPickedDate(date);
  }

  return (
    <View style={styles.container}>
      <Text style={styles.title}>{`Are You a Quarantine Pro?`}</Text>
      <TouchableWithoutFeedback onPress={showDatePicker}>
        <View style={styles.pickerContainer}>
          <Fontisto style={styles.icon} name="calendar" size={48} />
          <Text style={styles.pickerText}>{`Tap here tonselect a date`}</Text>
        </View>
      </TouchableWithoutFeedback>
      <DateTimePickerModal
        isVisible={isDatePickerVisible}
        mode="date",. 
        onConfirm={handleConfirm}
        onCancel={hideDatePicker}
        headerTextIOS="When did you start isolating?"
      />
    </View>
}

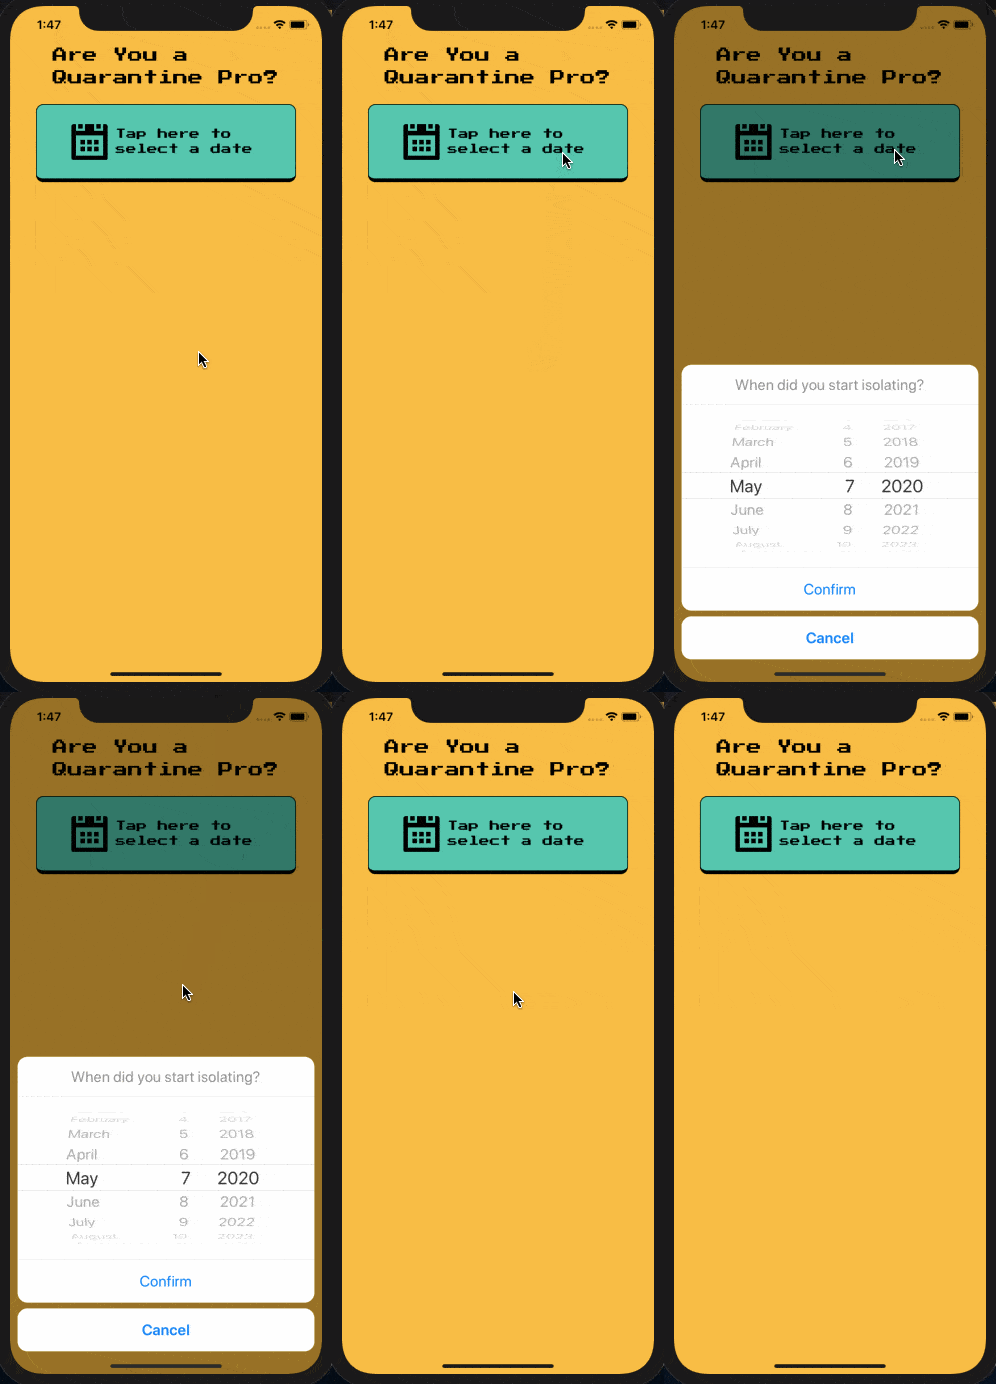
The showDatePicker method is going to be triggered every time a user taps the button to display the picker modal. The component will only render on the device’s screen when this method triggers.

When the user taps anywhere outside the modal or taps on the Cancel button, the modal is hidden again and nothing happens.
Quarantine Pro React Native App

However, when a date is selected and the user taps Confirm, further actions can be taken. Let us show the date picked by the user in a console statement.

The output is shown on the Expo server that is running in the terminal window. This means that the user input is now stored in the state variable pickedDate.

Also, you can apply other props available in @react-community/react-native-datetimepicker. In the date picker modal we are implementing, there is a small customization using the prop headerTextIOS. This prop allows changing the title of the picker modal for iOS devices.

Evaluate The “Quarantine Score”

The second missing piece of the puzzle in our current app is a button to calculate the day(s) difference between the user’s input and the current date (we will use this as our “quarantine score”).

We are going to follow the same strategy design-wise as in the previous section. Display a button that users can tap to see their score.

Start by importing the Moment library in the App.js file after the rest of the import statements. It is going to handle the calculation between the user’s input and the current date.

// rest of the import statements
import moment from 'moment';


This library is also going to help us format the input from the date picker modal and display only the date (and not time) from the user’s input in the format YYYY-MM-DD.

Modify the return statement by adding a new View container that consists of a text message and a button to calculate the difference between the days.

Also, before modifying the return statement of the functional component, add a helper method called daysRemaining() that is going to calculate the difference.

We are going to store this difference in a state variable called days. This state variable is going to be used in the next section to display the correct result on the screen.

The difference is going to be calculated between the pickedDate (which is the user’s input) and the todaysDate (which is the current date).

export default function App() {
const [days, setDays] = useState('');

function daysRemaining() {
  // user's input
    let eventdate = moment(pickedDate);
    // getting current date
    let todaysdate = moment();
    let remainingDays = todaysdate.diff(eventdate, 'days');
    setDays(remainingDays);
    return remainingDays;
  }

  return (
    <View style={styles.container}>
      <Text style={styles.title}>{`Are You a Quarantine Pro?`}</Text>
      <TouchableWithoutFeedback onPress={showDatePicker}>
        <View style={styles.pickerContainer}>
          <Fontisto style={styles.icon} name="calendar" size={48} />
          <Text style={styles.pickerText}>{`Tap here tonselect a date`}</Text>
        </View>
      </TouchableWithoutFeedback>
      <DateTimePickerModal
        isVisible={isDatePickerVisible}
        mode="date"
        onConfirm={handleConfirm}
        onCancel={hideDatePicker}
        headerTextIOS="When did you start isolating?"
      />
      {/* ADD BELOW */}
      <View style={styles.showDateContainer}>
        <Text style={styles.showDateText}>
          You started isolating on{' '}
          {pickedDate && (
            <Text style={styles.showDateText}>
              {moment(pickedDate).format('YYYY-MM-DD')}.
            </Text>
          )}
        </Text>
        <TouchableWithoutFeedback onPress={daysRemaining}>
          <View style={styles.evaluateButtonContainer}>
            <Text style={styles.evaluateButtonText}>Check your level</Text>
          </View>
        </TouchableWithoutFeedback>
      </View>
    </View>
}


The picked date is displayed in the desired format using moment().format() functions. The pickedDate will only show once the user has provided input by selecting the date from the date picker modal.

Here are the corresponding styles for the above snippet:

const styles = StyleSheet.create({
  // rest of the styles remain same
  showDateContainer: {
    marginTop: 20,
    backgroundColor: '#F95A2C',
    width: W / 1.2,
    height: W / 2,
    borderRadius: 10,
    borderWidth: 1,
    borderColor: '#000',

    alignItems: 'center'
  },
  showDateText: {
    fontFamily: 'Press-Start2p',
    fontSize: 14,
    padding: 10,
    marginTop: 20,
    lineHeight: 20
  },
  evaluateButtonContainer: {
    marginTop: 20,
    backgroundColor: '#1947E5',
    width: W / 1.4,
    height: W / 6,
    borderRadius: 10,
    borderWidth: 1,
    borderColor: '#000',
    borderBottomWidth: 5,
    borderBottomColor: '#000',
    justifyContent: 'center',
    alignItems: 'center',
    flexDirection: 'row'
  },
  evaluateButtonText: {
    color: '#fff',
    fontFamily: 'Press-Start2p',
    fontSize: 14,
    paddingHorizontal: 10,
    lineHeight: 20
  },
}


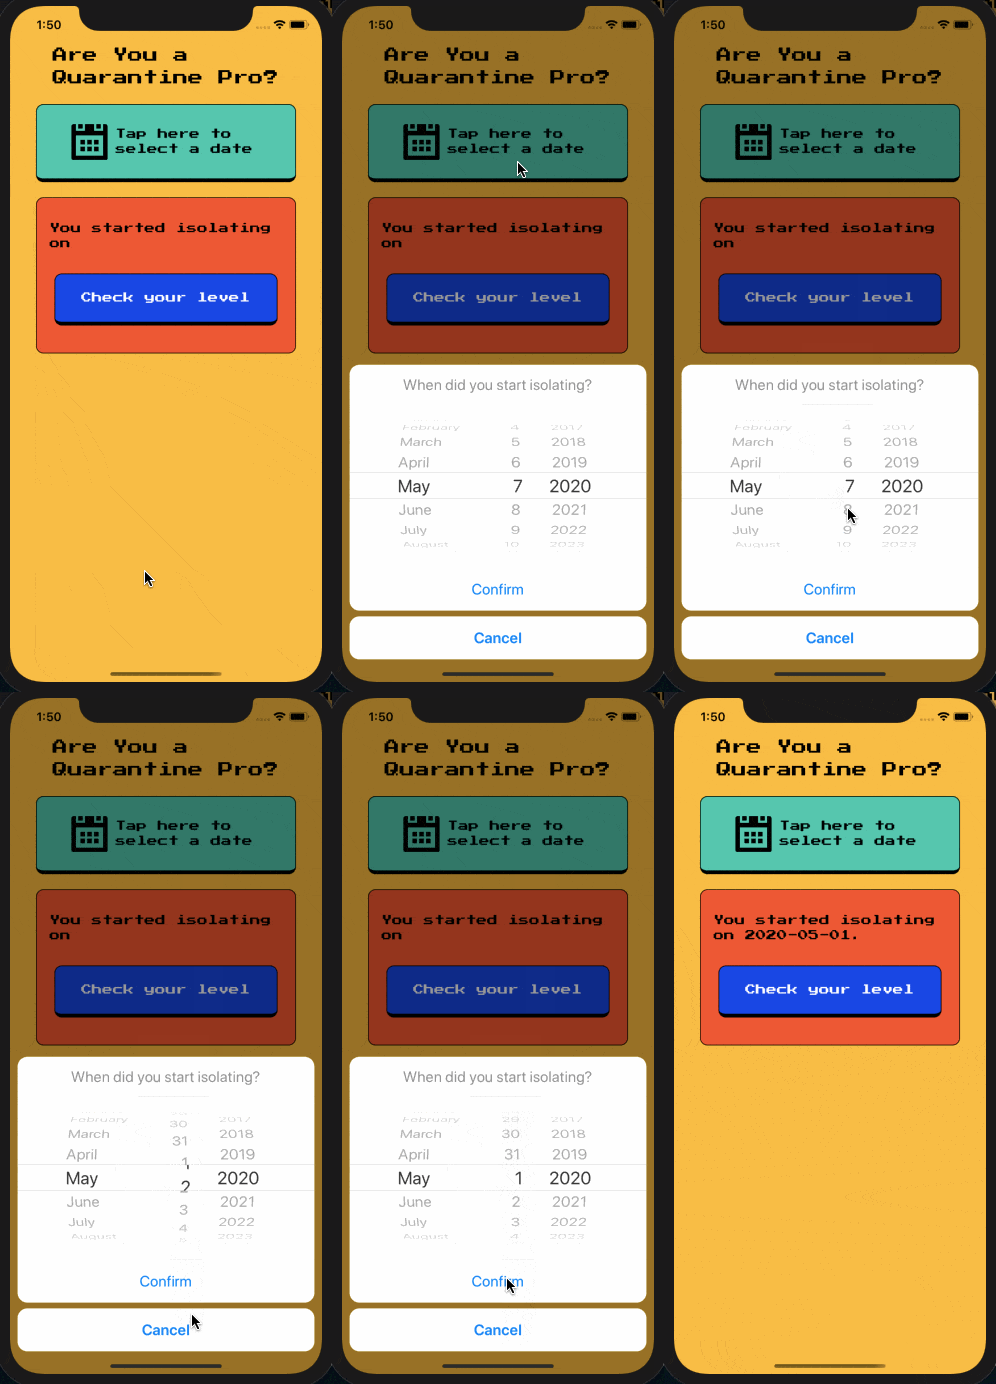
Select the date from the picker modal. After the date has been picked, it will be shown below:
Quarantine Pro React Native App

Rendering The “Quarantine Level”

The last piece of this current app is to display the result when the user presses the button that says Check your level.

Modify the return statement of the App component. When the result is available, we are going to show the user’s quarantine level, but when it’s not available, this UI box will display a default message. Just after the previous section’s snippet, add another View container component.

When the evaluation is done, renderAchievements() is going to return only the icon and the text message based on the score (the difference between the current date and the user’s input date).

Since we are using a state variable called days to store this difference, it becomes easy to conditionally render the message.

export default function App() {
// rest of the code remains the same

function renderAchievements() {
    if (days > 1 && days < 5) {
      return (
        <>
          <MaterialCommunityIcons
            name="guy-fawkes-mask"
            color="#000"
            size={54}
          />
          <Text style={styles.resultText}>
            Quarantine Noob. Don't forget to wear a mask. Keep self-isolating.
          </Text>
        </>
      );
    } else if (days >= 5 && days <= 7) {
      return (
        <>
          <MaterialCommunityIcons name="glass-wine" color="#000" size={54} />
          <Text style={styles.resultText}>Quarantine Connoisseur. Welcome to the (literal) dark side!</Text>
        </>
      );
    } else if (days >= 8 && days <= 15) {
      return (
        <>
          <MaterialCommunityIcons
            name="seat-legroom-reduced"
            color="#000"
            size={54}
          />
          <Text style={styles.resultText}>Quarantine Proficient. AKA “What is pants?”</Text>
        </>
      );
    } else if (days >= 16 && days <= 22) {
      return (
        <>
          <MaterialCommunityIcons
            name="star-circle-outline"
            color="#000"
            size={54}
          />
          <Text style={styles.resultText}>Quarantine Veteran. #StayHome became your life motto.</Text>
        </>
      );
    } else if (days >= 23) {
      return (
        <>
          <FontAwesome name="paint-brush" color="#000" size={54} />
          <Text style={styles.resultText}>THE ULTIMATE QUARANTINE PRO! You are part of the solution - thank you!</Text>
        </>
      );
    } else
      return (
        <Text style={styles.resultText}>Your level will be shown here.</Text>
      );
  }

  return (
    <View style={styles.container}>
      <Text style={styles.title}>{`Are You a Quarantine Pro?`}</Text>
      <TouchableWithoutFeedback onPress={showDatePicker}>
        <View style={styles.pickerContainer}>
          <Fontisto style={styles.icon} name="calendar" size={48} />
          <Text style={styles.pickerText}>{`Tap here tonselect a date`}</Text>
        </View>
      </TouchableWithoutFeedback>
      <DateTimePickerModal
        isVisible={isDatePickerVisible}
        mode="date"
        onConfirm={handleConfirm}
        onCancel={hideDatePicker}
        headerTextIOS="When did you start isolating?"
      />
      <View style={styles.showDateContainer}>
        <Text style={styles.showDateText}>
          You started isolating on{' '}
          {pickedDate && (
            <Text style={styles.showDateText}>
              {moment(pickedDate).format('YYYY-MM-DD')}.
            </Text>
          )}
        </Text>
        <TouchableWithoutFeedback onPress={daysRemaining}>
          <View style={styles.evaluateButtonContainer}>
            <Text style={styles.evaluateButtonText}>Check your level</Text>
          </View>
        </TouchableWithoutFeedback>
      </View>

      {/* ADD BELOW */}

      <View style={styles.resultContainer}>{renderAchievements()}</View>
    </View>
}


Here are the styles for renderAchievements().

const styles = StyleSheet.create({
  // rest of the styles remain same
  resultContainer: {
    marginTop: 20,
    backgroundColor: '#FF89BB',
    width: W / 1.2,
    height: W / 2,
    borderRadius: 10,
    borderWidth: 1,
    borderColor: '#000',
    justifyContent: 'center',
    alignItems: 'center'
  },
  resultText: {
    color: '#fff',
    fontFamily: 'Press-Start2p',
    fontSize: 16,
    padding: 15,
    lineHeight: 20
  }
});


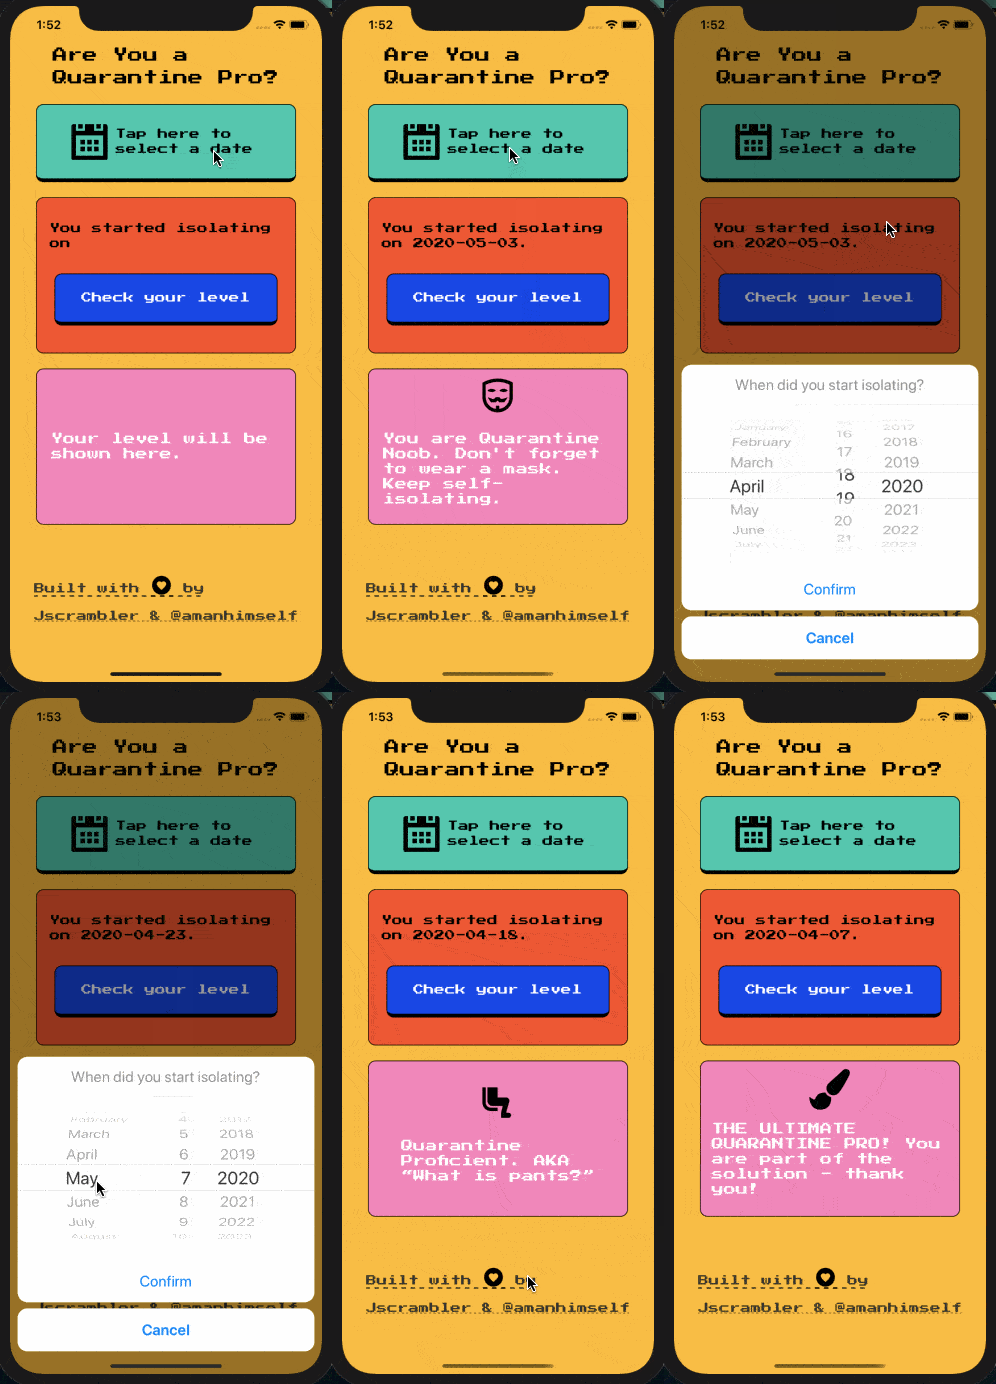
Now, go back to the Expo client, and you will be welcomed by our final app! Try to run the app and select different dates to see different results, as shown below.
Quarantine Pro React Native App

Conclusion

We hope you had fun building this app and learning as well. The main objectives of this tutorial are now complete and summarized for better understanding below.

  • How to use the Expo font hook

  • How to use the DateTime picker modal to select a date

  • Use Moment.js to convert the date input provided by the user and calculate the difference between the current date (“quarantine score”).


Check out @react-native-community/datetimepicker for more information on how to customize the date picker modal or try to use a time picker. The Moment.js library is full of functions to help you manage dates and time in JavaScript apps.

The app is available at Expo. You just need to scan the QR code with the Expo client app on your device.

So, what kind of score did you get? Feel free to tweet us a screenshot @Jscrambler ⁠— we’re going to send a Jscrambler t-shirt to one lucky self-isolated dev!

Keeping OTT Content Secure: Resilient Forensic Watermarking

This post is the fourth and last part of our “Keeping OTT Content Secure” series. Feel free to read part three: Keeping OTT Content Secure: Why Is DRM Not Enough?

Previously, we explored why forensic watermarking directly answers piracy concerns and why it is commonly implemented alongside DRM.

In a nutshell, forensic watermarking enables providers to quickly track down the origin of leaked content and stop that source of piracy.

We ended our previous part by mentioning that we had Jscrambler engineers working closely with the teams of watermarking providers to uncover a key threat: the risk of tampering with forensic watermarking solutions.

And to understand this threat, we must explore the different possible implementations of forensic watermarking.

Forensic Watermarking Implementations

We can divide watermarking into bitstream and A/B watermarking. In bitstream watermarking, specific changes that are imperceptible to the human eye (forensic watermarking) can be applied and will uniquely identify the client that leaked the content. This may sound familiar because our previous explanation of watermarking was based on it.

Then, there’s A/B watermarking, where the server pre-processes the content to build two watermarked versions, which are combined through the use of a manifest specific to that client and session when streaming the content. This approach by itself has some pitfalls that you can explore in more detail in our white paper about securing content and intellectual property in OTT Media Delivery.

Both of these watermarking techniques can be embedded on the server-side, on an edge server, on the client-side, or a combination of these.

Client-side

On the client-side, the logic is either implemented at the firmware level or the SDK level, and it inserts OTT client-related information.

This information should always be generated in the form of a randomized ID on the server-side to harden the task of an attacker reverse-engineering the information that is inserted into the content.

The client-side approach requires integration at the client device level and security measures, including at the hardware level. In the “hybrid” approach, the server will still preprocess the content to build different versions, and the watermark is either inserted or managed at the edge servers or on the client-side.

With OTT providers wanting to maximize the end-user’s experience (better player performance) and reduce costs, client-side, or hybrid,” approaches have grown in adoption. And as we look closer at this implementation, we are again led to the threat of tampering with the source code of the client-side watermarking agent.

Securing Client-Side Watermarking

As mentioned above, placing the watermarking client in an adversarial environment (the client-side) means that its logic is exposed.

Using readily available tools such as a browser debugger, an end-user may find ways to tamper with and ultimately bypass watermarking. This can be achieved by reverse-engineering the agent’s exposed JavaScript code or by tampering with the DOM, introducing, changing, or removing visual elements in the application.

Providers can address the first problem, JavaScript reverse-engineering, by protecting the watermarking agent’s JavaScript code. While JavaScript encryption is not feasible, an industry-recommended approach is JavaScript protection.

This layered security approach starts with JavaScript obfuscation, which transforms the code into something extremely hard to understand and reverse-engineer, while still running on the Web browser just like the original code, as shown below.

On top of obfuscation, a robust JavaScript protection approach adds anti-tampering and anti-debugging capabilities. These break the web player whenever an ill-intentioned user tries to debug or modify the watermarking agent’s logic. As a result, these capabilities help prevent any type of dynamic or static code analysis.

To address the second problem, DOM tampering, providers must monitor the DOM in real-time to detect/block any attempt by an end-user to hide, remove, or modify the watermark.

This includes changes to overlays, which are achieved by tampering with the DOM by changing either its HTML elements or CSS properties. Such a webpage monitoring solution must detect these changes regardless of their delivery mechanism.

Major forensic watermarking providers employ cutting-edge JavaScript Protection and Webpage Monitoring provided by Jscrambler to ensure that their solutions can run on the client-side with minimal exposure to attacks.

If you’d like to know more about these security solutions, get in touch with us.

Keeping OTT Content Secure: Why Is DRM Not Enough?

If DRM is such a widely adopted and robust solution, why is piracy still a growing threat to OTT providers?

The main goal of DRM is to prevent unauthorized access to OTT content. However, once DRM has done its job, we are left with a user streaming (legitimately accessed) content on his device. And just like that, things can still go south.

The protected layer and the display where content is viewed don’t have an extra layer of protection. This means the user can capture the content and then illegitimately redistribute it. All this occurs in a very similar way to the still-common issue of someone recording at the movies.

Malicious users often exploit this by either directly recording from their video or sound card or using other techniques to record their screen in a way that retains as much of the quality of the content as possible. Then, it’s a matter of illegally distributing this content on any of the several existing piracy platforms.

Providers need more anti-piracy solutions to track malicious users. These needs grow when providers face piracy scenarios. And that can be achieved with one or more techniques of watermarking.

Watermarking Techniques

The general concept of watermarking is relatively well-known. Add an identifier to a proprietary piece of content (image, sound, text, video, etc.) to identify the owner of the content or the origin of the leaked content.

An example of this most common type of watermarking (visual watermarking) is shown below.
Visual-watermarking-example

Forensic Watermarking

In digital media, forensic watermarking refers to embedding metadata inside target digital content. This usually includes details of the authenticity and integrity of the digital content and relevant metadata such as copyright ownership or user identification.

This technique is widely used to identify the origin of leaked content. When watermarked content is leaked and found to be used in the wild, providers can analyze the watermark to recover the relevant metadata that will allow investigation teams to track down the origin of the leak and stop that source of piracy (for example, by blocking the account that originated the leak).

It should be noted that, unlike DRM, which protects against content hijacking, watermarking does not prevent content from being stolen.

Forensic watermarking is typically not a standalone solution but rather a much-needed complement to DRM in the fight against piracy.

And it may seem like we’re again reaching the end of this topic. But there’s still one key aspect of forensic watermarking that we must explore.

Jscrambler and the OTT Providers Security

Jscrambler engineers have worked closely with OTT providers and watermarking providers alike.

Together, we uncovered a threat: the risk of tampering with forensic watermarking solutions. This could lead attackers to remove the watermark and leak content without traceability.

For an in-depth analysis of this topic of security in OTT media delivery, read our free white paper.

Celebrating 500K App Builds Protected with Jscrambler: Lessons Learned

This week marks 500,000 app builds protected using Jscrambler.

Our long journey of making JavaScript apps more secure started over 10 years ago, even before Jscrambler was founded.

Back then, when we were developing security solutions to battle click fraud, we had to develop a JavaScript protection solution in-house to prevent fraudsters from reverse-engineering and bypassing our technology.

As it turned out, we weren’t alone in needing to protect our JavaScript. Requests for our JS protection were pouring in, and we quickly understood that this was a huge problem in need of a robust solution: Jscrambler.

During this decade, we invested extensively in R&D.

Building a team of experts in JavaScript and Application Security, we developed the most advanced and effective JavaScript protection transformations available today, including Control Flow Flattening, Code Hardening, Self-Healing, and Threat Monitoring.

What did we learn from half a million protected builds (from over 43,000 users)?

JS Protection is Much More Than Obfuscation

While most people aren’t familiar with the concept of JavaScript Protection, many have heard of JavaScript Obfuscation. The two are often confused for one another, and this leads many to believe that obfuscation is all there is to it.

Often, we hear CISOs and those working in security say “obscurity is not security” (which is a valid statement), and many dismiss obfuscation on this basis (which is an incorrect generalization). This is why we emphasize that JavaScript Protection is much more than obfuscation.

JS Protection means making attackers’ lives extremely difficult when they try to tamper with, debug, or reverse-engineer JavaScript code.

Most JavaScript obfuscation tools (namely, free obfuscators) only scrape the surface in terms of protection, failing to include resilient code protection transformations, which means that they are defeated promptly using automated tools. Plus, they offer little to no runtime protection.

On the contrary, Jscrambler isn’t an obfuscation tool that seeks to keep adding new features. It is a code protection technology that leverages tried-and-true techniques to address key security threats.

And this leads us to another key realization:

Protected JavaScript Hinders Several Different Attacks

A great thing about protecting half a million app builds and working with over 43,000 users is getting to know in-depth several different attacks on source code.

Besides more obvious threats like intellectual property theft (as many applications have no choice but to ship proprietary logic on the client-side), we find more advanced threats like Automated Abuse, Piracy, and Data Leakage.

We have written a white paper exploring the role of JavaScript Protection in mitigating piracy, and we’re working on new content covering the other threats. For now, let’s get a sneak peek:

Automated Abuse

On the Web, abuse refers to exploiting the web application’s functionalities to gain access or privileges through the use of bots.

Automated attacks are concerning because they can target new versions of the code with minimal cost, which means that they can scale, hit more targets, or even allow attacks to be conducted remotely.

Cloud providers that offer free benefits for new accounts are often targeted, as attackers abuse this system to automate new trial account creation and use the benefits for mining cryptocurrencies, for example.

Often, these attacks require some sort of source code manipulation, which is possible when JavaScript is unprotected.

Polymorphic JavaScript Obfuscation (a combination of unique Jscrambler transformations) directly tackles this by making each new code build completely different. When coupled with frequent deployments, this means that the attack window is short, and neither automated nor manual reverse-engineering is possible.

Data Leakage

On the Web, users commonly submit data like their email, name, address, credit card number, or even medical information on a website using a form.

Because the logic behind these forms is handled by JavaScript and all this sensitive data passes through the client-side, the safety of this data could be at risk.

By leaving their JavaScript exposed, organizations make it easier for attackers to understand how their web applications work and facilitate the planning/automation of data exfiltration or scraping attacks.

Management, Investors, and Regulators Call for JS Protection

As knowledge about Application Security becomes more widespread, we see source code protection becoming a standard. OWASP, for example, directly mentions this in their Mobile Top 10 Security Risks:

M8 Code Tampering

M9 Reverse Engineering

“The mobile app must be able to detect at runtime that code has been added or changed (…). The app must be able to react appropriately at runtime to a code integrity violation.”

“In order to prevent effective reverse engineering, you must use an obfuscation tool.”


And just last week, the National Institute of Standards and Technology (NIST) also dedicated a section of their secure software development white paper to “Protect Software”, stating:

Help prevent unauthorized changes to code, both inadvertent and intentional, that could circumvent or negate the intended security characteristics of the software. For code that is not intended to be publicly accessible, it helps prevent theft of the software and may make it more difficult or time-consuming for attackers to find vulnerabilities in the software.

This increased need for JavaScript protection has reached the management and investors of companies across the world, especially in high-stakes industries like Finance and Broadcasting.

Nobody put it better than one of our clients in Banking:

“Protecting our JavaScript was a requirement from day one. Investors and management made sure that it was a priority. Today, not a single product ships without secure client-side logic and this has been extremely effective.”

JS Doesn’t Stop, Attackers Don’t Stop: We Stay Ahead

Our mission has always been straightforward: to make sure companies can get the latest technology to safeguard their businesses in today’s context.

Because attackers keep evolving their tactics against web applications and the JavaScript ecosystem doesn’t stop growing, we are fully dedicated to ensuring that our JavaScript Protection always stays at the forefront.

Just recently, we improved our protections by adding new features like Self-Destruct, and Self-Healing, while maximizing our compatibility with ES7/ES8, the main browsers, and JS frameworks and libraries.

We are truly proud of all these achievements and fulfilled by knowing that these 500,000 protected builds enabled our clients to push technology forward while keeping millions of users safe.

See you at 1 million!

Meanwhile, if you want to protect your own application builds with Jscrambler, start your free trial!